background image

Creating the Split-Line

Next you will use the Flange surface to create the small split-line feature at
the center line.

The Flange surface can only be built from a surface edge, not a curve. This is
because it measures its angle from the surface edge, not from a draft direction.
So first, you will template your curves to make it easier to select the surface
edges.

1

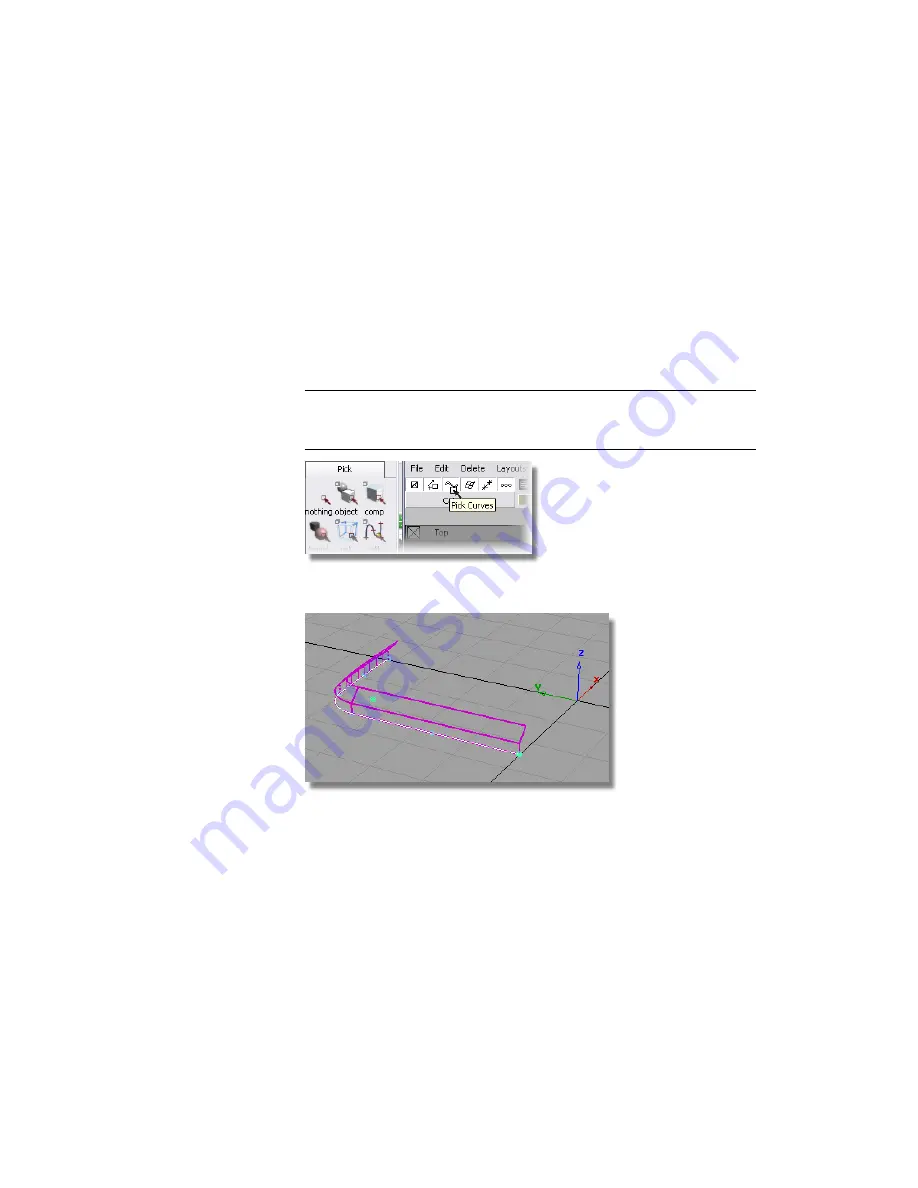
Choose Pick > Component and modify the options so that only curves
will be selected.

2 TIP

You can either double-click the Pick > Component icon to set up the

options in the option window, or you can use the small icons in the menu
bar, as shown below.

3

Drag a pick box across the model. Only the curves are selected.

4

Choose ObjectDisplay > Template to turn the curves into a template that
will not be selected by the Pick > Object tool.

Now you will create some small Flange surfaces to represent the split-line
detail.

Part 2: Creating the Side Surfaces | 421

Содержание ALIAS 2010

Страница 1: ...Autodesk Alias 2010 Learning Alias March 2009 Part No 712B1 050000 PM05A ...

Страница 2: ...er i drop ImageModeler iMOUT Incinerator Inferno Inventor Inventor LT Kaydara Kaydara design logo Kynapse Kynogon LandXplorer LocationLogic Lustre Matchmover Maya Mechanical Desktop Moonbox MotionBuilder Movimento Mudbox NavisWorks ObjectARX ObjectDBX Open Reality Opticore Opticore Opus PolarSnap PortfolioWall Powered with Autodesk Technology Productstream ProjectPoint ProMaterials RasterDWG React...

Страница 3: ...pter 2 Getting help on Alias 7 Finding help on Alias features 7 Finding Alias training resources 9 Finding support for Alias 10 Working with Alias 11 Chapter 3 Interface Basics 13 Learning objectives 13 Introduction 13 Installing the tutorial courseware files 13 Starting Alias 14 Overview of the Alias Interface 17 Using Help 18 Arranging Windows 18 iii ...

Страница 4: ...ing 3D objects 87 Saving your work 96 Part 2 Building the lampstand 102 Part 3 Organizing the model 114 Part 4 Building the lampshade 122 Part 5 Assembling the desk lamp 137 Part 6 Posing the Lamp Model 143 Conclusion 148 Quiz 148 On your own 150 Quiz Answers 153 Chapter 5 Modeling a Joystick 155 Introduction 155 Part 1 Creating the Joystick Handle 157 Part 2 Creating the Joystick Base 173 Part 3 ...

Страница 5: ...rves 403 Part 2 Creating the Side Surfaces 414 Part 3 Completing the Casing 425 Part 4 Creating the Screen Recess 442 Part 5 Center Navigation Key 462 Part 6 Control Button 470 Part 7 Completing the Model 493 Conclusion 505 Quiz 505 On Your Own 506 Quiz Answers 510 Chapter 8 Modeling a Sports Shower Gel Bottle 513 New Concepts 514 Part 1 Creating Primary Surfaces 516 Part 2 Creating the Finger Gri...

Страница 6: ...the Scene 657 Part 4 Creating an Image 669 Conclusion 676 Quiz 677 On Your Own 678 Quiz Answers 682 Chapter 11 More rendering 683 Part 1 Editing the Render Globals parameters 684 Part 2 Creating a background environment 692 Part 3 Creating a 3D solid texture 702 Part 4 Creating a 2D bump texture 710 Part 5 Raytracing 719 Conclusion 727 Quiz 728 On your own 729 Quiz Answers 729 Index 731 vi Content...

Страница 7: ... Alias and the world of three dimensional modeling rendering and animating Alias offers a complete solution for the creation of digital content in fields such as industrial design automotive design and consumer product design 1 ...

Страница 8: ...2 ...

Страница 9: ...gh the modeling tutorials because they build on each other The next two tutorials introduce rendering tools and skills These tutorials are densely packed with information and techniques that may be new to you You may want to re read the lessons after completion or even repeat the more difficult lessons You can view movies in Flash format demonstrating each tutorial in the online documentation In o...

Страница 10: ...e in the following picture we have marked the location of the close box on the Action Window To indicate a click we use this symbol For example in the following picture we have indicated that the Open command should be clicked In the text of the instruction we will refer to this as File Open The first word or term is the name of the menu or palette it is followed by an arrow and the name of the me...

Страница 11: ...release a mouse button twice fast Drag Move the mouse pointer over an object and hold down a mouse button then move the mouse with the button held down Then release the mouse button Click Drag Move the mouse pointer over an object press the mouse button and move the mouse pointer to a final position before releasing the mouse button The Scene The 3D world inside the view windows The Model The curv...

Страница 12: ...6 ...

Страница 13: ...pdf file on the top level of the DVD You are new to Alias Read Getting Started the booklet in cluded in the kit Browse through the information on the main documentation page in dex html Work through these tutorials in Learn ing Alias These are basic lessons that will teach you about working in 3D in Alias They are also the prerequisite for more advanced Alias courses Use the How To section of the ...

Страница 14: ...lettes and Menus sections of the online help Choose Help What s This and then click the tool or menu item Use the right mouse button on the background of any option window to see help for that tool or operation You want to learn new techniques for using Alias See Learning Alias See Learning Technical Surfacing Go to the Communities section of ht tp www autodesk com and check out the tips and trick...

Страница 15: ...th training See the learning materials and training courses available from Autodesk see http www autodesk com training You want to get tips and techniques from the experts at Alias MasterClasses For events near you see ht tp www autodesk com training You want to create plug ins for Alias Use the Alias Application Programmers Interface Manual to learn the object oriented programming required to bui...

Страница 16: ...ques tions in the technical support section of the Alias support website at ht tp www autodesk com support You want to license your software If you are a Platinum member and need a license check the executable license file on the top of your installa tion DVD If your license isn t there go to http www autodesk com spar and follow the instructions in the Installin gAlias pdf file at the top of the ...

Страница 17: ...ials in Learning Alias Check the community site for tips and tricks If you modify 3D models for manufacture Read Alias Fundamentals Work through the Learning Technical Surfacing tutorials If you create rendered images Read About Rendering Work through the rendering tutorials in Learning Alias Check the community site for tips and tricks and downloadable shaders and backgrounds If you create animat...

Страница 18: ... Check the community site for tips and tricks 12 Chapter 2 Getting help on Alias ...

Страница 19: ... begin working in Alias you should spend some time learning how Alias represents the scene and the model both externally and internally and how you use menus and tools to create and edit model data Installing the tutorial courseware files Each tutorial in this book is based on an Alias wire file which contains the material you need to learn the tools skills and concepts in the tutorial These files...

Страница 20: ...which you plan to install the courseware files 2 Copy the downloaded CourseWare folder into your user_data folder On Windows systems this is typically C Documents and Settings userid My Documents Autodesk Ali as user_data CourseWare On Mac OS X this is typically Documents Autodesk Alias user_data CourseWare Starting Alias Logging In If you have not logged in to your account on your workstation do ...

Страница 21: ...ely within a 2D environment You can click the do not show again check box so this window will not appear every time you launch Alias If you have chosen a workflow setting and checked don t show again you can change the default workflow by choosing the workflow you want from Preferences Workflows Alias launches the application in the same workflow that was active when you last exited the applicatio...

Страница 22: ... workflow is for working solely within a 2D environment You can click the do not show again check box so this window will not appear every time you launch Alias If you have chosen a workflow setting and checked don t show again you can change the default workflow by choosing the workflow you want from Preferences Workflows Alias launches the application in the same workflow that was active when yo...

Страница 23: ...s when you first start Alias the Shelves location can be customized the Control Panel located on the right If the Palette or Shelves are not visible choose Windows Palette or Window Shelves from the Menu Bar The position of the Palette and Shelves can be customized from the options in Preferences Interface Palette Shelves Layout In the following tutorials we will work with the Palette on the Left ...

Страница 24: ...ocated at the right end of the menu bar 2 In the Help menu click What s This You are prompted to select the tool for which you want help This prompt appears in the prompt line located just below the menu bar 3 Click a menu item or a tool icon in the Palette A browser window launches and the on line documentation about that tool icon or menu item displays 4 When you are finished reading the informa...

Страница 25: ...Click the All Windows command to open the submenu then click the All Windows option The All Windows command arranges view windows in the following layout Top Left Back and Perspective Arranging Windows 19 ...

Страница 26: ...youts All Windows All Windows As an alternative to the single click method you can use the pull down menus by dragging the mouse down the menu and releasing on the option you want Window Controls Use these controls on the borders of view windows to move close and resize the window 20 Chapter 3 Interface Basics ...

Страница 27: ...To close the Top view using the close box Find the close box in the upper left corner of the Top view window Click the Top view window close box The Top view window disappears Resizing Windows You can change the size of windows using the resize arrows at each corner To change the size of a view window using the resize arrows and maximize box 1 Find the resize arrows in the corners of a view window...

Страница 28: ...the window snaps to the new size 4 Try dragging the resize corners in the other corners to see how they resize the window To work in one large window to see more detail use the maximize box to temporarily make the view window fill the entire screen 5 Find the maximize box in the upper right corner of a view window 22 Chapter 3 Interface Basics ...

Страница 29: ...ized 7 Click the maximize box again to return the view window to normal size Moving Windows To move and arrange the remaining windows 1 Find a view window s title bar The title bar is the area at the top of the window between the close box and the other icons on the right 2 Drag the title bar An outline of the view window follows the mouse Arranging Windows 23 ...

Страница 30: ...indow snaps to the new location 4 By now you probably have some view windows overlapping other windows similar to this The windows are like a stack of papers on a desk As you shuffle them they can overlap 24 Chapter 3 Interface Basics ...

Страница 31: ...other windows The windows are probably a little disorganized at this point Quickly reset them to a default layout using the commands in the Layout menu again 6 Choose Layouts All Windows All Windows The Active Window Notice one of the view windows has a white border This is how Alias indicates the active view window sometimes also called the current view window Arranging Windows 25 ...

Страница 32: ...an save the set by choosing Layouts User Windows Save Current Layout You are prompted for a file name To use this layout in the future choose Layouts User Windows Retrieve Layout Using Tools Describes how to use the Alias interface such as selecting tools and creating shortcuts Tool Basics To orient yourself in the Palette window 1 Find the Palette window floating on the left side of the screen If...

Страница 33: ...he scroll bar on the left side of the palette window to scroll up or down until it is visible in the window 3 Hold the cursor over a tool The name of the tool appears in a small box just below the icon This small text window is called a tooltip This feature can help you to identify tools until you become familiar with the icons in the palette NOTE Once you are familiar with the icons in the palett...

Страница 34: ...ools using manipulators subpalettes tool option windows and snapping To create a primitive sphere in the scene 1 Click the Surfaces Primitives Sphere tool 2 A red outline appears around the icon to show it is the current tool 3 Click in the Top view window to place the new sphere A new sphere one grid unit wide appears where you release the mouse button Using a Snap Mode To use grid snapping to pl...

Страница 35: ...ars 3 Hold the middle mouse button on the different tools in the subpalette to see their names 4 Click the Cube tool The subpalette disappears The Cube tool is selected and now occupies the space in the main palette where the Sphere tool was This time place the new primitive using grid snapping 5 Find the snap buttons to the right of the promptline 6 Click the Grid button to turn on grid snapping ...

Страница 36: ...hod for choosing tools from palettes 1 Click the tab at the top of the Surfaces palette The palette collapses to just the tab and the other palettes move up to fill the space This feature is very useful for saving space in the palette window and in shelves You can still choose tools from the palette using the palette s menu 2 Click the right mouse button on the Surfaces palette s title tab to open...

Страница 37: ...r choose the tool from the palette menu 5 Click in the Top view to place a cone in the scene 6 Click the Surfaces palette s tab again to expand the Surfaces palette back to normal To use tool options to add a half cylinder 1 With the right mouse button click the title tab of the Surfaces palette to open the palette menu then open the Primitives submenu Notice that some items have shadowed boxes ne...

Страница 38: ...s Enter Windows or Return Mac to set the sweep to 180 degrees 5 Use the slider next to the Sections text box to set the sections to 4 6 Click the Go button at the bottom of the window This button applies the settings in the window and activates the tool 7 Click in the Top view window to place the new half cylinder in the scene 32 Chapter 3 Interface Basics ...

Страница 39: ...t to close the options window Picking and Unpicking Objects Picking refers to selecting objects in the scene for use with other tools For example to move a CV you must pick the CV then use the Move tool on the picked CV Picking objects in the scene is a fundamental part of modeling with Alias Because it is so important Alias provides several different tools for picking To pick all and pick nothing...

Страница 40: ...s to the last continuous tool you selected 3 In the Pick palette choose the Nothing tool 4 The Pick Nothing tool unpicks every object leaving nothing picked Like the Pick Object Types All Objects Lights tool the Pick Nothing tool does not stay selected The current tool reverts to the last tool you used To pick and unpick individual objects 1 Choose the Pick Object tool 34 Chapter 3 Interface Basic...

Страница 41: ...left mouse button The cone highlights to show it is picked 3 Click the other objects with the left mouse button They also become picked 4 With all the objects picked click one of the picked objects with the left mouse button Picking and Unpicking Objects 35 ...

Страница 42: ...ked and unpicked 5 Now click one of the primitives with the middle mouse button The object you clicked is picked and the other objects are unpicked The middle mouse button picks only the object you click 6 Click the picked primitive with the right mouse button 36 Chapter 3 Interface Basics ...

Страница 43: ...will see in the next procedure To use pick boxes to pick and unpick several objects at once 1 With the Pick Object tool still selected click one of the primitive objects with the left mouse button 2 Press the left mouse button and drag a box around all the primitive objects Picking and Unpicking Objects 37 ...

Страница 44: ...All the objects inside the pick box toggle between picked and unpicked 3 Now drag a pick box with the middle mouse button around some objects 38 Chapter 3 Interface Basics ...

Страница 45: ...mouse button around some of the picked objects Any objects inside the pick box are unpicked To pick by name 1 Use the middle mouse button to pick only the sphere 2 On the Windows menu choose Information Information Window The Information window appears Picking and Unpicking Objects 39 ...

Страница 46: ...l acts as if you had chosen Pick Nothing 6 Type sphere then press Enter Windows or Return Mac The text appears as you type in the promptline at the top of the workspace window When you press Enter Windows or Return Mac the sphere is picked Shortcuts to Tools The variety of tools available is the source of Alias s power but finding tools in the palette can become potentially time consuming You can ...

Страница 47: ...ep commonly used tools Alias however provides another even more convenient location for shelves In these tutorials you will use the shelf area in the control panel Since you will not be using the Shelves window you can close it 2 Choose Windows Shelves again to hide the Shelves window or click the Shelves window s close button To help demonstrate how to make new shelves clear the default shelves a...

Страница 48: ...urves to scan data To clear the existing shelf set and create a new one 1 Hold the left mouse button on the menu button at the top of the shelf area to open the options menu Notice how the menu button is now called Default after the name of the current shelf 2 Choose New from the options menu A requester appears asking for the name of the new shelf 3 Click in the text box press the Esc key to clea...

Страница 49: ...uld be useful to have customized versions of tools with different settings The shelf allows you to do this When you drag a tool onto a shelf the new copy of the tool keeps the settings it had when it was dropped on the shelf independent of the original tool in the palette Using this technique create several versions of the two original curve creation tools New curve edit pts and New curve cvs For ...

Страница 50: ...niform and Create Guidelines is off 4 Set the Degree option to 2 5 Find the tool icon at the top of the option window This icon represents the tool as configured with these settings 6 Press the middle mouse button on the tool icon at the top of the option box and drag it to the CurveFit shelf 44 Chapter 3 Interface Basics ...

Страница 51: ...top of the option window to the shelf Another copy of the tool is added to the shelf When you choose this copy of the tool the New Curve edit pts tool will create degree 3 curves 9 Click Exit at the bottom of the option window to close the window To rename the tools 1 Move the mouse over the CurveFit shelf s title tab and press the right mouse button to show the shelf s menu Creating Custom Shelve...

Страница 52: ...me requester appears 4 Double click in the text box and type Edit_pt_Deg_2 then click OK to rename the tool 5 Hold down the Ctrl Windows or Control Mac key and double click the second copy of the New Curve by Edit Points tool 6 Double click in the text box and type Edit_pt_Deg_3 then click OK to rename the tool 7 Hold down the right mouse button on the title tab of the shelf to open the shelf menu...

Страница 53: ...tion the cursor over the trash can icon 4 Release the mouse button The tool disappears from the shelf You can also delete groups of tools by dragging a tab with the middle mouse button to the trash can You may have noticed that icons are a bit crowded on the shelf The large icons are good when you are learning which icon is which but now you can switch to the small icon size to save space in the s...

Страница 54: ...reate shelves with customized tools In later lessons you will load pre made shelves containing all the tools you need to complete the tutorials Using and Customizing Marking Menus An even faster method for selecting tools is the marking menus Marking menus generally hold fewer tools than a shelf but are much faster since you can use quick gestures to choose tools With practice selecting tools with...

Страница 55: ...mouse button held down and drag down until the Pick Object box is highlighted A thick black line shows the direction of the mouse pointer 4 Release the mouse button to choose the highlighted tool The Pick Object tool is now the current tool 5 Hold Shift and Ctrl Windows or Shift and Control Mac with the middle then with the right mouse buttons to see the other marking menus Each mouse button has a...

Страница 56: ...not drawn When you release the mouse button the marking menu flashes the name of the selected tool on the screen You have just selected Pick Nothing Use this method to choose tools even faster once you have mastered the positions of the tools on the menu Learn which tools are on the marking menus and use the marking menus whenever you need to choose one of those tools The more you use them the fas...

Страница 57: ...ng menus The procedure to modify the content of marking menus is similar to the one for modifying shelves that you learned earlier Here you will make a small modification to the Selection marking menu shelf 2 Click the Pick tab in the Palette if it isn t already expanded and locate the Pick Template tool 3 Hold down the middle mouse button on the icon and drag it to the marking menu shelf to the l...

Страница 58: ...cation indicated by the red arrow You now have a tool on the marking menu to pick templated geometry 5 Hold down Shift and Ctrl Windows or Shift and Control Mac keys and press the left mouse button to show the marking menu again 52 Chapter 3 Interface Basics ...

Страница 59: ... MarkingMenu shelf window hold down the Ctrl Windows or Control Mac key and double click the Pick Template tool in the shelf 7 A dialog box appears 8 Type Template in the text field and click OK to rename the tool in the marking menu 9 Show the left mouse button marking menu again Using and Customizing Marking Menus 53 ...

Страница 60: ...acing tools Using hotkeys Hotkeys are special key combinations that choose tools or perform menu commands You can get a complete listing of all the hotkeys in the hotkey editor To use hotkeys 1 On the Preferences menu click Interface and choose Hotkeys Menu Editor The hotkey editor appears 54 Chapter 3 Interface Basics ...

Страница 61: ...organized into hierarchical sections that can be collapsed and expanded 2 In the Menu section click the Layouts subsection title to expand it Click to open a Section Heading You can see the hotkey for the User windows item as well as text fields for defining other hotkeys Using hotkeys 55 ...

Страница 62: ...o need a hotkey 3 Click the close box to close the hotkey editor Changing Your View of the Model Learn how Alias represents the 3D model on your 2D monitor and how to use the view controls to get the best possible angle on the model for the task at hand Tracking Dollying and Tumbling the Camera s View There are many different ways to change the camera s view in Alias In general you only need to le...

Страница 63: ... quickly To use the camera move mode to move the camera in a perspective window 1 Hold down the Shift and Alt Windows or Shift and Command Mac keys Keep the keys held down during the following steps 2 Make sure the mouse pointer is over the perspective view window Tracking Dollying and Tumbling the Camera s View 57 ...

Страница 64: ...and down to tilt the camera Tumbling the camera changes the azimuth and elevation angles of the camera 4 Release the left mouse button but keep the Shift and Alt Windows or Shift and Command Mac keys held down 5 Drag the right mouse button to dolly the camera in and out 58 Chapter 3 Interface Basics ...

Страница 65: ...held down 7 Drag the middle mouse button to track the camera Tracking moves the camera but does not change the direction in which the camera is pointing 8 When you are done moving the camera release the mouse button and the Shift and Alt Windows or Shift and Command Mac keys to exit camera move mode Tracking Dollying and Tumbling the Camera s View 59 ...

Страница 66: ...w 1 Hold the Shift and Alt Windows or Shift and Command Mac keys to enter camera move mode 2 Make sure the pointer is over an orthographic window such as Top Side or Back 3 Drag the right mouse button to dolly in and out 4 Drag the middle mouse button to track up down left and right 60 Chapter 3 Interface Basics ...

Страница 67: ...s second nature With practice you will be able to move the camera where you need it without thinking about the keys or the mouse Practice tumbling tracking and dollying the camera around the model some more before you move on To use Look At to center on an object 1 Use the marking menus to choose the Pick Nothing tool 2 Remember that the left mouse button marking menu has the pick tools 3 Now use ...

Страница 68: ...ow 6 Choose the Look At tool 7 The active view window the window with the white outline changes to center on the picked object 8 Pick nothing 9 Use the Look At tool again 10 The active view changes to center on all the existing geometry 62 Chapter 3 Interface Basics ...

Страница 69: ...ws or Shift Command Mac is calibrated to best view objects at the origin the center of world space coordinate 0 0 0 This can become awkward when you want to move the camera around objects away from the origin The point of interest manipulator lets you center the camera movements on a point on the model To use the point of interest manipulator First make sure the point of interest manipulator is tu...

Страница 70: ...e ViewCube and NavBar 5 Click Go to close the window and use the new settings 6 Hold down the Shift and Alt Windows or Shift and Command Mac keys to enter camera move mode Keep the keys held down for the rest of this procedure The Viewing Panel appears in the upper left corner of the Perspective window 7 Position the mouse pointer on the wireframe of one of the primitive objects and double click w...

Страница 71: ...r of the manipulator This arrow indicates the normal at this point on the surface The arrow is light blue when it is pointing toward you and yellow when pointing away 11 Click the light blue or yellow arrow The view changes to look at the point down the normal 12 Now look for the red and green arrows extending from the center of the manipulator tumble the view to show the arrows more clearly if ne...

Страница 72: ...Use the following overview illustration as a reminder of the different controls on the point of interest manipulator 66 Chapter 3 Interface Basics ...

Страница 73: ...view back and forth between two or more areas of interest The Viewing Panel lets you bookmark views of the model and return to those views by clicking the name of the bookmark To use the Viewing Panel to move between different views 1 Click the maximize box in the upper right corner of the Perspective view window The Perspective view window enlarges to full screen 2 Open the General Preferences wi...

Страница 74: ...ttom of a car represent the model 4 Click an arrow to view the model from one of eight different directions The horizontal and vertical arrows represent front side and back views The diagonal arrows represent three quarter views 5 Click the left car icon to see a top view or the right car icon to see a bottom view 68 Chapter 3 Interface Basics ...

Страница 75: ...the bottom of the Viewing Panel to return to the view previous to your last camera move 7 Click the Viewing Panel section heading at the top of the panel to collapse the entire panel into a small heading Using the Viewing Panel 69 ...

Страница 76: ... button to open the Viewing Panel Keep the keys held down for the rest of this procedure NOTE If the Viewing Panel does not appear ensure that you are not clicking the left mouse button before holding down Shift and Alt Windows or Shift and Command Mac 2 Double click an object This shows the manipulator and adds Pnt of Interest to the Viewing Panel 3 Click the arrow next to Pnt of Interest to see ...

Страница 77: ... the point of interest manipulator locked at its current position The manipulator does not move when you click at another point or drag its center handle Use this option if you find you are moving the manipulator unintentionally Turn the Locked check box off to free the manipulator 6 Turn off the Perspective check box The perspective view changes to an isographic projection Using the Viewing Panel...

Страница 78: ... bookmarks 1 Move the mouse pointer over the Perspective view and hold down the Shift and Alt Windows or Shift and Command Mac keys keeping them held down to enter camera move mode 2 With Shift and Alt Windows or Shift and Command Mac still held down find the Bookmarks section at the bottom of the Viewing Panel If it is not visible click the tag in the bottom right corner of the Viewing Panel It t...

Страница 79: ...ick the label for the first bookmark then the second The view switches back and forth between the two bookmarked views NOTE To be able to distinguish between bookmarks later you should rename them now 7 Click the edit button in the BookMarks section The BookMarks Lister window appears 8 Release the Shift and Alt Windows or Shift and Command Mac keys Using the Viewing Panel 73 ...

Страница 80: ...click and rename the other bookmark 12 Note the buttons in the Bookmark Lister window The Delete button removes the selected bookmarks white outline from the list The New button adds a bookmark of the current view This is the same as clicking new in the Viewing Panel The Prev and Next buttons change the view to the bookmark that precedes or follows the highlighted bookmark green outline The Toggle...

Страница 81: ...ng New shelf from the drop down menu creates a new shelf 13 Close the Bookmark Lister 14 Hold the Shift and Alt Windows or Shift and Command Mac keys in the Perspective window to show the Viewing Panel Notice your new names in the BookMarks section See also Windows Bookmark Lister Use the following overview illustration as a reminder of the different controls on the Viewing Panel NOTE The Twist an...

Страница 82: ...ct Lister than in a view window The Object Lister shows important information that has no visual equivalent in the view windows such as how the components and objects are grouped and how they relate to modeling layers The Object Lister lets you confirm the effects of tools and menu items on the internal structure of the scene to help diagnose problems Types of Nodes Information of different types ...

Страница 83: ...hite cube As well the object that has been instanced gains a node underneath Compressed as the Object Lister becomes busier you may want to collapse a part of the graph into a single node The node with other nodes below it has a plus sign in front of it Nodes that have been expanded and can be collapsed have a minus sign in front Shift click a or sign to expand or compress the entire hierarchy Inv...

Страница 84: ... types 3 Click a geometry node in the Object Lister window The corresponding object in the scene becomes picked Pick Object and Pick Component Unlike in the modeling windows you can use either Pick Object or Pick Component to select whole objects or parts of objects in the Object Lister In this section you will compare picking in the modeling window with picking in the Object Lister To pick using ...

Страница 85: ... mouse pointer with the name of both sides Click the name you want The Pick Component tool only picks one side of the cube In the Object Lister window you can see that instead of picking the entire group the Pick Component tool picked one of the subnodes 9 Instead of choosing Pick Component and having difficulties selecting a surface that can be attached to or overlaid by another surface you can c...

Страница 86: ...m and start Alias Get help Arrange windows Use tools and tool options Customize shelves and marking menus Tumble track and dolly the view Use the Object Lister window to understand the internal representation of the model 80 Chapter 3 Interface Basics ...

Страница 87: ... 3D space using the Autodesk Alias modeling environment You will build a desk lamp from cylinders and spheres using the Alias Surfaces menu As you build up the design you will get used to moving scaling and rotating objects in 3D space You will learn how to group and organize the desk lamp so that you can rotate the component parts to simulate the operation of a real lamp Beginning a Model Desk la...

Страница 88: ...ed onto the arm As you gain experience in using Alias choosing a modeling strategy will become a natural part of your workflow To help you build the desk lamp model an exercise file has been provided which contains outline sketches of the design Opening the tutorial file Watch how to open files and set projects 1 Choose File Open to open the File Browser 82 Chapter 4 Introduction to 3D ...

Страница 89: ...s If the desklamp file is shown jump to step 2 If not follow the next steps to set up the CourseWare directory On Windows click the arrow next to the Go field and select Projects to open the user_data directory Beginning a Model 83 ...

Страница 90: ...directory are displayed If the CourseWare project is not shown refer to To install the courseware for use with Alias on page 14 Make the CourseWare directory the current project and open its wire subdirectory as follows On Windows click the CourseWare directory and choose Project Set Current 84 Chapter 4 Introduction to 3D ...

Страница 91: ...the CourseWare directory click Set Current 2 In the wire directory choose the file desklamp and click Open Alternatively double click the file to open it When prompted to delete all objects click Yes Beginning a Model 85 ...

Страница 92: ...those in the desklamp wire file you are presented with a dialog box Click Accept New Settings to use the construction settings in desklamp wire The file browser closes and the desk lamp exercise file appears in the Alias window 86 Chapter 4 Introduction to 3D ...

Страница 93: ...he canvas plane display has been turned off To turn on canvas display choose WindowDisplay Toggles Canvas Planes TIP If you do not see any views or the views do not take up the full view window space choose Layouts All Windows All Windows Part 1 Creating 3D objects In this section you will create a primitive object a cylinder for the base of the desk lamp Watch Part 1 of the tutorial Part 1 Creati...

Страница 94: ...you can create the following primitives Sphere Torus Cylinder Cone Cube Plane Placing Primitives in views Use the 2D views Top Left and Back to place the primitives Which window you choose affects which way up the primitive is created For example placing a cylinder in the Top view creates a pillar Placing the cylinder in the Left or Back views creates a fallen pillar or a log 88 Chapter 4 Introduc...

Страница 95: ...Creating the lamp stand Now create a cylinder for the base of the lamp stand 1 Create the first cylinder using the Top window Maximize the Top view Part 1 Creating 3D objects 89 ...

Страница 96: ...s outlined in red to indicate it is the active tool 4 You can control the exact placing of a primitive using various snapping modes In this section use grid snapping to align all the cylinders centrally on the grid origin The grid origin is where the two dark grid lines cross Hold down the Alt Windows or Command Mac key to turn on grid snap mode Press and hold the Alt Windows or Command Mac key ne...

Страница 97: ...ows All Windows or press the F9 key to display all four views and check that the cylinder has been placed correctly as shown The cylinder remains picked or active Picked objects are drawn with white lines and objects that are not picked are drawn with dark blue Part 1 Creating 3D objects 91 ...

Страница 98: ... all primitives when they are first added to the scene The manipulator can be useful for transforming a primitive but is not relevant to this tutorial TIP To delete the cylinder press the Delete key Scaling the lamp base Next scale the cylinder to the correct size 1 Maximize the Left view as this is the view you will continue working in 2 Choose Transform Scale 92 Chapter 4 Introduction to 3D ...

Страница 99: ...same time the cylinder s manipulators disappear 3 Click and drag the left mouse button to scale the cylinder equally in all axes Scale the cylinder to roughly fit the width of the bottom cylinder shown on the sketch This forms the base of the lamp Part 1 Creating 3D objects 93 ...

Страница 100: ...This allows an object to be stretched or squashed The mouse buttons are used to control the non proportional scaling For this section use the 2D views Top Side and Back to control the transforms In these views the mouse buttons work as follows free transform Left mouse button 94 Chapter 4 Introduction to 3D ...

Страница 101: ...use button to adjust the vertical height of the base 1 Choose Transform Non p Scale 2 Click and drag with the right mouse button to adjust the height of the cylinder Make the height approximately the same as shown in the sketch NOTE The cylinder is centered on the origin Part 1 Creating 3D objects 95 ...

Страница 102: ...protected You cannot save any new work in the CourseWare project To save your work you must create a project directory Project directories are special directories created by Alias that allow you to efficiently store all the files related to a specific project together Saving your work in a Windows environment 1 Choose File Save As The File Browser opens 2 Click the arrow next to the Project field ...

Страница 103: ...eated which is immediately displayed in the File Browser 3 Click the Up 1 level button to move up one directory This is the user_data directory that contains all the projects including the new_project Saving your work 97 ...

Страница 104: ...ew_project directory and choose Rename from the menu 5 Type Lessons and press Enter Windows or Return Mac 6 Click the arrow next to the Project field and choose Set Current to make Lessons the current project 98 Chapter 4 Introduction to 3D ...

Страница 105: ...The wire directory of the Lessons project is now displayed in the File Browser 7 In the Object name field type mydesklamp and press Enter Saving your work 99 ...

Страница 106: ... save often as insurance against having to start from the very beginning if you make a mistake Saving your work in a Mac OS X environment 1 Choose File Save As The File Browser opens 2 Click Create and in the Name of new Project field type the project name Lessons 100 Chapter 4 Introduction to 3D ...

Страница 107: ...3 Click Create A new project is created which is immediately displayed in the File Browser 4 In the Save As field type mydesklamp and press Return Saving your work 101 ...

Страница 108: ...he cylinder to the grid in the Back view to make the cylinder look like it is sitting on the ground To do this accurately you need to set the pivot point of the cylinder Pivot points When scaling or rotating an object the transformation is applied about the object s pivot point When moving and snapping an object it is the pivot point that is snapped to the specified position The pivot point is ind...

Страница 109: ...the pivot point to the base use curve snapping and select the bottom line of the cylinder Hold the Ctrl and Alt Windows or Control and Command Mac keys down together to turn on curve snapping 3 Click the bottom edge of the cylinder with the right mouse button Using the right mouse button keeps the pivot point centered as it moves downwards Part 2 Building the lampstand 103 ...

Страница 110: ...e of the cylinder Release the Ctrl and Alt Windows or Control and Command Mac keys and the mouse button TIP If you make a mistake choose Edit Undo to step back Next move the cylinder onto the grid 4 Choose Transform Move 104 Chapter 4 Introduction to 3D ...

Страница 111: ...d Mac key to turn off grid snap mode NOTE You can adjust the height of the base again using Transform Non p Scale and the right mouse button The location of the pivot point makes the scaling easier to control Duplicating the cylinder The cylinder now has a convenient pivot point location To save time copy this cylinder and then move and scale it to create the other components 1 With the cylinder s...

Страница 112: ...ove 4 As the cylinder is already selected you do not need to click the cylinder to move it NOTE When there are many objects on the screen it is preferable to click away from the object when using any of the transform tools 5 Click and drag using the right mouse button away from the objects to move the new cylinder vertically away from the original 106 Chapter 4 Introduction to 3D ...

Страница 113: ...ol still has the red box outline so it is active If it is not active choose it again Hold down the Ctrl and Alt Windows or Control and Command Mac keys together to turn on curve snapping Click the top edge of the original cylinder with the right mouse button Part 2 Building the lampstand 107 ...

Страница 114: ...on p Scale and use the right mouse button to adjust the height of the cylinder to match the sketch NOTE When clicking and dragging the mouse click in the background away from all objects This ensures that no objects get accidentally picked or scaled Creating the lamp pillar The same technique can be used to create the main pillar of the lamp stand 1 With the second cylinder still selected use Edit...

Страница 115: ...nd is active ready to be moved 2 Choose Transform Move Hold down the Ctrl and Alt Windows or Control and Command Mac keys to turn on curve snapping mode 3 Click the top edge of the second cylinder to move the new cylinder into place Part 2 Building the lampstand 109 ...

Страница 116: ...the objects 5 Choose Transform Non p Scale and use the right mouse button to adjust the height of the cylinder to match the sketch Building the lamp arm Next build the angled arm of the lamp 1 With the third cylinder still selected choose Edit Copy followed by Edit Paste 2 Choose Transform Move Use the right mouse button to move the cylinder into place 110 Chapter 4 Introduction to 3D ...

Страница 117: ...determined by which mouse button you use The left mouse button rotates around the x axis The middle mouse button rotates around the y axis The right mouse button rotates around the z axis 4 Using the middle mouse button rotate the cylinder about the y axis until it is approximately in position Part 2 Building the lampstand 111 ...

Страница 118: ... second pillar Create the hinge cylinder Add one more cylinder to complete the design of the arm 1 Choose Surfaces Primitives Cylinder Hold down the Alt Windows or Command Mac key to turn on grid snapping Click near the grid intersection closest to the hinge 112 Chapter 4 Introduction to 3D ...

Страница 119: ...2 Choose Transform Move Click and drag the right mouse button to move the cylinder to the hinge position Part 2 Building the lampstand 113 ...

Страница 120: ...urrent scene and call your file mydesklamp2 Part 3 Organizing the model In this section you will organize your model by grouping One group will be the base of the lamp the other group will be the angled arm and hinge The groups will be named and managed using the Object Lister The Object Lister is a schematic view of the objects in your scene It is very useful for managing the components of a desi...

Страница 121: ...Lister from the Alias menu 2 Choose Show By Object on the Object Lister menu The objects in your scene are listed The sketch is shown at the top of the list followed by the cylinders you created NOTE The Persp object is the camera used to show the perspective view This will not be used in this tutorial and can be ignored Part 3 Organizing the model 115 ...

Страница 122: ...disappears from the screen NOTE Make the sketch visible again by selecting the same submenu and choosing Visible Grouping the base objects Individual objects can be grouped so they can be selected with a single click A group has a single pivot point 1 Use Pick Object from the Alias palette 2 Click and drag in the area shown to select all the base components 116 Chapter 4 Introduction to 3D ...

Страница 123: ...white and are also highlighted in the Object Lister Note that each cylinder is showing a different pivot point 3 Right click on the selected objects in the Object Lister and choose Group from the pulldown menu Part 3 Organizing the model 117 ...

Страница 124: ...e selected objects by choosing Edit Group from the main menu The grouped objects are now shown with a single pivot point at the origin The separate cylinders in the Object Lister have now been replaced by a single item named node 118 Chapter 4 Introduction to 3D ...

Страница 125: ...rd node is highlighted Type Base to name the group then press Enter Windows or Return Mac Grouping the arm Next group and name the upper arm of the lamp 1 Choose Pick Nothing 2 Choose Pick Object and pick the top two cylinders Part 3 Organizing the model 119 ...

Страница 126: ...3 Right click on the selected objects in the Object Lister and choose Group from the pulldown menu or choose Edit Group 4 Rename the new node to Arm 120 Chapter 4 Introduction to 3D ...

Страница 127: ...that all the objects are in the right locations NOTE If there are any problems ungroup the models and use Transform Move and Transform Scale to adjust the model Then group the components again as before Saving your work Choose File Save As to save the current scene and call your file mydesklamp3 Part 3 Organizing the model 121 ...

Страница 128: ...ls can be used You will model the lamp shade separately at the origin then move it into position on to the upper arm Watch Part 4 of the tutorial Making the base and arm invisible The components you have already built can be made invisible to provide a clear space to build the lamp 1 Choose Windows Object Lister to open the Object Lister window TIP If you cannot see your objects listed check that ...

Страница 129: ...visible 3 Make the Base invisible using the same process 4 Use the right mouse button over the Sketch_Lampshade text to select the submenu Choose Visible to make the sketch visible A new sketch for the lamp head appears in the Back window and all geometry should be invisible Part 4 Building the lampshade 123 ...

Страница 130: ... Close the Object Lister Creating the light bulb Build a simplified light bulb from a primitive sphere 1 Maximize the Back window to start creating the bulb and lampshade 124 Chapter 4 Introduction to 3D ...

Страница 131: ...d Mac key down to turn on grid snapping Click and hold the left mouse button and move the cursor around The new sphere jumps to grid points as you near them Position the new sphere on the origin 4 Choose Transform Move The manipulator disappears Part 4 Building the lampshade 125 ...

Страница 132: ...and drag the left mouse button to match the size of the sphere to the sketched bulb Creating the lampshade Next create the lamp shade The main shape of the lamp shade is created from two half spheres one large one and then a smaller one above A cylinder is then added to join the shade to the arm 126 Chapter 4 Introduction to 3D ...

Страница 133: ...on Hold the Alt Windows or Command Mac key down to turn on grid snapping Click near the origin to place the half sphere 3 Choose Transform Rotate Type 90 0 0 on the prompt line to rotate the sphere 90 degrees around the X axis 4 Choose Transform Scale Click and drag the left mouse button to scale the half sphere Part 4 Building the lampshade 127 ...

Страница 134: ...NOTE The reason we use the middle instead of the right mouse button is because the scaling occurs with respect to the local axes of the half sphere not the world axes To see the local axes of a selected object choose Transform Local Set Local Axes 6 Choose Edit Copy and Edit Paste to create a second half sphere Scale and move it to create the top section of the lamp 128 Chapter 4 Introduction to 3...

Страница 135: ...rag in an area of the screen that will not accidentally select any of the objects 8 Choose Transform Move and use the right mouse button to move the half sphere into position based on the sketch 9 Choose Transform Non p Scale and use the middle mouse button to adjust the height of the half sphere Part 4 Building the lampshade 129 ...

Страница 136: ...imize the Top view Now create a cylinder to connect the lampshade to the arm 12 Choose Surfaces Primitives Cylinder Hold down the Alt Windows or Command Mac key to turn on grid snapping and place the new cylinder at the origin in the Top view 130 Chapter 4 Introduction to 3D ...

Страница 137: ...s All Windows to display all four views Choosing to place the cylinder using the Top view has placed it in the correct orientation 14 Maximize the Back window to reposition and scale the cylinder Part 4 Building the lampshade 131 ...

Страница 138: ...sform Scale to reduce the cylinder to a size suitable for the end of the lampshade 16 Choose Transform Move and use the right mouse button to position the cylinder to match the sketch 132 Chapter 4 Introduction to 3D ...

Страница 139: ...ows Object Lister to open the Object Lister Use the right mouse button on the Sketch_Lampshade item to bring up the submenu Choose Visible to turn off the sketch 2 Use Pick Object and pick all the objects Part 4 Building the lampshade 133 ...

Страница 140: ...ot point at the origin The default location for a new pivot point is the origin The lampshade is designed to rotate where it connects to the lamp arm So next you will adjust the pivot point to be in the center of the cylinder 4 Choose Transform Local Set Pivot Use the right mouse button to move the pivot upwards to approximately the center of the cylinder 134 Chapter 4 Introduction to 3D ...

Страница 141: ...In the Object Lister the new group is shown as node 5 Double click node to rename it to Lampshade Part 4 Building the lampshade 135 ...

Страница 142: ... Arm components visible using the right mouse button and the submenu 7 Choose Pick Nothing All the objects are deselected 8 Choose Layouts All Windows All Windows to display all four views 136 Chapter 4 Introduction to 3D ...

Страница 143: ...sklamp4 Part 5 Assembling the desk lamp In this section you will assemble the finished desk lamp by moving the lampshade into the correct position and grouping it with the upper arm Watch Part 5 of the tutorial Positioning the lampshade 1 Maximize the Left window 2 Choose Pick Object and select the lampshade group Part 5 Assembling the desk lamp 137 ...

Страница 144: ...3 Choose Transform Move Click and drag away from the objects to move the lampshade to the end of the upper arm 138 Chapter 4 Introduction to 3D ...

Страница 145: ...button to rotate the lampshade about the y axis Grouping the lampshade and arm Next group the lampshade to the arm so the lamp can be moved and arranged 1 Use Pick Object and select the lampshade and the upper arm Part 5 Assembling the desk lamp 139 ...

Страница 146: ... in the Object Lister 2 Right click on the selected objects in the Object Lister and choose Group from the pulldown menu or Choose Edit Group A new node is created and displayed in the Object Lister 140 Chapter 4 Introduction to 3D ...

Страница 147: ...embly The group is created with the pivot point in the default location at the origin To ensure the upper assembly rotates correctly you will now move the pivot point to the center of the hinge Part 5 Assembling the desk lamp 141 ...

Страница 148: ...orm Local Set Pivot Hold the Ctrl and Alt Windows or Control and Command Mac keys down and use the right mouse button to click the center line of the hinge cylinder The pivot point moves to the center of the hinge 142 Chapter 4 Introduction to 3D ...

Страница 149: ...r file mydesklamp5 Part 6 Posing the Lamp Model Watch Part 6 of the tutorial The groups you created previously are still in the model 1 In the Object Lister click the sign to the left of Upper Assembly The Lampshade and Arm subgroups are shown Part 6 Posing the Lamp Model 143 ...

Страница 150: ...erent components of the lamp 2 Maximize the perspective view 3 Click the Upper Assembly in the Object Lister to select the group 4 Choose Transform Rotate Use the middle mouse button to rotate the upper assembly about the y axis 144 Chapter 4 Introduction to 3D ...

Страница 151: ...5 In the Object Lister click the Lampshade 6 With the Transform Rotate tool still active use the middle mouse button to rotate just the lampshade about the y axis Part 6 Posing the Lamp Model 145 ...

Страница 152: ... z axes Using Diagnostic Shading The wire model can be shaded to give a more realistic view of the geometry Diagnostic shading can be accessed in the Control Panel to the right of the Alias interface NOTE If the panel is not shown choose Windows Control Panel to make it visible 146 Chapter 4 Introduction to 3D ...

Страница 153: ...1 Choose Pick Nothing 2 Choose the Multi Color shade icon to color all objects in the scene To return to the wireframe view choose the wireframe icon Part 6 Posing the Lamp Model 147 ...

Страница 154: ...nter the model Organizing your model using the Object Lister Regularly saving your work Quiz Now that you have completed this modeling tutorial do this quick quiz to help you remember what you have learned 1 How do you place an object exactly at the origin a Hold the Ctrl Windows or Control Mac key down before you click b Hold the Alt Windows or Command Mac key down and click close to the origin c...

Страница 155: ...n object c Zoom in an out of the view d Scroll the Palette up and down e Save the file 5 Which button or key is used to specify movement or scaling in the horizontal direction in the Top Left and Side views a Left mouse button b Middle mouse button c Right mouse button d The Alt Windows or Option Mac key e The Ctrl Windows or Control Mac key 6 Which location is the best one to save your data into ...

Страница 156: ...made from a half sphere with a torus for the rim and cubes for the hands The clock is assembled first and then grouped and rotated so that the face is angled upwards Finally two scaled spheres are used for feet Have a look at the help documentation on the Edit Duplicate Object tool as this is useful to help build the 12 hour markers on the clock face 150 Chapter 4 Introduction to 3D ...

Страница 157: ...ally scaled to create the flattened oval shape A fun exercise that will give you the opportunity to use all the primitive tools is to build a snowman The model shown is just one variation use your imagination to create your own character To save time use the Edit Duplicate Mirror tool to create a left arm as a copy of the right arm You On your own 151 ...

Страница 158: ...he option box to make sure that you mirror the objects in the right direction Using Edit Group on the head or the arm objects for example lets you rotate them into realistic positions 152 Chapter 4 Introduction to 3D ...

Страница 159: ...ill be affected by whatever tool you choose for example Transform Move To make sure that nothing is affected choose the Pick Nothing tool 3 a Away from the geometry Because the object is already selected the only input required is a click and a drag to specify the transform If you accidentally pick on a second object the transform will be applied to that object instead Try to find an area in the v...

Страница 160: ...y of a project created and renamed for your task in the user_data directory It takes a few steps to set up a new Alias project but doing so will make your data much easier to manage and to find 154 Chapter 4 Introduction to 3D ...

Страница 161: ...of surfaces skinned revolved extruded and planar View a model in hardware shaded mode Edit CVs Introduction In this tutorial you will model a computer joystick like the one below You will be introduced to tools that enable you to build surfaces from curves As well you will start to use layers to organize your work Finally you will learn a way to view and evaluate your work 5 155 ...

Страница 162: ...imitives Circle Pick Point Types CV Pick Point Types Hull Curves New Curves New Edit Point Curve Curves New Curves New CV Curve Surfaces Skin Surfaces Planar Surfaces Set Planar Surfaces Swept Surfaces Extrude 156 Chapter 5 Modeling a Joystick ...

Страница 163: ...ve Watch Part 1 of the tutorial Opening the tutorial file 1 Choose File Open to open the File Browser 2 In the File Browser locate the CourseWare directory and set it as the Current Project 3 Open the file called joystick wire located in the wire directory in the CourseWare project For information on how to open a file see Opening the tutorial file on page 82 A dialog box appears asking if you wan...

Страница 164: ...ction tolerances differ from those in the joystick wire file you will be presented with a dialog Click Accept New Settings to use the construction tolerances in joystick wire The file is opened 158 Chapter 5 Modeling a Joystick ...

Страница 165: ... choose WindowDisplay Toggles Construction Objects If the modeling views do not occupy the full size of the Alias window choose Layouts All Windows All Windows Creating the Joystick Handle You will start by creating a curve that follows the profile of the joystick handle which will later be used to revolve a surface for the handle 1 Maximize the Left view by clicking on the square icon on the top ...

Страница 166: ...e a curve by placing control vertices CVs for short CVs control the shape of a curve 4 Hold down the Alt Windows or Command Mac key to turn on grid snap mode and click the left mouse button on the grid intersection at the top of the handle 160 Chapter 5 Modeling a Joystick ...

Страница 167: ...s a small U By using the middle mouse button the second CV is horizontally aligned with the first CV Having these two CVs aligned horizontally helps to avoid a bump or dimple in the top when you revolve the surface NOTE The straight red line joining the first and second CVs is not the curve It is the hull Hulls connect all the CVs on a curve 7 Press and hold the left mouse button along the edge of...

Страница 168: ...tween the first second and third CV 8 Press and hold the left mouse button again to position the fourth CV along the edge of the handle outline The fourth CV appears A white curve now connects the first CV and the fourth CV The hull now consists of three red straight line segments that connect all the CVs together 162 Chapter 5 Modeling a Joystick ...

Страница 169: ...e the curve 10 Choose Pick Nothing to complete the curve and unpick it Editing the handle profile curve Now you will move CVs to edit the shape of the profile curve to match the reference image 1 Choose Pick Point Types CV 2 Use the left mouse button to click the third CV or drag a pick box around it Remember CVs do not lie on the curve they are located on the hull Part 1 Creating the Joystick Han...

Страница 170: ...3 Choose Transform Move and drag the mouse to move the CV so that the curve lies directly on the edge of the handle sketch 4 Click the fourth CV to pick it 164 Chapter 5 Modeling a Joystick ...

Страница 171: ...Move tool still active drag the mouse to move the CV so the curve lies on the edge of the handle sketch 6 Continue picking and moving CVs until the curve matches the sketch Part 1 Creating the Joystick Handle 165 ...

Страница 172: ...e profile curve to create a surface for the joystick handle 1 Choose Surfaces Revolve In the prompt window which is just below the menu bar you are prompted to select a curve to revolve 2 Click on the profile curve to select it 166 Chapter 5 Modeling a Joystick ...

Страница 173: ...s two green manipulators These manipulators enable you to easily change the sweep of the profile curve and the angle of the revolution axis The surface you have created is correct and so you won t adjust the manipulators 3 Choose Pick Nothing to unpick the surface Part 1 Creating the Joystick Handle 167 ...

Страница 174: ...ruction history allows you to easily change a surface after you have created it For example if you move a CV on the original profile curve the revolved surface will automatically update Next you will move a CV to see the effect of construction history 1 Choose Pick Point Types CV and click the third CV to pick it 168 Chapter 5 Modeling a Joystick ...

Страница 175: ...2 Choose Transform Move and drag the mouse to move the CV slightly When you release the mouse button the revolved surface automatically updates Part 1 Creating the Joystick Handle 169 ...

Страница 176: ... for the curve TIP It is good practice to turn off the CVs for curves and surfaces if you don t need to use them This helps to reduce clutter on your screen and makes your model easier to view It is easy to turn the CVs back on if you need to work with them On the Control Panel on the right of your screen is a Display section 170 Chapter 5 Modeling a Joystick ...

Страница 177: ...rol Panel to make it visible In the Display section the CV Hull check box indicates that the CVs and hulls are currently visible 4 With the CV still selected click the CV Hull check box to remove CVs from the curve display Part 1 Creating the Joystick Handle 171 ...

Страница 178: ...The CVs and hulls are no longer displayed in the view 5 Choose Layouts All Windows All Windows to return to the four views 172 Chapter 5 Modeling a Joystick ...

Страница 179: ...ry as the Current Project 3 Save your work in the wire directory of the Lessons project 4 Name your file myjoystick wire For information on creating the Lessons project or saving your work see Saving your work on page 96 Part 2 Creating the Joystick Base In this section you will create the joystick base with skin and planar surfaces Opening the tutorial file optional If you successfully completed ...

Страница 180: ...ourseWare project This file contains the completed model from Part 1 Watch Part 2 of the tutorial Creating the Base Outline Curve First you will create a rounded triangle shape from a primitive circle 1 Choose Layouts Top to maximize the Top view TIP The hotkey for Layouts Top is F5 174 Chapter 5 Modeling a Joystick ...

Страница 181: ...the circle In the Sections box the default number of sections is set at 8 As you will be creating a triangular shaped base 9 sections will provide a better arrangement of CVs Type in 9 in the Sections box Click the Go button in the circle option box Part 2 Creating the Joystick Base 175 ...

Страница 182: ...intersect to place the circle at the center of the base A small circle is placed at the origin The manipulators are shown but you won t use them for this part of the tutorial Next you will scale and reshape the circle to form the base outline 5 Choose Transform Scale 6 The manipulators disappear 176 Chapter 5 Modeling a Joystick ...

Страница 183: ...the circle to the inside of the base outline as shown below TIP Use the screen diagonal direction for an increase or decrease in scale Drag towards the bottom left corner to decrease the scale Drag towards the top right corner to increase the scale 7 Choose Pick Nothing to deselect the circle Part 2 Creating the Joystick Base 177 ...

Страница 184: ... to click and drag towards the top right of the screen You will now select the three CVs which will form the apexes of the triangular base 8 Choose Pick Point Types CV and click the CV nearest the right side of the sketch This CV is drawn as a small U 9 TIP As the CVs are small it is sometimes easier to select them by dragging a pick box around each one 178 Chapter 5 Modeling a Joystick ...

Страница 185: ... CV at the top left hand corner of the sketch by clicking and dragging a pick box around it The second CV is selected and highlighted 11 With the Pick Point Types CV tool still active click and drag a pick box around the CV at the bottom left hand corner of the sketch Part 2 Creating the Joystick Base 179 ...

Страница 186: ... selected and shown in yellow and that there are two unselected red CVs between each corner CV 12 Choose Transform Scale 13 Click and drag the left mouse button until the outline shape is matched 180 Chapter 5 Modeling a Joystick ...

Страница 187: ...Next you will make the CVs and hulls invisible for the curve 14 On the Control Panel go to the Display section Click on the CV Hull check to remove it Part 2 Creating the Joystick Base 181 ...

Страница 188: ...The CVs and Hulls for the curve are no longer visible 15 Choose Pick Nothing to unpick the curve 182 Chapter 5 Modeling a Joystick ...

Страница 189: ...rve for the Base Next you will create the upper edge of the side wall by copying and moving the first curve 1 Choose Pick Object and select the base outline curve that you just created Part 2 Creating the Joystick Base 183 ...

Страница 190: ...hanged but a second curve is created and placed at the same location as the first This curve is selected shown in white and ready to move 3 Choose Layouts Left or press the F6 hotkey to maximize the Left view 4 Choose Transform Move 184 Chapter 5 Modeling a Joystick ...

Страница 191: ...ve to avoid picking the original curve Move the curve so it is aligned with the top of the wavy edge of the joystick base sketch 6 With the curve still selected click the CV Hull check box in the Control Panel Display section to turn the CVs and Hulls on The CVs and hulls appear Part 2 Creating the Joystick Base 185 ...

Страница 192: ...he screen 7 Use Layouts All Windows All Windows or the F9 hotkey to return to the four views 8 Choose Pick Nothing to deselect the curve 9 Looking in the Top view choose Pick Point Types CV and select the three corner CVs 10 Click on each CV or drag a pick box over each of them 186 Chapter 5 Modeling a Joystick ...

Страница 193: ...ew 11 Choose Transform Move 12 In the Left view use the right mouse button to move the selected CVs downwards until the curve matches the shape of the top edge drawn in the sketch 13 Choose Pick Nothing to deselect the CVs Part 2 Creating the Joystick Base 187 ...

Страница 194: ... in the four views to create the small circle at the top of the base where the joystick handle is connected 1 Choose Curves Primitives Circle 2 Hold down the Alt Windows or Command Mac key to turn on grid snapping In the Top view click near the origin to place the circle exactly on the center grid point 188 Chapter 5 Modeling a Joystick ...

Страница 195: ... any of the curves and click and drag with the left mouse button Drag towards the top right of the screen to scale the circle to match the smaller inner circle on the sketch Now you will move the circle upwards in the Left view 5 With the circle still selected choose Transform Move Part 2 Creating the Joystick Base 189 ...

Страница 196: ...to match the top of the base in the sketch The circle is now in position at the top of the base 7 On the Control Panel Display section click on the CV Hull check to turn the CVs and hulls off for the circle 8 Choose Pick Nothing to deselect the circle 190 Chapter 5 Modeling a Joystick ...

Страница 197: ...ls First you will create the side wall of the base using a skin surface 1 Choose Layouts Perspective or F8 to maximize the perspective view 2 Choose Surfaces Revolve 3 You are prompted to select the first curve 4 Select the first triangular curve you created at the bottom of the base Part 2 Creating the Joystick Base 191 ...

Страница 198: ...5 Select the second triangular curve as the top edge of the side wall 192 Chapter 5 Modeling a Joystick ...

Страница 199: ... will create the surface across the top of the base component 6 With the Skin tool still active select the second triangular curve again The pick chooser offers a choice between the curve and the surface you just created Part 2 Creating the Joystick Base 193 ...

Страница 200: ...nd move the mouse over the circle curve in the pick chooser Release the mouse button to select the circle 7 Now you are prompted to select the next curve Click the smaller circle at the top of the base 194 Chapter 5 Modeling a Joystick ...

Страница 201: ...e two curves Next you will create the surface underneath the base 8 Choose the Surfaces Planar Surfaces Set Planar tool 9 Select the first triangular curve at the bottom of the base The pick chooser appears Part 2 Creating the Joystick Base 195 ...

Страница 202: ...Select the circle curve 196 Chapter 5 Modeling a Joystick ...

Страница 203: ...Click on the Go button that appears in the bottom right of the screen Part 2 Creating the Joystick Base 197 ...

Страница 204: ...A planar surface is created across the bottom of the base 10 Choose Pick Nothing to unpick the planar surface 198 Chapter 5 Modeling a Joystick ...

Страница 205: ...file myjoystick2 wire Part 3 Creating the Flexible Sleeve In this section you will create the flexible component that connects the base to the joystick handle Opening the tutorial file optional If you successfully completed Part 2 you can proceed directly to the next step Creating the zig zag curve Part 3 Creating the Flexible Sleeve 199 ...

Страница 206: ... from Part 2 Watch Part 3 of the tutorial Creating the zig zag curve To create the profile for the sleeve you will first create a simple curve across the gap between the handle and the base Then you will increase the number of CVs in the curve so a detailed zig zag shape can be created 1 Choose Layouts Left or F6 to maximize the Left view 200 Chapter 5 Modeling a Joystick ...

Страница 207: ...2 Zoom in to the sleeve area Hold the Shift and Alt Windows or Shift and Command Mac keys down together and click drag with the right mouse button Part 3 Creating the Flexible Sleeve 201 ...

Страница 208: ... 4 Hold down the Alt Ctrl Windows or Command Control Mac and keys to turn on curve snapping Click on the base of the handle to place the first edit point Without releasing the mouse button drag the edit point until it snaps to the corner Keep the Alt Ctrl Windows or Command Control Mac keys held down and click near the top of the base to place the second edit point Without releasing the mouse butt...

Страница 209: ...points there will be many spans one between each pair of edit points When a curve has more spans it also has more CVs These extra CVs can be used to create a more complex shape You will now increase the number of CVs in this curve so you can create the zig zag profile of the sleeve 5 In the Control Panel the number of spans that make up the curve is displayed Part 3 Creating the Flexible Sleeve 20...

Страница 210: ...pan 6 In the Spans section of the control panel type in 8 and press Enter Windows or Return Mac The curve is rebuilt with 8 spans and now has 11 CVs A preview of the rebuilt curve is shown in the view 204 Chapter 5 Modeling a Joystick ...

Страница 211: ... curve the first CV is shown as a small square and the second CV is shown as a U You will leave these two CVs unselected so the sleeve profile stays connected to the handle and the direction of the end tangent is not modified 8 Choose Pick Point Types CV 9 Continue counting from the top and select the third fifth seventh and ninth CVs Part 3 Creating the Flexible Sleeve 205 ...

Страница 212: ...eave the last two CVs unselected so the sleeve curve remains connected to the base profile and the direction of the end tangent is not modified 10 Choose Transform Move 206 Chapter 5 Modeling a Joystick ...

Страница 213: ...the right until a gentle zig zag shape is created as shown 12 With the CVs still selected click on the CV Hull check box to turn off the CVs and hulls for the curve 13 Choose Pick Nothing to deselect the CVs Part 3 Creating the Flexible Sleeve 207 ...

Страница 214: ...Next you will create the sleeve surface 14 Choose Surfaces Revolve You are prompted to select a curve to revolve 15 Click on the zig zag curve to select it 208 Chapter 5 Modeling a Joystick ...

Страница 215: ...The surface is created and the green handles displayed 16 Choose Pick Nothing to deselect the surface The green handles disappear Part 3 Creating the Flexible Sleeve 209 ...

Страница 216: ...17 Zoom out to view the whole joystick design 18 Choose the F9 key to return to the four windows 210 Chapter 5 Modeling a Joystick ...

Страница 217: ...r file myjoystick3 wire Part 4 Creating the connecting cable In this section you will create part of the cable that connects the joystick to the computer Opening the tutorial file optional If you successfully completed Part 3 you can proceed directly to the next step Create the cable path curve Part 4 Creating the connecting cable 211 ...

Страница 218: ...ick_part4 wire located in the wire directory of the CourseWare project This file contains the completed model from Part 3 Watch Part 4 of the tutorial Create the cable path curve 1 Choose Layouts Left or F5 to maximize the Top view 212 Chapter 5 Modeling a Joystick ...

Страница 219: ...and Alt Windows or Shift and Command Mac keys down and use the right mouse button to zoom out of the view With the Shift and Alt Windows or Shift and Command Mac keys still held down use the middle mouse button to pan the view so there is some free space to the left of the joystick Part 4 Creating the connecting cable 213 ...

Страница 220: ...r Command Mac key down to turn grid snapping on and click on the grid intersection at the left side of the base The first CV of the curve is created 5 Click and drag the middle mouse button to position the second CV to the left of the first 214 Chapter 5 Modeling a Joystick ...

Страница 221: ...the first 6 Continue to place CVs creating a wavy path for the cable Create the cable profile curve Next you will create a small circle for the cross section profile of the cable 1 Choose Layouts Left or F7 to maximize the Back view Part 4 Creating the connecting cable 215 ...

Страница 222: ...tions which was set previously for the triangular shape The default number of sections is 8 which creates a good general purpose circular shape Click the Reset button at the bottom of the Circle Options box to reset the options to the default values Press Go to create the circle 216 Chapter 5 Modeling a Joystick ...

Страница 223: ...igin in the Back window to place the circle at the center of the base A small circle is placed at the origin The CVs are highlighted in yellow and the manipulator is showing but it won t be used 5 Choose Layouts Left or F6 to switch to the Left view Part 4 Creating the connecting cable 217 ...

Страница 224: ...rve begins 6 With the circle still selected choose Transform Move 7 Hold down the Alt Windows or Command Mac key to turn on grid snapping Click near the grid point where the path curve starts being careful not to select any other geometry The circle moves to the start of the path 218 Chapter 5 Modeling a Joystick ...

Страница 225: ...he middle of the base side wall 10 Choose Pick Point Types CV and drag a box around the circle CVs and the first two CVs on the path curve 11 Choose Transform Move 12 Click and drag the right mouse button to move the selected CVs upwards so the circle sits in the middle of the sidewall of the base Part 4 Creating the connecting cable 219 ...

Страница 226: ... to deselect the CVs 14 Choose Layouts Perspective or the F8 hotkey to switch to the perspective view The small circle is at the start of the path curve centered on the side wall of the base 220 Chapter 5 Modeling a Joystick ...

Страница 227: ...ndows or Shift and Command Mac keys and use the left mouse button to tumble the view and the right mouse button to zoom in To create the cable surface you will extrude the small circle along the path curve 2 Choose the Surfaces Swept Surfaces Extrude tool 3 You are prompted to select the curves to extrude Click the circle to select it to be extruded Part 4 Creating the connecting cable 221 ...

Страница 228: ... 4 You are prompted to select the extrude path Click on the long wavy curve to select it as the path curve The extruded surface is created 5 Choose Pick Nothing to deselect the surface 6 Tumble and zoom out to view the cable surface 222 Chapter 5 Modeling a Joystick ...

Страница 229: ...e your file myjoystick4 wire Part 5 Assigning objects to layers In this section you will assign the curves and surfaces you have created to new layers Opening the tutorial file optional If you successfully completed Part 4 you can proceed directly to the next step Assigning curves to a layer Part 5 Assigning objects to layers 223 ...

Страница 230: ...ing related objects and organizing a scene By default all objects you create are assigned to the Default Layer First create a layer 1 Choose Layers New to create a layer A new layer button called L1 appears in the Layer Bar The Layer Bar is located just below the prompt line and just above the view window area 2 To rename the layer in the Layer Bar double click the L1 layer Type the word Curves an...

Страница 231: ... object you want to select In this case you will set it to select curves only so that all the curves can be easily selected using a drag box 3 Choose Pick Component 4 Double click the icon to open the option box Deselect all the options except Curves Select the Go button at the bottom of the option box Part 5 Assigning objects to layers 225 ...

Страница 232: ...5 Drag a pick box around all of the objects to choose all the curves Only the curves are selected 226 Chapter 5 Modeling a Joystick ...

Страница 233: ...own menu Then choose Assign from the menu to assign all the picked curves to the Curves layer 7 Press and hold the left mouse button on the Curves layer and choose Visible to turn off the visibility of the layer The curves are no longer displayed in the scene Part 5 Assigning objects to layers 227 ...

Страница 234: ...A new layer button called L2 appears in the Layer Bar 2 To rename the layer in the Layer Bar double click the L2 layer Type the word Joystick and press Enter Windows or Return Mac 3 Choose Pick Object 4 Select the joystick base sleeve and handle 228 Chapter 5 Modeling a Joystick ...

Страница 235: ...ssign all the picked surfaces to the Joystick layer These surfaces are left visible so you can continue working on them in the next section 6 Create another layer using Layers New Rename the layer Cable 7 Choose Pick Nothing to deselect the joystick objects 8 Choose Pick Object and select the cable surface Part 5 Assigning objects to layers 229 ...

Страница 236: ...er 10 Press and hold the left mouse button on the Cable layer choose Set State then Inactive to make the cable surface inactive The cable surface is still visible but is shown in pale blue and cannot be selected 230 Chapter 5 Modeling a Joystick ...

Страница 237: ...Finally as you have finished using the sketches as guides you will turn them off 11 Choose WindowDisplay Toggles Construction Objects to turn off the sketches Part 5 Assigning objects to layers 231 ...

Страница 238: ...ur file myjoystick5 wire Part 6 Directly modifying surfaces In this section you will refine the design by directly moving the CVs of the handle and base surfaces The sketches shown below show the design changes The top of the base has changed from being a straight surface to a gently rounded surface 232 Chapter 5 Modeling a Joystick ...

Страница 239: ...The top of the handle has a triangular angled shape A button has been added to the base Part 6 Directly modifying surfaces 233 ...

Страница 240: ...proceed directly to the next step Deleting Construction History If you were not successful in part 5 open the file called joystick_part6 wire located in the wire directory of the CourseWare project This file contains the completed model from Part 5 234 Chapter 5 Modeling a Joystick ...

Страница 241: ...aces will update In this section of the tutorial instead of using the curves to modify the surfaces you will be modifying the surfaces directly To do this you will first delete the construction history for the surfaces 1 On the Layer Bar use the left mouse button to click the Joystick layer and select Pick Objects from the pull down menu All the joystick surfaces are selected Part 6 Directly modif...

Страница 242: ...onstruction History A dialog box appears asking if you want to delete the construction history for the objects Click Yes to delete the history 3 Choose Pick Nothing to unpick all the surfaces 236 Chapter 5 Modeling a Joystick ...

Страница 243: ...y used CVs to create and shape curves Surfaces also have CVs which can be used in the same way to directly modify the surface shape By default the CVs for a surface aren t displayed so next you will turn on the CVs for the top of the base 1 Choose Pick Object and select the top surface on the base Part 6 Directly modifying surfaces 237 ...

Страница 244: ...n the Control Panel click the CV Hull check box to turn on the CVs and Hulls for the surface The CVs and Hulls are displayed 3 Choose Pick Nothing to deselect the surface 238 Chapter 5 Modeling a Joystick ...

Страница 245: ...e Layouts Top or F5 to switch to the Top view The CVs on the surface are arranged in rows connected by hull lines The arrangement of hulls on this surface is shown below Part 6 Directly modifying surfaces 239 ...

Страница 246: ...The hulls go in two directions One set of hulls radiates out from the middle of the surface 240 Chapter 5 Modeling a Joystick ...

Страница 247: ... select the two center hulls from this set to sculpt a gentle curve into the top surface of the joystick base 5 Choose Pick Point Types CV Click the red hull line connecting the second row of CVs in from the outer edge Part 6 Directly modifying surfaces 241 ...

Страница 248: ...The row of CVs is selected and highlighted in yellow 242 Chapter 5 Modeling a Joystick ...

Страница 249: ...6 Click the red hull line connecting the third row of CVs in from the outer edge Both rows of CVs are now selected Part 6 Directly modifying surfaces 243 ...

Страница 250: ...ew to sculpt the surface 7 Choose Layouts Left or F6 to switch to the Left view 8 Choose Transform Move 9 Click and drag the right mouse button to move the hulls upwards Move them enough to create a gentle curve on the top edge of the surface 244 Chapter 5 Modeling a Joystick ...

Страница 251: ...ck the CV Hull check box to turn off the CVs and Hulls for the surface 11 Choose Pick Nothing to unpick the surface Sculpting the Top of the Handle Next you will refine the shape of the top of the joystick handle 1 Choose Pick Object and select the handle surface Part 6 Directly modifying surfaces 245 ...

Страница 252: ...2 On the Control Panel choose the CV Hull check to turn on the CVs and Hulls for the handle surface 3 Choose Pick Nothing to unpick the surface 246 Chapter 5 Modeling a Joystick ...

Страница 253: ...tool showing Click and hold the left mouse button on the Pick Hull icon to open the tool drawer Move the mouse to the CV icon and release to select the Pick Point Types CV tool 4 Choose Pick Point Types CV Drag a pick box around the top right set of CVs shown below Part 6 Directly modifying surfaces 247 ...

Страница 254: ...ighlighted in yellow The first modification will be to the plan shape of the handle so the transforms will be made in the Top view 5 Choose Layouts Top or the F5 hotkey to switch to the Top view 248 Chapter 5 Modeling a Joystick ...

Страница 255: ...wn the Shift and Alt Windows or Shift and Command Mac keys together and click and drag the right mouse button to zoom 7 Choose Transform Non p Scale 8 Click and drag the right mouse button to reshape the handle Part 6 Directly modifying surfaces 249 ...

Страница 256: ...ick and drag away from any of the geometry to avoid selecting different geometry The selected area of the handle surface is stretched 9 Choose Pick Nothing to unpick the CVs 250 Chapter 5 Modeling a Joystick ...

Страница 257: ... the handle so you can create a soft pointed shape 10 Choose Pick Point Types CV and drag a pick box over the central CVs on the left of the handle The center line CVs are selected and highlighted in yellow Part 6 Directly modifying surfaces 251 ...

Страница 258: ...ale and click and drag the middle mouse button the stretch the handle surface outwards to the side 12 Choose Pick Nothing to unpick the CVs The top of the handle now has a smooth triangular shape 252 Chapter 5 Modeling a Joystick ...

Страница 259: ...he angle of the top of the handle to make it more ergonomic 1 Choose Layouts Left or F6 to switch to the Left view 2 Choose Pick Point Types CV and click and drag a box around all the CVs at the top of the handle Part 6 Directly modifying surfaces 253 ...

Страница 260: ...lways works around the object s pivot point The pivot point for the CVs defaults to the origin To rotate the CVs correctly you will position the pivot point at the center of the selected CVs using the Center pivot tool 254 Chapter 5 Modeling a Joystick ...

Страница 261: ...ose Transform Rotate and click and drag with the middle mouse button to rotate the CVs about the y axis 5 Choose Transform Move and click and drag with the middle mouse button to move the CVs slightly to the right to create a smooth transition from shaft of the handle Part 6 Directly modifying surfaces 255 ...

Страница 262: ...e Control Panel click the CVs Hulls check to turn the CVs and hulls off 7 Choose Pick Nothing to deselect the object 8 Choose Layouts Perspective or F8 to evaluate the design 256 Chapter 5 Modeling a Joystick ...

Страница 263: ...essons project 3 Name your file myjoystick6 wire Part 7 Creating the button In this section you will create a button from a modified sphere Opening the tutorial file optional If you successfully completed Part 6 you can proceed directly to the next step Creating a primitive sphere Part 7 Creating the button 257 ...

Страница 264: ...the CourseWare project This file contains the completed model from Part 6 Watch Part 7 of the tutorial Creating a primitive sphere You will now create the button for the joystick by placing and transforming a primitive sphere 1 Choose Layouts Top or F5 to switch to the top view 258 Chapter 5 Modeling a Joystick ...

Страница 265: ...low This means that it is the active layer and any new curves or surfaces are placed on it 3 Choose Surfaces Primitives Sphere 4 Double click the icon to open the option box You need to create a whole sphere so check that the sweep is set to 360 degrees Part 7 Creating the button 259 ...

Страница 266: ...x 5 Hold down the Alt Windows or Command Mac key to turn on grid snapping Click near the grid intersection just inside the right hand edge of the base A small sphere is placed on the grid intersection 6 Choose Transform Move 260 Chapter 5 Modeling a Joystick ...

Страница 267: ... edge of the base 8 Choose Transform Non p Scale 9 Click and drag the middle mouse button to stretch the sphere sideways 10 With Transform Non p Scale still selected click and drag the right mouse button to stretch the sphere upwards making an oval shape for the button Part 7 Creating the button 261 ...

Страница 268: ...tch to the Left view 12 Choose Transform Move 13 Click and drag the right mouse button to move the sphere vertically until the center of the sphere is approximately aligned to the top edge of the base 262 Chapter 5 Modeling a Joystick ...

Страница 269: ...and drag the middle mouse button to rotate the sphere to approximately match the angle of the base 16 Choose Pick Nothing to unpick the sphere 17 Choose Layouts Perspective to switch to the Perspective view Part 7 Creating the button 263 ...

Страница 270: ...e Lessons project 3 Name your file myjoystick7 wire Part 8 Visualizing the Model In this section you will view the model using Hardware Shading Opening the tutorial file optional If you successfully completed Part 7 you can proceed directly to the next step Shading the view 264 Chapter 5 Modeling a Joystick ...

Страница 271: ...ade Hardware shading allows for more visual effects and introduces you to the techniques you will use for rendering in later tutorials You will start by making the cable surface pickable so it can be shaded 1 On the Layer Bar press and hold the left mouse button on the Cable layer choose Set State then Pickable to make cable surface active 2 Tumble the view until you get a good view of the joystic...

Страница 272: ...3 Choose WindowDisplay Hardware Shade The model is shaded in the default colour 4 Choose WindowDisplay Hardware Shade to open the option box 266 Chapter 5 Modeling a Joystick ...

Страница 273: ... the Enable Environment Effects section Click the Ground plane check box to turn on the ground plane effects Click the Edit Environment button to open the Environment window Part 8 Visualizing the Model 267 ...

Страница 274: ...n Mac to drop the shadow slightly below the base Ensure the Shadows box has a check mark so that shadows are turned on A shadow appears underneath the joystick and cable Change the Shadow Position Click and hold the left mouse button on the Shadow Position menu which is set to DIRECTLY ABOVE by default Choose 45 DEGREES RIGHT and release the mouse button 268 Chapter 5 Modeling a Joystick ...

Страница 275: ... the Shade On button at the bottom of the Hardware Shade Settings box To view the design more clearly you will now turn off the wireframe grid and lights 7 In the title bar of the modeling window click the Show button to open up the menu and select Model to remove the check mark The wireframe lines are turned off Part 8 Visualizing the Model 269 ...

Страница 276: ...k mark The grid lines are turned off 9 In the title bar of the modeling window click the Show button to open up the menu and select Lights to remove the check mark The light icons disppear The joystick design is displayed in shaded mode with no model lines grid lines or lights showing 270 Chapter 5 Modeling a Joystick ...

Страница 277: ...licking the cross in the top right corner Now that the Hardware Shade is set up you don t need to go into the option box the next time you want to shade the model Just choose WindowDisplay Hardware Shade to toggle the shading on or off Save your work 1 Choose File Save As to save the current scene 2 Save your work in the wire directory of the Lessons project 3 Name your file myjoystick8 wire Part ...

Страница 278: ...surface CVs directly to change the surface shape The Control Panel can be used to display or hide the CVs of a curve or surface It is good practice to turn off the CVs on objects that aren t being modified to reduce the complexity of the view on the screen Regularly save your work Quiz Now that you have completed this joystick modeling tutorial do this quick quiz to help you remember the tools and...

Страница 279: ...tions in shiny materials d only shaded geometry with no wireframe CVs or edit points showing e all of the above 5 To position the pivot point at the center of a group of selected CVs which tool would you use a Transform Local Set Pivot and the Ctrl Windows or Control Mac key to snap to a CV point b Transform Move and move the mouse to the center of the CVs c Pick Hull and Transform Local Set Pivot...

Страница 280: ...d the spout is a skin surface You will notice that the components are intersecting and have not been fully detailed This is acceptable for a concept model and you will learn the detailing techniques in the following tutorials Continuing the kitchen theme the lemon squeezer handle is built from revolved surfaces The squeezer was sculpted from a simple revolved shape The number of spans was increase...

Страница 281: ...shlight below is based on a circle which has been shaped to a smooth square shape Skin surfaces have been used for the main shape with extrude surfaces used for the grip detail and the lanyard On Your Own 275 ...

Страница 282: ...lect the third and subsequent curves The surface is blended smoothly through all the curves 3 c The Pick Hull tool A whole row of CVs can also be selected using Pick CV and carefully dragging a pick box around the required CVs The Pick Hull tool is often easier to use and it is often good practice to modify a whole row of CVs together to have more control over the final shape of a surface 4 e All ...

Страница 283: ...cal Center Pivot tool This tool can be used with all objects curves surfaces and groups of CVs 6 Match the Hotkeys to the window views Hotkey Window F7 Back F5 Top F9 All four views F6 Left F8 Perspective Quiz Answers 277 ...

Страница 284: ...278 ...

Страница 285: ...son you will build a hand held car vacuum cleaner This lesson introduces you to more surface building techniques You will learn how to Create swept surfaces Trim off the excess areas of surfaces Create rounded edges Use Layers to organize complex models 6 279 ...

Страница 286: ...design is complete you will copy and mirror the surfaces to create the full model The workflow you will use to create the vacuum cleaner model is shown below First you will create the main surfaces and then intersect and trim them to create the body shape Throughout the tutorial you will build one half of the vacuum cleaner and at the end you will mirror the surfaces to create the completed model ...

Страница 287: ...cus on the techniques of intersecting and trimming surfaces introduced in this tutorial The curves have been created using the same techniques you learned in Tutorial 2 If you want to see how the curves are constructed use the Control Panel CV Hull display to display the CVs If you prefer to create your own curves you can make the curves layer inactive and create your own curves using these as a g...

Страница 288: ...and actions Click Yes If your values for construction tolerances differ from those in the vacuum wire file you will be presented with a dialog Click Accept New Settings to use the construction tolerances in vacuum wire The file is opened 282 Chapter 6 Modeling a Vacuum Cleaner ...

Страница 289: ...the Alias window choose Layouts All Windows All Windows Watch Part 1 of the tutorial Creating the lower surface You will start by creating the lower body shape using a mono rail surface 1 Maximize the Perspective view Part 1 Creating Primary Surfaces 283 ...

Страница 290: ...Surface The Rail surface defaults to a birail which has two path curves You will now change this to a mono rail with only one path curve 3 Double click the Rail surface icon to open the option window 284 Chapter 6 Modeling a Vacuum Cleaner ...

Страница 291: ...option window click 1 in the Rail curves section Check that the Generation curves section is also set to 1 5 Close the Rail Surface option window by clicking the X in the top right corner Part 1 Creating Primary Surfaces 285 ...

Страница 292: ...eft mouse button and click the curve shown to select it as the generation curve The curve is highlighted You are prompted to select the primary rail curve 7 Click the lower profile of the vacuum to select it as the path curve 286 Chapter 6 Modeling a Vacuum Cleaner ...

Страница 293: ...A mono rail surface is created 8 Choose Pick Nothing to deselect the surface Part 1 Creating Primary Surfaces 287 ...

Страница 294: ...agnostic Shading on the Control Panel to shade the surface TIP If the Control Panel is not displayed on your screen choose Windows Control Panel to make it visible 9 Select the Multi Color shade icon to turn on the shading 288 Chapter 6 Modeling a Vacuum Cleaner ...

Страница 295: ...rface of the vacuum cleaner using a Mono rail surface with two generation curves When two generation curves are used the surface blends between the two shapes as it sweeps along the path curve This will create a smooth surface blended between the wide nozzle and the narrower handle section 1 Choose Surfaces Swept Surfaces Rail Surface Double click the icon to open the option window The Rail tool i...

Страница 296: ... the Generation curves section 3 Close the option window You are prompted to select the generation curve 4 Click the curve located at the front of the vacuum nozzle to select it as the first generation curve 290 Chapter 6 Modeling a Vacuum Cleaner ...

Страница 297: ...5 Click the curve located at the rear of the vacuum cleaner body to select it as the second generation curve The curve is highlighted Next you are prompted to select the primary rail curve 6 Click the upper profile curve of the vacuum cleaner body Part 1 Creating Primary Surfaces 291 ...

Страница 298: ...A mono rail surface is created that blends smoothly between the two generation curves 7 Choose Pick Nothing to deselect the surface 292 Chapter 6 Modeling a Vacuum Cleaner ...

Страница 299: ...between the two overlapping surfaces You have now created the two main shapes that will be used to create the vacuum cleaner body Saving your work Now you will save the scene as a new file 1 Choose File Save As to open the File Browser Part 1 Creating Primary Surfaces 293 ...

Страница 300: ...ss each other This is the approach you will take with the upper and lower surfaces of the vacuum cleaner First you will intersect the surfaces When you intersect surfaces you create curves on surface which are lines that are created on the surfaces where the surfaces intersect You will then trim the intersecting surfaces along the curves on surface so the unnecessary surface areas are discarded an...

Страница 301: ... the tutorial Intersecting the upper and lower surfaces Now you will intersect the upper and lower surfaces to create the body shape 1 Click the wireframe icon in the diagnostic Shading area of the Control Panel to remove the shading 2 Choose Surface Edit Create CurvesOnSurface Intersect This tool creates the curves on surface that are used to trim the surfaces Part 2 Intersecting and Trimming 295...

Страница 302: ...elect the surface s to intersect Use the left mouse button to click the upper surface to select it The surface is highlighted and a Go box appears in the lower right corner of the view 296 Chapter 6 Modeling a Vacuum Cleaner ...

Страница 303: ...t the first surface to be intersected The surface is highlighted in pink 4 You are prompted to select the intersecting surface Click the lower surface to intersect it with the upper surface Part 2 Intersecting and Trimming 297 ...

Страница 304: ... By default the Intersect tool creates a curve on surface on each surface so each surface can be trimmed Both surfaces are now drawn with a dotted outline to indicate that each has a curve on surface 5 Choose Pick Object Types Curve on Surface 298 Chapter 6 Modeling a Vacuum Cleaner ...

Страница 305: ...d curves that appear are the two curves on surface It looks as though there is only one curve on surface but in fact there are two in the same location one on the upper surface and one on the lower surface 7 Choose Pick Nothing to unpick the curves on surface Part 2 Intersecting and Trimming 299 ...

Страница 306: ...king the Divide button that appears at the bottom right corner of the screen 1 Choose Surface Edit Trim Trim Surface 2 You are prompted to select a surface to trim Pick the upper surface 3 You are then prompted to select one of the following Shift select to select surfaces or click to select REGIONS The last option allows you to trim away the excess parts of the surface so this is the prompt you w...

Страница 307: ...The Trim tool places an indicator where you clicked and an option box appears in the bottom right corner of the view 4 Click the Keep button Part 2 Intersecting and Trimming 301 ...

Страница 308: ...The upper surface is trimmed 5 Repeat steps 1 4 to trim the lower surface 302 Chapter 6 Modeling a Vacuum Cleaner ...

Страница 309: ...Part 2 Intersecting and Trimming 303 ...

Страница 310: ... to complete the exterior shape of the vacuum body 1 1 Choose the Surfaces Planar Surfaces Set Planar tool 2 You are prompted to select a curve 3 Click the straight line curve along the center grid line to select it as the first curve for the planar surface 304 Chapter 6 Modeling a Vacuum Cleaner ...

Страница 311: ...ed to select another curve 4 Click the front nozzle curve to select it as the second curve for the planar surface If the pick chooser appears make sure that you pick the curve not the surface edge The curve is selected and you are prompted to select another curve Part 2 Intersecting and Trimming 305 ...

Страница 312: ...curve is selected The three curves form a closed region within which the planar surface will be created 6 Click Go to create the planar surface The surface is created and highlighted in pale yellow 7 Choose Pick Nothing to deselect the planar surface 306 Chapter 6 Modeling a Vacuum Cleaner ...

Страница 313: ...the Control Panel to view the model Save your work 1 Choose File Save As to save the current scene 2 Save your work in the wire directory of the Lessons project 3 Name your file myvacuum2 wire Part 2 Intersecting and Trimming 307 ...

Страница 314: ...rounded surface the Surface Fillet tool can also trim back the original surfaces to create a finished continuous form This trimming is achieved using curves on surface which are automatically created by the Surface Fillet tool Opening the tutorial file optional If you successfully completed Part 2 you can proceed directly to the next step Creating the body fillet If you were not successful in part...

Страница 315: ...view 1 Return to a wireframe view by clicking the wireframe icon in the diagnostic Shading section of the Control Panel The upper surface only has lines showing on its edges To improve the visualization of the surface and to make it easier to select you can increase the number of lines across the surface using the patch precision tool Next you will increase the patch precision for the upper surfac...

Страница 316: ...ed lines across its interior These dotted lines make the surface easier to visualize in wireframe and can be used to select the surface Next you will create the surface fillet along the trimmed edge where the two main surfaces meet 4 Choose Surfaces Surface Fillet Double click the icon to open the option box 310 Chapter 6 Modeling a Vacuum Cleaner ...

Страница 317: ...5 In the Radius section type in a radius value of 0 75 6 Click the Advanced tab to open the advanced options for the surface fillet tool Part 3 Surface Fillet 311 ...

Страница 318: ...ns are set to DEFAULT For the Start and End select EDGE ALIGN This choice ensures that the fillet surface is built to the full length of the edge and the upper and lower surfaces are correctly trimmed 7 Close the Surface Fillet option box You are prompted to select the first set of surfaces 312 Chapter 6 Modeling a Vacuum Cleaner ...

Страница 319: ...e upper surface If the pick chooser appears select the mono rail surface The surface is selected and highlighted in pink an Accept button appears in the bottom right corner of the view Part 3 Surface Fillet 313 ...

Страница 320: ...ected and highlighted in yellow and an Accept button appears in the bottom right corner of the view 11 Click Accept to select the second surface for filleting Arrows appear on both surfaces indicating on which side of the surfaces the fillet will be built If necessary tumble the view to see which direction the arrows are pointing 314 Chapter 6 Modeling a Vacuum Cleaner ...

Страница 321: ...g out from the surface then click it to reverse it The yellow arrow for the lower surface also needs to point inwards toward the inside of the vaccum cleaner body If it isn t click it to reverse its direction 12 Click Build The fillet surface is created and the upper and lower surfaces are trimmed Part 3 Surface Fillet 315 ...

Страница 322: ... length of the fillet surface For the nozzle you will create a chordal fillet A chordal fillet maintains a constant width of surface instead of a constant radius This will produce a more regular surface when the angle between the two main surfaces varies along their edge 1 Choose Surfaces Surface Fillet Double click the icon to open the surface fillet option box In the Advanced tab the flow contro...

Страница 323: ... choose DEFAULT NOTE The ends of the fillet fall on the center line of the vacuum design As the edges of the main surfaces are already aligned to the center line the Surface fillet EDGE ALIGN adjustment isn t required 3 In the Construction Type setting there are two choices on the pull down menu Part 3 Surface Fillet 317 ...

Страница 324: ...to 0 5 Close the Surface Fillet option box You are prompted to select the first set of surfaces 5 Drag a pick box around the upper lower and fillet surfaces avoiding the planar surface All three surfaces are selected and highlighted in pink and an Accept button appears in the bottom right corner of the view 318 Chapter 6 Modeling a Vacuum Cleaner ...

Страница 325: ...o select the first set of surfaces for filleting You are prompted to select the second set of surfaces 7 Click the planar surface to select it If the pick chooser appears pick the trim_surface Part 3 Surface Fillet 319 ...

Страница 326: ...cept to select the second surface for filleting Arrows appear on both sets of surfaces indicating on which side of the surfaces the fillet will be built The pink arrow needs to point in towards the inside of the vacuum body If it is pointing out of the surface click the arrow to reverse it 320 Chapter 6 Modeling a Vacuum Cleaner ...

Страница 327: ...body If it is pointing downwards out of the surface click the arrow to reverse it 9 Click Build The chordal fillet surface is created and the surfaces trimmed to create a smooth continuous exterior 10 Choose Pick Nothing to deselect all the surfaces Part 3 Surface Fillet 321 ...

Страница 328: ...Save your work 1 Choose File Save As to save the current scene 2 Save your work in the wire directory of the Lessons project 3 Name your file myvacuum3 wire 322 Chapter 6 Modeling a Vacuum Cleaner ...

Страница 329: ...p edged shape Instead you will use the Surface Fillet tool to create a rounded edge and trim at the same time Opening the tutorial file optional If you successfully completed Part 3 you can proceed directly to the next step Creating the handle surface below If you were not successful in part 3 open the file called vacuum_part4 wire located in the wire directory of the CourseWare project This file ...

Страница 330: ... curve 2 Choose Edit Copy followed by Edit Paste The screen appears the same but a second curve has been created and placed on top of the original and is selected ready to be moved 3 Choose Transform Move Since you are working in the perspective view the mouse buttons can be used to specify a move in the x y or z direction Click and hold the middle mouse button and move the second curve in the neg...

Страница 331: ...n body 5 Use the F8 hotkey to return to the perspective view Next you will create a skin surface between the two handle curves 6 Choose the Surfaces Skin tool 7 You are prompted to select the first curve Click the first handle curve to select it for the skin surface Part 4 Creating the Handle 325 ...

Страница 332: ... you are prompted to select the next curve Click the second handle curve to select it The skin surface is created and highlighted in white 8 Choose Pick Nothing to deselect the skin surface 326 Chapter 6 Modeling a Vacuum Cleaner ...

Страница 333: ...short of the body surfaces use Pick Object to select the second handle curve Then use Transform Move with the middle mouse button to adjust the position of the curve Because the skin surface has construction history it will be rebuilt to the new curve position when the mouse button is released Part 4 Creating the Handle 327 ...

Страница 334: ...ge 1 Choose Surfaces Surface Fillet The settings you used before will be used for this fillet surface so you don t need to open the option box NOTE If you have exited Alias since building the last fillet see Creating the nozzle fillet on page 316 for the correct Surface Fillet options to use You are prompted to select the first set of surfaces 2 Click the upper surface to select it 328 Chapter 6 M...

Страница 335: ... Accept button appears in the lower right corner of the view 3 Click the Accept box to select the first surface for filleting You are then prompted to select the second set of surfaces 4 Click the handle surface to select it Part 4 Creating the Handle 329 ...

Страница 336: ...ept to select the second surface for filleting Arrows appear on both surfaces indicating on which side of the surfaces the fillet will be built The pink arrow needs to point in towards the inside of the vacuum surfaces If it is pointing out from the surfaces click the arrow to reverse it 330 Chapter 6 Modeling a Vacuum Cleaner ...

Страница 337: ...e center of the handle click the arrow to reverse it 6 Click Build A small fillet surface is created and the upper and handle surfaces are trimmed To create a comfortable handle a larger fillet is required 7 Choose Surfaces Surface Fillet p to open the option window Part 4 Creating the Handle 331 ...

Страница 338: ...rdal Distance field and press Enter Windows or Return Mac to adjust the fillet size A Recalc button appears at the bottom right corner of the view 9 Click Recalc to rebuild the fillet 332 Chapter 6 Modeling a Vacuum Cleaner ...

Страница 339: ...t to the larger size providing a more comfortable handle design 10 Choose Pick Nothing to deselect all the surfaces 11 You have now completed the main body shape for the vacuum cleaner design Part 4 Creating the Handle 333 ...

Страница 340: ...present styled air intakes Opening the tutorial file optional If you successfully completed Part 4 you can proceed directly to the next step Creating the groove surfaces If you were not successful in part 4 open the file called vacuum_part5 wire located in the wire directory of the CourseWare project This file contains the completed model from Part 4 Watch Part 5 of the tutorial 334 Chapter 6 Mode...

Страница 341: ...s fade out at the outer edge To match the character of the main body shape you will use the original nozzle curve as a path to extrude the three groove surfaces 1 Choose Pick Object and select the front nozzle curve NOTE The surfaces are highlighted in pink This indicates the surfaces have construction history If the curve is modified the surfaces will update You will not be modifying the curve in...

Страница 342: ...a copy of the curve NOTE The surfaces are no longer highlighted in pink as the new curve is a new copy with no relationship to the surfaces 3 Choose Transform Scale and type in 1 5 to increase the size of the curve 336 Chapter 6 Modeling a Vacuum Cleaner ...

Страница 343: ...for the extruded surfaces The three gray circles at the front of the vacuum cleaner have been templated You will now untemplate these so you can use them as the generation curves for the extrude surfaces 5 Choose Pick Template and drag a pick box around the three circles Part 5 Air Vents 337 ...

Страница 344: ...rn the curves to pickable geometry You will now extrude the circles along the path curve 7 Choose Surfaces Swept Surfaces Extrude You are prompted to select curve s to extrude 8 Pick all three circles 338 Chapter 6 Modeling a Vacuum Cleaner ...

Страница 345: ...cles for extrusion 9 You are prompted to select the extrude path Click the larger curve you have just scaled to select it as the path curve Three surfaces are created following the shape of the upper surface Part 5 Air Vents 339 ...

Страница 346: ...ts You will now intersect and trim the three extruded surfaces with the upper surface of the vacuum body 1 With the three surfaces still selected choose Surface Edit Create CurvesOnSurface Intersect 340 Chapter 6 Modeling a Vacuum Cleaner ...

Страница 347: ...ce of the vacuum The surfaces are intersected and the curves on surface created Now you will trim the excess from the surfaces starting with the extruded surfaces In this trimming operation it is easier to select the part of the surfaces you want to discard so you will use the Discard option in the trim tool instead of the Keep option 3 Choose Pick Object and drag a pick box to select the three ex...

Страница 348: ... you can select them all using a pick box before choosing the trim tool 4 Choose Surface Edit Trim Trim Surface The surfaces are highlighted in pink and you are prompted to select the regions to trim 342 Chapter 6 Modeling a Vacuum Cleaner ...

Страница 349: ...truded surface in the region to discard 6 Pick the second extruded surface also in the regions that need to be discarded 7 Pick the third extruded surface also in the regions that need to be discarded Part 5 Air Vents 343 ...

Страница 350: ...he lower right corner of the view The excess surfaces are discarded Next you will trim the upper surface 9 Still in the Trim tool pick on the upper surface to select it for trimming 344 Chapter 6 Modeling a Vacuum Cleaner ...

Страница 351: ...f the upper surface to select it as the part of the surface to keep An indicator is placed where you clicked and three buttons appear in the bottom right corner of the view 11 Click Keep to trim the surface Part 5 Air Vents 345 ...

Страница 352: ... be viewed more clearly 13 On the Layer Bar click and hold on the curves layer to view the pull down menu Select Visible to turn off the visibility of the layer In the Layer Bar the curves layer is displayed with a dotted outline to indicate it is turned off The curves are no longer displayed on the screen 14 Use diagnostic shading to evaluate the results 346 Chapter 6 Modeling a Vacuum Cleaner ...

Страница 353: ...create the button detail in two stages First you will create a recess in the body surface where the button will sit Then you will create the button so it sits flush with the body surface Because one set of surfaces will fit into another you will use layers to organize the geometry Opening the tutorial file optional If you successfully completed Part 5 you can proceed directly to the next step Crea...

Страница 354: ...ompleted model from Part 5 Watch Part 6 of the tutorial Creating a cylinder for the power button First you will create a cylinder surface for the outline of the power button 1 Return to the wireframe view using the diagnostic Shading in the Control Panel 2 Choose Layouts Top or the F5 hotkey to switch to the Top view 348 Chapter 6 Modeling a Vacuum Cleaner ...

Страница 355: ...der Double click the icon to open the cylinder options 4 Set the Sweep to 180 and the Sections to 4 to create a half cylinder Set the Caps to 0 from the pull down menu to only create the side wall of the cylinder Part 6 Power Button 349 ...

Страница 356: ... grid snapping and click near the origin Snapping the cylinder on the origin ensures that it is centered 6 With the cylinder still selected choose Transform Non p Scale Type in 4 3 2 to scale the half cylinder to an oval shape and to invert it so it is on the right side of the grid 350 Chapter 6 Modeling a Vacuum Cleaner ...

Страница 357: ...ows or Control and Command Mac keys to turn on curve snapping Point the cursor at the top edge of the upper surface and click and hold down the left mouse button With the mouse button still pressed move the cylinder until it is roughly half way between the handle and the air vents Part 6 Power Button 351 ...

Страница 358: ...nd the y axis Check that the cylinder is entering the upper surface at a good angle If you need to adjust the angle further click and drag the middle mouse button to adjust the y rotation 10 Choose Layouts Perspective or the F8 hotkey to return to the perspective view 352 Chapter 6 Modeling a Vacuum Cleaner ...

Страница 359: ...ou will use it as the sidewall of the power button then a second copy will be used to create the sidewall of the recess in the main body The upper surface will also be used twice A copy will be used to create the top of the power button Most of the surface will be trimmed away but the part that is left will be flush with the vacuum body Part 6 Power Button 353 ...

Страница 360: ... button surfaces 1 Choose Layers New to create a layer 2 Rename the layer body 3 Choose Pick Object Click drag a pick box over all the geometry to select all the surfaces 4 On the Layer Bar click and hold on the body layer to see the pull down menu Choose Assign to assign all the surfaces onto the layer 5 Choose Pick Nothing to deselect all the surfaces 354 Chapter 6 Modeling a Vacuum Cleaner ...

Страница 361: ...oose Layers New to create a layer 7 Rename the layer power_button 8 Choose Pick Object Pick the half cylinder and the upper surface of the vacuum body 9 Choose Edit Copy followed by Edit Paste The two surfaces are copied and left selected Part 6 Power Button 355 ...

Страница 362: ...er and one on the power_button layer 11 Choose Pick Nothing to deselect the surfaces Creating the power button Next you will use the copied surfaces to create the power button You will use the Surface fillet tool to trim and round the edge of the power button 1 On the Layer Bar click and hold on the body layer to see the pull down menu Choose Visible to make the body surfaces invisible 356 Chapter...

Страница 363: ... Fillet Double click the icon to open the option box Change the settings to Construction Type RADIUS and Radius 0 25 Close the Surface Fillet option window You are prompted to select the first set of surfaces 3 Click the upper surface to select it Part 6 Power Button 357 ...

Страница 364: ...ept button appears in the bottom right corner of the view 4 Click Accept to select the first surface for filleting You are then prompted to select the second set of surfaces 5 Click the half cylinder surface to select it 358 Chapter 6 Modeling a Vacuum Cleaner ...

Страница 365: ...Click Accept to select the second surface for filleting Arrows appear on both surfaces indicating on which side of the surfaces the fillet will be built The pink arrow needs to point in towards the inside of the vacuum surfaces If it is pointing out from the surfaces click the arrow to reverse it Part 6 Power Button 359 ...

Страница 366: ...If it is pointing outwards click the arrow to reverse it 7 Click Build The fillet surface is created and the upper and cylinder surfaces are trimmed to create the power button 8 Choose Pick Nothing to deselect all the surfaces 360 Chapter 6 Modeling a Vacuum Cleaner ...

Страница 367: ... round the edge of the power button recess 1 On the Layer Bar click and hold on the power_button layer to see the pull down menu Choose Visible to make the power_button surfaces invisible 2 Make the body layer visible by choosing Visible from the pull down menu Part 6 Power Button 361 ...

Страница 368: ...et The settings you used before are used for this fillet surface and so you don t need to open the option box You are prompted to select the first set of surfaces 5 Click the upper surface to select it The surface is selected and highlighted in pink and an Accept button appears in the bottom right corner of the view 362 Chapter 6 Modeling a Vacuum Cleaner ...

Страница 369: ...yellow and an Accept button appears in the bottom right corner of the view 8 Click Accept to select the second surface for filleting Arrows appear on both surfaces indicating on which side of the surfaces the fillet will be built The pink arrow needs to point in towards the inside of the vacuum surfaces If it is pointing out from the surfaces click the arrow to reverse it Part 6 Power Button 363 ...

Страница 370: ...row to reverse it 9 Click Build The fillet surface is created and the upper and cylinder surfaces are trimmed to create a recess for the power button NOTE Because you changed the direction of the yellow arrow for this second fillet the result is different from the filleting of the power button 10 Choose Pick Nothing to deselect the fillet surface 364 Chapter 6 Modeling a Vacuum Cleaner ...

Страница 371: ...ve your work in the wire directory of the Lessons project 3 Name your file myvacuum6 wire Part 7 Dust Bag and Cable Connector In this section you will create the dust bag and cable connector surfaces at the rear of the vacuum cleaner Opening the tutorial file optional If you successfully completed Part 6 you can proceed directly to the next step Extracting the body shape Part 7 Dust Bag and Cable ...

Страница 372: ...y of the CourseWare project This file contains the completed model from Part 6 Watch Part 7 of the tutorial Extracting the body shape At the back end of the vacuum cleaner there are two additional components a dust bag and a cable connector shown on the sketch below 366 Chapter 6 Modeling a Vacuum Cleaner ...

Страница 373: ...body surfaces and placing them onto a new layer 1 Choose Layouts Left to maximize the Left window 2 Choose Layers New to create a layer 3 In the Layer Bar rename the new layer dustbag Now you will make a copy of the surfaces and assign them to the dustbag layer 4 Choose Pick Object and drag a pick box around the end surfaces of the vacuum body Make sure you don t select the handle or handle fillet...

Страница 374: ...the surfaces is made placed on top of the originals and highlighted 6 In the Layer Bar click and hold on the dustbag layer to see the pull down menu Choose Assign to assign the copied surfaces to the dustbag layer 368 Chapter 6 Modeling a Vacuum Cleaner ...

Страница 375: ...te Inactive to make the body surfaces inactive The layer tab is displayed in pale blue to indicate that it is inactive 9 Do the same for the power_button layer to make the power button surfaces inactive Now only the copied surfaces on the dustbag layer are displayed and pickable Part 7 Dust Bag and Cable Connector 369 ...

Страница 376: ...he surfaces easier to work with and easier to visualize You will trim the surfaces by using a curve to define the cutting line 1 Choose Curves New Curves New Edit Point Curve You are prompted to enter the new edit point position Hold down the Alt Windows or Command Mac key and click near the grid intersection shown below to position the first edit point of the curve 370 Chapter 6 Modeling a Vacuum...

Страница 377: ...p the mouse button held down and move the edit point until the curve is roughly at the same angle as the back of the vacuum Make sure your curve is long enough to extend beyond the body surfaces 2 Choose Pick Nothing to deselect the curve Part 7 Dust Bag and Cable Connector 371 ...

Страница 378: ...drawn to cut away the front end of the surfaces 3 Choose Surface Edit Trim Trim Surface and double click the icon to open the option box Click the 3D Trimming check box to turn on the projection option in the trim tool 4 You are prompted to select the surfaces to trim Click and drag a pick box around all the surfaces 372 Chapter 6 Modeling a Vacuum Cleaner ...

Страница 379: ... to select additional surfaces or Select curves to PROJECT or click to select REGIONS This time you will use the Trim tool to project the curve onto the surfaces and so you will respond to the second prompt 5 Click the curve you just created to select it as a curve to project Part 7 Dust Bag and Cable Connector 373 ...

Страница 380: ...n surface has been created across the surfaces and is shown in bright blue Still in the trim tool you are now prompted with the three options This time you want to select a REGION of each surface to keep 7 Zoom and tumble the view to get a close up view of the rear of the vacuum 374 Chapter 6 Modeling a Vacuum Cleaner ...

Страница 381: ...he surface to show it is selected for trimming 9 Click the rear part of the fillet Avoid clicking any of the lines on the fillet surface as these will be mistaken for projection lines TIP Zoom in to make it easier to select a part of the fillet surface with no lines Part 7 Dust Bag and Cable Connector 375 ...

Страница 382: ...ed for trimming 10 Click the rear part of the lower surface An indicator appears on the surface to show that it is selected for trimming 11 Click Keep in the bottom right corner of the view to keep the ends of the surfaces 376 Chapter 6 Modeling a Vacuum Cleaner ...

Страница 383: ...ct the curve 13 Choose Delete Delete Active or press the Delete key on the keyboard to delete the curve You have trimmed out a part of the vacuum design that can now be used to create the dust bag and cable connector Part 7 Dust Bag and Cable Connector 377 ...

Страница 384: ...the dust bag and connector Next you will group the surfaces together so that they can be scaled and positioned to complete the design of the dustbag 1 Choose Layouts Left to switch to the Left view 2 Choose Pick Object and drag a pick box around all the surfaces 378 Chapter 6 Modeling a Vacuum Cleaner ...

Страница 385: ... 4 With the group still selected choose Transform Local Set Pivot Hold down the Ctrl and Alt Windows or Control and Command Mac keys to turn on curve snapping Point the cursor exactly on the top edge of the upper surface You may need to zoom in to view the area in more detail Click and hold the left mouse button and drag it to the pale blue cross at the right end of the surface to position the piv...

Страница 386: ... you want to delete the construction history for the surfaces Click Yes The surfaces are scaled smaller to form the dustbag 6 Choose Transform Move You are prompted to enter the move amounts The prompt line displays ABS to indicate absolute mode In absolute mode coordinates that are typed in will be measured from the origin 380 Chapter 6 Modeling a Vacuum Cleaner ...

Страница 387: ...turn Mac 8 Type 1 25 0 0 5 and press Enter Windows or Return Mac to move the dust bag 1 25 cm in x and 0 5 cm in z NOTE The x y z values can be typed in with either a space or a comma separating the numbers The dustbag is now in position Creating the cable connector The cable connector component is created in the same way 1 With the dustbag still selected choose Edit Copy followed by Edit Paste Pa...

Страница 388: ... transform 2 Choose Transform Scale Type in 0 6 to reduce the size of the group of surfaces 3 Choose Transform Move Type in and press Enter Windows or Return Mac to move the cable connector 1 25 cm in x and 0 5 cm in z 382 Chapter 6 Modeling a Vacuum Cleaner ...

Страница 389: ...t to adjust the design 4 Choose Pick Nothing to deselect the surfaces 5 On the Layer Bar click and hold on the body layer to see the pull down menu Choose Set state Pickable to view the main body Do the same for the power_button layer Part 7 Dust Bag and Cable Connector 383 ...

Страница 390: ... connector surfaces overlapping with the main body shape This allows you to quickly experiment with scaling and moving the components to explore the design When the design is resolved you would trim away the parts of the surfaces that are intersecting the body to create a continuous outer surface This is covered in Part 8 an optional extra stage in this tutorial 384 Chapter 6 Modeling a Vacuum Cle...

Страница 391: ...ces You also have the option of creating the power cable to finish off the presentation of the design Opening the tutorial file optional If you successfully completed Part 7 you can proceed directly to the next step Mirroring the surfaces If you were not successful in part 7 open the file called vacuum_part8 wire located in the wire directory of the CourseWare project This file contains the comple...

Страница 392: ...ly you will mirror all the surfaces to create the final design 1 Choose Layouts Left or the F8 hotkey to switch to the perspective view 2 Choose Pick Object and drag a pick box around all of the surfaces to select them 386 Chapter 6 Modeling a Vacuum Cleaner ...

Страница 393: ... mirror tool option box 4 Choose XZ as the Mirror Across plane and click Go The vacuum cleaner surfaces are mirrored and the whole design can now be viewed 5 Choose Pick Nothing to deselect the mirrored surfaces Part 8 Completing the Model 387 ...

Страница 394: ...tional Create the power cable If you have time you can create the power cable using an extruded surface as you did in the joystick tutorial The curves are supplied as templates on the curves layer of the tutorial file 388 Chapter 6 Modeling a Vacuum Cleaner ...

Страница 395: ... the dust bag and cable connector Remember to intersect all dust bag surfaces with the body surfaces and the connector surfaces with the dust bag surfaces TIP Delete the mirrored surfaces then do the intersecting and trimming When the trimming is complete mirror the surfaces to create the completed model Save your work 1 Choose File Save As to save the current scene Part 8 Completing the Model 389...

Страница 396: ... organize the geometry and control how the objects display on the screen For a concept model it is common to leave the surfaces overlapping as the design goes through revisions and changes The overlapping surfaces will not be seen when the model is shaded and viewed For a detailed finished model all the surfaces should be intersected and trimmed to create a single enclosed outline This can be used...

Страница 397: ...yer displayed a The layer tab blinks b All the geometry on the layer is shown in pale blue c All the other layer tabs are hidden d The layer tab is shown in yellow e The layer tab is shown in red 3 When typing in x y z dimensions how do you switch from absolute to relative mode a Choose Relative from the Control Panel b Choose Relative from the Transform palette c Type r after you have typed the d...

Страница 398: ...te a curve on surface e All of the above On Your Own The modeling technique of overbuilding and trimming can be used to create more detailed and intricate models Use the following examples as inspiration for practicing the skills you have just learned The 1970 s style TV shown below is based on a simple sphere The screen and the controls are cut into the sphere using intersecting and trimming The ...

Страница 399: ...On Your Own 393 ...

Страница 400: ...l is typical of many electronic devices with function buttons You can use the same technique that you used with the vacuum cleaner power button to create the key fob function key 394 Chapter 6 Modeling a Vacuum Cleaner ...

Страница 401: ...The wheel shown below is created from one revolved surface and six skin surfaces Intersecting and trimming is used to cut the holes out of the revolved surface On Your Own 395 ...

Страница 402: ...made in a workshop Imagine the fork prongs as a sheet of steel bent to give the gentle curve along their length The prong shape is then cut out The handle is made from two large mono rail surfaces intersected trimmed and then filleted 396 Chapter 6 Modeling a Vacuum Cleaner ...

Страница 403: ...the Ctrl and Alt Windows or Control and Command Mac keys 2 d The layer tab is shown in yellow 3 d type r before you enter the values either on the same line or press Enter Windows or Return Mac between the r and the values 4 b Two 5 e All of the functions Quiz Answers 397 ...

Страница 404: ...398 ...

Страница 405: ...l of an MP3 player You will learn how to Use Keypoint curves to create accurate geometric shapes Create surfaces with a draft angle Set up Construction Options for accurate modeling Create edges with a radius using the Fillet and Round tools Create symmetrical and duplicated geometry 7 399 ...

Страница 406: ...this tutorial Object Edit Offset Edit Duplicate Object Curves Arcs Curve Edit Create Fillet Curve Surfaces Draft Flange Surfaces Round Object Display Template Object Display Invisible 400 Chapter 7 Modeling an MP3 Player ...

Страница 407: ...rdinate type the X Y and Z values into the prompt line They must always be in the X Y Z order and the three numbers can be separated by either a space or a comma for example Absolute and Relative Coordinates Coordinates can be specified in two ways absolute or relative Absolute coordinates are always measured from the origin Relative coordinates are measured from the last coordinate used In the pr...

Страница 408: ... dimensions of lines curves and objects You will use the Information Window to specify the radius of arcs Keypoint Curves In the previous tutorials you created freeform curves using CVs and Edit Points In this tutorial you will use keypoint curves to create geometrically accurate lines and arcs 402 Chapter 7 Modeling an MP3 Player ...

Страница 409: ...asing You will choose millimeters as the units for measurement and building and use X Y Z coordinates to accurately position the curves To save time you will build only one quarter of the geometry and use symmetry to create the full model The dimensions of the casing are shown below Part 1 Creating the Casing Curves 403 ...

Страница 410: ...the dimensioned drawing to create your model Watch Part 1 of the tutorial Choose File New to open the File Browser If you already have a file open you will be asked if it is OK to delete the current file Answer Yes An empty file is created 404 Chapter 7 Modeling an MP3 Player ...

Страница 411: ...ll the commonly used units are available For this tutorial you will be working in millimeters so first you will ensure that the modelling units are set to mm 1 Choose Preferences Construction Options In the Units section open Linear and check that the Main Units are set to mm Close the window Part 1 Creating the Casing Curves 405 ...

Страница 412: ...e the grid spacing 2 Choose Construction Grid Preset and double click the icon to open the option window 3 Set the Grid Spacing to 10 0 mm in the Preset Grid Options window 4 Click Go to change the grid 5 Maximize the Top window 406 Chapter 7 Modeling an MP3 Player ...

Страница 413: ...te the side and top curves of the MP3 player casing 1 Choose Curves Keypoint Curve Toolbox then Keypoint Curve Tools Lines Line and use the Alt Windows or Command Mac key to Grid Snap the start of the line to the origin 2 Grid Snap the end of the line to the grid point 4 grid squares up to create a vertical line 40 mm long Part 1 Creating the Casing Curves 407 ...

Страница 414: ...urve 25 mm to the left in the x direction TIP If the last coordinate numbers are zero then you can omit them For example 25 0 0 can be entered as 25 only However a coordinate of 0 0 25 needs to be entered in full Next you will create the arc for the top of the MP3 player 408 Chapter 7 Modeling an MP3 Player ...

Страница 415: ...t is mirrored So first you will create a horizontal construction line to help create a tangent arc 4 Choose Curves Keypoint Curve Toolbox then Keypoint Curve Tools Lines Line and use the Alt Windows or Command Mac key to Grid Snap to the grid point at 0 40 0 5 Using the middle mouse button click to the right of the grid to create a horizontal line Part 1 Creating the Casing Curves 409 ...

Страница 416: ...rompted to Select the curve at location to make arc tangent to Click the horizontal line and without releasing the mouse button drag the start point to the left end of the line where it meets the grid NOTE The arc start point automatically snaps to the line so you don t need to use the curve snap Ctrl and Alt Windows or Control and Command Mac 8 You are prompted to Enter end point of tangent arc T...

Страница 417: ... your own shape choose Curves Keypoint Curve Toolbox then Keypoint Curve Tools Drag Keypoints and click and drag the end of the arc until you achieve the desired curve The curve remains tangent to the center line 9 You no longer need the horizontal line so choose Pick Object to select it and press the Delete key to delete it Part 1 Creating the Casing Curves 411 ...

Страница 418: ... Fillet tool to create a smooth corner 10 Choose Curve Edit Create Fillet Curves 11 You are prompted to choose a curve 12 Pick the vertical line Then you are prompted to choose a second curve 412 Chapter 7 Modeling an MP3 Player ...

Страница 419: ...lick Accept to create the fillet curve TIP Guidelines may be created when you use keypoint curves They appear as dotted lines which highlight when the cursor is near They can be useful when laying out a design but you don t need them for this tutorial Part 1 Creating the Casing Curves 413 ...

Страница 420: ...mation on creating the Lessons project or saving your work see Saving your work in a Windows environment on page 96or Saving your work in a Mac OS X environment on page 100 Part 2 Creating the Side Surfaces The design of the MP3 player features chamfered sides You will now use the Draft and Flange tools to create the side surfaces and a split line feature The dimensions for the casing are shown be...

Страница 421: ...eed to the next step Creating the Side Surfaces below If you were not successful in part 1 open the file called MP3Player_part2 wire located in the wire directory of the CourseWare project This file contains the completed model from Part 1 Part 2 Creating the Side Surfaces 415 ...

Страница 422: ...ll create later in the tutorial 1 Maximize the Perspective Window 2 Choose Pick Object and drag a pick box over all the curves to select them 3 Choose Transform Move and type r0 0 0 25 in the prompt window to move the curves up by 0 25 mm in the z direction 4 You will be asked about losing construction history which relates to the fillet curve Answer Yes 416 Chapter 7 Modeling an MP3 Player ...

Страница 423: ... option window You will start with the default Draft settings and then modify them after the surface is created 6 As the curves are already selected click Go to create the surface The default Draft surface is built The default draft direction is in the positive z axis which is correct for your design Part 2 Creating the Side Surfaces 417 ...

Страница 424: ...resenting the axes Now you will modify the Draft Angle and the Surface Depth to match the required dimensions 7 In the Draft option window change the settings to an Angle of 3 degrees and a Surface Depth of 2 The Draft surface is rebuilt to the new settings 418 Chapter 7 Modeling an MP3 Player ...

Страница 425: ...nge the settings to an Angle of 45 degrees and a Surface Depth of 5 NOTE You will build the chamfered surface to an approximate length The front face of the MP3 player will later be used to trim the side walls to the correct height 11 Pick the three top edges of the draft surfaces as the input curves for the new draft surfaces Part 2 Creating the Side Surfaces 419 ...

Страница 426: ...Click Go to create the chamfered surfaces 12 Choose Pick Nothing to complete the Draft surfaces 420 Chapter 7 Modeling an MP3 Player ...

Страница 427: ... edges 1 Choose Pick Component and modify the options so that only curves will be selected 2 TIP You can either double click the Pick Component icon to set up the options in the option window or you can use the small icons in the menu bar as shown below 3 Drag a pick box across the model Only the curves are selected 4 Choose ObjectDisplay Template to turn the curves into a template that will not b...

Страница 428: ...6 Change the Surface Depth to 0 5 and change the Angle to 3 NOTE The angle of 3 degrees compensates for the draft angle of 3 degrees on the sidewalls So the flange surfaces will be built parallel to the ground plane 7 Click the lower edges of the side walls and click Go The small flange surfaces are created 422 Chapter 7 Modeling an MP3 Player ...

Страница 429: ... of flange surfaces to meet the center line 9 Choose Surfaces Draft Surfaces Draft Flange again double click the icon to open the option window 10 Change the Angle to 0 and the Surface Depth to 0 25 11 Choose the three edges of the flange surface you just created and click Go Part 2 Creating the Side Surfaces 423 ...

Страница 430: ...2 Choose Pick Nothing to complete the Flange surface 13 The side profile of the surfaces shows how the draft angles and split line detail have been accurately created 424 Chapter 7 Modeling an MP3 Player ...

Страница 431: ...oject 3 Name your file myMP3Player2 wire For information on creating the Lessons project or saving your work see Saving your work in a Windows environment on page 96 or Saving your work in a Mac OS X environment on page 100 Part 3 Completing the Casing To complete the design you will use a Plane surface to create the front of the casing and a Surface Fillet to trim and fillet it to the chamfered s...

Страница 432: ...ace below If you were not successful in part 2 open the file called MP3Player_Part3 wire located in the wire directory of the CourseWare project This file contains the completed model from Part 2 Watch Part 3 of the tutorial Creating the Front Surface First you will create the front face of the casing and position it at the correct height for the MP3 Player dimensions 1 Maximize the Top window 426...

Страница 433: ...lane position Use the Alt Windows or Command Mac key and grid snap the plane to the origin The Plane surface is created 1mm square in size It is already selected so you will now scale and move the plane to form the front face of the casing Part 3 Completing the Casing 427 ...

Страница 434: ...gh to see clearly Now you will set the pivot point for the Plane to the lower right hand corner 4 Choose Transform Local Set Pivot Use the curve snap Ctrl Alt Windows or Control Command Mac to snap the pivot accurately to the bottom right corner of the plane 428 Chapter 7 Modeling an MP3 Player ...

Страница 435: ...p Alt Windows or Command Mac key to position the plane exactly at the origin 6 Use Transform Non p Scale to size the plane to approximately fit the design Make sure that the plane overlaps the chamfered edges Part 3 Completing the Casing 429 ...

Страница 436: ...ou will move the plane up in the z axis 7 Maximize the Left window 8 Choose Transform Move and type 0 0 5 5 in the prompt window to move the plane up 5 5 mm in the z axis 430 Chapter 7 Modeling an MP3 Player ...

Страница 437: ...d create an edge with a radius in one operation 1 Maximize the Perspective window 2 Choose Surfaces Surface Fillet and double click the icon to open the option window 3 Change the Radius to 2 4 You are prompted to select the first set of surfaces Select the plane Part 3 Completing the Casing 431 ...

Страница 438: ...f surfaces Click the three chamfered surfaces 7 Click Accept Arrows appear on both surfaces indicating on which side the fillet will be built In this case we want the pink arrow to point down and the yellow arrow to point inwards 432 Chapter 7 Modeling an MP3 Player ...

Страница 439: ...ry click an arrow to reverse its direction 9 Click Build The edge with the specified radius is created and all the surfaces are trimmed 10 Choose Pick Nothing to complete the fillet Part 3 Completing the Casing 433 ...

Страница 440: ...es already meet at a sharp edge the Round tool will be quicker to use 1 Choose Surfaces Round You are prompted to select a pair of edges Click one of the edges between the chamfer and the side surfaces A radius indicator appears and is highlighted in white 2 Type in 2 at the prompt line to adjust the radius value to 2 mm 3 Click the other edges to complete the round 434 Chapter 7 Modeling an MP3 P...

Страница 441: ...4 Click Build to create the round surfaces and trim back the draft surfaces 5 Choose Pick Nothing to complete the round Part 3 Completing the Casing 435 ...

Страница 442: ...ront and rear casings using the mirror tool and Layer symmetry First you will create the lower quarter of the front casing 1 Choose Pick Object and drag a selection box over all the surfaces to select them 2 Choose Edit Duplicate Mirror to open the mirror option window 3 Choose the XZ plane and click Go 436 Chapter 7 Modeling an MP3 Player ...

Страница 443: ...the geometry to be the same on both sides So for the left and right sides you will use Layer Symmetry to view a mirror image of the geometry which will update as you continue to build surfaces 1 Choose Layers New to create a layer for the front casing 2 Double click in the layer tab and rename the layer Front Casing 3 Choose Pick Object and drag a pick box over all the surfaces to select them 4 Ch...

Страница 444: ...layer is selected and shown in yellow If the layer isn t selected you need to click the layer tab to select it 5 Choose Layers Symmetry Set Plane The current symmetry plane is highlighted in yellow You need to change this so that the geometry will be mirrored left and right 6 Click the small brown square that represents the YZ plane 438 Chapter 7 Modeling an MP3 Player ...

Страница 445: ...t axis for your model 7 Click Set as Default to set this axis for all future layers 8 Click Set Plane to set the plane for this layer On the Front Casing layer choose the symmetry option from the layer sub menu Part 3 Completing the Casing 439 ...

Страница 446: ...l geometry Creating the Rear Casing Now is a good time to copy the surfaces for the rear casing before you start to detail the front First you will create a layer for the rear 1 Choose Layers New and rename the layer Rear Casing 2 Choose Pick Object and drag a pick box over all the geometry to select it 440 Chapter 7 Modeling an MP3 Player ...

Страница 447: ...3 Choose Edit Duplicate Mirror to open the option window Choose the XY plane and click Go The surfaces are mirrored Part 3 Completing the Casing 441 ...

Страница 448: ...he wire directory of the Lessons project Name your file myMP3Player3 wire Part 4 Creating the Screen Recess The screen is cut out of the front face of the MP3 player You will Offset the outline of the casing to create the screen curves You will then Project them onto the front face to create Curves on Surface These can then be used to Trim out the aperture for the display screen 442 Chapter 7 Mode...

Страница 449: ...Opening the tutorial file optional If you successfully completed Part 3 proceed to the next step Creating Offset Curves below Part 4 Creating the Screen Recess 443 ...

Страница 450: ...e top of the MP3 player Start by duplicating the edge of the top surface to create a reference curve 1 Maximize the Top window 2 Turn off the Symmetry on the Front Casing layer and zoom into the top half of the casing 3 Choose Curve Edit Create Duplicate Curve and select the lower edge of the fillet surface at the top of the casing 4 You will get a choice of picking the edge of the fillet surface ...

Страница 451: ...uplicate of the surface edge 5 With the Curve Edit Create Duplicate Curve tool already active select the fillet surface at the left side 6 Again choose the fillet edge not the edge of the plane Part 4 Creating the Screen Recess 445 ...

Страница 452: ...7 With the curves still highlighted choose Object Edit Offset and type in 3 to create the top and side curves for the screen 446 Chapter 7 Modeling an MP3 Player ...

Страница 453: ...me you will use a different technique for mirroring The Edit Duplicate Mirror tool always mirrors across a grid axis You will use the Edit Duplicate Object tool to mirror across an object s pivot point So first set the pivot for the curve 9 Choose Pick Object and select the upper curve Part 4 Creating the Screen Recess 447 ...

Страница 454: ...vot and use the Ctrl Windows or Control Mac key to snap the pivot point to the end of the curve 11 Choose Edit Duplicate Object to open the option window Change the Scaling in the y direction to 1 448 Chapter 7 Modeling an MP3 Player ...

Страница 455: ...ting patterns of many duplicates and you will use it later in the tutorial to create the pattern of control buttons Click Go to create a duplicated curve scaled in the Y direction to create a mirrored copy 12 Choose Transform Move and type in 0 28 to move the curve downward Part 4 Creating the Screen Recess 449 ...

Страница 456: ... Choose Curve Edit Create Fillet Curves and follow the prompts to create fillets between the curves Set the fillets radii to 2 0 by typing the value on the prompt line 450 Chapter 7 Modeling an MP3 Player ...

Страница 457: ...ned by the active window the curves will be projected perpendicular to the active window By continuing to work in the Top window you will be setting the direction of projection correctly 1 Choose Surface Edit Create CurvesOnSurface Project 2 You are prompted to select a surface Pick the plane surface and click Go Part 4 Creating the Screen Recess 451 ...

Страница 458: ...3 You are then prompted to select the curves to project Drag a pick box over the screen outline curves you created 4 Click Go to project the curves 452 Chapter 7 Modeling an MP3 Player ...

Страница 459: ...You will now template the curves so that you can see the curves on surface more easily 6 Choose Pick Component and choose the curves only option 7 Drag a pick box over all the curves to select them Part 4 Creating the Screen Recess 453 ...

Страница 460: ...8 Choose ObjectDisplay Template to template the curves Now you can see the curves on surface created by projecting 454 Chapter 7 Modeling an MP3 Player ...

Страница 461: ...e opening for the screen 9 Choose Surface Edit Trim Trim Surface You are prompted to select a surface to trim Pick the plane surface 10 You are then prompted to select a region Click the plane surface outside the screen area Part 4 Creating the Screen Recess 455 ...

Страница 462: ...ate a chamfered edge for the screen and a screen surface 1 Choose Surfaces Draft Surfaces Draft Flange Double click the icon to open the option window Reset the Construction Type to Draft Set the Angle to 45 degrees and the Surface Depth to 1 5 456 Chapter 7 Modeling an MP3 Player ...

Страница 463: ...2 Select the edges of the screen to create the draft surface from 3 Click Go to create the draft surface Part 4 Creating the Screen Recess 457 ...

Страница 464: ...rface To finish off the screen create a planar surface for the face of the screen 4 Choose Curves Keypoint Curve Toolbox then Keypoint Curve Tools Lines Line and use the curve snap Ctrl and Alt Windows or Control and Command Mac to create a curve for the center line of the screen face 458 Chapter 7 Modeling an MP3 Player ...

Страница 465: ...Part 4 Creating the Screen Recess 459 ...

Страница 466: ...5 Choose Surfaces Planar Surfaces Set Planar and select all the lower edges of the screen chamfer 460 Chapter 7 Modeling an MP3 Player ...

Страница 467: ...ssign all the surfaces to the Front Casing layer You now have lots of curves so it s a good idea to organize them onto a separate layer 8 Choose Layers New to create a layer 9 Change the layer name to Curves Part 4 Creating the Screen Recess 461 ...

Страница 468: ...title bar to turn off the Model and Grid for a better view Saving your work Save your work in the wire directory of the Lessons project Name your file myMP3Player4 wire Part 5 Center Navigation Key For most symmetrical designs it is helpful to build the geometry centrally around the origin This will let you use the mirroring tools to duplicate geometry So you will build the Navigation Key and the ...

Страница 469: ...ove the casing will be built The dimensions for the Navigation Key profile are shown below This will be revolved to create the button surfaces Opening the tutorial file optional If you successfully completed Part 4 proceed to the next step Navigation Key Curves below Part 5 Center Navigation Key 463 ...

Страница 470: ...the central navigation key Change the layer name to NaviKey Maximize the Left window First you will create a construction line to specify the tangency for the center of the button TIP It can be useful to turn off the guidelines when you are using Keypoint curves To do this choose Preferences General Preferences to open the option window In the Modeling section choose zero for the Maximum Number of...

Страница 471: ...hamfered edge 4 Choose Curves Keypoint Curve Toolbox then Keypoint Curve Tools Lines Line again When prompted to enter the start point of the line use Grid Snap Alt Windows or Command Mac key to place the start of the line at the grid point at 10 mm in the X direction When prompted to place the end point of the line type in R 2 0 1 TIP The letter R is used to switch from ABSolute to RELative dimen...

Страница 472: ...curve at location to make arc tangent to Click the first line and without releasing the mouse button drag the start of the arc to the end of the line at the origin You are prompted to enter the end point of the arc Use the Point Snap Ctrl Windows or Control Mac key to place the end point of the arc on the top keypoint of the angled line 466 Chapter 7 Modeling an MP3 Player ...

Страница 473: ...remove it 7 Choose Curve Edit Create Fillet Curves and double click to open the option window Change the Radius to 1 87 Follow the prompts to create a 1 87 mm radius fillet between the curves Revolving the Surfaces Now you will revolve the profile curves to create the button surfaces Part 5 Center Navigation Key 467 ...

Страница 474: ...he profile curves 3 4 Choose Surfaces Revolve and double click to open the option window Choose the Global option for the Axes This will allow you to revolve many curves at once around the origin not around each curve s pivot point 468 Chapter 7 Modeling an MP3 Player ...

Страница 475: ...Click the Go button and the surfaces will be revolved 5 Choose Pick Object and the surfaces will automatically be selected Part 5 Center Navigation Key 469 ...

Страница 476: ... wire directory of the Lessons project Name your file myMP3Player5 wire Part 6 Control Button There are four Control Buttons so you will start by creating only one and then later duplicate it to create the other three Each button is symmetrical so to save time you will only build one half of one button and use mirroring to create the other half The dimensions for the buttons are shown below 470 Ch...

Страница 477: ...faces will be created using the Revolve and Round tools Opening the tutorial file optional If you successfully completed Part 5 proceed to the next step Control Button Revolved Surface below Part 6 Control Button 471 ...

Страница 478: ... Button Revolved Surface First you will create the outline circles for the button design 1 Maximize the Top window 2 Choose Layers New to create a layer Change the name of the layer to Control Buttons 3 Choose Curves Keypoint Curve Toolbox then Keypoint Curve Tools Circular Arc You are prompted to enter the center of the circle Type in 0 to place the center of the circle at the origin 472 Chapter ...

Страница 479: ...f the circle Type in 17 5 to create a circle with a radius of 17 5 mm 4 Choose Curves Keypoint Curve Toolbox then Keypoint Curve Tools Circular Arc again and create a circle with the center at the origin and a radius of 11 mm Part 6 Control Button 473 ...

Страница 480: ...the circles You will use the Keypoints on the two circles to locate the arc 5 Choose Curves Keypoint Curve Toolbox then Keypoint Curve Tools Arcs Arc Three Point You will be prompted to place the start point of the arc Use point snap Ctrl Windows or Control Mac key and select the keypoint on the inner circle 474 Chapter 7 Modeling an MP3 Player ...

Страница 481: ...n window When prompted to place the end point of the arc use the point snap Ctrl Windows or Control Mac key again and choose the keypoint on the large circle The arc is created at an approximate radius but with an accurate start and end point 6 With the arc still selected choose Windows Information Information Window Open the Attributes section and change the Arc Length Radius to 10 Part 6 Control...

Страница 482: ...o raise the button surface above the casing 7 With the arc still selected choose Transform Move and type in 0 0 0 75 to move the arc up 0 75mm in the z direction 8 Maximize the Top window Leave the curve selected as it will now be used to create a revolved surface 476 Chapter 7 Modeling an MP3 Player ...

Страница 483: ...to open the option window Change the Sweep Angle to 45 and ensure that Axes is set to Global then click Go TIP When revolving a smaller amount you can reduce the number of sections to reduce the isoparms in the revolved surface Part 6 Control Button 477 ...

Страница 484: ...ide the revolved surface and the arc to make it easier to work on the outline curves 10 Choose Pick Object and select the surface and the arc 11 Choose ObjectDisplay Invisible to temporarily hide the surface and the curves 478 Chapter 7 Modeling an MP3 Player ...

Страница 485: ...s to create the button outline 1 Choose Curves Keypoint Curve Toolbox then Keypoint Curve Tools Break Join Break Curve at Keypoint Click the top keypoint of the outer curve Still in the Break at Keypoint tool click the top keypoint of the inner curve Part 6 Control Button 479 ...

Страница 486: ...and segments now have keypoints at their centers You will now break the curves at these keypoints to create a 45 degree segment Click the middle keypoint of each curve to break it into 45 degree segments 480 Chapter 7 Modeling an MP3 Player ...

Страница 487: ...2 Choose Pick Object and select the parts of the circles you don t need 3 Press the Delete key to delete the curves Part 6 Control Button 481 ...

Страница 488: ... Curve Toolbox then Keypoint Curve Tools Lines Line and snap to the grid points Alt Windows or Command Mac key to create a horizontal line You will create the line over long so that it can be used for trimming 2 Choose Transform Move and type in 0 1 to move the line up by 1 mm in the y axis 482 Chapter 7 Modeling an MP3 Player ...

Страница 489: ...e Edit Curve Section You will be prompted to select a curve to trim Click both arcs above the line and click the GO button You will be prompted to select the trimming curves Choose the line Part 6 Control Button 483 ...

Страница 490: ...t Curve Section again and this time choose the line Make sure you select the curve in between the arcs to keep that part of the line When prompted to select the trimming curves first choose the outer arc 484 Chapter 7 Modeling an MP3 Player ...

Страница 491: ...Then choose the inner arc to complete the trimming Part 6 Control Button 485 ...

Страница 492: ...e window 2 Choose Pick Object and select all the curves 3 Choose Surfaces Draft Surfaces Draft Flange and double click to open the option window Modify the settings to Draft Angle 2 degrees and a Surface Depth of 2 mm 486 Chapter 7 Modeling an MP3 Player ...

Страница 493: ...e the pale blue arrow is pointing upwards in a positive z direction NOTE Depending on your curves you may need to change the Draft Angle to 2 to get the side walls falling inwards with the draft 4 Choose ObjectDisplay Visible to make the revolved surface of the button visible again Part 6 Control Button 487 ...

Страница 494: ...n use the Round tool to complete the button design 1 Choose Pick Object and pick the draft surfaces 2 Choose Surface Edit Create CurvesOnSurface Intersect As the draft surfaces have already been selected you will be prompted to select the intersecting surfaces Click the revolved surface 488 Chapter 7 Modeling an MP3 Player ...

Страница 495: ...rsected and curves on surface created 3 Choose Surface Edit Trim Trim Surface Follow the prompts to trim the revolved surface to keep the inner part Trim the draft surfaces to keep the lower parts Part 6 Control Button 489 ...

Страница 496: ...ign them to the Curves layer Rounding Multiple Edges 1 Choose Surfaces Round and double click the option box to open the option window 2 Change the Unequal Radius Corner to Single Surface to create a simple rounded corner 490 Chapter 7 Modeling an MP3 Player ...

Страница 497: ...3 Select one of the side edges and type in 1 at the prompt line to set the round radius to 1 mm 4 Select the other side edge and leave the radius value at 1 Part 6 Control Button 491 ...

Страница 498: ...one of the top edges and type in 0 35 in the prompt line to change the round radius to 0 35mm 6 Select the other three top edges 7 Click the Build button to create the round 492 Chapter 7 Modeling an MP3 Player ...

Страница 499: ...ect Name your file myMP3Player6 wire Part 7 Completing the Model You will now complete the MP3 Player design by duplicating the control buttons and moving all the buttons into the correct position on the front casing Opening the tutorial file optional If you successfully completed Part 6 you can proceed directly to the next step Creating Four Buttons below Part 7 Completing the Model 493 ...

Страница 500: ... This file contains the completed model from Part 6 Creating Four Buttons Watch Part 7 of the tutorial First you will rotate the half button into the correct orientation and then mirror the surfaces to create one full button 1 Maximize the Top window 2 Choose Pick Object and select all the surfaces 494 Chapter 7 Modeling an MP3 Player ...

Страница 501: ... single pivot point at the origin 4 Choose Transform Rotate and type in 0 0 45 You will be asked about losing construction history answer Yes 5 Choose Edit Duplicate Mirror and select the YZ plane to Mirror Across Part 7 Completing the Model 495 ...

Страница 502: ...6 Click Go to create the mirrored geometry 7 Choose Pick Object and select both halves of the button 8 Choose Edit Group to group them as a single button 496 Chapter 7 Modeling an MP3 Player ...

Страница 503: ...oose Edit Duplicate Object First click the Reset button at the bottom of the option window This will restore all the default settings Then set the Number of duplicates to 3 and the Rotation to 90 degrees in the z axis Click Go to create the duplicates The four buttons are created Part 7 Completing the Model 497 ...

Страница 504: ...trol Buttons layer and set the layer to inactive Positioning the Buttons Now you will move the buttons into their correct location centered on the lower part of the Front Casing 1 Maximize the Perspective window 498 Chapter 7 Modeling an MP3 Player ...

Страница 505: ... the Front Casing layer visible 3 Turn off the Symmetry on the layer 4 Set the state of the Front Casing layer to Reference so that it can be snapped to but not fully pickable Part 7 Completing the Model 499 ...

Страница 506: ...urve Tools Lines Line and use curve snap Ctrl and Alt Windows or Control and Command Mac keys to place the curve along the edge of the casing You will now use the center keypoint on the new line to position the buttons 500 Chapter 7 Modeling an MP3 Player ...

Страница 507: ...ck Object and select all the buttons 8 Choose Transform Move Use the point snap Ctrl Windows or Control Mac key to position the keys on the center Keypoint of the line You will be asked if you want to delete construction history answer YES Part 7 Completing the Model 501 ...

Страница 508: ...9 To convert the Layer Symmetry geometry into real geometry first set the state of the layer back to Pickable 10 Then turn on the Symmetry for the layer 502 Chapter 7 Modeling an MP3 Player ...

Страница 509: ...ose Layers Symmetry Create Geometry The mirrored geometry is no longer shown in dotted lines and can be modified independently 12 Do the same for the Rear Casing layer to complete the MP3 Player design Part 7 Completing the Model 503 ...

Страница 510: ...design 14 Use the Show menu in the window title bar to turn off the Model and Grid for a better view Saving your work Save your work in the wire directory of the Lessons project Name your file myMP3Player7 wire 504 Chapter 7 Modeling an MP3 Player ...

Страница 511: ... you set up which modeling units for example mm or inches you will use for a model a In the Preferences General Preferences window b In the Windows Information Information Window c In the Preferences Construction Options window d Type in the units that is mm after you enter the value e In the Construction Grid Preset option window 2 When projecting a curve what determines the direction the curve i...

Страница 512: ...with symmetrical geometry d You can use the center grid lines for snapping geometry to e All of the above 5 The Round tool has what advantage over the Surface Fillet tool a It is more accurate b You can chain select a row of edges c It has Construction History d It automatically trims the surfaces e The Round tool can create a corner surface between three edges On Your Own Now you can create accur...

Страница 513: ...Most computer speakers make good subjects for practicing your modeling Take measurements and try to replicate the shape as accurately as you can On Your Own 507 ...

Страница 514: ...508 Chapter 7 Modeling an MP3 Player ...

Страница 515: ...ack at the Vacuum Cleaner tutorial to remind yourself how the button was detailed You can finish off your MP3 player model by recessing and filleting the buttons and the button holes in a similar way On Your Own 509 ...

Страница 516: ...en t used this tool before Quiz Answers Answers to the MP3 Player Tutorial quiz 1 c In the Preferences Construction Options window 2 b The active window the curve will be projected perpendicular to the window view 3 a In the Attributes section of the Information Window 4 e All of them 510 Chapter 7 Modeling an MP3 Player ...

Страница 517: ...5 e The Round tool can create a corner surface between three edges Quiz Answers 511 ...

Страница 518: ...512 ...

Страница 519: ...ymmetry Change the degree of a curve We will expect you to know how to do certain things like opening and saving files picking objects and moving around in the views without being told which tool to use If you cannot remember check the previous tutorials New tools used in this tutorial Object Edit Align Align Object Edit Attach Detach Surfaces Boundary Surfaces Square Surfaces Swept Surfaces Rail ...

Страница 520: ...y The dashed curve touches the two solid curves but there is an angle between them and so there is a sharp break between the curves Tangent Continuity The dashed curve has no angle difference where it meets the solid curves The Round surface tool and the Curve Fillet tool create this type of continuity Curvature Continuity The dashed curve blends in even more smoothly to the solid curves 514 Chapt...

Страница 521: ... control them enables you to create smooth organic designs in Alias Construction Tolerances Construction Tolerances are important as well when matching surfaces Construction tolerances specify the accuracy of the Position Tangent and Curvature continuity when surfaces are built This is important if the model is used for manufacture or is transferred to another CAD system For more detailed informat...

Страница 522: ...eate the shoulder surface you will blend it smoothly to the main bottle surface using tangent continuity Watch Part 1 of the tutorial Opening the tutorial file The tutorial file has curves for building the shower gel bottle 1 Choose File Open to open the File Browser 2 In the File Browser locate the CourseWare directory and set it as the Current Project 3 Open the file called showergel wire locate...

Страница 523: ...o use the construction tolerances in showergel wire The file is opened The main bottle curves are visible and placed on a layer named Curves Other curves are on layers that are not currently visible you will use these later in the tutorial Setting the Construction Tolerances Before you start to create your model you will choose the construction tolerances you want to work to 1 Choose Preferences C...

Страница 524: ... While this is suitable for rapid concept development a more accurate setting will be needed for data transfer to a CAD or Rapid Prototyping system 2 In the option window choose General CAD Settings 518 Chapter 8 Modeling a Sports Shower Gel Bottle ...

Страница 525: ...o open the tolerances section of the Construction Options window TIP For future projects you can choose settings that match the CAD system you will be exporting data to 3 Close the Construction Options window Part 1 Creating Primary Surfaces 519 ...

Страница 526: ... Perspective view 2 Check that the Bottle layer tab is shown in yellow indicating the new surfaces you create will be assigned to it If not click the layer tab to make it active 3 Choose Surfaces Boundary Surfaces Square 4 Double click the icon to open the option window 520 Chapter 8 Modeling a Sports Shower Gel Bottle ...

Страница 527: ...nge the continuity option to Fixed This ensures that the square surface accurately matches the curves For boundaries 1 and 3 change the Continuity option to Implied Tangent The Implied Tangent option ensures the surfaces will align smoothly across the center line Part 1 Creating Primary Surfaces 521 ...

Страница 528: ...You are prompted to select the four boundary curves Click the curves in the order shown When the fourth curve is selected the square surface is created 522 Chapter 8 Modeling a Sports Shower Gel Bottle ...

Страница 529: ...the Neck Surface 1 Adjust the view to see the curves for the neck of the bottle 2 Choose Surfaces Skin and when prompted select the two neck curves to create the neck surface Part 1 Creating Primary Surfaces 523 ...

Страница 530: ...in surface from the body to the neck You will then create continuity between the shoulder and body using the Align tool It is useful to understand how the Align tool creates the desired continuity and you can see this by observing how the CVs and Hulls change as the Align tool is applied Positional Continuity One row of CVs is aligned to the other surface This is the default continuity when you cr...

Страница 531: ...s of CVs are aligned to the other surface Creating the Shoulder Surface First create the shoulder surface with positional continuity 1 Choose the Surfaces Skin tool 2 When prompted select the edges of the body and neck surfaces to create the shoulder skin surface Part 1 Creating Primary Surfaces 525 ...

Страница 532: ... the shoulder skin to allow it to be modified 1 With the shoulder surface still selected choose Delete Delete Construction History and answer Yes when prompted 2 With the surface still selected turn on the CVs by clicking the Cv Hull check box on the Control Panel This makes it easier to see the results of the Align tool 526 Chapter 8 Modeling a Sports Shower Gel Bottle ...

Страница 533: ...You are prompted to select the boundary of the surface to be aligned the input This is the skin surface you created for the shoulder 4 Move the cursor to the junction of the bottle and shoulder surfaces Click the edge of the surface and select the skin surface from the pick chooser Part 1 Creating Primary Surfaces 527 ...

Страница 534: ...ndary between the two surfaces again to select the edge of the body The top edge of the body surface is automatically selected The CVs of the shoulder surface are modified to align the shoulder to the bottle surface with tangent continuity as indicated by the T on the green indicator 528 Chapter 8 Modeling a Sports Shower Gel Bottle ...

Страница 535: ...hape of the input surface to match that of the master Turn on the CVs and hulls on the master to see this 7 Scroll to the bottom of the option window and turn off Continuity Check to remove the continuity indicator Part 1 Creating Primary Surfaces 529 ...

Страница 536: ...ulls 8 Use the F9 hotkey to show the four modelling windows 9 Choose Pick Nothing to deselect the surface 10 Choose Pick Point Types Hull 11 In the Back window select the hull of the second row of CVs from the top by clicking the red hull line 530 Chapter 8 Modeling a Sports Shower Gel Bottle ...

Страница 537: ... mouse button to create a smooth shoulder shape NOTE The pivot point for the CVs defaults to the origin so the CVs will scale correctly 13 In the Left window drag with the middle mouse button to refine the shoulder shape Part 1 Creating Primary Surfaces 531 ...

Страница 538: ...on click the hull of the third row of CVs and drag upwards to sharpen the shoulder profile Continue to adjust the vertical position of the hulls until you are happy with the design 532 Chapter 8 Modeling a Sports Shower Gel Bottle ...

Страница 539: ...ow you will save the scene as a new file 1 Save your work in the wire directory of the Lessons project 2 Name your file myshowergel wire For information on creating the Lessons project or saving your work see Saving your work in a Windows environment on page 96 or Saving your work in a Mac OS X environment on page 100 Part 2 Creating the Finger Grip Having created the basic form of the bottle you ...

Страница 540: ...el_part2 wire located in the wire directory of the CourseWare project This file contains the completed model from Part 1 Making Space for the Grip Detail To make space for the finger grip you will split the body surface and discard the part which will be replaced by the grip feature Because the isoparms on the surface are at a convenient location you can use the Detach tool to split the surface at...

Страница 541: ...istory and answer Yes when prompted NOTE Detaching leaves a good quality edge on the surface However it is not reversible so we recommend you save before using Detach 4 Choose the Object Edit Attach Detach tool Hold down the Ctrl Windows or Control Mac key and select the isoparm shown Part 2 Creating the Finger Grip 535 ...

Страница 542: ...e detach tool has locked on to the isoparm The isoparm is highlighted and a Go button appears 5 Click Go to detach the surface 6 Choose Pick Object and select the smaller piece of surface 536 Chapter 8 Modeling a Sports Shower Gel Bottle ...

Страница 543: ...e small surface A curve has been provided on the GripCurves layer to define the profile of the finger grip 8 Turn on the visibility of the GripCurves layer by selecting Visible from its layer tab menu Part 2 Creating the Finger Grip 537 ...

Страница 544: ...ce It will match the curve at the base with positional continuity and have Implied Tangency on the finger grip curve where the surface will later be mirrored 1 Choose Surfaces Swept Surfaces Rail Surface Double click the icon to open the option box In the Generation Curve section choose 2 In the Rail Curve section also choose 2 538 Chapter 8 Modeling a Sports Shower Gel Bottle ...

Страница 545: ...ecked click in them to remove the check TIP The Rebld option can improve the parameterization of an edge typically a trimmed edge As all your edges and curves have good parameterization you don t need to use it in this case 3 You are prompted to select the edges of the birail Select the curves in the order shown Part 2 Creating the Finger Grip 539 ...

Страница 546: ...birail surface is created With the surface still selected and the option window still open on screen you can now adjust the continuity options at each edge 540 Chapter 8 Modeling a Sports Shower Gel Bottle ...

Страница 547: ...4 Change the following continuity settings gen2 Tangent Tangent rail1 Implied Tangent rail2 The surface is rebuilt with the new continuity settings Part 2 Creating the Finger Grip 541 ...

Страница 548: ...n off the model and the grid Remember to turn them on again when you remove the shading Creating the Base Surface The base of the bottle will be created as a flat plane 1 Choose Surfaces Planar Surfaces Set Planar 2 You are prompted to drag select curves Drag a pick box over the two base curves 542 Chapter 8 Modeling a Sports Shower Gel Bottle ...

Страница 549: ...g Go 4 Make sure that all the surfaces are assigned to the Bottle layer 5 The curves are no longer needed so turn off the visibility of the GripCurves layer Save your work 1 Save your work in the wire directory of the Lessons project 2 Name your file myshowergel2 wire Part 2 Creating the Finger Grip 543 ...

Страница 550: ...main body surface Then you will create a recessed surface for the label panel This will be trimmed slightly smaller so there is a space for a smooth blend surface to be built NOTE You cannot use Detach in this case to cut the surface as the desired shape does not follow the isoparms of the surface Watch Part 3 of the tutorial Opening the tutorial file optional If you successfully completed Part 2 ...

Страница 551: ...he CourseWare project This file contains the completed model from Part 2 Trimming the Label Area First you will project the label shape curve onto the bottle surface The projection direction will be determined by the active window so you will use the Left window 1 Maximize the Left window Part 3 Label Surface 545 ...

Страница 552: ...urve will be used to trim away the main body surfaces Now you will Project the outer label curve onto the body surface 3 Choose Surface Edit Create CurvesOnSurface Project 4 You are prompted to select a surface Click the main bottle surface to select it 546 Chapter 8 Modeling a Sports Shower Gel Bottle ...

Страница 553: ...hen prompted to select the projecting curves 6 Click the outer label curve to select it and then click Go The curve is projected onto the surface 7 Maximize the Perspective view to see the curves on surface more clearly Part 3 Label Surface 547 ...

Страница 554: ...rompted to select the surfaces to trim Click the main bottle surface to select it 10 You are then prompted to select REGIONS Click the part of the surface you want to keep the part outside the label area 548 Chapter 8 Modeling a Sports Shower Gel Bottle ...

Страница 555: ...11 Click Keep shown in the bottom right corner of the window The surface is trimmed 12 Use diagnostic shading to verify the surface has been trimmed correctly Part 3 Label Surface 549 ...

Страница 556: ...paper can only bend in one direction at a time if it is to have no folds or wrinkles Therefore the label surface should only bend in one direction This is called single curvature You will create a single curvature surface by using a Skin surface between two identical curves First organize your model using the layers 1 Make the Bottle layer invisible using the layer sub menu There are two identical...

Страница 557: ...to the shape of the label This time we will show how both operations can be executed at once by using the 3D Trimming option in the Trim Surface tool 3 Choose Surface Edit Trim Trim Surface Double click the icon to open the option box Turn on 3D Trimming then close the option box You are prompted to select the surfaces to trim 4 Click the label surface to select it Part 3 Label Surface 551 ...

Страница 558: ... label shape curve to select it You are then prompted to select REGIONS 6 Click the part of the surface you want to keep the part inside the label area Then click Keep shown in the bottom right corner of the window 552 Chapter 8 Modeling a Sports Shower Gel Bottle ...

Страница 559: ...The surface is trimmed 7 Turn on diagnostic shading to verify this 8 Make the Bottles layer visible and assign the new surface to it Part 3 Label Surface 553 ...

Страница 560: ...9 Make the LabelCurves layer invisible Save your work 1 Save your work in the wire directory of the Lessons project 2 Name your file myshowergel3 wire 554 Chapter 8 Modeling a Sports Shower Gel Bottle ...

Страница 561: ...se the two trimmed edges as Rails and create two new curves for the Generation curves Watch Part 4 of the tutorial Opening the tutorial file optional If you successfully completed Part 3 proceed to the next step Creating the Generation Curves below If you were not successful in part 3 open the file called showergel_part4 wire located in the wire directory of the CourseWare project This file contai...

Страница 562: ...ing the minimum number of CVs needed in a curve or a surface helps to keep your model light and smooth 1 Zoom in to the area at the top of the label 2 Choose Curves New Curves New Edit Point Curve 3 Double click to open the option window In the Curve Degree section choose 2 This will create a single span curve with only 3 CV points 4 Use Curve Snap Ctrl Alt Windows or Control Command Mac keys toge...

Страница 563: ...first edit point of the new curve is placed 5 Use Curve Snap again and click the edge of the label surface then without releasing the mouse button drag to the top of the edge Part 4 Adding Blend Details 557 ...

Страница 564: ...ely aligned so it is important that the curve is snapped accurately to the corner 6 Choose the Object Edit Align Align tool Double click the icon to open the option window In the Continuity section choose Tangent 558 Chapter 8 Modeling a Sports Shower Gel Bottle ...

Страница 565: ... to select the object to align input Click the curve near the label surface 8 You are prompted to select the object to align to Click the vertical edge of the label surface near the curve Part 4 Adding Blend Details 559 ...

Страница 566: ...art of the label surface 10 Create another Degree 2 edit point curve across the gap using curve snap to place the curve edit points exactly at the corner of the surfaces 11 Use Object Edit Align Align again to align the curve to the label surface 560 Chapter 8 Modeling a Sports Shower Gel Bottle ...

Страница 567: ...aces Swept Surfaces Rail Surface tool Double click the icon to open the option window 2 Check that the options are set for 2 generation curves and 2 rail curves Adjust the Continuity settings to Implied Tangent gen 1 Implied Tangent gen 2 Tangent rail 1 Position rail 2 Part 4 Adding Blend Details 561 ...

Страница 568: ...ed edges of surfaces choosing the Rebld option on the two rails will improve the quality of the surface 4 You are prompted to select the curves in order Choose the curves and edges as shown 562 Chapter 8 Modeling a Sports Shower Gel Bottle ...

Страница 569: ...created 5 Choose Pick Nothing to de select the surface 6 Choose Pick Object then pick and assign the two curves you created to the Curves layer 7 Use diagnostic shading to evaluate the result Part 4 Adding Blend Details 563 ...

Страница 570: ...ing the Model with Round Surfaces To complete the model you will soften all the sharp edges with Round surfaces 1 Remove the diagnostic shading from the model 564 Chapter 8 Modeling a Sports Shower Gel Bottle ...

Страница 571: ...nd the shoulder surfaces 4 The default radius value is shown and highlighted in white 5 Type in a new radius value of 1 Then press Enter Windows or Return Mac 6 Click the Build button A round fillet is created 7 Choose Pick Nothing to remove the round indicators Part 4 Adding Blend Details 565 ...

Страница 572: ...e edge of the label panel 9 Use the Surfaces Round tool again to create a fillet along the sharp edge of the label birail surface 10 Choose Pick Nothing to remove the round indicators 566 Chapter 8 Modeling a Sports Shower Gel Bottle ...

Страница 573: ...l again to create a fillet As there are two edges at the base click first on main bottle surface edge Type in a Radius value of 10 Then click the edge created by the finger grip surface and the base The round surface will then be built along both edges Part 4 Adding Blend Details 567 ...

Страница 574: ...uild button to create the round surface 14 Choose Pick Nothing to remove the round indicators 15 Make sure that all the new surfaces are assigned to the Bottle layer 568 Chapter 8 Modeling a Sports Shower Gel Bottle ...

Страница 575: ...ssons project 2 Name your file myshowergel4 wire Part 5 Embossed Logo Details In this section you will create an embossed logo at the base of the pack You will use an offset surface to create the logo surface trimming to create the logo outline and a Freeform Blend to join it to the main surface smoothly Part 5 Embossed Logo Details 569 ...

Страница 576: ...can proceed directly to the next step Trimming the Body Surfaces below If you were not successful in part 4 open the file called showergel_part5 wire located in the wire directory of the CourseWare project This file contains the completed model from Part 4 570 Chapter 8 Modeling a Sports Shower Gel Bottle ...

Страница 577: ...s The embossed logo surface will be created using the Offset tool You will start by projecting the outer logo curves onto the main surfaces 1 First make the LogoCurves layer visible 2 Maximize the Left window to specify the direction of projection 3 Choose Surface Edit Create CurvesOnSurface Project 4 You are prompted to select the surfaces Select the main bottle surface and the finger grip surfac...

Страница 578: ...ou are prompted to select the curves to project As there are many curves in the logo detail drag a selection box over all the curves All the curves are highlighted 572 Chapter 8 Modeling a Sports Shower Gel Bottle ...

Страница 579: ... 7 Maximize the Perspective window to see the curves on surface more clearly Next you will trim away the main surfaces 8 Select the Surface Edit Trim Trim Surface tool You are prompted to select the surface to trim Click the main bottle surface first Part 5 Embossed Logo Details 573 ...

Страница 580: ... trim regions click the part of the bottle surface to keep as shown Click the Keep button to trim the surface The surface is trimmed to the outer curves the inner curves are ignored 574 Chapter 8 Modeling a Sports Shower Gel Bottle ...

Страница 581: ...pts to trim the finger grip surface The surfaces have now been trimmed to allow the logo details to be embossed Creating the Offset Surfaces To create an embossed effect the main bottle surface will be offset by 0 5 mm outwards from the bottle This will then be trimmed to the inner logo curves You will first create a layer for the new offset surface Part 5 Embossed Logo Details 575 ...

Страница 582: ...organize the model so there is no need to re name it Now create the offset surface 2 Choose Object Edit Offset and select the main bottle surface 3 At the prompt line type in an offset value of 0 5 Click Accept to create the surface 576 Chapter 8 Modeling a Sports Shower Gel Bottle ...

Страница 583: ...ly the new surface is showing on the screen When the surface was offset the curves on surface and trims were offset with it As you don t want these you will un trim the surface and remove the curves on surface 7 With the surface still selected choose Surface Edit Trim Untrim Double click the icon to open the option window Part 5 Embossed Logo Details 577 ...

Страница 584: ...fully untrimmed in one operation 9 Choose Pick Object Types Curve on Surface and drag a pick box over all the curves on surface to select them 10 Press the Delete key to delete the curves on surface 578 Chapter 8 Modeling a Sports Shower Gel Bottle ...

Страница 585: ...st solution is to extend the surface slightly so the curves fit You will use the Extend tool interactively to extend the surface a small amount by eye 12 Choose Object Edit Extend and click the edge shown You will be asked if you want to remove the construction history answer Yes Part 5 Embossed Logo Details 579 ...

Страница 586: ...n 0 at the prompt line to return the surface to its original shape Trimming the Offset Surfaces Now you will project the curves onto the offset surface so it can be trimmed to the inner logo shapes 1 Choose Surface Edit Create CurvesOnSurface Project 2 When prompted to select the surfaces select the offset surface and click Go 580 Chapter 8 Modeling a Sports Shower Gel Bottle ...

Страница 587: ...3 When prompted to choose the curves to project use a drag box to select all the curves 4 Click Go to project them onto the surface Part 5 Embossed Logo Details 581 ...

Страница 588: ... only the three inner shapes remain 5 Select the Surface Edit Trim Trim Surface tool and click the offset surface when prompted 6 When prompted select the three inner Regions and click Keep 582 Chapter 8 Modeling a Sports Shower Gel Bottle ...

Страница 589: ...ce is trimmed into the three parts of the logo Now is a good time to tidy up the layers 7 Choose Pick Object and select the offset surface 8 On the Bottle layer tab select Assign Part 5 Embossed Logo Details 583 ...

Страница 590: ... offset surface is there 10 Make the LogoCurves layer invisible 11 Remove the temporary layer by choosing Layers Delete Unused Layers Creating the Freeform Blend Surfaces To give a smooth embossed edge to the logo you will use the Freeform Blend tool to blend from the outer to the inner shapes 584 Chapter 8 Modeling a Sports Shower Gel Bottle ...

Страница 591: ...up of many curves you can use the Chain Select option to select the whole edge 2 Choose Surfaces Multi Surface Blend Freeform Blend and double click the icon to open the option window 3 Choose the Chain Select option and leave the option window open on screen 4 You are prompted to pick the input surface curves Click the edge of the first logo offset surface as shown Part 5 Embossed Logo Details 58...

Страница 592: ...The whole edge is selected and highlighted in pink 5 Next click the edge on the bottle surface 586 Chapter 8 Modeling a Sports Shower Gel Bottle ...

Страница 593: ...The edge is selected and highlighted in yellow 6 Click Recalc to build the Freeform Blend Part 5 Embossed Logo Details 587 ...

Страница 594: ...7 To continue building the blend surfaces click Next in the Freeform Blend option window 8 Repeat the process to create the other two blends 588 Chapter 8 Modeling a Sports Shower Gel Bottle ...

Страница 595: ... are assigned to the Bottle layer Save your work 1 Save your work in the wire directory of the Lessons project 2 Name your file myshowergel5 wire Part 6 Completing the Model In this section you will complete the model by mirroring the surfaces and creating a cap Part 6 Completing the Model 589 ...

Страница 596: ...l in part 5 open the file called showergel_part6 wire located in the wire directory of the CourseWare project This file contains the completed model from Part 5 Mirroring the Surfaces Finally you will mirror all the surfaces using the Layer Symmetry tools 1 Turn on Symmetry for the Bottle layer using the sub menu on the layer menu 590 Chapter 8 Modeling a Sports Shower Gel Bottle ...

Страница 597: ...yer tab to make the layer active It will be shown in yellow with a white border 3 Choose Layers Symmetry Create Geometry to convert the mirrored image of the geometry into actual geometry Part 6 Completing the Model 591 ...

Страница 598: ...a closed volume add a planar surface to the top of the neck 4 Choose Surfaces Planar Surfaces Set Planar and select the two top edges of the neck Click Go to create the surface 592 Chapter 8 Modeling a Sports Shower Gel Bottle ...

Страница 599: ...ds NOTE The Surface Edit Orientation Set Surface Orientation tool can be used to show surface orientation blue shading means that the surface faces outwards yellow inwards For an accurate volume calculation you need all the surfaces to face outwards So you will first unify the orientation of the surfaces Preparing the Model for Volume Calculation 1 Make sure that only the bottle surfaces are visib...

Страница 600: ...3 The surfaces are highlighted 4 Click Classify The surfaces are highlighted in blue and a Unify button is shown 594 Chapter 8 Modeling a Sports Shower Gel Bottle ...

Страница 601: ... Unify to unify the surface orientations A message is shown in the prompt window confirming the surfaces have been unified Calculating the Volume Now you will calculate the volume of the bottle 1 Choose Pick Object and select all the surfaces 2 Choose the Evaluate Mass Properties tool The volume is created and displayed in a separate window Part 6 Completing the Model 595 ...

Страница 602: ...ample a volume of 336555 cubic millimeters is 336 5 milliliters Also the volume measured is the external volume of the whole bottle This will include the liquid the airspace at the top of the bottle and the thickness of the plastic itself Making an allowance of 25 is a good approximation of the extra volume all these factors add to the desired product volume 596 Chapter 8 Modeling a Sports Shower ...

Страница 603: ...ow Revolving a Cap To finish off the model you can build a simple cap from curves supplied on the CapCurves layer 1 Turn on the visibility of the CapCurves layer 2 Select all the cap curves using Pick Objects on the layer sub menu 3 Choose Surfaces Revolve and double click the icon to open the option window 4 In the Axes section select Global This enables you to revolve all the curves at the same ...

Страница 604: ... Click Go in the option window to create the cap surfaces 6 Assign the new cap surfaces to the CapCurves layer The Shower Gel pack design is now complete 598 Chapter 8 Modeling a Sports Shower Gel Bottle ...

Страница 605: ...he wire directory of the Lessons project 2 Name your file myshowergel6 wire Conclusion Congratulations You have completed the Shower Gel Bottle and have an understanding of continuity and how to build smooth forms in Alias Conclusion 599 ...

Страница 606: ...ed 1 Which of the following can be toggled on and off using the Show menu on the window pane a Model b Lights c Grid d Pivots e Locators f All of the above 2 Which of the following tools have a Chain Select option a Round b Tubular Offset c Freeform Blend d Profile Blend e Tube Surface f Draft Flange 3 Where can you set up a mirror image of your geometry one that will update each time you modify o...

Страница 607: ...o c three d four e five 5 What kind of continuity does the Round surface produce a You can choose either Tangent or Curvature b None c Positional only d Tangent only e Curvature only 6 What is important when calculating the volume of a model a The surfaces represent a closed volume b The surfaces all face outwards c There are no duplicate surfaces d Which units are set up in the Construction optio...

Страница 608: ...es fully takes time and practice and is one of the advanced topics to study in Alias Below are some ideas for practicing and exploring these techniques Packaging design is a good area to look for freeform and smooth surfaces Below are two examples of shapes and features that you could try 602 Chapter 8 Modeling a Sports Shower Gel Bottle ...

Страница 609: ...ng the label area on the Shower gel bottle can be used to create features on product designs and vehicle designs as well The finger recess on the back of this cell phone is created in the same way as the recessed label On Your Own 603 ...

Страница 610: ...The raised center section of this car hood is blended into the main surface using a Birail with curvature continuity 604 Chapter 8 Modeling a Sports Shower Gel Bottle ...

Страница 611: ... with curvature continuity instead of tangent Look at the model supplied for Shaders and Lights on page 631 This version of the shower gel bottle has been created using curvature continuity Quiz Answers Answers to the Shower Gel Bottle Tutorial quiz 1 f All of them 2 b c d and e 3 c In the Layer tab use the symmetry setting 4 c Three 5 d Tangent only 6 e All of them are important Quiz Answers 605 ...

Страница 612: ...606 ...

Страница 613: ...on theory shaders and texture theory the Multi lister the hardware shader editing shaders and textures assigning shaders To complete this tutorial you will be supplied with the model of a personal digital assistant PDA We will examine some of the key concepts of rendering like the Render Globals settings window resolution and the powerful interactive form of rendering Hardware Shading 9 607 ...

Страница 614: ...y levels Generally the better the rendering quality required the longer the renderer takes The rendering pipeline The rendering process requires that you set up surfaces cameras lights and any animation channels that may have been used in the scene When a rendering is executed all of the information about the scene is either streamed directly to the renderer for immediate rendering or it is export...

Страница 615: ...ine rendering of the scene and renders objects using flat unshaded color Raycast This rendering type produces a smooth shaded rendering of the scene that includes shadowing capabilities Raycasting is faster than Raytracing but lacks the extra realism added by true reflections and refractions If necessary reflections can be simulated in a Raycast rendering using environment maps and linear transpar...

Страница 616: ...globals Before rendering you must decide on both the size of the image and how detailed the image will be The Render Globals window under the Render menu is used to set the size and resolution of the image the quality of anti aliasing the raytrace rendering limits and many other rendering 610 Chapter 9 An introduction to Rendering ...

Страница 617: ...graphic views are rendered and the size of the rendered images Renderings are bitmap images that consist of a matrix of pixels each holding a particular color The size of the rendering is set in pixels representing the number of colored squares along the X and Y axis of the rendering The Predefined Resolutions section of the Render Globals window contains a comprehensive list of image size standar...

Страница 618: ... some theory In order for a bitmap image to look good the pixels must be as small as possible so they are not easily perceived individually by the human eye Every bitmap image has a resolution that determines how many pixels fill an inch pica or centimeter A 10 ppi pixels per inch image displays 10 pixels in every linear inch of image A 72 ppi image has 72 pixels per linear inch and a 300 ppi imag...

Страница 619: ...t resolutions The first image is 40 ppi and the second is 150 ppi Resolution is used to determine how big an image will display or print on an output device Your monitor is an output device as is your printer Your monitor is typically capable of 95 dpi dots per inch Therefore if you want to see a 4 x 5 image on your monitor you need 95 dpi x 4 pixels and 95 dpi x 5 pixels or 380 x 475 pixels If yo...

Страница 620: ...pening the tutorial file on page 82 2 A dialog box appears asking if you want to delete all objects shaders views and actions Click Yes 3 If your construction tolerance values differ from those in the pda_rendering wire file you will be prompted by a Construction Options dialog box Click Accept New Settings to use the construction tolerances in the pda_rendering wire file 614 Chapter 9 An introduc...

Страница 621: ...the tool palette To pick objects or components you can use the marking menus 6 Choose Windows Control Panel This opens up a frame in the window containing frequently used tools for the visualization process Between the menus marking menus and control panel you have all the tools you need to work on an image at your fingertips Visualizing a PDA 615 ...

Страница 622: ...u will use shaded mode This tool provides a fast colored and shaded reference of a model in a modeling window You can also enable textures shadows reflections and more For more information about all the functionality of this mode see WindowDisplay Hardware Shade To enable shaded mode 1 Choose WindowDisplay Hardware Shade to open the Hardware Shade window 616 Chapter 9 An introduction to Rendering ...

Страница 623: ...2 In the Hardware Shade window click the Shade on button to shade the model in the Perspective view Tumble about to get a good view of the model Click Shade off Visualizing a PDA 617 ...

Страница 624: ...ply shaders and textures to your objects Alias uses shaders to define the appearance of your objects so they look as if they were created with real materials Textures can also be applied to the shaders to create more sophisticated visual effects As you will discover in later tutorials you can even add special effects to shaders to make them appear semi transparent or to give them a sense of 3D rel...

Страница 625: ...1 Drag the bar down until you see all the shaders in this wire file The resident shaders section should now look similar to the following image Visualizing a PDA 619 ...

Страница 626: ... and click this tool to see which shaders are assigned to what parts of the model by looking in the Perspective view after you have clicked this tool 3 Click each shader and then click the Pick Objects by Current Shader tool to see the assignments You can also modify some attributes of shaders in the visualization panel 4 Click the green shader and then Pick Object by Current Shader You will see t...

Страница 627: ... the Shader Parameters for this shader The most commonly used shader parameters are shown in this section of the panel 6 Click the green rectangle under RGB Color This opens the color palette so you can choose a different color for the shader Visualizing a PDA 621 ...

Страница 628: ... 8 Notice that the color rectangle in the Visualization panel has changed to orange 9 Use the marking menu to pick nothing then choose WindowDisplay Hardware Shade to see the model with an orange button 10 For a better view without the wireframe choose Model unchecking it from the Show menu on the window bar to hide the wireframe 622 Chapter 9 An introduction to Rendering ...

Страница 629: ...Visualizing a PDA 623 ...

Страница 630: ...ccess the Control Window and the Color Editor To open shaders in the Multi lister 1 Choose Render Multi lister Shaders A number of shaders have been supplied for this tutorial You can adjust the size of the icons by clicking the right mouse button over the background of the multi lister and choosing either Large Icons or Small Icons The images in this tutorial show small icons The Chrome shader wa...

Страница 631: ... used in WindowDisplay Hardware Shade NOTE If you use the Hardware tab you must first set the Shading method to Per pixel or Per vertex in the Hardware Shade option window 3 In the Shader Name field rename the shader to Case 4 Click the Map button associated with the Reflection parameter found in the Phong Shader Parameters section This opens the texture editor for the Chrome reflection Visualizin...

Страница 632: ...5 Scroll down and click the Sky button located in the Environments section This opens the SkyTexture editor 626 Chapter 9 An introduction to Rendering ...

Страница 633: ...Shaders window is updated to reflect the changes Note how the Chrome shader wears the Sky texture 6 To see the effect of your changes look at the shaded model in the perspective window Visualizing a PDA 627 ...

Страница 634: ...ion Congratulations You have completed this tutorial You now know some rendering and image resolution theory the Multi lister shaded mode how to edit shaders and textures the visualization panel 628 Chapter 9 An introduction to Rendering ...

Страница 635: ...ade mode 2 If you are taking an image to press check with your printer as to the number of _____ that are used a Dots per inch b Lines per inch c Pixels per inch d All of the above 3 Shaders determine what _____ look like a Surfaces b Models c Images d All of the above 4 The ______ is the primary interface you use to create edit manage and display shaders textures lights and the environment a Cont...

Страница 636: ...uestions found in the Introduction to Rendering tutorial 1a The raytracer rendering type offers true reflections refractions and shadows 2b If you are taking an image to press check with your printer as to the number of lines per inch that are used 3a Shaders determine what surfaces look like 4c The multi lister is the primary interface you use to create edit manage and display shaders textures li...

Страница 637: ...ow to create shaders and lights and use Hardware Shade to create rendered images of your design To complete this tutorial you will be supplied with a scene of two plastic bottles New tools used in this tutorial Window Display Hardware Shade Render Multi lister Lights 10 631 ...

Страница 638: ...rent properties such as the size of the highlight the brightness and color of the highlight and the reflectivity In this tutorial you will learn how to simulate different materials by creating Shaders and adjusting the Shader Parameters First you will set up Hardware shading to view your model as a rendered scene Then you will create new shaders for the cap and the bottle and apply a graphic image...

Страница 639: ...eWare directory and set it as the Current Project 3 Open the file called Render_Basics wire located in the wire directory in the CourseWare project For information on how to open a file see Opening the tutorial file on page 82 A dialog box appears asking if you want to delete all objects shaders views and actions Click Yes If your values for construction tolerances differ from those in the Render_...

Страница 640: ...les in different positions one with the cap open and one with it closed Viewing a Shaded Scene When setting up a model to be rendered it is useful to work interactively with a rendered view For this exercise you will use Hardware Shade to work directly on a shaded scene 1 Maximize the Perspective view 634 Chapter 10 Shaders and Lights ...

Страница 641: ...2 Choose WindowDisplay Hardware Shade to open the Hardware Shade Options 3 Choose All Geometry from the option window and click Shade on at the bottom of the option window Part 1 Creating Shaders 635 ...

Страница 642: ...ls paper or blackboards PHONG is more complex and gives highlights suitable for high gloss plastic glass and metals BLINN provides more flexible highlights that can be adjusted for softer plastics satin finishes and natural materials LIGHTSOURCE makes the object look like it emits light like an incandescent bulb or flame As you gain more experience with shaders you will understand which Shading Mo...

Страница 643: ...e Control Panel For this part of the tutorial you will use the Visualize Control Panel to create and modify shaders TIP If the Control Panel is not currently shown choose Windows Control Panel to turn it on 1 At the top of the Control Panel choose the Visualize option The Default Shader is shown in the Resident Shaders section Part 1 Creating Shaders 637 ...

Страница 644: ...rey shader ball you can turn on the icon labels in the General Preferences 2 Choose Preferences General Preferences to open the preferences window 3 The Interface section is opened Check the Icon labels box to turn on the icon text 638 Chapter 10 Shaders and Lights ...

Страница 645: ...actice to not use or modify the default shader as you will copy it to create new shaders So first you will create a shader for the bottle Creating a Bottle Shader 1 Click the Default shader to select it Below the resident Shaders section there are four icons Click the Copy Current Shader icon to create a shader Part 1 Creating Shaders 639 ...

Страница 646: ... are shown 3 Change the Shader Name to Bottle and leave the Shading Model set to BLINN This will give a soft highlight for the bottle plastic Now you will choose a color for the bottle 4 In the shader editor open the Common Shader Parameters section 640 Chapter 10 Shaders and Lights ...

Страница 647: ...Click the grey color chip to open the Color Editor 5 In the Color Editor choose a color for the bottle The color chip updates and the Bottle shader shows the new color Part 1 Creating Shaders 641 ...

Страница 648: ... 6 Select the bottle surfaces by using the Pick Objects option on the Bottles layer sub menu All the bottle surfaces are selected 7 Click the Assign icon on the Visualize Panel to assign the new shader to the bottle surfaces 642 Chapter 10 Shaders and Lights ...

Страница 649: ...ault shader to select it Then choose the Copy Current Shader tool to create a second new shader 9 Double click the icon of the second new shader to open the shader editor Change the Shader Name to Cap and the Shading Model to PHONG In the Common Shader Parameters section choose a color for the cap Part 1 Creating Shaders 643 ...

Страница 650: ...menu 11 Assign the Cap shader to the cap surfaces using the Assign icon in the Visualize Panel A small bright highlight appears on the caps illustrating a glossy plastic material 12 Close the shader editor window 13 Choose Pick Nothing to de select the label surfaces 644 Chapter 10 Shaders and Lights ...

Страница 651: ...in the Visualize Panel Now you will give the cap a more shiny appearance and the bottle a softer finish 1 Click the Cap shader to select it and open the Shader Parameters section of the Visualize Panel 2 Modify the Shinyness value to make the highlight on the cap smaller Part 1 Creating Shaders 645 ...

Страница 652: ...curately 3 Click the Bottle shader to select it 4 In the Shader parameters section modify the Eccentricity and Spec Rolloff values to make the bottle plastic look less shiny with a softer surface finish The two images below show the changes you will see in the materials 646 Chapter 10 Shaders and Lights ...

Страница 653: ...n the File Browser 2 Save your work in the wire directory of the Lessons project 3 Name your file myRender_Basics1 wire Part 2 Adding a Label In this part of the tutorial you will take a graphic design for the label of the shower gel bottle and apply it to the label surface The process of applying the graphic is called Mapping The graphic file shown on the left is in a standard format such as a ti...

Страница 654: ...TIP Mapping can be used on many of the shader parameters such as transparency bump or reflection Opening the tutorial file optional If you successfully completed Part 1 proceed to the next step Create a Label Shader below If you were not successful in part 1 open the file called Render_Basics_part2 wire located in the wire directory of the CourseWare project This file contains the completed model ...

Страница 655: ... Default shader to select it Then choose the Copy Current Shader tool to create a third shader 2 Double click the icon of the new shader Change the Shader Name to Label and set the Shading Model to LAMBERT to represent a matte paper label Part 2 Adding a Label 649 ...

Страница 656: ...ill replace the default grey color Mapping the Color Channel 1 In the Label shader editor click the Map button beside the Color parameter 2 The Texture Procedures window appears Choose the Surface file texture 3 The File Texture editor is opened Choose the Browse button next to the Image section 650 Chapter 10 Shaders and Lights ...

Страница 657: ... CourseWare directory 4 Select the ShowerGel_Label tif image The pathname of the label file is shown in the Image section Leave the editor window open on the screen as you will use it later to modify the position of the label The shader icon in the Visualize Panel shows the label wrapped around the shader ball Part 2 Adding a Label 651 ...

Страница 658: ...he label surfaces 5 Pick the label surfaces using the Layer sub menu 6 Assign the Label shader to the label surfaces using the Visualize Panel Assign icon 7 The label graphic now appears on the label surfaces 652 Chapter 10 Shaders and Lights ...

Страница 659: ...lect the surfaces 9 The placement of the label can be modified in the Surface Placement section of the texture editor window 10 In the Rotate section type in 90 degrees to see an alternative label position Part 2 Adding a Label 653 ...

Страница 660: ...11 Return the label rotation to zero degrees to get the correct label view Toggle off the wireframe and grids using the Show button in the Perspective window pane 654 Chapter 10 Shaders and Lights ...

Страница 661: ... Panel for working with shaders You will use it in the next section to work with lights In the Multi lister you can see the label graphic is shown as a File Texture attached to the Label shader If you want to delete the label graphic you can select it in the Multi lister and use Delete Active on the Multi lister menus Part 2 Adding a Label 655 ...

Страница 662: ...ve from the main menus as this will delete any geometry selected in the scene Save your work 1 Save your work in the wire directory of the Lessons project 2 Name your file myRender_Basics2 wire 656 Chapter 10 Shaders and Lights ...

Страница 663: ... Watch Part 3 of the tutorial An overview of lights used in Alias Lights illuminate objects If your scene contains no lights it will render entirely black There are different types of lights you can use Ambient Light Directional Light Spotlight Point Light Linear Light Area Light Volume Light For most of your scenes you will use one Ambient light and either a Directional light or Spotlight for the...

Страница 664: ...fault lights are one Ambient and one Directional light Lights in the Multi lister When you create lights they are listed in the Multi lister If you double click a light icon in the Multi lister you open the Light editor This is where you can set and edit the light parameters such as Intensity and Color 658 Chapter 10 Shaders and Lights ...

Страница 665: ... when selected a different one for each type of light The light symbols can be toggled on and off using the Show panel on each window pane Shadows The shadows a light casts can be used to help compose the scene In hardware shade a virtual Ground plane can be enabled which allows shadows to be cast You can choose to cast these shadows from one of your lights or from some preset lighting options Par...

Страница 666: ...ing in the scene Instead you will use the default lights listed in the Multi lister to light the scene This will give you complete freedom to adjust the lights and shadows First you will modify the Hardware Shade options to display the effects of the default lights in the scene Choose WindowDisplay Hardware Shade to open the option window In the Light source option of the Settings choose ALL LIGHT...

Страница 667: ... enable the virtual ground plane in the Environment shader This is an invisible floor plane that catches the shadows but does not appear rendered in the scene 1 Double click the Environment shader to open its option window 2 Click the Hardware tab at the top of the option window 3 Open the Ground Plane section Part 3 Lighting the Scene 661 ...

Страница 668: ...s box if unchecked and set Shadow Position to USER DEFINED 5 Set Shadow Blur and Shadow Transparency until you get an acceptable shadow in the shaded view 6 Close the Environment window 662 Chapter 10 Shaders and Lights ...

Страница 669: ...ng the Light Direction Now you will rotate the Directional light to modify the shadow direction 1 Choose Layouts All Windows All Windows or F9 to show all four windows In the Top window the two lights are shown but are partly hidden by the model 2 In the SHOW button in the Top window choose Model to remove the wireframe view This makes it easier to see the lights in the scene Part 3 Lighting the S...

Страница 670: ...t and select the Directional Light TIP You can Transform Scale the light symbol to make it easier to see This will not change the lighting effects 4 Choose Transform Rotate and use the right mouse button to rotate the light in the z axis 664 Chapter 10 Shaders and Lights ...

Страница 671: ...on the shadow so that it falls to the right side of the bottles This shadow position helps to emphasize the design of the finger grip TIP It is often easier to view and manipulate the lights in the 2D windows than in the Perspective window Part 3 Lighting the Scene 665 ...

Страница 672: ... Directional 2 You are prompted to place the light in the scene In the Top view click near the origin to place the light NOTE The location of a directional light does not affect the lighting in the scene only the rotation of the light makes a difference 3 With the light still selected choose Transform Rotate and click and drag the middle mouse button to rotate the light in the y axis 666 Chapter 1...

Страница 673: ...te it in any of the three axes until it is illuminating the dim areas of the bottles The bottles may be over lit as the new light has an Intensity of 1 Now you will modify the second light using the Multi lister 1 Choose Render Multi lister Lights Part 3 Lighting the Scene 667 ...

Страница 674: ... 2 Double click the new light icon to open the option window Open the Common Parameters section and reduce the intensity to around 0 5 3 Check the shaded view and adjust the light intensity further if necessary 668 Chapter 10 Shaders and Lights ...

Страница 675: ...ty image that can be used for presentations or work in progress discussions Opening the tutorial file optional If you successfully completed Part 3 proceed to the next step Setting the Image Quality below If you were not successful in part 3 open the file called Render_Basics_part4 wire located in the wire directory of the CourseWare project This file contains the completed model from Part 3 Part ...

Страница 676: ...ective window 2 Choose WindowDisplay Hardware Shade 3 Make sure that Quality is set to HIGH and Shading method is set to Per pixel to create a high quality image 4 In the Enable Environment Effects section turn on Show Background The background color defaults to black which obscures the shadows 670 Chapter 10 Shaders and Lights ...

Страница 677: ...fy the intensity or direction of the lights to adjust the image Now you will change the background color using the Environment shader 5 In the Enable Environment Effects section of the Hardware Shade window click the Edit Environment button to open the Environment editor window Part 4 Creating an Image 671 ...

Страница 678: ...e Control Panel and double click the Environment shader icon to open the Environment editor window 6 In the Background section of the Hardware tab change the color to white or any other color The shaded view updates to the new background color 672 Chapter 10 Shaders and Lights ...

Страница 679: ...realism to the image you can add a reflection in the ground plane 1 In the Ground Plane section of the Environment shader options check the Reflection option to see a reflection of your model in the ground plane Part 4 Creating an Image 673 ...

Страница 680: ...2 Modify the Reflectivity and Reflection Depth options to change the reflections in the view Exporting an Image Now you can set up the view and export the image 674 Chapter 10 Shaders and Lights ...

Страница 681: ...defaults to tif You can specify an alternative format if necessary The Image Size defaults to the screen size You can choose an alternative image size by choosing Specify Image Size 3 Click Go to save the image The File Lister appears 4 In the Object Name section Windows or Save As field Mac type in myRender and click Save Part 4 Creating an Image 675 ...

Страница 682: ...nts Save your work 1 Save your work in the wire directory of the Lessons project 2 Name your file myRender_Basics4 wire Conclusion Congratulations You have completed a visualization of the shower gel bottles The basic skills you have learned in this tutorial will enable you to visualize your models to a high quality at every stage of your design You have learned to Create and edit shaders Create a...

Страница 683: ...l a Assign a shader to a surface b Modify a light c Change the color of a shader d Change the shading model of a shader e Select objects used by a particular shader 3 Where do you enable the Ground Plane option for receiving shadows a In the Light editor b In the Shader editor c In the Environment editor d In the Hardware Shade Settings e In the General Preferences 4 Which of these techniques you ...

Страница 684: ...ing windows c The intensity value d The color e The layer it is on is not visible On Your Own Now that you have an understanding of how to create shaders and lights practice your skills on the following projects You can create new shaders to illustrate different color options for the design Use the object lister to select the individual bottles and caps You may want to design your own label graphi...

Страница 685: ...Use the scene you have just set up and create some detail views of the design On Your Own 679 ...

Страница 686: ...ls that you created can be rendered using the techniques shown For example the joystick handle is likely to be made from soft touch plastics so try using the Blinn shader Vary the Eccentricity and Specular Rolloff values to create different plastic finishes for the different elements 680 Chapter 10 Shaders and Lights ...

Страница 687: ...For the MP3 Player you may want to drag some shaders from the shader library to create metallic finishes On Your Own 681 ...

Страница 688: ...a light 3 c The Ground Plane is enabled in the Hardware settings tab of the Environment shader editor 4 c Using a Ground Plane for shadows and reflections 5 a The position of a Directional light doesn t affect the light it casts on the scene 682 Chapter 10 Shaders and Lights ...

Страница 689: ... advanced rendering techniques including color mapping bump mapping environment mapping 3D textures and raytracing In this tutorial you will learn how to edit the Render Globals parameters create a background environment create a sky texture create a fractal texture 11 683 ...

Страница 690: ...the scene again and save your work You will begin by re rendering the scene from the last tutorial Watch Part 1 of the tutorial Opening the tutorial file 1 Choose File Open to open the File Browser 2 In the File Browser locate the CourseWare directory and set it as the Current Project 3 Open the file called more_rend wire located in the wire file of the CourseWare directory For information on how ...

Страница 691: ...s Click Yes NOTE If your values for construction tolerances differ from those in the more_rend wire file you will be presented with a dialog Click Accept New Settings to use the construction tolerances in more_rend wire The file is opened Part 1 Editing the Render Globals parameters 685 ...

Страница 692: ...er go to the Lessons project Set the Lessons project as the Current Project 3 In the Lessons project open the pix directory 4 Type render3 in the Object name field Windows or Save As field Mac then press Enter Windows or Return Mac or click the Save button 686 Chapter 11 More rendering ...

Страница 693: ...oses and the render begins When rendering begins the Render Monitor opens 5 When the render is complete click the Show button on the Render Monitor The render is displayed Part 1 Editing the Render Globals parameters 687 ...

Страница 694: ...g is often called nickeling after the faceted edges on old Canadian and American five cent pieces There are two variables that affect the quality of the render The first is the overall quality setting that you assign to the rendering process in general and the second is the tessellation of the model 6 Click the close box on the rendered image and the Render Monitor to close both windows Editing th...

Страница 695: ...and may not contain all the reflections that would be achieved with a higher setting HIGH produces a very high quality image but the image will also take longer to compute The rendering process is an iterative process The typical rendering process is to set some variables in the scene and then render a test image to see the results then change one or some variables and re render the scene to see t...

Страница 696: ...is low the surface is divided into few triangles and it may appear faceted when rendered even if the Global Quality Level is set to HIGH In some cases the only way to reduce the faceting is to increase the model s tessellation value Tessellation value is another important variable in the quality of a final render Mesh Tolerance is the maximum allowable distance measured in centimeters between a NU...

Страница 697: ...nt to overwrite or replace the file Click OK The rendering process begins 2 After the render has completed click the Show button on the Render Monitor to view the image The entire model is much smoother in particular the handle and the base of the teakettle are no longer faceted 3 Click the close box of the Render Monitor and rendered image windows to close them Save your work 1 Choose File Save A...

Страница 698: ... tutorial Creating a cloudy sky background environment First you will create a sky texture with clouds for the background of the scene 1 Open the Multi lister window and display only the shaders Render Multi lister Shaders 2 Double click the Environment shader to open the Environment control window The environment shader allows you to determine the type of image that is produced in the background ...

Страница 699: ...t to the Color field to open the Texture Procedures window There are three types of textures Surface Environments and Solid 4 Click the three texture tabs to open them The Surface section contains 2D textures Part 2 Creating a background environment 693 ...

Страница 700: ... environments that give the appearance of real objects in the scene without adding additional geometry The Solid section contains textures that appear to be created from a block of solid material like wood or marble 694 Chapter 11 More rendering ...

Страница 701: ...procedural texture that simulates a sky Procedural means that the program executes a series of commands to create the texture instead of using a 2D image of the sky The sky texture can simulate a sunrise or sunset or you can create a sunset as it might appear on some faraway planet Part 2 Creating a background environment 695 ...

Страница 702: ...meters tab This section contains variables that control the clouds in the sky Currently there are no clouds in the sky texture as you can see in the Multi lister swatch One way to create clouds is to map a two dimensional texture to the Cloud texture variable 7 Click the Map button next to the Cloud texture variable 696 Chapter 11 More rendering ...

Страница 703: ...ures window appears 8 Click the Fractal button in the Surface section This is a two dimensional texture that works well to simulate clouds and other textures like fog or smoke Part 2 Creating a background environment 697 ...

Страница 704: ...ult variables for the fractal texture because they are sufficient for producing a good cloud image NOTE The Multi lister now contains a Fractal swatch The Fractal texture is used to simulate clouds These clouds are visible in the SkyTexture swatch 698 Chapter 11 More rendering ...

Страница 705: ...e Floor Parameters tab to open this section 11 Click the OFF option next to the variable Has_Floor This turns off the default floor in the Sky texture We do not need the floor because the table top obscures the ground The floor disappears from the SkyTexture swatch in the Multi lister Part 2 Creating a background environment 699 ...

Страница 706: ...d finally black Now drag the slider back to its maximum value Notice how the sky texture changes from black to orange and finally to a very bright washed out color Set the Elevation value to 40 to mimic the sun at noon Change the size of the sun variable from a value of 0 531 to 2 0 and change the azimuth value from 145 0 to 0 0 The SkyTexture swatch updates 700 Chapter 11 More rendering ...

Страница 707: ...er command Render Render The File Browser opens to the pix directory of the Lessons project 2 Type render4 in the Object name field Windows or Save As field Mac then click the Save button The File Browser closes and the render begins 3 Click the Show button on the Render Monitor to view the rendered image Part 2 Creating a background environment 701 ...

Страница 708: ...ky from another position 4 Click the close box in the Render Monitor window and the rendered image window to close them Save your work 1 Save your work in the wire file of the Lessons directory 2 Name your file myadv_rend2 wire Part 3 Creating a 3D solid texture Next you will create a granite 3D solid texture that will be used for the tabletop 702 Chapter 11 More rendering ...

Страница 709: ... to open the Tabletop control window 3 In the Tabletop Control Window change the Shading Model to Phong This will allow you to create a more reflective surface for the tabletop Phong is good for polished stone the highlights are based on the light s color 4 Click the Map button next to the Color field to open the Texture Procedures window Part 3 Creating a 3D solid texture 703 ...

Страница 710: ...5 In the Solid section click the Granite button The Granite Control window opens 704 Chapter 11 More rendering ...

Страница 711: ...ite Click the color swatch next to the Filler Color parameter The Color Editor opens 7 Select a teal color or set the red value to 51 green to 255 and blue to 255 Drag the cross hair cursor on the color triangle toward the bottom apex which will darken the color Part 3 Creating a 3D solid texture 705 ...

Страница 712: ... the colors of the small aggregate stone flecks within the granite Click the Color2 parameter to open the Granite Color 2 Editor Darken the color by moving the cross hairs down on the triangle 706 Chapter 11 More rendering ...

Страница 713: ...9 Click the Color3 parameter to open the Granite Color 3 Editor Darken it as well Part 3 Creating a 3D solid texture 707 ...

Страница 714: ...s supersede the shader color 11 Close the Color Editor Granite Control Window and Multi lister Rendering the scene Now you will render the scene to see the granite texture on the tabletop 1 Select the Render command Render Render The File Browser opens to the pix directory of the Lessons project 2 Click the Save button to overwrite the previous file named render4 708 Chapter 11 More rendering ...

Страница 715: ...t you are using does not show the thickness of the tabletop if you were to re position the camera to view the table thickness and re rendered the scene the table would look like it was cut from a solid piece of granite 4 Click the close box on the window bar of the rendered image to close it Save your work 1 Save your work in the wire file of the Lessons directory 2 Name your file myadv_rend3 wire...

Страница 716: ... Creating a shader for the Grip surface 1 Open the Multi lister 2 Click the Plastic shader to make it active 3 In the Multi lister select the Copy command Edit Copy A new shader is created called Plastic 2 We are creating a shader instead of modifying the original plastic shader because the original shader was also shared by the Decorations layer We don t want to change the shader on the decoratio...

Страница 717: ...deling window click the Grip layer button and select the Pick Objects option The grip becomes active 5 Assign the new Plastic 2 shader to the grip 6 Choose Pick Nothing to deselect all objects Part 4 Creating a 2D bump texture 711 ...

Страница 718: ...trol window You will change the characteristics of the material to be more like a hard sponge The surface will still be somewhat shiny but will not be very reflective 8 Set the Diffuse parameter to 0 2 9 Set the Shinyness value to 2 712 Chapter 11 More rendering ...

Страница 719: ...ch to open the Color Editor 11 In the Color Editor click to open the Swatches section click a red swatch then close the Color Editor At the Shader Name cell change the shader name to Grip Part 4 Creating a 2D bump texture 713 ...

Страница 720: ...rds everywhere there was a dark circle on the image The darker the color the farther it gets pushed from the surface It is important to note that bump maps create the appearance of a bump on a surface but do not affect the surface The edge of a bumped object will retain its original smoothness If you need to the edge or profile of an object to be bumpy as well consider using a displacement map whi...

Страница 721: ...2 Click the Map button next to the Bump parameter Part 4 Creating a 2D bump texture 715 ...

Страница 722: ...The Texture Procedures window is opened 3 In the Surface section click the Bulge texture You will use this texture as the image in the bump mapping procedure 716 Chapter 11 More rendering ...

Страница 723: ... control window is opened 4 Click the Surface Placement tab to open it The Surface Placement parameters control the number of times the image is repeated across the surface Part 4 Creating a 2D bump texture 717 ...

Страница 724: ...ter The bulge texture is apparent 7 Close the control window and the Multi lister Rendering the scene Now you will render the scene to see the bumpy grip texture 1 Select the Render command Render Render The File Browser opens to the pix directory of the Lessons project 2 Type render5 in the Object name field Windows or Save As field Mac then click the Save button 718 Chapter 11 More rendering ...

Страница 725: ...rk 1 Choose File Save As to open the File Browser 2 Save your work in the wire file of the Lessons directory 3 Name your file myadv_rend4 wire Part 5 Raytracing So far you have been rendering your scene using a type of renderer called a raycast renderer A raycast rendering requires a lot of tricks to make it look real because raycasted images do not produce true reflections or refractions Part 5 R...

Страница 726: ...ll delete the Chrome texture from the Metal shader Then you will raytrace the scene Watch Part 5 of the tutorial Deleting the chrome texture In the previous tutorial you applied a chrome texture to the teakettle surface The chrome texture is assigned to the Metal shader Now you will delete this texture because it will not be needed when raytracing 1 Open the Multi lister window and display only th...

Страница 727: ...firm that you want the chrome to be deleted from the model 5 Close the Multi lister Raytracing the scene 1 Select the Render options command Render Render to open the Rendering Options window The Rendering Options window is opened 2 In the Renderer Type section click Raytracer Part 5 Raytracing 721 ...

Страница 728: ... Type render6 in the Object name field Windows or Save As field Mac then click the Save button The File Browser closes and the render begins Rendering a raytraced image takes longer than rendering a raycasted image This is because raycasting requires more time to compute reflections and refractions in a scene 6 Click the Show button on the Render Monitor to view the rendered image 722 Chapter 11 M...

Страница 729: ... visible in the tabletop 7 Close the rendered image and Render Monitor windows Adjusting the reflectivity of surfaces In some cases you may prefer to limit the amount of reflection that occurs on a surface Next you will change the reflectivity of the teakettle and the color on the teakettle 1 Open the Multi lister 2 Double click the Metal shader to open its Control Window Part 5 Raytracing 723 ...

Страница 730: ... teakettle very reflective similar to a mirror 4 Click the Color field to open the Color Editor 5 In the Color Editor change the color of the metal surface from grey to red Then move the cross hairs along the long edge of the color triangle to make the color darker 724 Chapter 11 More rendering ...

Страница 731: ...tor 7 Click the Tabletop shader to display its parameters in the control window 8 In the Reflectivity field change the setting from 0 5 to 0 2 This will reduce the amount of reflection on the tabletop Part 5 Raytracing 725 ...

Страница 732: ... Render The File Browser opens to the pix directory of the Lessons project 2 Type render7 in the Object name field Windows or Save As field Mac then click the Save button The File Browser closes and the render begins 3 Click the Show button on the Render Monitor to view the rendered image 726 Chapter 11 More rendering ...

Страница 733: ...ork 1 Save your work in the wire file of the Lessons directory 2 Name your file myadv_rend5 wire Conclusion Congratulations You have completed this rendering tutorial You now know how to improve the quality of a final render by adjusting variables in the Render Globals window create a background environment specifically a cloudy sky at noon create a solid three dimensional texture granite Conclusi...

Страница 734: ...e Render Monitor Name them 3 In the color editor what effect does lowering the value slider have on the color a makes it darker b makes it lighter c changes the hue d makes the color more intense e makes the color more pastel 4 To reduce the nickeling on an object when its rendered a fix the shading in the shader control window b rebuild the model with more CVs to make it smoother c adjust its tes...

Страница 735: ... Teakettle Tutorial quiz 1 Raytracing 2 Show Log and Abort Exit are the three buttons on the Render Monitor The third button changes its name from Abort to Exit when a render job completes 3 a It makes the color darker 4 c Adjust its tessellation in Render Globals How did you do on this quiz If you got all of the answers correct congratulations If you missed any of the answers you may want to revi...

Страница 736: ...730 ...

Страница 737: ... point 474 arranging windows 19 26 arrow on tool icons 28 assigning objects to construction layers 224 B backgrounds environment shader 692 image 692 birail surface continuity 563 birail tool adjusting continuity after building a surface 540 continuity and tangency 538 blend surfaces 555 Bookmark Lister adding shelves 75 bookmarks adding 72 74 removing 74 renaming 74 toggle camera only mode 74 usi...

Страница 738: ...ol panel increasing spans 203 location 17 control panels visualize 637 coordinate positions 401 coordinates absolute vs relative measure 401 copy objects 447 copying geometry and scaling for rhythm 366 corner fillet for lines 412 courseware installing 13 creating curve with CVs 160 fractal texture 697 new projects in Windows environment 96 100 creating lights 657 creating mirrored surfaces 503 cur...

Страница 739: ...rdware shade 672 environments control window 692 shader 692 sky 695 702 equipment casing 414 extrusion surfaces 339 creating in tutorial 213 F file browser creating new projects in Windows environment 96 100 files opening in Windows environment 82 saving in Windows environments 96 fillet 308 surface fillets 431 fillet a corner on two lines 412 fillet surfaces chordal 316 circular 316 flange 414 fl...

Страница 740: ...nel 203 information window and setting dimensions 475 use in modeling 402 installation courseware 13 interface control panel 17 main window 17 menu bar 17 overview 17 palette 17 shelves 17 interface options icon size 48 point of interest 63 intersecting and trimming surfaces 341 surfaces 294 intersecting surfaces 488 invisibility controlling with object lister 115 obects 478 removing from objects ...

Страница 741: ... 386 590 modeling specifying dimensions 405 modeling to accurate dimensions 401 modeling with primitives 88 models changing view 56 75 definition 5 modifying curves by moving CVs 163 mouse buttons use in non proportional scaling 94 use in rotate tool 111 moving camera 56 75 windows 23 moving keypoints 411 multi lister delete 721 deleting active swatches 721 N nodes 76 node states 78 non proportion...

Страница 742: ...n tutorial 195 planes setting symmetry with 438 point of interest activating 63 locking 71 showing and hiding 70 using 63 positional continuity 514 primary surfaces 281 primitive NURBS objects cone 31 creating 28 cylinder 32 sphere 28 primitives circle changing options 175 modeling with 88 projected curves and trimmed surfaces 373 projects creating 96 100 creating lessons project Windows 96 100 cu...

Страница 743: ...nding multiple edges 490 S save as command 96 100 saving in Windows environments 96 100 shelves 42 saving files in Windows environments 96 100 saving images in hardware shade 675 saving with hardware shade 675 SBD nodes 76 scaling geometry copies for rhythm 366 scaling using pivot points 102 scene rendering 687 scenes definition 5 Sections option 32 setting grid spacing 406 pivot points 428 units ...

Страница 744: ...t line feature 414 421 sponge surfaces 712 square surfaces 520 start up screen 15 16 starting up process 15 16 start up screen 15 16 troubleshooting 15 16 workspace window 15 16 starting up Alias 14 sub palettes 28 sun editing 700 sunrise 700 sunset 700 surface depth with draft tool 418 surface fillet chordal 316 circular 316 surface fillets 431 surface modification and construction history 168 ro...

Страница 745: ...e 712 surface 693 surface placement tab 717 three point arcs 474 tolerances construction 515 tools adding to shelves 43 options 31 picking components 78 removing from shelves 47 renaming 46 shortcuts 40 small icons 48 using 56 tools palette 56 tracking 56 transition surfaces 308 trim label area on packaged goods 545 trimmed surfaces 300 using projected curves 373 trimming 280 intersected surfaces ...

Страница 746: ...th object lister 115 visible image planes 159 visualize control panel 637 assigning shaders 642 creating labels 647 creating new shaders 639 modifying shaders 645 volume measurement 593 and mass properties tool 595 W window location in Alias 17 windows active 25 arranging 19 26 closing 21 moving 23 palette 26 30 resizing 21 Windows environments opening files in 82 opening tutorial file 82 saving f...

Отзывы: