


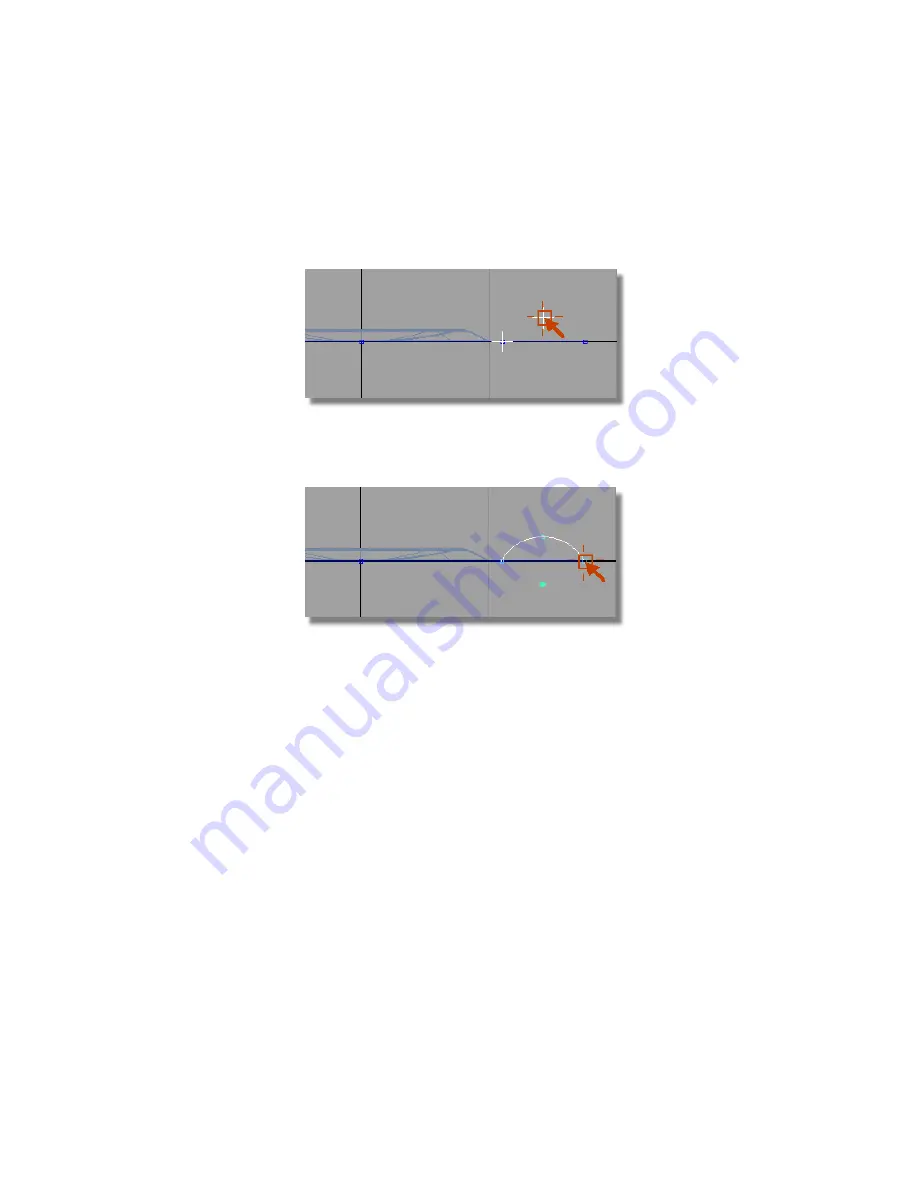
When prompted for the next point on the arc, select an approximate
location for the peak of the curve. This doesn’t need to be accurate, as
later you will set the radius of the arc accurately using the Information
window.
When prompted to place the end point of the arc, use the point snap
(
Ctrl
(Windows) or
Control
(Mac) key) again and choose the keypoint on
the large circle.
The arc is created at an approximate radius, but with an accurate start
and end point.
6
With the arc still selected, choose Windows > Information > Information
Window .
Open the Attributes section, and change the Arc Length/Radius to
10.
Part 6: Control Button | 475
Содержание ALIAS 2010
Страница 1: ...Autodesk Alias 2010 Learning Alias March 2009 Part No 712B1 050000 PM05A ...
Страница 8: ...2 ...
Страница 12: ...6 ...
Страница 18: ... Check the community site for tips and tricks 12 Chapter 2 Getting help on Alias ...
Страница 198: ...5 Select the second triangular curve as the top edge of the side wall 192 Chapter 5 Modeling a Joystick ...
Страница 202: ...Select the circle curve 196 Chapter 5 Modeling a Joystick ...
Страница 203: ...Click on the Go button that appears in the bottom right of the screen Part 2 Creating the Joystick Base 197 ...
Страница 248: ...The row of CVs is selected and highlighted in yellow 242 Chapter 5 Modeling a Joystick ...
Страница 284: ...278 ...
Страница 293: ...A mono rail surface is created 8 Choose Pick Nothing to deselect the surface Part 1 Creating Primary Surfaces 287 ...
Страница 308: ...The upper surface is trimmed 5 Repeat steps 1 4 to trim the lower surface 302 Chapter 6 Modeling a Vacuum Cleaner ...
Страница 309: ...Part 2 Intersecting and Trimming 303 ...
Страница 399: ...On Your Own 393 ...
Страница 404: ...398 ...
Страница 465: ...Part 4 Creating the Screen Recess 459 ...
Страница 491: ...Then choose the inner arc to complete the trimming Part 6 Control Button 485 ...
Страница 514: ...508 Chapter 7 Modeling an MP3 Player ...
Страница 517: ...5 e The Round tool can create a corner surface between three edges Quiz Answers 511 ...
Страница 518: ...512 ...
Страница 612: ...606 ...
Страница 629: ...Visualizing a PDA 623 ...
Страница 685: ...Use the scene you have just set up and create some detail views of the design On Your Own 679 ...
Страница 710: ...5 In the Solid section click the Granite button The Granite Control window opens 704 Chapter 11 More rendering ...
Страница 721: ...2 Click the Map button next to the Bump parameter Part 4 Creating a 2D bump texture 715 ...
Страница 736: ...730 ...