background image

Short messages (SMS) 

45 

Short messages  (SMS) 

The SMS service allows you to send or receive SMS messages to other terminals. 
The messages are not transferred directly to the other terminal but instead are sent 
to your network operator's message center. The message can contain up to 160 
characters. You can save up to 20 messages in the inbox. To use the SMS it is es-
sential that there is support for transferring the call number (CLIP). Then all you 
have to do is register with your message center and away you go. 

You can also send your short message to a subscriber that does not have an SMS-
enabled device. The short message is then read out loud as a voice message. 
Please refer to your network operator's information material for this and other func-
tions. 

Please observe the following points so that you can send and receive short mes-
sages (SMS) with your Voicemail Center 461.2: 

Configuring the telephone connection 

Analogue telephone connection 

If you have an analogue telephone connection, please check whether you can ac-
cess the "Call number transfer" and "Call number display" (CLIP, incoming and out-
going) functions. To do so, please ask your network operator if these features are 
available for your connection. 

ISDN connection 

If you have an ISDN connection check that call number display (CLIP), is activated 
and that call number transfer (CLIR) is not suppressed in your PABX. 

Содержание VOICEMAIL CENTER 461.2

Страница 1: ...User Manual Answering Machine Voicemail Center 461 2 ...

Страница 2: ...e sup port application and or nuclear facility When using our products for such applications a writ ten agreement by Auerswald for each individual case is necessary in advance Accessory and Service components These are available at your authorized dealer or in the Internet shop distriCOM at http www districom online de Only shipping in Germany ...

Страница 3: ...y from sources of electrical disturbance Only attach accessories authorised for this device Never open the device yourself Do not use sharp or metal objects on the wrap connections Use only a soft damp cloth to clean the device Do not use abrasive liquids or chemicals to clean the device Protect the device from moisture dust liquids and vapours Do not use the device where there is direct sunlight ...

Страница 4: ...xt entries is used as the entry button for letters and numbers Message transfer Switches message transfer on or off For text entries is used as the entry button for letters and numbers Timer Switches timer on or off For text entries is used as the entry button for letters and numbers Secondary function Enables a secondary function For text entries is used as the entry button for letters and number...

Страница 5: ...coming messages Playback starts with the oldest and ends with the newest recording and Secondary function and Control button down pressed in succession Opens the entry field for the telephone book and Secondary function followed by pressing and holding message Starts recording the outgoing message via the audio input and Secondary function and Answering mode pressed in succession opens the setting...

Страница 6: ...ull and there is no more memory for new short mes sages LED in the answering mode button Is lit when answering mode is switched on answering machine active LED in the playback button Flashes when there are new unread incoming messages Flashes quickly if the memory is full and there is no more space for new incom ing messages ...

Страница 7: ...source 16 Checking OGMs 17 Deleting OGMs 17 Answering mode 18 Playing back and deleting incoming messages 20 Playing back new incoming messages 20 Playing back all incoming messages 20 Repeating 21 Pausing playback 21 Skip 21 Fast forward and rewind 21 Deleting individual incoming messages 22 Deleting all incoming messages 22 Dialling the caller directly 22 Monitoring Personal info memo 24 Monitor...

Страница 8: ...on 45 Registering and de registering with your message center 46 Entry options for short messages 46 Inbox 47 Outbox 49 Sending a message SMS 51 Templates 53 Message center 54 Timer 55 Setting options for timer 55 Programming timer 56 Sample programming for timer 57 Switching on timer 58 Message transfer 59 Setting options for message transfer 59 Settings for message transfer 60 Message transfer b...

Страница 9: ...4 Setting options for mailboxes 74 Setting up mailboxes 75 Using the mailboxes 77 Remote access to mailboxes 78 Automatic call forwarding to the mailbox 78 Settings 79 Setting options 79 Setting menu 82 Adjusting the volume 83 Service menu 84 Appendix 86 Troubleshooting 86 Delivery status 88 Technical Data 90 Index 91 Brief operating instructions 93 Operating card for remote control 94 ...

Страница 10: ...recording Remaining incoming message capacity Timer on switching time time Secondary function Message transfer switched on Enter a call number from the telephone book Selected outgoing message Delete Search forwards Automatic call back Search backwards Redial Call unsuccessful Call successful Branch to a sub menu Mailbox 1 set up new incoming messages available Device locked Mailbox 1 set up Ongoi...

Страница 11: ...and operation Send receive short message Switch on off basic settings software update call forwarding Automatic answering line busy Appointment absence manager active Ringing signal for incoming calls Transfer telephone book to a second device Outgoing call ...

Страница 12: ...e been altered in this way may leave tracks behind on the furniture Therefore use a non slip underlay especially for new or freshly treated furniture Connecting Before you can use your Voicemail Center 461 2 you first need to connect all the necessary cables 1 Fit the small connector of the mains plug into the POWER jack and the plug into a 230 V socket outlet 2 Fit the small connector of the tele...

Страница 13: ...o the IN socket and the cinch plug to the audio output on the external device audio system cassette recorder etc 5 If you want to transfer the telephone book from one different Voicemail Center 461 2 to another use the transfer cable with two jack plugs Fit the plugs to the OUT socket on one device and the IN socket on the other ...

Страница 14: ...ot record an incoming message OGM only the caller is given information but cannot leave a message Sample outgoing messages Outgoing message with incoming message option Hello this is the connection for Manfred Miller from I am currently away from the office and expect to return by time You can reach me in person between time and time or call me on Alternatively you can leave your name and number a...

Страница 15: ...hout incoming message is displayed To continue the recording press and hold OGM again The recording continues To cancel the recording press stop The recording is cancelled Using the selection button next to the relevant line select whether the OGM should provide the option of leaving an incoming message or not The OGM is completed and is played back for verification purposes If the OGM gives the o...

Страница 16: ...displayed to signal an ongoing recording Start the playback for the external signal source You can follow the ongoing recording via the loudspeaker The display shows the time that you have already been re corded To end the recording release OGM With incoming message and Without incoming message is displayed Using the selection button next to the relevant line select whether the OGM should provide ...

Страница 17: ... at the bottom right of the dis play Press OGM briefly The OGM is played back The playback symbol the time that you have already heard and the number of the current OGM are displayed The volume can be set using the control buttons left right Deleting OGMs Press the selection button next to the delete symbol speed during playback The current OGM is deleted ...

Страница 18: ...ts up For OGMs without the option to record a telephone with the number of calls is displayed For OGMs with the option to record in addition the number of incoming messages is shown in large digits to the right of the telephone If the caller s number is transferred dur ing a call the display changes and the call number is displayed If the telephone number matches one from the telephone book the ca...

Страница 19: ...l not be an swered The standby status is displayed If you record OGM 5 without the option to record OGM only when the incom ing message capacity is full your Voicemail Center 461 2 switches to this OGM automatically Otherwise the device leaves the answering mode and does not re spond to further calls ...

Страница 20: ...ne number is trans ferred during a call then this is also dis played If the telephone number matches one from the telephone book the caller s name is displayed The LED in the playback button flashes if you have new unread messages Playing back all incoming messages Press secondary function The secondary function symbol is dis played Press playback The playback starts with the first incom ing messa...

Страница 21: ...s paused Press playback Playback continues Skip Press the selection button next to the go backwards or forwards symbol The incoming message you are listening to is skipped or repeated Fast forward and rewind Press and hold the selection button next to the go backwards or for wards symbol Playback is interrupted and the display counts down or up the playback time ...

Страница 22: ... The display shows standby and answer ing mode 2s Press the selection button next to the delete symbol for 2 seconds All incoming messages are deleted Dialling the caller directly Press the selection button next to the displayed telephone number or the name during playback The device starts dialling the selected telephone number Dialling can be screened via the loudspeaker After dialling accept th...

Страница 23: ...Playing back and deleting incoming messages 23 ...

Страница 24: ...e receiver is displayed so as to indi cate an ongoing recording To end the recording press stop or hang up The standby status is again displayed If answering mode was activated before this continues A monitoring recording is stored as any other regular recording and can be played back at any time You can also transfer recordings via the audio output on an external device e g cassette recorder The ...

Страница 25: ...ng Start speaking maintain approx 15 cm distance from the microphone The display shows the minutes and sec onds that you have been speaking To stop the recording press stop The recording ends The LED in the play back button flashes to signal a new message If answering mode was acti vated before the incoming message counter increases by 1 You can also record your personal info during answering mode...

Страница 26: ...Voicemail Center 461 2 switches this message off automatically Press secondary function The secondary function symbol is dis played Press answering mode The display changes and shows the cur rent date and time The hours flash Set the desired time using the con trol buttons up down left right The display shows the absence time that will be announced You can also reset the date entry using the selec...

Страница 27: ...ghts up and the display shows the absence time Calls are answered and the caller hears the absence message Press Answer mode to end the ab sence manager ahead of time The display changes and returns to the initial state Timer switching times are not activated when the absence manager is active ...

Страница 28: ...tries or the complete list You can transfer telephone numbers directly into the telephone book Press control button up The display shows the newest entry from the call list A smiling or sad face indi cates whether the connection was suc cessful or whether the caller hung up without being answered You can search the whole list using the control buttons up down To call a caller back press the se lec...

Страница 29: ... button next to the delete sym bol The entry is deleted 2s To delete the whole call list press the selection button next to the de lete symbol for 2 seconds The entire call list is deleted To exit the list press stop The initial state is again displayed ...

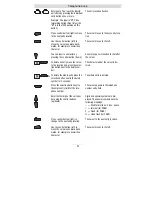
Страница 30: ... individual ringing tone refer to Page 36 Vocal clip or a personalised OGM refer to Page 35 Personal outgoing message to an entry If at a later stage the call number for this entry is received you will hear the individual ringing tone from the device s loudspeaker or the caller will hear the special OGM that you have assigned to him Entering and saving entries Press secondary function The secondar...

Страница 31: ... and press the selec tion button next to the delete sym bol The character under the cursor is de leted 2s To delete the whole entry press the selection button next to the delete symbol for 2 seconds The whole entry is deleted Press the selection button next to the empty entry field for the tele phone number The cursor appears in the telephone number entry field Enter the first digit of the call nu...

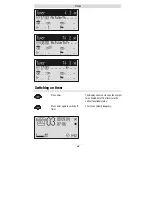
Страница 32: ... sym bol The character under the cursor is de leted 2s To delete the whole entry press the selection button next to the delete symbol for 2 seconds The whole entry is deleted To stop the entry press stop several times The entry is stored The initial state is again displayed For PABX the prefix for the public telephone network is dialled before each call number refer also to Page 81 Settings PABX p...

Страница 33: ... 5 U V W X Y Z Ü u v w x y z ü ù 6 7 8 9 0 Search entries Press control button down The telephone book is opened Search for the desired entry using the control buttons up down The entries scroll through the display or Select initial letters by pressing the corresponding entry button one or more times e g T press OGM button five times The entries with the requested initial let ters appear in the di...

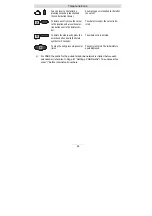
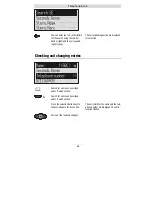
Страница 34: ...es are displayed for selection Checking and changing entries Search for names as described under Search entries 2s Search for names as described under Search entries Press the selection button next to the desired name for 2 seconds The entry field for the name and the tele phone number are displayed The entry location flashes Carry out the required changes ...

Страница 35: ...2s For an existing entry Search for entry as described in Searching entries and press the selection button next to the entry for 2 seconds Press the selection button next to the sub menu symbol for 2 sec onds The display shows the current OGM Set the desired OGM using the control buttons up or down The numbers 1 to 5 none and a dash ap pear in the display If you select none the answering machine d...

Страница 36: ... For an existing entry Search for entry as described in Searching entries p 33 and press the selection button next to the entry for 2 seconds 2x Press the selection button next to the sub menu symbol twice The display shows the current ringing tone Set the desired ringing tone using the control buttons up or down The numbers 1 to 14 and a dash appear in the display The function is switched off usi...

Страница 37: ...461 2 Search for names as described under Search entries page 33 Press the selection button next to the desired name The device starts dialling the selected telephone number Dialling can be screened via the loudspeaker After dialling accept the call by lift ing the receiver The display shows a stopwatch that counts the duration of the current call ...

Страница 38: ...tions To activate Call back on busy you usually dial a certain combination of digits e g Hook flash 37 The combination of digits must be pre entered as described in Settings Call back code Page 80 You call someone and the number is engaged Subscriber busy is displayed To start automatic re dialling press the selection button next to the re dial symbol After the pre set time the dialling is re peat...

Страница 39: ...bed in Settings Page 80 Call Voicemail Center 461 2 You hear the OGM Start entry with the star button The OGM stops Enter the message code via the telephone keypad If you make a mistake delete entry using the star key and start again A voice message confirms recognition of each digit To confirm the entry press the hash button The device requests you to speak If you enter an incorrect code your Voi...

Страница 40: ...A voice message confirms recognition of each digit To confirm the entry press the hash button If the correct code is detected your Voicemail Center 461 2 notifies you via a voice message If the code is wrong the device breaks the connection Start the desired function by enter ing the corresponding number If there are new messages playback starts automatically Press digit 8 to end a function The cu...

Страница 41: ... where it was paused e g after a quit request Skip Press 4 for back or 6 for forwards dur ing playback The ICM you are listening is skipped or repeated To delete the current ICM Press 7 during playback The current incoming message is deleted To delete all ICMs Press and 7 in succession All incoming messages are deleted Intercom function Room monitoring intercom Press 1 The microphone switches on a...

Страница 42: ... Voicemail Center 461 2 asks you to speak Record an outgoing message For an outgoing message with incom ing message option After recording the OGM press 8 The OGM is played back for checking At the end you hear one signal tone or For an OGM without incoming mes sage option OGM only After recording the OGM press The OGM is played back for checking At the end you hear two signal tones The message is...

Страница 43: ...S To delete the call number Press and 7 in succession The call number is deleted To accept the call number Press and 8 in succession The new call number is played back for checking Call forwarding function Activating call forwarding Press and 1 in succession The current target call number is an nounced Next comes the request to enter a new target call number Enter the new target call number For sp...

Страница 44: ...w target call number Switch off device function Switching answering mode on off Press and 0 in succession Your Voicemail Center 461 2 disconnects and will not answer any more calls Remote activation of the answer mode Call Voicemail Center 461 2 After 50 seconds the device answers with a beep Enter the remote access code via the telephone keypad Start entry with and confirm with The OGM is played ...

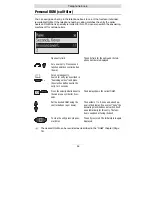
Страница 45: ...MS enabled device The short message is then read out loud as a voice message Please refer to your network operator s information material for this and other func tions Please observe the following points so that you can send and receive short mes sages SMS with your Voicemail Center 461 2 Configuring the telephone connection Analogue telephone connection If you have an analogue telephone connectio...

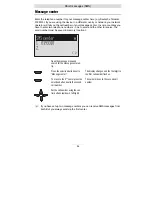
Страница 46: ...ow be sure that you can send and receive SMS using your Voicemail Center 461 2 You can deactivate receiving SMS messages by sending ABMELD to target call number 8888 Future SMS that are sent to your call number are then read as voice messages As of June 2004 Entry options for short messages Inbox This is where you find all the short messages you have received and can scroll through read delete or ...

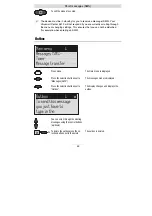
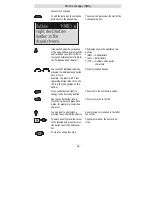
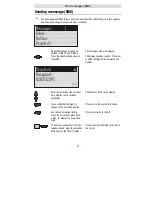
Страница 47: ...center Never enter outside line numbers prefixes for your PABX before the call number e g 0 This is done in the Settings PABX prefix menu refer to Page 81 Inbox If you have new unread messages SMS the SMS LED flashes If the SMS LED blinks rapidly there is no space in the inbox for new messages Delete the older messages to create more space Press menu The main menu is displayed Press the selection ...

Страница 48: ...e number to the telephone book press secon dary function and the relevant se lection button The entry field for the telephone book is displayed with the copied telephone number Now all you have to do is enter the name To read a message press the selec tion button next to the desired mes sage briefly The selected message is displayed You can scroll through the mes sages using the control buttons up...

Страница 49: ...hat you can not be disturbed for example when entering an SMS Outbox Press menu The main menu is displayed Press the selection button next to Messages SMS The messages menu is displayed Press the selection button next to Outbox The display changes and displays the outbox You can scroll through the existing messages using the control buttons up down 2s To delete the outbox press the se lection butt...

Страница 50: ... individual entry button once or more Example You require M Press forwarding button three times the M is in the third position on this button The entry location flashes Press control button right to change to the next entry location The cursor to the next entry location Use the control button left to move the cursor once place back wards for example to overwrite a character The cursor moves to the...

Страница 51: ...e first digit of the recipient s call number Enter the first digit of the call num ber using the control buttons up down The numbers 0 to 9 in the display Press control button right to change to the next entry location The cursor to the next entry location Use the control button left to move the cursor once place back wards for example to overwrite a digit The cursor moves to the left To transfer ...

Страница 52: ...y move the cursor to the location and press the selec tion button next to the delete sym bol The character under the cursor is de leted To transfer the call number press stop The call number is transferred and Dis patch is displayed To start the transfer press the se lection button next to Dispatch The device creates the connection to the message center and transfers the outbox to the selected rec...

Страница 53: ...to the templates You can scroll through individual templates using the control buttons up down The start of the selected template is dis played 2s To copy a template to the outbox press the corresponding selection button for two seconds The template is copied and the display changes to outbox To create or edit a template press the selection button next to the de sired template briefly The selected...

Страница 54: ...ive The send number must be saved in memory location 1 Open the message menu and search for the message center en try Press the selection button next to Message center The display changes and the first digit in the first call number flashes To move to the 2nd center press the selection button next to the second call number The cursor moves to the second call number Set the call number using the co...

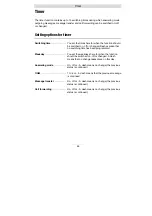
Страница 55: ...ashes mean that no switching time has been programmed Weekday You set the weekdays here for when the function should be switched on off or changed A dash means that no change takes place on this day Answering mode On off or A dash means no change the previous status is continued OGM 1 to 6 or A dash means that the previous message is continued Message transfer On off or A dash means no change the ...

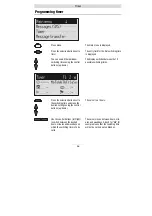
Страница 56: ...hes between the 10 possible switching times Press the selection button next to the switching time and make the desired settings using the control buttons up down The cursor is at hours Use the control buttons left right to switch between the desired hours minutes and weekdays on which the switching time is to be valid The cursor moves between hours min utes and weekdays A dash for Mo for example m...

Страница 57: ...e delete sym bol for 2 seconds All switching times are deleted 2s To stop entering additional switch ing times press stop The settings are confirmed To stop the entry press stop several times The initial state is again displayed Use the two lower selection buttons and the control buttons left right to find what needs to be changed in the selected time The symbols have the following mean ings Answe...

Страница 58: ...r 58 Switching on timer Press timer The display shows a clock as the symbol for activated timer The timer sets the current functional status Press timer again to switch off timer The clock symbol disappears ...

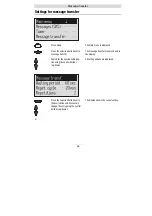
Страница 59: ...ol Code If you do not access the messages remotely the device dials the next call number after a waiting period 5 180 seconds If no remote control is carried out during the repeat time 5 60 minutes the device dials the complete call number sequence again as a reminder If there is no remote control your Voicemail Center 461 2 makes no one or two repetitions depending on the setting you have chosen ...

Страница 60: ...ge transfer The message transfer menu is shown in the display Search for the desired setting op tion using the control buttons up down All setting options are displayed Press the selection button next to the desired line and if necessary change the entry using the control buttons up down The display shows the current setting or ...

Страница 61: ...o move the cursor once place back wards for example to overwrite a character The cursor moves to the left To transfer a call number from the telephone book press the selection button next to the Insert symbol The call number is entered to the left of the cursor Search and select names as de scribed under Search entries The name is displayed below the call number To enter a character press secon da...

Страница 62: ... mobile phone You have 2 new messages from 1 01701234567 2 Ashton Deidra Use this function if you do not want to be disturbed and will pick up your messages later using remote access To ensure you receive an SMS instead of a message place an S before the target call number Your device must also be set up for SMS messages refer to Short messages SMS chapter Example You would like to receive an SMS ...

Страница 63: ...ike message transfer by short message SMS you must enter an S before the call number Normal subscriber 0123456789 PABX Extension to extension i 269 Short message SMS S 017012345678 Switching on message transfer Press message transfer The message transfer symbol is dis played Press message transfer again to switch off message transfer The symbol for message transfer is dis played During ongoing mes...

Страница 64: ...nging tone for your tele phone and your Voicemail Center 461 2 will play it back Please note that your individual ringing tone is only played back on the second call signal During playback it is not possible to receive a new call number CLIP Press menu The main menu is displayed Search for the Individual ringing tone entry using the control but tons up down Press the selection button next to Indiv...

Страница 65: ...ecord symbol Now record your individual ringing tone by playing any sound in front of the inte grated microphone Release the button The recording is completed and is played back for verification purposes To playback an existing recording press the selection button next to the playback symbol The ringing tone is played back To delete the ringing tone press the selection button next to the delete sy...

Страница 66: ...e before the target call number e g 21 A second code e g 21 switches call forwarding off again Refer also to your network operator s or system manufacturer s user instructions Setting options for call forwarding Activate You can enter the code to switch on call forwarding here You can enter up to 15 characters A dash means Entry location deleted Deactivate You can enter the code to switch off call...

Страница 67: ... change The cursor is located at the entry point Select the desired entry location using the control buttons left right and change it with the control but tons up down The display shows the current setting or When entering the target call num ber set the first digit using the con trol buttons up down Digits and special symbols are dis played The special symbols have the following meanings Wait for...

Страница 68: ... cribed under Search entries p 33 To enter a character press secon dary function and then control but ton down An empty space is inserted to the left of the cursor To delete a digit move the cursor to the location and press the selec tion button next to the delete sym bol The character under the cursor is de leted 2s To delete the whole entry press the selection button next to the delete symbol fo...

Страница 69: ...call forwarding service Please note that the target call number must end with a hash Activate 21 Deactivate 21 Target call number 021024712 For PABX the prefix for the public telephone network is dialled before each call number refer also to Page 81 Settings PABX prefix To suppress this enter i before internal call numbers ...

Страница 70: ...ith unimportant recordings you still have the option of saving the recording only after pressing a confirmation on the device You also have the option of activating the monitoring via the contact control via the alarm input Setting options for automatic monitoring Activate function Yes or no You can switch the function on and off here All calls Yes or no Select No if you only want to record in com...

Страница 71: ...l buttons up down Press the selection button next to Automatic monitoring The entry field for automatic monitoring is displayed Press the selection button next to the setting that you wish to change until the desired setting is dis played The display shows the current setting To stop the entry press stop several times The initial state is again displayed ...

Страница 72: ... the PIN code is 0000 Locking the device Changing PIN Press menu The main menu is displayed Search for the Security lock entry using the control buttons up down Press the selection button next to Security lock The PIN entry field is displayed Enter the first digit of the PIN using the control buttons up down The display shows the current setting Select the next or previous entry location using the...

Страница 73: ...utton next to Change PIN The Voicemail Center 461 2 requests you to enter a new PIN Use the control buttons to enter a new PIN The display shows the current entry To stop the entry press stop several times The new PIN is confirmed and the initial state is again displayed Unlocking device Use the control buttons to enter the PIN The display shows the current setting After entry press the selection ...

Страница 74: ...cting the relevant mailbox automatically refer to Automatic call forwarding to the mailbox p 78 Another usage is an information center where the caller first hears the set message from the actual answering machine The OGM contains notes on where the desired information is located mailbox 1 2 3 or 4 Setting options for mailboxes Activate Yes or no If you enter Yes here the mailbox will be switched ...

Страница 75: ...boxes and the message transfer function you must enter the target call number here Setting up mailboxes Press menu The main menu is displayed Search for the Set up mailboxes entry using the control buttons up down Press the selection button next to Mailbox setup The mailbox setup menu is displayed Search for the desired mailbox us ing the control buttons up down 4 mailboxes are displayed ...

Страница 76: ...ws the current setting or When entering digits press the se lection button next to the desired line The entry location flashes Change the settings using the con trol buttons up down The display counts up or down For settings with several digits move the entry location to the re quired location using the control buttons left right The selected entry location flashes To end digit entry press the sel...

Страница 77: ... detail in the previous chapters Because there is only one OGM for each mailbox it goes without saying that it is not possible to select the OGM Press the selection button next to the mailbox symbol until the de sired mailbox flashes The selected mailbox flashes E g Carry out desired function e g playback all ICMs Playback of all the ICMs in the selected mailbox starts To go back to the actual ans...

Страница 78: ... Your PABX must meet the following requirements The CLIP function transfer of call number must be supported and the call number of the extension that has for warded must be transferred Connect your Voicemail Center 461 2 to a free extension analogue port on your PABX Set the mailboxes up and enter the call numbers of the corresponding extensions Record individual OGMs for the individual mailboxes ...

Страница 79: ...nounce the time after each ICM Date ancmnt Yes or no You can set here whether to announce the date after each ICM Number ancmnt Yes or no You can set here whether to announce the call number transferred after each ICM Ancmnt at unit Yes or no Here you can switch the speaking clock off and on when playing back from the device Quality 128 KB sec or 64 KB sec There are two levels for the recording qu...

Страница 80: ...number of ringing tones set If there are no new ICMs the device only answers the calls after the number of ringing tones set in the Ringing tones option So before accept ing the call you already know whether there are new ICMs and whether remote control is worthwhile Remote on off Yes or no You set whether the answering mode should be activated remotely or not Remote delete Yes or no You can set h...

Страница 81: ...all number In order to rec ognise the additional numbers and to cut them off you can enter them here Call back code Enter your call back code for your PABX e g 79 here You can enter up to 15 characters Message tone Volume levels 1 to 4 or off If you activate the sound by setting the volume each time a new ICM is re ceived a message tone sounds every 10 seconds Contrast You can set the screen contr...

Страница 82: ...ttings menu is displayed Search for the desired setting op tion using the control buttons up down All setting options are displayed Press the selection button next to the setting that you wish to change until the desired setting is dis played The display shows the current setting or When entering digits press the se lection button next to the desired The entry location flashes ...

Страница 83: ...ft right The selected entry location flashes To end digit entry press the selec tion button next to the desired line again The entry location stops flashing To stop the entry press stop several times The initial state is again displayed Adjusting the volume You can set the volume when the device is in the initial state Set the volume using the control buttons left right The volume bar shows the cu...

Страница 84: ...ns all settings to the status they had on delivery The call list and all ICMs and OGMs and individual ringing tones are deleted The telephone book entries are retained The Delete telephone book function deletes the entire telephone book The function firmware download loads the latest program version via the tele phone network and then replaces the former program by the new program One download pro...

Страница 85: ... button next to the desired function and follow the displayed instructions To carry out the software update enter the phone number of the update server This entry has to be made only once the number will then be available for all further software updates The relevant telephone number for your coun try is indicated in the appendix under service ...

Страница 86: ... Interference from cordless telephone monitor etc Chang installation location Messages not recorded Device is set to OGM without ICM option message only Change or re record OGM No answer subsequent telephone does not work Wrong connection cable wiring boxes incorrectly wired Only use original cables check wiring boxes if nec get a specialist to check Incorrect or no connection when dialling from P...

Страница 87: ... function is not authorised The caller has suppressed his call number or has a secret number The call comes from a public telephone The called is made via a telephone network that does not support transferring call numbers Check with network operator or PABX as to whether function is supported or needs to be authorised ...

Страница 88: ...lity 128 kb sec Length of ICM 2 minutes Monitoring during ICM Yes Number of ringing tones before answer 2 Queue message Own number Remote access code Quick check code Toll saving No Remote activation of the answer mode No Remote deletion Yes Room monitoring Yes Message code Redial every 10 seconds External call back code Prefix for the public network PABX CLIP correction PABX Internal call back co...

Страница 89: ...inutes Repetitions 2 OGM playback 5 Individual ringing tone Off Activation code for call forwarding Deactivation code for call forwarding Automatic monitoring No All calls No Confirm save Yes Appointments Off PIN 0000 Mailboxes Off ...

Страница 90: ... Number of outgoing messages 6 Incoming messages Recording method PCM 64 128 kBit s Sampling rate 8 16 kHz Total recording capacity approx 60 30 Min Number of incoming messages max 199 Memory Call list 50 entries Telephone book 100 entries SMS inbox 20 short messages CLIP Call number display Dual mode DTMF FSK Data retained after power failure 10 years Time Network synchronous Display Graphics LCD...

Страница 91: ...84 Deleting messages 22 Deleting OGMs 17 Delivery status 88 Destination call number 66 75 Dial tone dial pause 31 61 67 Dialing from the telephone book 37 Dialing the caller directly 22 Display symbols 10 E Entering entries 30 Extension 75 External signal source 16 65 F Fast forward and rewind 21 Flash 31 61 67 H Holding a call 38 Hook flash 38 61 81 I Inbox 46 47 Individual ringing tone 36 64 Ins...

Страница 92: ...ation 44 Remote deletion 41 Repeat period 59 Repeating 21 Repetitions 59 Ringing tones 79 Room monitoring 41 S Safety instructions 3 Sample outgoing messages 14 Search entries 33 Security lock 72 Send telephone book 84 Sending a message 51 Sending SMS 46 Service menu 84 Set backlight 81 Set language 79 Set remote control 80 Setting contrast 81 Setting options 79 Setting time 79 Setting up mailboxe...

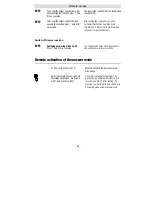
Страница 93: ...ges To play back all recordings Adjust volume Deleting all incoming messages or Press selection button during playback to delete the current ICM Press selection button for 2 seconds to delete all messages Answering mode Press to switch on answering mode Press to switch off answering mode Dialling from the telephone book Open telephone book and search for entry using the control button down To limi...

Страница 94: ...Operating card for remote control ...

Страница 95: ...884273 01 12 05 ...

Отзывы: