background image

24 

First, choose the method how the bass of the selected channel group is reproduced: 

None:


speaker(s) of this channel group is/are not available. 

Small:


Bass  below  the  crossover  frequency  ('

X-Over  Freq

')  is  redirected  to 

subwoofer channel or to any speaker selected as '

Large

', if no Subwoofer 

is available. Please use this option for small speakers, that are not capable 
of reproducing frequencies below the crossover frequency. 

Large:


the  speaker(s)  of  this  channel  group  reproduce  the  full  frequency  range. 
Select  this  option,  if  your  speakers  are  able  to  reproduce  bass  below  the 
crossover frequency. 

X-Bass:

  same as '

Large

', but additionally the bass below the x-over frequency of 

this  channel  group  is  re-routed  to  the  Subwoofer.  Use  this  setting  if  you 
want  to  drive  your  speaker  in  full  range,  but  also  create  a  stronger  bass 
foundation. 

Note:

  As  now  the  speaker(s)  of  this  channel  group  and  the 

subwoofer reproduce the bass of this group, an unwanted bass gain could 
occur. In this case switch to setting '

Large

' or '

Small

'  


Note:

 This option is only available, if a subwoofer is connected and set to 

'

available

'. 


Set X-Over Freq: 

Use  keys 

  and 

  to  adjust  crossover  frequency  ('

X-Over  Freq.

')


for  the 

speakers of the current channel group. Skip through channel groups by using keys 


Set High Pass Q: 

Adjust  Q  factor  of  current  high  pass  filter.  Default  setting  is  0.71  and should only be 
altered by experts. 


Is Subwoofer available?: 

If  a  subwoofer  is  available  in  your speaker configuration, press 

 key to activate it 

('

Yes

' or '

available

'). If a subwoofer is not available, press 

 key to deactivate the 

subwoofer channel ('

No

' or '

not available

'). 

Note:

 You can only switch off the subwoofer, if Front speakers are set to '

Large

' and 

no  channel  group  is  set  to  '

X-Bass

'.  Otherwise  the  display  shows  '

n/a

'  if  you  press 

 key. 


Set Subw. Phase: 

Select phase of the Subwoofer to '

normal

' or '

inverted

'. 


Содержание MAP v2.0

Страница 1: ...1 audionet maP v2 0 Multi Channel Audio Video Pre Amplifier User s Manual V0 7 ...

Страница 2: ...nt panel 8 Remote control 9 Preferences Setup 15 Menu Channel Setup 17 Menu Decoder Setup 19 Menu Options Setup 21 Menu Video Setup 23 Menu Bass Manager 23 Menu Delay Manager 25 Display 26 On Screen Display OSD 29 Progressive Scan Card 30 Security advice 37 Addendum Picture of back panel ...

Страница 3: ...be earthed Please ensure a stable earth connection Phase Hot pin is marked at the back panel phase 23 The MAP is a stand by device Please use the mains switch 23 at the back panel to switch on the MAP After a short time the display reads AUDIONET to show that the unit is in stand by mode Only in case of extended absence like vacations or if massive trouble on mains power is to be expected you shou...

Страница 4: ... and EPS with mains Switch on first the EPS then the MAP The unit is now in stand by mode To disconnect both units from mains please switch off first the MAP then the EPS Before switching off the MAP make sure it is in stand by mode by pressing the power key at the front panel or the key on the remote control Audio Video Connections Analog Inputs Connect 2 channel analog sources to one of the 6 an...

Страница 5: ...ible to receive and decode DVD Audio data with the MAP Note Data on the Audionet HighBit interface will be recognized and decoded automatically by the MAP If the second data connection is missing the MAP will issue the error message HighBit Cable 2 Out of lock Please check the correct setup and connection of both cables from VIP to MAP External 8 Channel Analog Inputs Plug in analog multi channel ...

Страница 6: ...ogressive Scan Card video inputs Y R Cr G and Cb B 2 are decoupled from the corresponding outputs by 0dB gain video amplifiers Connect your DVD Player and projector to the corresponding in outputs Note Please refer to chapter Progressive Scan Card for detailed information about connection and configuration of the optional Progressive Scan Card First Steps The following provides a short overview of...

Страница 7: ...l will support you to determine the correct level of each speaker so all perceived volumes are the same This setup is necessary as different speakers have different sensitivities causing different perceived volumes though the input signal has the same level Note After adjusting the volume levels of all speaker channels we recommend to save these settings to all input channels as a simple start up ...

Страница 8: ...menus please press the up and down keys With the set key you skip through the menu items of the setup menus If you press and hold the set key for more than 2 seconds it will get you to the next setup menu Overview of setup menus RUN mode â Level Setup â Channel Setup â Decoder Setup â Options Setup â Video Setup â Bass Manager â Delay Manager Before describing all menus and their menu items the fu...

Страница 9: ...to 4 If you want to change any setup options use keys on page 5 To change any setting of the digital equalizer please refer to page 6 Note While being in the device menu MAP of the remote control use the arrow keys and on the bottom of the touch screen to skip through the screen pages The first number displayed between the arrow keys is the number of the current screen page the second number shows...

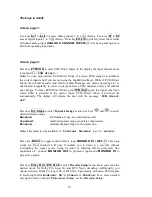
Страница 10: ...s switched off automatically The display will inform the user with the message PCM direct off Press key Dyn Range to enter Dynamic Range menu Use keys and to select desired dynamic range Maximum full dynamic range no compression at all Standard medium dynamic range moderate compression Minimum minimal dynamic range full compression Note This menu is only available if Internal Decoder is set to act...

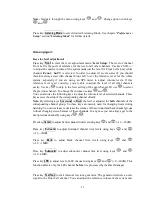
Страница 11: ...nd You can also use the following keys to adjust the volume level of selected channels These keys access the setup of the corresponding channel directly Note By selecting keys Surround or Back the level is adjusted for both channels of the corresponding channel group So these keys are mainly used for changing levels during listening You can increase or decrease the volume of the surround and back ...

Страница 12: ...g Dim Display again or waiting approx 12 seconds If display brightness is set to Off the display is only activated while making adjustments It will be switched off automatically some seconds after the last change of settings Press key DigiRec Select to decide which signal is routed to digital out Use and keys to select which digital input is output at the digital output jacks DIGITAL OUT 8 indepen...

Страница 13: ...hannel or even to every input channel at once Press and select the input channel with or Then press to transfer the current settings to that input channel Press again to enter the mode to assign current settings to all input channels Press to start the data transfer A user setting comprises Trim and balance levels of all channels PCM direct mode dynamic range Dolby Pro Logic IIx and DTS Neo 6 Mode...

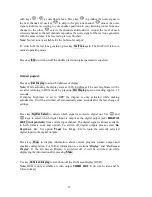
Страница 14: ... the 8 keys invokes the setup mode for the equalizer Then the keys have the following function MPE selects the previous MPE filter of current channel MPE selects next MPE filter of current channel Freq decreases frequency of current selected MPE filter Freq increases frequency of current selected MPE filter Q decreases Q factor of current selected MPE filter Q increases Q factor of current selecte...

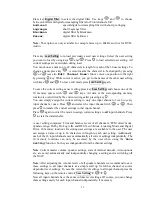
Страница 15: ...er channel is re routed to Front Left and Right channels 3Stereo reproduces audio programs using only the three front channels L C R Surround reproduces all channels originally available in the program material 2 channel Stereo is reproduced as Stereo see table Overview Listening Modes Audionet D8 reproduces all available channels of the program material Additionally material with stereo encoded s...

Страница 16: ... 5 1 The Decoder mode is defined by the function 2 ch PCM Input uses in menu Decoder Setup see chapter Preferences Setup section Decoder Setup Additional options are available by function Dolby Pro Logic IIx Mode for 2 Ch or Set DTS Neo 6 Mode see chapter Preferences Setup section Decoder Setup 2 The Decoder delivers a 7 channel output The Back Surround speakers playback a stereo signal 3 The Deco...

Страница 17: ... like Dolby Pro Logic IIx or DTS Neo 6 decoding bass and delay management digital equalizer etc are available as for any digital audio input Note The internal analog to digital converter has an input sensitivity of 2 VRMS If input signals exceed this level the converter will overload causing audible distortions The front display and the On Screen Display OSD will issue a warning ADC Overload OSD A...

Страница 18: ... This menu item has the same function as the key Digital Filter on the remote control described above Dynamic Range This menu item has the same function as the key Dyn Range of the remote control described above Set Dual Mono Select the preferred playback mode for DVD soundtracks in Dual Mono mode with the and keys CH1 CH2 Both Dual Mono channels are reproduced CH1 only Only Dual Mono channel 1 is...

Страница 19: ...offers 4 different modes for decoding of 2 channel sources Select your preferred mode with the and keys Movie The Movie mode is for use with stereo TV shows and all Dolby Surround encoded programs The result is an enhanced soundfield directionality that approaches the quality of discrete 5 1 channel sound Music The Music mode is for use with any stereo music recordings and provides a wide and deep...

Страница 20: ...d either towards the front or towards the rear This can be useful to help achieve the desired balance from all the speakers with certain recordings that may contain either too much or too little spatial effect Step 0 is the recommended setting which has no effect on the sound Steps 1 2 and 3 gradually move the sound forward and steps 1 2 3 move the sound towards the surrounds The Dimension control...

Страница 21: ...eo PCM signals to 6 or 7 channels Dolby PLIIx Select this option to use Dolby Pro Logic IIx The options selected by function Dolby PL IIx Mode for 2 Ch are used see above DTS Neo 6 Select this option to use DTS Neo 6 The settings from function DTS Neo 6 Mode are applied see above Menu Options Setup This menu adjusts global options for the MAP which are saved automatically when switching off the un...

Страница 22: ... key for buffered input The display will show buffered Use buffered input if the output impedance of a source connected to the 8 ch analog input is greater than 100 Ohms Note If you connect Audionet devices to the 8 ch analog input the input signals do not need to be buffered In this case use option direct Dolby D EX Mode Use keys and to select if for Listening Mode Surround Dolby Surround EX enco...

Страница 23: ...hannel relative to each other It is only for synchronising picture and sound Set Video Input This it the same function as in the Channel Setup menu It s also integrated here for easier access Note The video input setting applies to each audio input channel independently All other video settings are set globally Set TV System For correct conversion from cinch video to S Video please select the corr...

Страница 24: ... foundation Note As now the speaker s of this channel group and the subwoofer reproduce the bass of this group an unwanted bass gain could occur In this case switch to setting Large or Small Note This option is only available if a subwoofer is connected and set to available Set X Over Freq Use keys and to adjust crossover frequency X Over Freq for the speakers of the current channel group Skip thr...

Страница 25: ...cm Alternatively you can enter the distance in Inches Set Distance Unit According to the entered distances the MAP calculates the necessary delays of each channel to ensure that all signals from all speakers arrive at the same time at the listening position Use keys and to enter the distance select channel to be setup with keys The order of channels is the same as in the Level Setup menu Subw Offs...

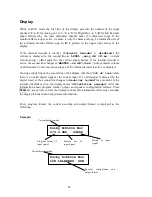
Страница 26: ... the user can easily see if the internal decoder is active or disabled If using a digital input the second line of the display will show Out of lock while there is no valid digital signal at the current input If a valid signal is detected by the digital receiver the second line changes to Receiver locked for a moment Is the internal jitterkiller active the display shows Jitterkiller engaged After ...

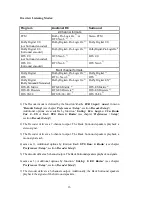
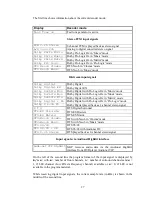
Страница 27: ...ital with Pro Logic IIx in Matrix mode Dolby Digital PL Dolby Digital with Pro Logic IIx in Pro Logic mode Dolby D 2 ch St Dolby Digital played back as 2 channel stereo signal D T S DTS Digital Surround DTS ES Discrete DTS ES Discrete DTS ES Matrix DTS ES Matrix DTS Neo 6 Cinema DTS with Neo 6 in Cinema mode DTS Neo 6 Music DTS with Neo 6 in Music mode DTS 96 24 DTS 96 24 DTS 96 24 D8 DTS 96 24 wi...

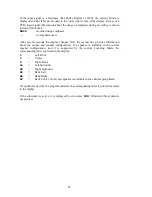
Страница 28: ...es information about the output and speaker configuration If a speaker is available in the current speaker configuration and it is supported by the current Listening Mode the corresponding letter is printed in the display L Left Front C Center R Right Front LS Left Surround RS Right Surround BL Back Left BR Back Right BC Back Center if only one speaker is available in the channel group Back If a s...

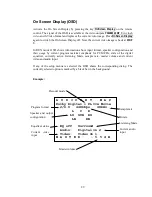
Страница 29: ...y current program material emphasis for PCM CDs state of the digital equalizer currently active Listening Mode sample rate master volume and current video and audio input If any of the setup menus is selected the OSD shows the corresponding dialog The currently selected option is marked by a black bar in the background Example A U D I O N E T M A P Dolby Digital PL IIx Movie 2 0 0 448kbps 48kHz L ...

Страница 30: ...ress the following keys to get to the function Set Video Input Video Setup à Or Channel Setup à Now use keys and to select the desired video input for the currently active audio input Note To each audio input the user can assign a video input separately The easiest way to achieve this is to assign the video input while you setup the individual settings like level adjustments name assignment decode...

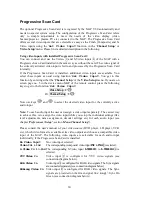
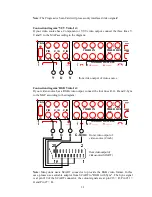
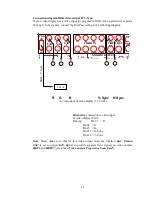
Страница 31: ... Scan Card will process only interlaced video signals Connection diagram YUV Video In If your video source has a Component or YUV video output connect the three lines Y U and V to the MAP according to the diagram Y U V from video output of video source Connection diagram RGB Video In If your video source has a RGB video output connect the four lines R G B and C Sync to the MAP according to the dia...

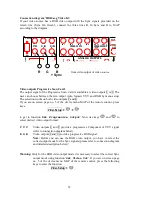
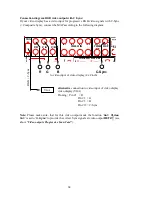
Страница 32: ...formats YUV and RGB by menu setup The selection works on both video outputs 1 and 2 If you are on screen page no 5 of the device menu MAP of the remote control press keys Video Setup à à to get to function Set Progressive Output Now use keys and to select desired video output format Y U V Video outputs 1 and 2 provide a progressives Component or YUV signal refer to connection diagram below R G B V...

Страница 33: ...ignal for RGB video output with C Sync Video output OUT1 has no signal in this mode H V Sync Video output OUT1 provides the V Sync Vertical Sync signal and OUT2 the H Sync Horizontal Sync signal for RGB video output with separate Sync signals Note Please consult the user s manual of your video display projector video beamer plasma TV etc connected to the MAP to decide which video output format is ...

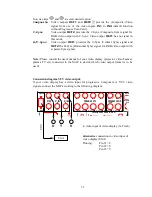
Страница 34: ...isplay has a video input for progressive RGB video signals with C Sync Composite Sync connect the MAP according to the following diagram R G B C Sync to video input of video display 4x Cinch alternative connection to video input of video display video display VGA Pinning Pin 1 R Pin 2 G Pin 3 B Pin 13 C Sync Note Please make sure that for this video output mode the function Set Video Out is set to...

Страница 35: ...o input for progressive RGB video signals with separate H Sync V Sync signals connect the MAP according to the following diagram R G B V Sync H Sync to video input of video display 5x Cinch alternative connection to video input of video display VGA Pinning Pin 1 R Pin 2 G Pin 3 B Pin 13 H Sync Pin 14 V Sync Note Please make sure that for this video output mode the function Set Video Out is set to ...

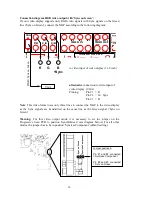
Страница 36: ...o input of video display 3x Cinch Sync alternative connection to video input of video display VGA Pinning Pin 1 R Pin 2 G Sync Pin 3 B Note This video format uses only three lines to connect the MAP to the video display as the Sync signals are transmitted on the same line as the Green signal Sync on Green Warning For this video output mode it is necessary to set the jumper on the Progressive Scan ...

Страница 37: ...any liquid to get into the unit Set up the unit in a sufficiently ventilated place Do not cover e g with a blanket Do not open the case Unauthorised opening will cause loss of guarantee Use a dry cloth for cleaning We would like to wish you many exciting listening experiences with your new Audionet product If you still have any questions don t hesitate to ask your competent Audionet dealer ...

Страница 38: ... Inc U S Pat No s 5 451 942 5 956 674 5 974 380 5 978 762 6 226 616 6 487 535 and other U S and world wide patents issued and pending DTS DTS ES Neo 6 and DTS 96 24 are trademarks of Digital Theater Systems Inc Copyright 1996 2003 Digital Theater Systems Inc All Rights Reserved Engineered and produced by Idektron GmbH Co KG Herner Str 299 Gebäude 6 44809 Bochum www audionet de contact audionet de ...

Отзывы: