


3-4
XDS-PRO (PRO1R, PRO4R & PRO1S, PRO4S) Satellite Receivers - User Guide Rev. A R830001-2106
FRONT PANEL OPERATIONS
ATX
Confidential & Proprietary
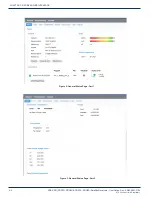
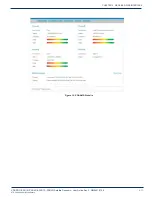
3.3.3.1 SETUP: NETWORK Sub-Menus
Starting from the Main Menu and navigating to Setup option and pressing ▼, and then navigating to Network option and
pressing
SET
, a user will have access to the Network sub-menus. In these sub-menus, the receiver’s network settings can be
made. The network menu options include:
•
DHCP (on or off): Allows the user to specify a dynamic or static IP (on or off respectively).
•
LAN IP Address: In the case of a static IP, this allows the user to specify the LAN IP address of the receiver.
•
LAN Subnet Mask: Allows the user to specify the LAN Subnet mask.
•
LAN2 Address: Specify the LAN2 IP address. For XDS-PROS receivers this interface is used in case the network
wants to make the receiver access available to a local private network, Fro XDS-PROR receivers this interface is
used in case the network wants to output AoIP AES67 or Livewire audio into an exclusive local multicast IP audio
network.
•
LAN2 Subnet Mask: Specify the LAN2 subnet mask.
•
LAN3 Address for XDS-PROS receivers only: Specify the LAN3 IP address. In case the network wants to output AoIP
AES67 or Livewire audio into an exclusive local multicast IP audio network.
•
LAN3 Subnet Mask: Specify the WAN subnet mask.
•
GATEWAY: Allows the user to specify the default gateway to direct traffic to.
•
DNS: Allows the user to specify DNS servers the receiver will use.
•
PROXY: Allows the user to specify a proxy server the receiver will go through.
•
TEST NOC: When SET is pressed, this menu offers the user two test options. Pressing 1 allows you to ping the
internet to ensure the network connection is functioning, and pressing 2 tests the receiver’s website to ensure it is
functioning. Pressing 3 exits from the Test menu.
•
NTP Server: To enable the receiver to become a local NTP server source. The receiver will be serving network
synchronized time.
•
SAMBA Share: To enable or disable the receiver SAMBA share capability to expose shared files and folders to other
computers in the network can access.
To modify any of these numeric values: use◄ or ► to select which part of the IP to change. Make a digit larger using ▲ and
to make a digit smaller using ▼. Press
SET
whenever you are done editing and want to commit a setting.
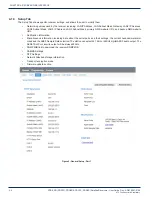
3.3.4 AUDIO PORTS Sub-Menus
From the Audio Ports sub-menus, users can change the settings for each of the four ports as well as headphones port. To
choose which of these five ports to modify scroll between them using ◄ or ► until the desired port is selected. Once the
desired port is selected, pressing
1
will take you to the Station sub-menu where call letters for a station may be selected.
Pressing
2
will take you to Programs sub-menu where a specific program may be chosen from a list using ▲ and ▼. Pressing
3
will navigate to the Spots sub-menu where specific radio spots may be chosen from a list, again using ▲ and ▼.
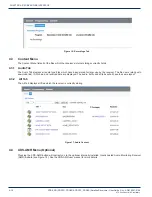
3.3.4.1 AUDIO PORTS: SETUP Sub-Menus
Each of the five audio ports (Audio Port A-D, and Headphones) have their own identical setup sub menus. From these menus,
users may modify the station call number, the current program played on the audio port, the current commercial spot played
on the audio port, and a couple miscellaneous audio settings (stereo or mono). These settings may only be changed if a red-
cross symbol is not visible on the port’s menu screen. If this symbol does appear, it means that this audio port is controlled
automatically by the broadcaster, and that the user is unable to change any of these settings.
When the Station menu is selected by pressing
SET,
the receiver navigates to a screen where call letters can be selected in
order by using ▲ and ▼ to choose a letter for the selected spot, ◄ and ► to choose which position in the name is selected for
editing, and
SET,
to commit the changes to the station’s call letters. When Program or Spot menus are selected, the receiver
will display a list of programs or spots respectively. Use ▲ and ▼ to scroll through these lists, and use
SET
to select something
from one of these lists. When the Settings menu is selected, the user can change the audio ports output mode from mono to
stereo or vice versa. Again use the arrow keys and
SET,
to accomplish this.
CHAPTER 3:


