background image

AT-HDVS-150-RX

36

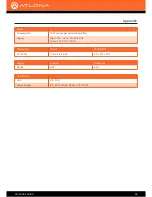
Power

Consumption

15 W (varies per paired transmitter)

Supply

Input: 100 - 240 V AC, 50/60 Hz


Output: 48 V DC, 0.83 A

Dimensions

Inches

Millimeters

H x W x D

1.18 x 4.8 x 4.92

30 x 122 x 125

Weight

Pounds

Kilograms

Device

0.67

0.31

Certification

Unit

CE, FCC

Power Supply

CE, FCC, cULus, RoHS, CCC, RCM

Appendix

Содержание AT-HDVS-150-RX

Страница 1: ...AtlonaManuals Scalers AT HDVS 150 RX HDBaseT Scaler with HDMI and Analog Audio Outputs ...

Страница 2: ...AT HDVS 150 RX 2 Version Release Date Notes 2 04 17 New format 3 02 18 Added firmware update procedure Version Information ...

Страница 3: ...voluntary and failure to register will not affect the product warranty To register your product go to http www atlona com registration Sales Marketing and Customer Support Welcome to Atlona Operating Notes IMPORTANT Visit http www atlona com product AT HDVS 150 RX for the latest firmware updates and User Manual Main Office Atlona Incorporated 70 Daggett Drive San Jose CA 95134 United States Office...

Страница 4: ...roduct Warranty Terms New Products 10 years from proof of purchase date for hardware electronics products purchased on or after June 1 2013 3 years from proof of purchase date for hardware electronics products purchased before June 1 2013 Lifetime Limited Product Warranty for all cable products Limited Product Warranty Terms Refurbished B Stock Products 3 years from proof of purchase date for all ...

Страница 5: ...cts or states do not allow the exclusion or limitation of relief special incidental consequential or indirect damages or the limitation of liability to specified amounts so the above limitations or exclusions may not apply to you Exclusive Remedy To the maximum extent permitted by law this limited product warranty and the remedies set forth above are exclusive and in lieu of all other warranties r...

Страница 6: ... 5 Do not use this product near water 6 Clean only with a dry cloth 7 Do not block any ventilation openings Install in accordance with the manufacturer s instructions 8 Do not install or place this product near any heat sources such as radiators heat registers stoves or other apparatus including amplifiers that produce heat 9 Do not defeat the safety purpose of a polarized or grounding type plug A...

Страница 7: ...ay 13 Input Select 14 Input Resolution 14 Output Resolution 15 VGA Adjust 15 Picture Adjust 16 Aspect 17 Overscan 17 Audio 18 OSD 19 Others 20 Information 22 System Reset 23 Control Software 24 Installing the Software 24 HDVS Receiver 26 HDVS Receiver Controls 26 Picture Controls 29 Projector 30 Projector Command Settings 30 Projector Controls 31 Appendix 32 Default Settings 32 Updating the Firmwa...

Страница 8: ...ance transmission and display control in corporate or educational settings using analog and digital sources The HDVS 150 maintains all capabilities the HDVS series is known for and adds industry standard Power over Ethernet for full HDBaseT certification The HDVS 150 Series is a simple audio visual system with auto switching for HDMI and VGA inputs projector on off control analog audio de embeddin...

Страница 9: ...pply to this power receptacle 4 HDMI OUT Connect an HDMI cable from this port to a display or other sink device 5 AUDIO OUT Connect the included 5 pin Phoenix block from this connector to an audio amplifier 6 RS 232 Connect the included 3 pin Phoenix block from this connector to an RS 232 device 7 PW This LED indicator will glow bright green when the scaler is powered 8 LINK This LED indicator wil...

Страница 10: ...f using non tinned stranded wire presss the orange tab above the terminal while inserting the exposed wire Repeat this step for the TX RX and GND connections RS 232 Connector GND RX TX Installation The AUDIO OUT connector on the AT HDVS 150 RX provides the connection of either balanced or unbalanced audio outputs using XLR connectors Use the included 5 pin Phoenix terminal block Balanced audio con...

Страница 11: ...que devices when securing the wires to the Phoenix terminal block as this may damage the screws and or block 1 Insert the wires into the correct terminal on the included Phoenix block as shown below 2 Tighten the screws to secure the wires Do not use high torque devices as this may damage the screws and or connector block Black White 5V DC power supply Installation ...

Страница 12: ...The AT HDVS 150 RX is designed to be used with the AT HDVS 150 TX Connection Instructions 1 Use an HDMI cable to connect an HDMI display to the HDMI OUT port on the unit 2 Connect an Ethernet cable up to 230 feet 70 meters from the HDBaseT IN port on the unit to a PoE compatible transmitter not included Ethernet cables should use EIA TIA 568B termination 3 Connect the included power supply to the ...

Страница 13: ...this illustration the Aspect menu item indicates that Full is the currently selected aspect ratio setting Refer to Aspect page 17 for more information HDBaseT IN FW DC 48V HDMI OUT AUDIO OUT L R RX TX RS 232 MENU V V PW LINK HDBaseT IN FW DC 48V HDMI OUT AUDIO OUT L R RX TX RS 232 MENU V V PW LINK HDBaseT IN FW DC 48V HDMI OUT AUDIO OUT L R RX TX RS 232 MENU V V PW LINK Aspect Full 16 9 TV 16 10 T...

Страница 14: ... 1 Under the Main Menu highlight the Input Select menu item using the UP DN buttons on the front panel 2 Press the MENU button 3 The Input Resolution menu will be displayed 4 Press the UP DN buttons to highlight the desired input 5 Press the MENU button to confirm the selection and display the list of available input resolutions 6 Press the UP DN buttons to select the desired resolution 7 Press th...

Страница 15: ... Back option under Output Resolution 3 then press the MENU button to return to the Main Menu Provides adjustment of the VGA signal This menu option is only available if using the VGA input on the transmitter 1 Under the Main Menu highlight the VGA Adjust menu item using the UP DN buttons on the front panel 2 Press the MENU button 3 The VGA Adjust menu will be displayed 4 Press the UP DN buttons to...

Страница 16: ... clock polarity should be set to Normal Inverse Inverts the clock polarity shifting it by 180 VGA Adjust Auto Adjust Clock Polarity Normal Menu Back Provides custom adjustment of picture brightness contrast saturation hue sharpness and color space 1 Under the Main Menu highlight the Output Resolution menu item using the UP DN buttons on the front panel 2 Press the MENU button 3 The Picture Adjust ...

Страница 17: ...o fill the screen 16 9 TV The output signal will be scaled to fit as 16 9 16 10 TV The output signal will be scaled to fit as 16 10 4 3 TV Output signal will be set to 4 3 If the input is HD approximately 35 of the total horizontal resolution will be lost Keep Ratio The input aspect ratio is preserved on the output Adjusts the overscan setting of the output video signal By default overscan is disa...

Страница 18: ...dio menu will be displayed Audio Audio On Off On HDMI Audio On L R Audio On Menu Back Audio Setting Description Audio On Off Provides muting of both HDMI and analog audio outputs Set this value to Off to mute all audio HDMI Audio Controls the HDMI audio only Set to Off to mute the HDMI audio L R Audio Toggles the analog audio output On or Off Set to Off to mute the analog audio output 4 Press the ...

Страница 19: ... OSD Range 5 to 100 Info Timer The duration in seconds of how long the Info Display screen is displayed Range 5 to 100 Menu Timer The duration in seconds of how long the OSD remains on the screen after no activity Range 5 to 100 Info Display Adjusts the display settings of the Info Display screen which indicates the input and output resolution Refer to the illustration below for an example of the ...

Страница 20: ...nd Grey Menu Back IN 720p60 OUT 1080p60 Info Display screen IN 720p60 OUT 1080p60 This menu provides control for various other settings such as auto switching HDCP and vertical mirroring 1 Under the Main Menu highlight the Others menu item using the UP DN buttons on the front panel 2 Press the MENU button 3 The Others menu will be displayed 4 Press the UP DN buttons to highlight the desired option...

Страница 21: ...ols how the display behaves when connected to a source device DispSW AVSW Display switches on off source audio video signal switches on off DispSW AVon Display switches on off source audio video signal always on Always ON Display is always on source audio video signal always on AV SW Display is always on source audio video signal switches on off Disp Key Lock Allows the MENU button to be locked pr...

Страница 22: ...he MENU button 3 The Information menu will be displayed 4 Press the MENU button to view the next page 5 Press the MENU button again to return to the Main Menu Information Source HDMI Name Intel Product 9xxxx Sink HDMI VSC Model VA2465 SERIES Native1 1920x1200 Native2 None F W TX v1 0 2 RX v1 0 2 Next Page Information Source Detection HV Total 1344x806 HV Display 1024x768 HV Polarity Neg Neg Scan M...

Страница 23: ...f Sync Indicates whether the source status of the TMDS sync is detected On or has been lost Off Identity Displays the detected resolution of the source Type Audio Displays the audio format SR Audio Displays the sampling rate of the audio signal FIFO Audio Displays the status of the FIFO audio buffer The System Reset menu provides the ability to reset the AT HDVS 150 RX to factory default settings ...

Страница 24: ...ate the Resources tab c Click on the Control Software Version 1 0 0 hyperlink to begin downloading the software 2 Extract the files from the zip file 3 Double click the setup exe to run the installation wizard Follow the directions on each screen to install the software 4 After the installation wizard has completed the installation disconnect the AT HDVS 150 RX from the display 5 Connect the AT HD...

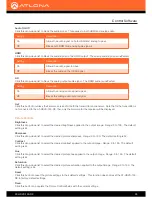
Страница 25: ...r to the following is displayed then click the OK button and check the following The incorrect COM port is selected in the control software Select another COM port from the drop down list next to the Connect and Disconnect buttons Windows was unable to install the COM port Check the connection between the computer and the AT HDVS 150 RX In addition verify that the Phoenix terminal block is wired c...

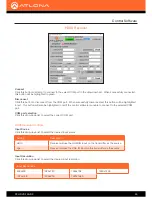
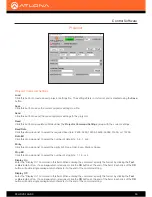
Страница 26: ... in red if the control software is unable to connect to the selected COM port COM port selection Click this drop down list to select the correct COM port Input Source Click this drop down list to select the desired input source Input Resolution Click this drop down list to select the desired input resolution Setting Description Hdmi Receiver will use the HDMI IN input on the transmitter as the sou...

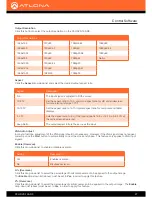
Страница 27: ... Click this drop down list to select the percentage of vertical overscan to be applied to the output image The Enable drop down list above must be set to Yes in order to apply this feature Output Resolutions 1024x768 720p25 1080i59 94 1080p50 1280x800 720p29 97 1080i60 1080p59 94 1280x1024 720p30 1080p23 98 1080p60 1366x768 720p50 1080p24 Native 1400x1050 720p59 94 1080p25 1600x1200 720p60 1080p29...

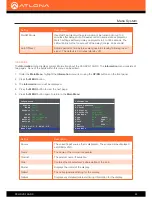
Страница 28: ...o a value greater than zero when specifiing the Display Power Off option Refer to the Projector Controls page 31 section for more information Setting Description DispSW AVon Turns the display on or off the source is unaffected DispSW AVSW Turns the display on off and blocks unblocks the AV source AV SW Blocks unblocks the source display control is unaffected Always ON Pressing the DISPLAY button w...

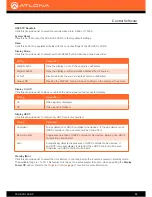
Страница 29: ...lt setting is 32 Contrast Click this drop down list to select the desired contrast applied to the output image Range 0 to 100 The default setting is 64 Hue Click this drop down list to select the desired picture hue applied to the output image Range 0 to 100 The default setting is 64 Saturation Click this drop down list to select the desired picture saturation applied to the output image Range 0 t...

Страница 30: ...is drop down list to select the parity bit None Odd Even Mark or Space Stop Bit Click this drop down list to select the number of stop bits 1 1 5 or 2 Display On Enter the Display On command in this field When entering the command specify the format by clicking the Text or Hex radio button If a carriage return is required click the CR button at the end of the field Each click of the CR button will...

Страница 31: ...up with the current settings ProjSW Mode Sec Sets the time interval in seconds before the front panel buttons are locked after a power off command is sent to the projector Range 0 to 300 Control Software Projector Controls Setting Description On Powers on the display when a source is detected Off Display is not powered on when a signal is detected Setting Description On Power off the display when ...

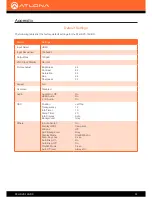
Страница 32: ... On Off HDMI Audio L R Audio On On On OSD Position Transparency Info Timer Menu Timer Info Display Background Left Top 12 10 20 Auto Grey Others In Auto Switch Display HDCP Mirror V ASP Background Display Mode Disp Key Lock Auto Disp On Auto Disp Off ProjSW Mode Auto Off sec On Compliant Off Grey DispSW AVon 0 sec On On 0 sec Always On Default Settings The following tables list the factory default...

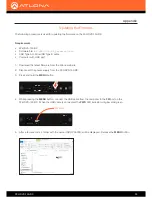
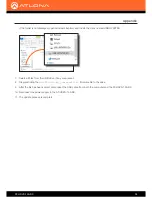
Страница 33: ...e AT HDVS 150 RX 3 Press and hold the MENU button 4 While pressing the MENU button connect the USB cable from the computer to the FW port on the AT HDVS 150 RX When the USB cable is connected the PWR LED indicator will glow solid green 5 After a few seconds a folder with the name USB UPDATER will be displayed Release the MENU button Appendix Updating the Firmware HDBaseT IN FW DC 48V HDMI OUT AUDI...

Страница 34: ...7 Delete all files from the USB drive if any are present 8 Drag and drop the AT HDVS 150 RX_ version bin firmware file to the drive 9 After the file has been copied disconnect the USB cable from both the computer and the AT HDVS 150 RX 10 Reconnect the power supply to the AT HDVS 150 RX 11 The update process is complete ...

Страница 35: ...29 30 50 59 94 60Hz 1920 1200 1680 1050 1680 1200 1400 1050 1366 768 1280 1024 1280 800 1024 768 Color Space YUV RGB Chroma Subsampling 4 4 4 4 2 2 Color Depth 8 bit 10 bit 12 bit Audio Analog PCM 2Ch de embedded HDMI OUT HDBaseT IN PCM 2Ch Sample Rate 32 kHz 44 1 kHz 48 kHz 88 2 kHz 96 kHz 176 4 kHz 192 kHz Bit Rate 24 bit max Cable Feet Meters CAT5e 6 200 60 CAT6a 7 230 70 HDMI IN OUT 30 10 Sign...

Страница 36: ...d transmitter Supply Input 100 240 V AC 50 60 Hz Output 48 V DC 0 83 A Dimensions Inches Millimeters H x W x D 1 18 x 4 8 x 4 92 30 x 122 x 125 Weight Pounds Kilograms Device 0 67 0 31 Certification Unit CE FCC Power Supply CE FCC cULus RoHS CCC RCM Appendix ...

Страница 37: ...irmware updating 33 H HDCP 21 Hue adjusting 16 29 I Information displaying 22 Info screen settings 19 Input selecting 14 26 Installation 10 M Menu button 13 locking 21 main 13 O Operating notes 3 OSD background color 19 position 19 timer 19 transparency 19 Output vertically mirroring 21 Overscan enabling disabling 17 27 horizontal 17 vertical 17 P Panel descriptions 9 Picture reset 16 Power connec...

Страница 38: ... registered trademarks of Atlona Inc All other brand names and trademarks or registered trademarks are the property of their respective owners Pricing specifications and availability subject to change without notice Actual products product images and online product images may vary from images shown here ...

Отзывы: