background image

CS1842 / CS1844 User Manual

72

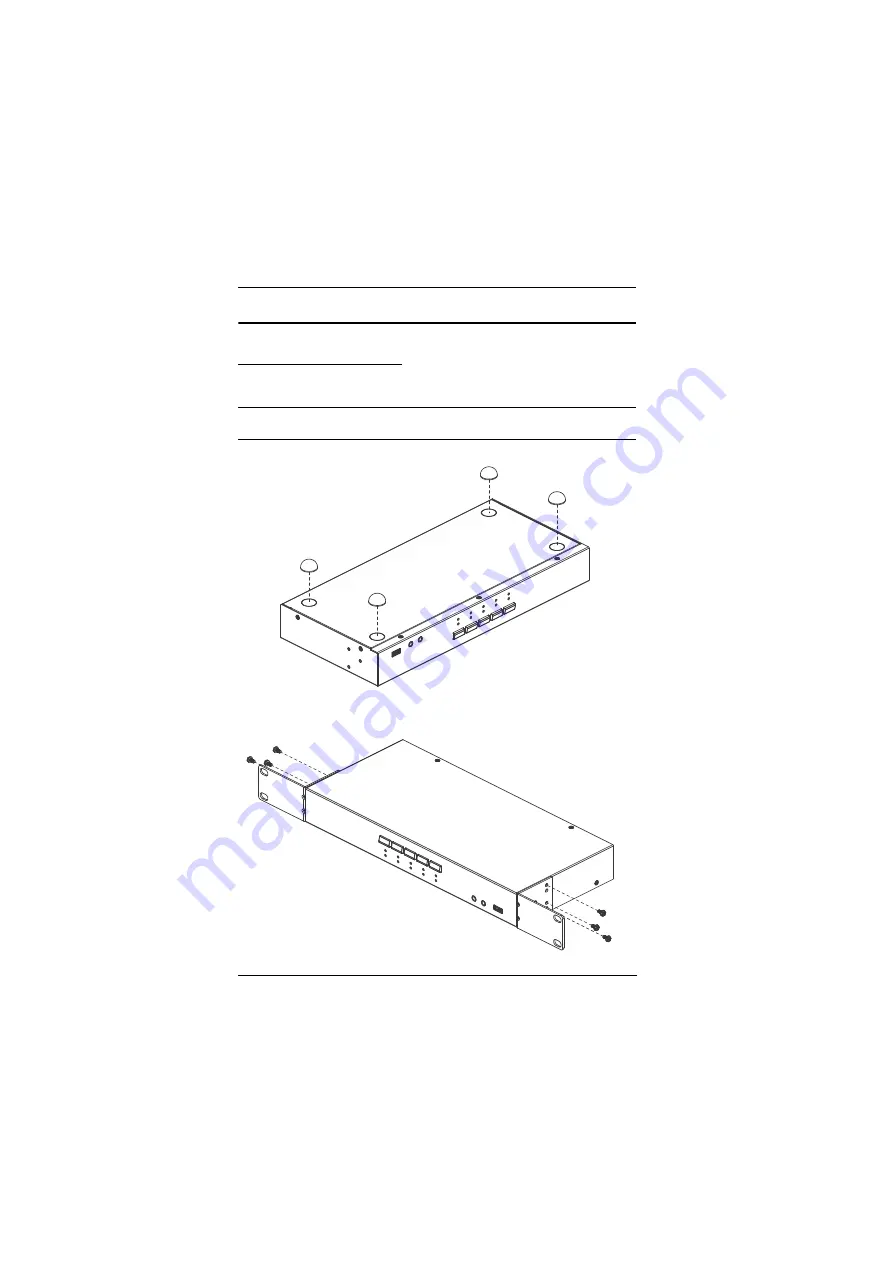
Optional Rack Mounting

Installation Kit Mounting

2X-045G rack mounting option is available for CS1842 / CS1844. To install 
the 2X-045G rack mounting kit, do the following:

Note:

The 2X-045G is sold separately. Contact your ATEN dealer for product 
information. 

1. Remove the rubber feet from the bottom of the unit.

2. Use the M3 X 8 Phillips hex cap screws supplied with the rack mounting 

kit to screw the rack mounting brackets in the side near the front of the 
unit. 

Содержание CS1842

Страница 1: ...CS1842 CS1844 2 4 Port USB 3 0 4K HDMI Dual Display KVMP Switch User Manual...

Страница 2: ...ion of this equipment in a residential area is likely to cause harmful interference in which case the user will be required to correct the interference at his own expense The device complies with Part...

Страница 3: ...s A digital apparatus complies with Canadian ICES 003 HDMI Trademark Statement The terms HDMI HDMI High Definition Multimedia Interface and the HDMI Logo are trademarks or registered trademarks of HDM...

Страница 4: ...ybrominated diphenyl ethers PBDE Cable PCBA Plastic Other parts Metal parts 1 0 1 wt 0 01 wt Note 1 Exceeding 0 1 wt and exceeding 0 01 wt indicate that the percentage content of the restricted substa...

Страница 5: ...ove defective following their purchase the buyer and not the manufacturer its distributor or its dealer assumes the entire cost of all necessary servicing repair and any incidental or consequential da...

Страница 6: ...out all ATEN products and how they can help you connect without limits visit ATEN on the Web or contact an ATEN Authorized Reseller Visit ATEN on the Web for a list of locations and telephone numbers...

Страница 7: ...y KVMP Switch 4 HDMI cables 2 USB 3 0 cables 2 speaker cables 2 microphone cables 1 power adapter 1 remote port selector 1 user instructions CS1844 1 CS1844 4 Port USB 3 0 4K HDMI Dual Display KVMP Sw...

Страница 8: ...ents 4 Console 4 Computers 4 Cables 4 Operating Systems 4 Components 5 CS1842 Front View 5 CS1844 Front View 5 CS1842 Rear View 6 CS1844 Rear View 6 LED Status Panel 8 Port LED Behavior 8 Mode Selecti...

Страница 9: ...t 28 Keyboard Language 29 Buzzer Control 29 Hotkey Port Switching 29 Firmware Upgrade Mode 29 Restore Default Settings 30 Power on Detection 30 Alternative Manual Port Selection Settings 30 Keyboard E...

Страница 10: ...tkey Setting 52 Hotkey Switching 53 USB Reset 54 Restore Default Settings 55 Firmware Upgrade 56 KVM Status 57 7 The Firmware Upgrade Utility Before You Begin 59 Starting the Upgrade 60 Upgrade Succee...

Страница 11: ...CS1842 CS1844 Chapter 4 Hotkey Operation details all of the concepts and procedures involved in the Hotkey operation of your CS1842 CS1844 installation Chapter 5 Keyboard Emulation provides tables tha...

Страница 12: ...eys need to be chorded they appear together in the same bracket with a plus sign between them Ctrl Alt 1 Numbered lists represent procedures with sequential steps Bullet lists provide information but...

Страница 13: ...ionality the CS1842 CS1844 offers serial commands to help switch ports and configure device settings A Power On Detection feature also ensures that if one computer is powered off the CS1842 CS1844 wil...

Страница 14: ...upports Console mouse emulation bypass feature Independent switching of KVM USB peripheral and audio focus3 Multilingual keyboard mapping supports English Japanese French and German keyboards HDMI com...

Страница 15: ...HD audio through HDMI channel cannot be switched independently 4 PC keyboard combinations emulate Mac keyboards Mac keyboards only work with their own operating system 5 N key Rollover supports up to...

Страница 16: ...ables To guarantee video quality we recommend using only ATEN HDMI KVM cables Four CS1842 or eight CS1844 cables are provided with this package Note The quality of the display is affected by the quali...

Страница 17: ...ocus to the computer attached to its corre sponding port Press a port selection pushbutton twice to bring the audio focus to the computer attached to its corresponding port Press a port selection push...

Страница 18: ...port USB peripherals printers scanners drives etc plug into this port This USB 3 1 Gen 1 port features 5 Gbps data transfer rates for compatible USB peripherals No Component Description 1 DCC port Da...

Страница 19: ...hese jacks 6 USB 3 1 Gen 1 peripheral port USB peripherals printers scanners drives etc plug into this port This USB 3 1 Gen 1 port features 5 Gbps data transfer rates for compatible USB peripherals 7...

Страница 20: ...LEDs of currently focused connectors KVM audio USB link will be fully lit The LED s of KVM connectors not currently focused but connected will be half lit The LED s of audio and USB link connectors n...

Страница 21: ...ons please refer to Manual Switching on page 17 Button Press Mode LED that Lights up Follow Up Action Once KVM Audio USB Press any of the port selection pushbutton to select focus for all connectors T...

Страница 22: ...the table below Refer to Buzzer Control on page 29 if you wish to turn the buzzer on or off Sound Description 1 beep Changing port Activating auto scan mode Pausing resuming auto scan 1 long beep Pow...

Страница 23: ...console ports from the console ports section located on the unit s rear panel and power on the monitors 1 Important safety information regarding the placement of this device is provided on page 65 Ple...

Страница 24: ...nnector into the HDMI B socket in the same KVM Ports Section of the switch Note Verify that all the connectors are in the same KVM Ports Section all in CPU1 all in CPU2 etc 7 At the other end of the c...

Страница 25: ...sure that 4K UHD 3840 x 2160 60 Hz or 4K DCI 4096 x 2160 60 Hz resolutions can be reached It is highly recommended that the CS1842 CS1844 is kept powered on at all times Make sure the computers and de...

Страница 26: ...CS1842 CS1844 User Manual 14 Installation Diagram 2 1 4 10 5 8 9 6 DT2955 Gspou DT2955 Sfbs 7 3 8...

Страница 27: ...ctive ports on the computer 4 Repeat steps 2 and 3 for all computers 5 Plug the console monitors into the HDMI console ports located on the Host s and Client s rear panel 6 Use an RJ 45 cable to conne...

Страница 28: ...CS1842 CS1844 User Manual 16 Quad Display Installation 5 Host Client 2 3 5 6 7 1 5 8...

Страница 29: ...he KVM focus to a computer press the Mode pushbutton twice the Mode pushbutton s KVM icon lights up and then press the port selection pushbutton that corresponds to that computer The port s KVM icon t...

Страница 30: ...g the Scroll Lock key twice Regarding details of the Hotkey parameters see Hotkey Operation page 21 Remote Port Selector Switching For Remote Port Selection Press the remote port selector button to cy...

Страница 31: ...Port ID is used to specify which computer gets the KVM USB peripheral and audio focus with the Hotkey port selection method see page 23 for details Alternative Manual Port Selection Settings When Hot...

Страница 32: ...CS1842 CS1844 User Manual 20 This Page Intentionally Left Blank...

Страница 33: ...and audio focus If you wish you can give one computer the KVM console focus another the USB hub focus and the other two the audio focus Port Switching All port switches begin with tapping the Scroll L...

Страница 34: ...ort on the installation The USB and audio focus remain where they are Example 1 Press Scroll Lock twice 2 Press K 3 Press Enter Scroll Lock Scroll Lock U Enter Brings only the USB hub focus from the p...

Страница 35: ...d port The USB hub and audio focus remain where they are Example 1 Press Scroll Lock twice 2 Press 2 3 Press K 4 Press Enter Scroll Lock Scroll Lock n U Enter Brings only the USB hub focus to the comp...

Страница 36: ...dio focus to the computer attached to the specified port The USB hub focus remains where it is Example 1 Press Scroll Lock twice 2 Press 2 3 Press K and then press S 4 Press Enter Scroll Lock Scroll L...

Страница 37: ...tion 2 While Auto Scan Mode is in effect ordinary keyboard and mouse functions are suspended only Auto Scan Mode compliant keystrokes and mouse clicks can be input You must exit Auto Scan Mode in orde...

Страница 38: ...ion to invoke HSM See below for details When HSM is active the Caps Lock and Scroll Lock LEDs flash in succession to indicate that HSM is in effect They stop flashing and revert to normal status when...

Страница 39: ...Lock and the F12 key instead of Note This procedure is a toggle between the two methods To revert back to the original HSM invocation keys invoke HSM then press and release the H key again Alternate...

Страница 40: ...te Function key see table below After completing this procedure you automatically exit HSM List Switch Settings To see a listing of the current switch settings do the following 1 Open a text editor or...

Страница 41: ...the following 1 Invoke HSM see page 26 2 Press and release B Hotkey Port Switching To enable disable hotkey port switching do the following 1 Invoke HSM see page 26 2 Press X Enter When disabled port...

Страница 42: ...enable disable Power on Detection do the following 1 Invoke HSM see page 26 2 Press E Alternative Manual Port Selection Settings To toggle between the default and the alternative front panel pushbutt...

Страница 43: ...e Note 1 This hotkey is only supported by CS1842 CS1844 using firmware v 1 1 101 or later 2 The function press a port selection pushbutton twice to bring the audio focus to the computer attached to it...

Страница 44: ...e keyboard language code US English 33 French 08 German 09 Japanese 15 F10 Enables Windows keyboard emulation B Enables disables the buzzer E Turns the Power on Detection function on off H Toggles bet...

Страница 45: ...y CS1842 CS1844 using firmware v 1 1 101 or later 2 The function press a port selection pushbutton twice to bring the audio focus to the computer attached to its corresponding port will be disabled wh...

Страница 46: ...CS1842 CS1844 User Manual 34 This Page Intentionally Left Blank...

Страница 47: ...he emulation mappings are listed in the table below Note When using key combinations press and release the first key Ctrl then press and release the activation key PC Keyboard Mac Keyboard Shift Shift...

Страница 48: ...her keys The corresponding functions are shown in the table below Note When using key combinations press and release the first key Ctrl then press and release the activation key PC Keyboard Sun Keyboa...

Страница 49: ...HyperTerminal application on a computer that is not part of the installation which will be used to control the switch via the RS 232 connection HyperTerminal applications can be download from the Inte...

Страница 50: ...ents for the CS1842 CS1844 s rear DCC Port that is used for connecting to a serial terminal are given in the table below Pin Assignment 1 N A RJ 45 Female 2 N A 3 TXD Transmit Data 4 N A 5 GND Signal...

Страница 51: ...ablish a HyperTerminal session using the instructions below 1 Open the HyperTerminal application and configure the port settings for COM1 port then click OK Bits per Second 19200 Data Bits 8 Parity No...

Страница 52: ...el pushbuttons mouse switching hotkeys and remote port selector will be disabled Verification After entering a command a verification message appears as shown below at the end of the command line as f...

Страница 53: ...l pushbuttons mouse switching hotkeys and remote port selector close the RS 232 link command and slide the DCC Switch to the P position Primary Use the Formula to set Parameters to create a Command Fo...

Страница 54: ...Switch Port Command Some available formula for the Switch Port commands is as follows Command Control Enter For example to switch to port 2 type the following sw i02 Enter Note The Control command can...

Страница 55: ...842 CS1844 using firmware v 1 1 102 or later Use the Formula to set Parameters to create a Command Formula Command Enter Parameters Switch to Next Port Command The available formula for the Switch to...

Страница 56: ...mmand Control Enter Parameters Switch Port KVM Focus only Command Some available formula for the Switch Port KVM Focus only command is as follows Command Control Enter For example to switch the KVM fo...

Страница 57: ...l Enter Parameters Switch Port USB Peripherals Focus only Command Some available formula for the Switch Port USB Peripherals Focus only command is as follows Command Control Enter For example to switc...

Страница 58: ...Control Enter Parameters Switch Port Audio Focus only Commands Some available formula for the Switch Port Audio Focus only command is as follows Command Control Enter For example to switch the audio...

Страница 59: ...Parameters Switch Port KVM and USB Peripherals Focus Commands Some available formula for the Switch Port KVM and USB Peripherals Focus command is as follows Command Control Enter For example to switc...

Страница 60: ...l Enter Parameters Switch Port KVM and Audio Focus Commands Some available formula for the Switch Port KVM and Audio Focus command is as follows Command Control Enter For example to switch the KVM and...

Страница 61: ...ameters Switch Port USB Peripherals and Audio Focus Commands Some available formula for the Switch Port USB Peripherals and Audio Focus command is as follows Command Control Enter For example to switc...

Страница 62: ...mula Command Control Enter Parameters Set Baud Rate Commands Some available formula for the Set Baud Rate command is as follows Command Control Enter For example to set the baud rate to 19200 type the...

Страница 63: ...ows 1 Command Control Enter For example to change the keyboard language layout to Japanese type the following layout jp Enter 2 Command Control Enter For example to change the keyboard language layout...

Страница 64: ...Some available formulas for Hotkey Setting commands are as follows 1 Command Control Enter For example to change the HSM invoke key to Num Lock type the following hotkey num Enter 2 Command Control En...

Страница 65: ...Hotkey Switching commands are as follows 1 Command Control Enter For example to change the hotkey switching mode to Scroll Scroll type the following switch scroll Enter 2 Command Control Enter For ex...

Страница 66: ...a Command Formulas Command Control Enter Parameters USB Reset Command The available formula for the USB Reset command is as follows Command Control Enter For example to reset the USB connection type...

Страница 67: ...rmulas Command Control Enter Parameters Restore Default Value Command The available formula for the Restore Default Settings command is as follows Command Control Enter For example to restore all CS18...

Страница 68: ...mand Formulas Command Control Enter Parameters Firmware Upgrade Command The available formula for the Firmware Upgrade command is as follows Command Control Enter For example to enable firmware upgrad...

Страница 69: ...KVM Status command is as follows Command Control Enter For example to display the CS1842 CS1844 s configuration status type the following status on Enter A message similar to the one below will then...

Страница 70: ...CS1842 CS1844 User Manual 58 This Page Intentionally Left Blank...

Страница 71: ...844 to get a list of available Firmware Upgrade Packages 2 Choose the Firmware Upgrade Package you want to install usually the most recent and download it to your computer 3 Unzip the downloaded firmw...

Страница 72: ...con or by opening a command line and entering the full path to it The Firmware Upgrade Utility Welcome screen appears Note The screens shown in this section are for reference only The wording and layo...

Страница 73: ...e Utility main screen appears The Utility inspects your installation All the devices capable of being upgraded by the package are listed in the Device List panel 4 As you select a device in the list i...

Страница 74: ...rings up a dialog box informing you of the situation and gives you the option to Continue or Cancel If you didn t enable Check Firmware Version the Utility installs the upgrade files without checking...

Страница 75: ...se the Firmware Upgrade Utility After a successful completion the switches exit Firmware Upgrade Mode and reset themselves If you have a DCC mode installation be sure to reconnect the cable connected...

Страница 76: ...e you should do the following 1 Power off the CS1842 CS1844 by removing the power jack 2 Invoke Firmware Upgrade Mode by holding down the Mode Selection pushbutton on the front panel see mode selectio...

Страница 77: ...been provided Never spill liquid of any kind on the device Unplug the device from the wall outlet before cleaning Do not use liquid or aerosol cleaners Use a damp cloth for cleaning The device should...

Страница 78: ...or plug has become damaged or frayed Liquid has been spilled into the device The device has been exposed to rain or water The device has been dropped or the cabinet has been damaged The device exhibit...

Страница 79: ...rack Do not overload the AC supply branch circuit that provides power to the rack The total rack load should not exceed 80 percent of the branch circuit rating Make sure that all equipment used on the...

Страница 80: ...e seconds then power up USB devices not responding USB ports need to reset Unplug the device s USB cable from the USB port on the CS1842 CS1844 s rear panel then plug it back in PC or OS does not supp...

Страница 81: ...n t work after its set Some Hotkeys are not supported as front panel pushbutton combo keys The X Enter R Enter and upgrade Enter Hotkeys can not be set as a front panel pushbutton combo key Select a d...

Страница 82: ...e the following information ready beforehand Product model number serial number and date of purchase Your computer configuration including operating system revision level expansion cards and software...

Страница 83: ...o Jack Female Green Microphone 2 x 3 5mm Audio Jack Female Pink 4 x 3 5mm Audio Jack Female Pink Daisy Chain Port 1 x RJ 45 Female Remote Port Selector 1 x 2 5mm Audio Jack Female Power 1 x DC Jack US...

Страница 84: ...stall the 2X 045G rack mounting kit do the following Note The 2X 045G is sold separately Contact your ATEN dealer for product information 1 Remove the rubber feet from the bottom of the unit 2 Use the...

Страница 85: ...Appendix 73 3 Place the KVM switch in the rack Position it so that the holes in the mounting brackets line up with the holes in the rack Secure the mounting brackets to the front of the rack...

Страница 86: ...Number Lock Keyboard Emulation Enabled Mouse Emulation Enabled Auto Scan Interval 5 Seconds Mouse Wheel Switching Disabled Power On Detection Enabled Keyboard Operating Platform Windows Keyboard Langu...

Страница 87: ...de a repair service without charge during the Warranty Period If a product is detective ATEN will at its discretion have the option to 1 repair said product with new or repaired components or 2 replac...

Страница 88: ...District New Taipei City 221 Taiwan Phone 886 2 8692 6789 Fax 886 2 8692 6767 TECHNICAL SUPPORT CENTER 886 2 8692 6959 ATEN and the ATEN logo are registered trademarks of ATEN International Co Ltd All...

Отзывы: