background image

EN 57

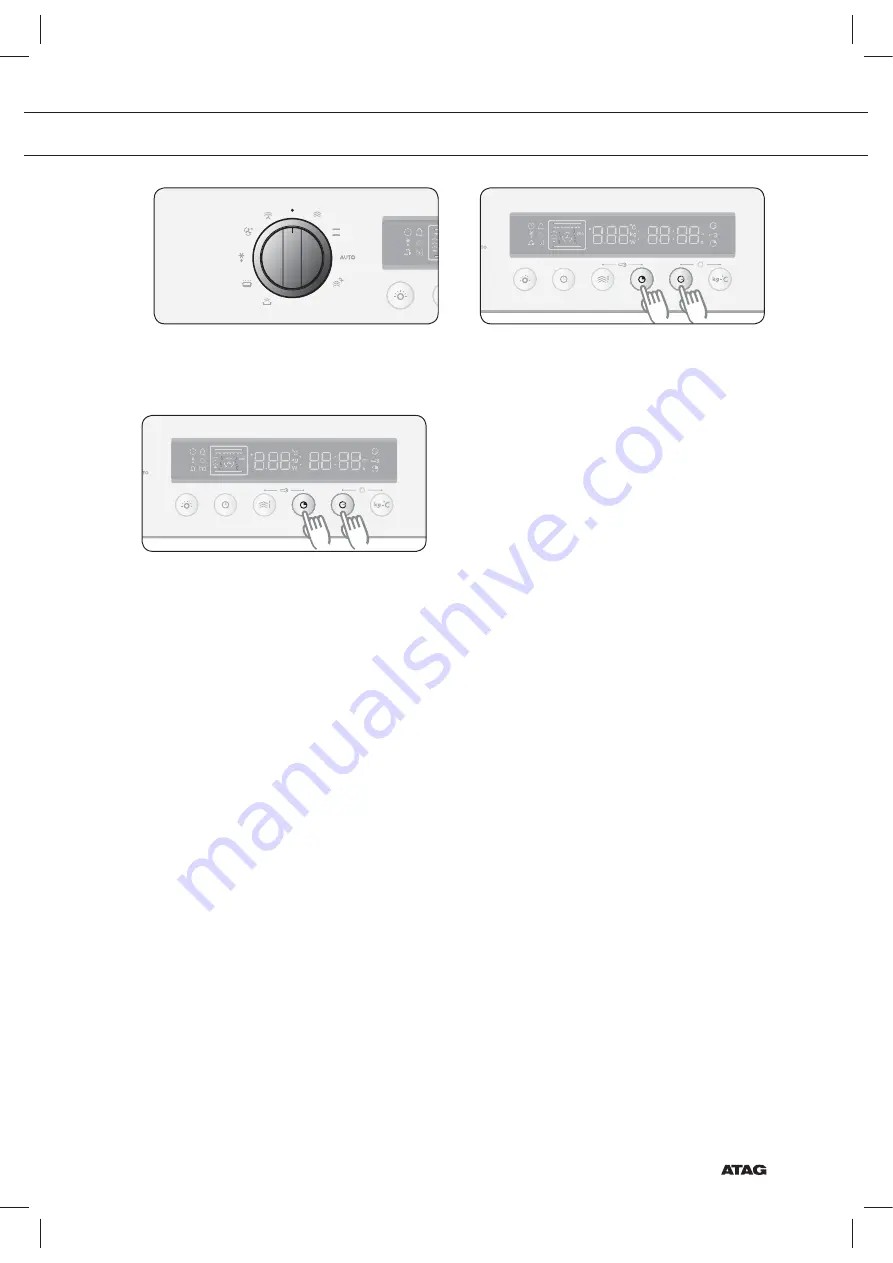
SWITCHING OFF THE BEEPER

1

 Turn 

the 

MODE SELECTOR

 to “OFF” 

position.

2


To switch the beeper off , press 

COOK 

TIME

 and 

END TIME

 at the same time 

and hold for 3 seconds.

3


To switch the beeper back on, press 

COOK TIME

 and 

END TIME

 again at 

the same time and hold for 3 seconds.

Содержание CS4411B

Страница 1: ...n r serviceafdelingen kontaktes Ha hele typenummeret for h nden n r du kontakter serviceavdelingen Ha det kompletta typnumret till hands n r du tar kontakt med serviceavdelningen Adressen en telefoon...

Страница 2: ...isning SV 3 SV 61 Gebruikte pictogrammen Pictogrammes utilis s Benutzte Piktogramme Pictograms used Anvendte piktogrammer Symboler brukt Symboler som anv nds Belangrijk om te weten Important savoir Wi...

Страница 3: ...oven mode 27 Using the multi level cook mode 38 Setting the cook time 40 Setting the end time 41 Cooking time reservation function 42 Using the auto menu mode 43 Using the defrost mode 47 Using the k...

Страница 4: ...6 AUTO MENU MODE 7 DEFROST MODE 8 KEEP WARM MODE 9 REHEAT MODE 10 STEAM CLEAN MODE 11 DISPLAY 12 LAMP ON OFF 13 CLOCK 14 STEAM LEVEL STEAM 1 2 or 3 15 COOK TIME 16 END TIME 17 WEIGHT TEMP 18 MODE SEL...

Страница 5: ...ll function The levels 1 and 2 are mainly used for steaming Please refer to the Cooking Guides provided throughout this booklet to determine the appropriate shelf level for your dishes OVEN FEATURES C...

Страница 6: ...3 Steam dish unperforated 40 mm deep useful during steam mode for collecting condensation 4 Steam dish perforated 40 mm deep useful for steam mode For steaming you can place the perfora ted steam dis...

Страница 7: ...and knowledge provided they are supervised and instructed in the safe use of the appliance and understand the associated dangers Do not allow children to play with the appliance Do not allow children...

Страница 8: ...in order to sti e any ames Only use the temperature probe recommended for this oven for appliances having a facility to use a temperature sensing probe Remove all excess spillage and utensils before c...

Страница 9: ...afe use of oven Steam oven The oven is fully insulated Despite this there is always some transfer of heat as a result of which the outside of the oven heats up This heating up falls well within the no...

Страница 10: ...baking tins should be used in the steam oven Silicone baking tins are not suitable when combining hot air circulation and steam Do not use baking tins that have areas of rust Even tiny patches can lea...

Страница 11: ...ns supply before starting any repair work Appliance should allow to disconnection of the appliance from the supply after installation The disconnection may be achieved by having the plug accessible or...

Страница 12: ...ng counterclockwise 2 Remove the metal ring and the two sheet rings and clean the glass cap 3 If necessary replace the bulb with a 25 Watt 230 V 300 C heat resistant oven light bulb 4 Fit the metal an...

Страница 13: ...ing jug to ll the water tank you don t have to pull the water tank completely out of the appliance Close the lid until you feel it engage Slide the water tank back until it engages Empty the water tan...

Страница 14: ...ts blinking 3 Turn the MULTI FUNCTION SELECTOR to set the hour 4 Press CLOCK again The 00 starts blinking 5 Turn the MULTI FUNCTION SELECTOR to set the minutes 6 Press CLOCK again Note If you want to...

Страница 15: ...de after 10 minutes if not operated default ECO mode In ECO mode the current time is not displayed You cannot use the oven 1 Turn the MODE SELECTOR to the OFF position 2 Press END TIME for 3 seconds T...

Страница 16: ...ucture Meat roasts and sh will keep a more juicy texture inside When cooking with this mode always ll the water tank with fresh water Suggested temperature 180 C Reheat Mode use the button steam level...

Страница 17: ...by the low temperature of preselection This process is done while the top and the bottom heaters are operating This mode is suitable for meat roasts poultry and sh Suggested temperature 100 C ECO Hot...

Страница 18: ...Mode 35 pre programmed auto menu settings can be selected for your convenience Time and temperature will be set automatically You simply select the programme the weight of your dish and start the stea...

Страница 19: ...hile the default time temperature is blinking turn the MULTI FUNCTION SELECTOR to set the desired time temperature If the blinking has stopped you can change the time temperature by pressing COOK TIME...

Страница 20: ...e MODE SELECTOR to Steam mode position Press STEAM LEVEL to set steam level 1 2 or 3 3 Press WEIGHT TEMP The temperature is blinking 4 During Blinking turn the MULTI FUNCTION SELECTOR and set the temp...

Страница 21: ...ate as it is hot First leave the door a little open to allow the hot steam to escape Pay attention to the steam outlets as well 4 When you have nished cooking pull the water tank out of the appliance...

Страница 22: ...perforated 2 Whole carrots 100 C 25 30 Steam dish perforated 2 Sliced Vegetables pepper courgettes carrots onions 100 C 15 20 Steam dish perforated 2 Green Beans 100 C 20 25 Steam dish perforated 2 As...

Страница 23: ...30 40 Steam dish perforated 2 Two Level Steam Cooking Use settings and times in this table as guide lines for steam cooking We recommend to always ll the water tank with fresh water to the maximum le...

Страница 24: ...ature 5 Press COOK TIME to set the desired cooking time The time is blinking If you don t set the cooking time the oven operates Hot Air mode 6 Turn the MULTI FUNCTION SELECTOR and set the desired coo...

Страница 25: ...eese 200 C 1 15 20 Baking tray 1 Croissants all ready made croissant dough 180 C 1 17 23 Baking tray 1 Homemade Bread 180 C preheating 2 30 40 Oven rack 1 Vegetable Gratin Potato Gratin 160 180 C 2 35...

Страница 26: ...ring blinking turn the MULTI FUNCTION SELECTOR and set the desired cooking time 5 Automatically start after 5 seconds Reheat Cooking Use settings and times in this table as guide lines for reheating W...

Страница 27: ...Air Hot Air Top Heat Top Heat Bottom Heat Grill Top Heat Fan Hot Air Bottom Heat Intensive ProRoasting ECO Hot Air To change the temperature press WEIGHT TEMP and turn the MULTIFUNCTION SELECTOR to se...

Страница 28: ...OK TIME and TEMPERATURE can be changed Cooking time press COOK TIME and then turn the MULTI FUNCTION SELECTOR Temperature press WEIGHT TEMP and then turn the MULTI FUNCTION SELECTOR 2 In Oven Mode set...

Страница 29: ...ood Item Shelf level Temperature C Time h Accessory Hazelnut Cake Square Mould 1 160 170 1 00 1 10 Oven rack Lemon Cake Ring Shaped or Bowl Mould 1 150 160 0 50 1 00 Oven rack Sponge Cake 1 150 160 0...

Страница 30: ...e Put meat on oven rack follow shelf level advice in the table and use baking tray as oil pan on level 1 Food Item Shelf level Temperature C Time h Accessory Beef roast beef 1 kg medium 2 1 170 190 1...

Страница 31: ...end to preheat the oven with Top Heat Bottom Heat mode Food Item Shelf level Temperature C Time h Accessory Lasagne 2 200 220 0 20 0 25 Oven rack Vegetables Gratin 2 180 200 0 20 0 30 Oven rack Potato...

Страница 32: ...1st side Time h 2nd side Accessory Kebab Spits 4 1 0 08 0 10 0 06 0 08 Oven rack Baking tray Pork Steaks 4 1 0 07 0 09 0 05 0 07 Oven rack Baking tray Sausages 4 1 0 06 0 08 0 06 0 08 Oven rack Bakin...

Страница 33: ...imes in this table as guidelines for grilling Set 220 C grill temperature preheat for 5 minutes Food Item Shelf level Time h Accessory Sausages 3 0 08 0 10 Oven rack Potato wedges 3 0 20 0 25 Oven rac...

Страница 34: ...mend to preheat the oven with Hot Air Bottom heat mode Food Item Shelf level Temperature C Time h Accessory Homemade Pizza 1 200 220 0 20 0 25 Baking tray Chilled Pre baked Quiche Pie 1 180 200 0 10 0...

Страница 35: ...or baking We recommend to preheat the oven with Intensive mode Food Item Shelf level Temperature C Time h Accessory Lasagne 2 kg 1 180 200 0 20 0 30 Oven rack Vegetables Gratin 2 kg 1 160 180 0 40 0 6...

Страница 36: ...sts poultry and sh Oven rack and baking tray is often used on Level 2 and 1 Temperatures Setting 40 150 C Please ensure that glass baking dishes are suitable for 40 250 C cooking temperatures Cooking...

Страница 37: ...evel Temperature C Time h Accessory Sponge cake 1 150 160 0 30 0 40 Oven rack Small cake 2 150 170 0 20 0 30 Baking tray Muffin 2 160 180 0 30 0 40 Oven rack Beef Roast Beef 1 kg Medium 2 1 170 190 1...

Страница 38: ...o trays of biscuits The cooking time will be increased compared to 1 level cooking but you can cook more dishes at the same time Multi level Cook Setting 1 Turn the MODE SELECTOR to Multi level Cook m...

Страница 39: ...ime h Accessory Small cakes 4 1 150 160 0 20 0 30 2 baking trays Mini pies 4 1 160 180 0 20 0 30 2 baking trays Croissants 4 1 160 180 0 20 0 30 2 baking trays Puff pastry 4 1 180 200 0 30 0 40 2 baki...

Страница 40: ...the setting of the cook time 4 Automatically start after 5 seconds Note 1 When the set time has elapsed an audible signal sounds 0 00 will blink in the display and the oven switches itself of The cur...

Страница 41: ...atically start after 5 seconds Cooking time 1 00 is displayed Note 1 The cooking time will count down in the time display When the set time has elapsed an audible signal sounds 0 00 will blink in the...

Страница 42: ...hours 3 Press END TIME The Cook Time is added to the current time and 14 00 is displayed Turn the MULTI FUNCTION SELECTOR to set the desired End Time 18 00 4 Press END TIME You see a gure in the displ...

Страница 43: ...the maximum line and place it back Place your food into the cooking cavity 4 Press WEIGHT TEMP The weight range starts blinking 5 If you want to change the weight turn the MULTI FUNCTION SELECTOR 6 Pr...

Страница 44: ...aw uncooked peeled or unpeeled on the steam dishes A 06 Steamed Chicken breast 0 2 1 0 Steam dishes perforated and unperforated 2 Put chicken breast on the steam dishes A 07 Eggs medium hard 0 1 0 6 S...

Страница 45: ...ck A 20 Homemade pizza 0 6 1 0 Baking tray 1 Put pizza on the baking tray The weight ranges include topping such as sauce vegetables ham and cheese 3 Grilling No Food Item Weight Accessory Shelf level...

Страница 46: ...aluminium foil A 30 Whole sh 0 4 0 8 Oven rack Baking tray 2 1 Brush skin of whole sh with oil and herbs and spices Put sh side by side head to tail on the oven rack Turnover as soon as the beep sound...

Страница 47: ...imum line and place it back Then place your food into the cooking cavity 2 Turn the MODE SELECTOR to the Defrost mode position 3 Turn the MULTI FUNCTION SELECTOR to choose a defrost feature 4 Press WE...

Страница 48: ...m foil This programme is suitable for whole shes as well as for sh llets Put sh on the oven rack Insert oven rack in shelf level 2 baking tray in shelf level 1 d 04 Defrost Frozen Bread 18 C 0 1 0 3 0...

Страница 49: ...sition 2 Press WEIGHT TEMP The temperature is blinking 3 During blinking turn the MULTI FUNCTION SELECTOR and set the desired temperature 4 Press COOK TIME The time is blinking 5 During blinking turn...

Страница 50: ...1 Hot Air 150 160 30 35 Shortbread Baking tray 2 Top Heat Bottom 150 160 20 30 2 Hot Air 150 160 20 30 Apple Yeast Tray Cake Baking tray 1 Top Heat Bottom 150 160 40 50 1 Hot Air 150 160 45 55 Apple P...

Страница 51: ...e obtained from the local water board Changing the water hardness 1 Turn the MODE SELECTOR to OFF position 2 Press LAMP and COOK TIME button at the same time 3 Turn the MULTI FUNCTION SELECTOR to sele...

Страница 52: ...water in the water tank Regarding to mixing ratio refer to the user manual of descaler 2 Close the lid of water tank before installing into main unit 3 Turn the FUNCTION KNOB to OFF position 4 Close t...

Страница 53: ...the door and wipe inside the cooking cavity with a dry cloth Note We advise to use NOKALK DLS when you descale the machine NOKALK DLS is a highly effective descaler made exclusively from natural total...

Страница 54: ...hem from the ceiling or walls with a soft cloth 1 Fill the water tank up to the maximum line and place it back 2 Turn the MODE SELECTOR to STEAM CLEAN 3 The oven will start automatically 4 When the pr...

Страница 55: ...Move them towards the middle 2 and pull them out Wipe any leftovers from the ceiling or walls using a neutral cloth dipped in detergent When completed install both shelves back into the correct posit...

Страница 56: ...tral detergent and then rinse them with water 4 Cleaning the accessories Wipe them with a neutral detergent and dry them before inserting them back into the cooking cavity Do not use force on the acce...

Страница 57: ...the MODE SELECTOR to OFF position 2 To switch the beeper off press COOK TIME and END TIME at the same time and hold for 3 seconds 3 To switch the beeper back on press COOK TIME and END TIME again at...

Страница 58: ...OFF position 2 Press STEAM LEVEL and COOK TIME at the same time and hold for 3 seconds 3 A lock symbol appears in the display indicating that all functions are locked To Unlock the Oven 1 Turn the MO...

Страница 59: ...r 4 Wash the inside Important Take special care NOT to spill water in the vents NEVER use abrasive products or chemical solvents ALWAYS ensure that door seals are clean to prevent particles from build...

Страница 60: ...etting EEPROM READ WRITE ERROR EEPROM use does not occur STEAM SENSOR OPEN ERROR It occurs due to a defective steam sensor misplaced wires a defective PCB and when A D value that MICOM senses rises ov...

Страница 61: ...V 50 Hz Power Consumption Maximum Power Grill Mode Hot Air Mode Steam Mode 3100 W 2500 W 2400 W 2800 W Cooling Method Cooling fan motor Dimensions Set size Built in size W 595 x H 454 x D 569 4 mm W 5...

Страница 62: ...ated processing is compulsory to avoid any negative effects on the environment and public health This means that at the end of its working life you must hand it in at a special refuse collection centr...

Отзывы: