42
4
Using the Notebook PC
Optical Drive
Inserting an optical disc
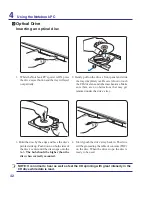
1. While the Notebook PC’s power is ON, press
the drive’s eject button and the tray will eject
out partially.
2. Gently pull on the drive’s front panel and slide
the tray completely out. Be careful not to touch
the CD drive lens and other mechanisms. Make
sure there are no obstructions that may get
jammed under the drive’s tray.
3. Hold the disc by the edge and face the disc’s
printed side up. Push down on both sides of
the disc’s center until the disc snaps onto the
hub.
The hub should be higher than the
disc when correctly mounted.
4. Slowly push the drive’s tray back in. The drive
will begin reading the table of contents (TOC)
on the disc. When the drive stops, the disc is
ready to be used.
NOTE: It is normal to hear as well as feel the CD spinning with great intensity in the
CD drive while data is read.
Содержание U2E
Страница 1: ...Notebook PC Hardware User s Manual E3474 Oct 2007 OFF ON EXPRESS u DVI ...
Страница 4: ... Contents ...
Страница 10: ...10 1 Introducing the Notebook PC ...
Страница 22: ...22 2 Knowing the Parts ...
Страница 36: ...36 4 Using the Notebook PC ...
Страница 83: ...Appendix A A 31 ...

