background image

0

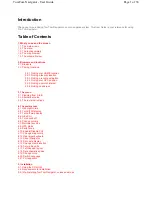
3D Day Map View   


3D Night Map View

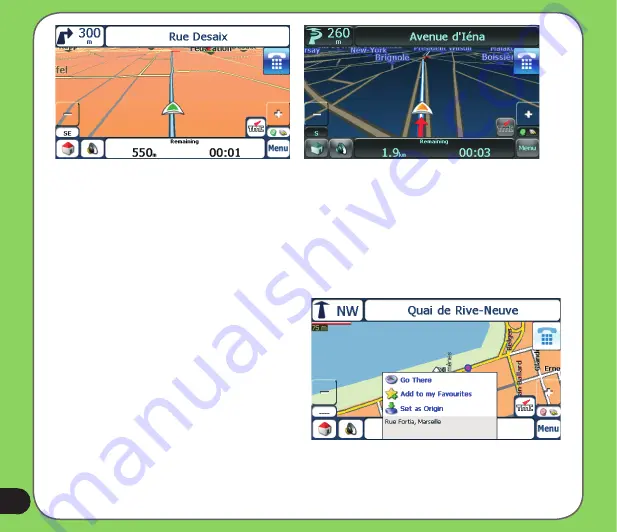
Point on the Map

You can navigate to any point by tapping its location directly on the 

Main Map

 screen in both 

2D and 3D map view. This feature is especially handy when you want to navigate to a specific 

point on the map, but you don’t have the street address. When you tap on the map, the 

context menu appears.

Go There

 – This button lets you calculate a 

route from the map point. 

To Favourites

 – This button lets you save a 

point on the map as a favourite destination. 

This is helpful if you see a location that you 

want to return you later.

Set as Origin

 –This button lets you 

designate the selected point as the starting 

point and not the designation. This is helpful 

when you want to calculate a route from a 

point other than your current location.

Содержание R600 - Auto Light Sensor PND

Страница 1: ...R600 Portable Navigation Device E3219 ...

Страница 2: ...ANTABILITY OR FITNESS FOR A PARTICULAR PURPOSE IN NO EVENT SHALL ASUS ITS DIRECTORS OFFICERS EMPLOYEES OR AGENTS BE LIABLE FOR ANY INDIRECT SPECIAL INCIDENTAL OR CONSEQUENTIAL DAMAGES INCLUDING DAMAGES FOR LOSS OF PROFITS LOSS OF BUSINESS LOSS OF USE OR DATA INTERRUPTION OF BUSINESS AND THE LIKE EVEN IF ASUS HAS BEEN ADVISED OF THE POSSIBILITY OF SUCH DAMAGES ARISING FROM ANY DEFECT OR ERROR IN TH...

Страница 3: ...d in this section Destinator Technologies makes no warranties or includes any conditions with respect to the products express or implied including but not limited to the implied warranties or conditions of merchantability fitness for a particular purpose and no infringement 2 Liability Limitation In no event shall Destinator Technologies be liable to Client and Client hereby waives any indirect sp...

Страница 4: ...er operating Configure the device settings before driving Do not configure it while driving The navigation may not be always in accordance with the actual locations and it s for your reference only The map may not be exact the same with the actual locations and it s for your reference only It is the user s responsibility to observe safe driving practice and the local laws of driving Avoiding expos...

Страница 5: ...osion if battery is replaced by an incorrect type Dispose of used batteries according to the instructions All function about GPS or the similar are not intended to be used for location of persons especially for life safety and non life safety applications Package contents Standard items ASUS R600 device Quick Guide Map CD SD card Warrenty card Adapter Car charger Car kit Note The Standard items ta...

Страница 6: ...MB SDRAM 128 MB NAND Flash Connectivity Bluetooth 2 0 Expansion Slot SD slot support up to 4GB Advanced Light sensor Echo cancellation chip Other Optional TMC module Communication Phone Answer make phone call through BT Entertainment Video player play suspend forward backward next previous Full screen play Play Lister MP3 Player play suspend forward backward next previous Play Lister Photo Viewer ...

Страница 7: ... your R600 12 1 1 Layout features 13 1 2 Charging the battery 16 1 3 Turn on the device 18 1 4 Main menu 19 1 5 Adjust the basic Settings 20 1 6 Installing the car kit 25 Chapter 2 Destinator Navigation System 26 2 1 Introduction 27 Destinator features 27 Destinator Guided Tour 28 Technical support 28 Using the 5 way key 28 ...

Страница 8: ...ense Agreement 29 Driver Warning 29 Menus 29 Main Map 36 Dialler 38 GPS not found 39 Map Views 39 Point on the Map 40 Screen Buttons 41 Cycling Through Screens 41 2 3 Search for a Location 42 Enter Address 42 Address Modes 44 Address Actions 45 Go to your Destination 46 ...

Страница 9: ...anager 63 Map Manager 70 Extras 73 2 4 Settings 78 Prompts 78 Language Settings 79 GPS Settings 79 Factory Restore 80 2 5 Getting Started with Destinator PC portal 81 Installing the Destinator PC Portal 81 Recommended PC System Requirements 82 Using the Destinator PC Portal Wizard 82 Installing Maps 85 ...

Страница 10: ...es 89 Chapter 3 Multi media features 93 3 1 Music Player 93 Launch the Music player 93 Playlist 94 Play music 95 3 2 Photo Viewer 96 Launch the Photo Viewer 96 View photos 97 Display a photo 98 3 3 Video Player 99 Launch the Video Player 99 Playlist 100 Playing a video 101 ...

Страница 11: ...ngs 104 4 3 Connecting R600 to your cellphone 105 4 4 Making and receiveing phone calls 107 ASUS Contact information 109 Note the screens procedures and specifications in this manual may not be exactly the same with those of your device please take them as reference only ...

Страница 12: ...12 Getting to know your R600 Chapter 1 ...

Страница 13: ...rofessional portable navigation device PND which provides reliable navigation and positioning function R600 also provide you with phone and multi media functions Front and top features 8 1 2 3 4 5 6 7 1 1 Layout features ...

Страница 14: ...14 8 9 10 11 12 13 14 Rear and side features ...

Страница 15: ...eatures of different applications Sleep Mode button Press to turn on the device enter into sleep mode External Antenna jack Connects to an external antenna for better signal performance the external antenna is optional Microphone Detect the noise in the environment and enhance signal strength SD card slot Insert the external SD memory card to this slot Audio line in Use to connect headsets or two ...

Страница 16: ...device AC power adapter Car charger kit NOTE When the Main Power Switch is set to Off the device can not be charged While charging the power LED lights up in orange When the battery is fully charged the power LED turns to blue You can use the device while charging However the device takes much less time to be fully charged in sleep mode 1 2 Charging the Battery ...

Страница 17: ... much battery power remains 1 From the main menu tap Settings 2 The Sub menu Settings appears Tap to display Battery icon 3 The Battery screen appears and displays a battery icon indicating the battery power that remains see the figure below ...

Страница 18: ... power switch figure 1 figure 2 Note When the main power switch is set to Off the device is not able to be charged If you press the Sleep Mode button when the device is on it enters into sleep mode When the device is on it takes longer time for the battery to be fully charged When the device is in sleep mode the battery can be fully charged quickly 1 3 Turning on the Device ...

Страница 19: ...evice settings Tap Video Player to play videos Tap Music Player to play musics Tap Photo to view photos Tap Phone to use phone through the bluetooth connection 1 4 Main Menu Note The bluetooth icon only appears when the bluetooth function is enabled Note Use the up and down button of the 5 way key to adjust volume and the left and right key to adjust backlight ...

Страница 20: ...ettings menu by tapping Settings on the main menu The settings menu allows you to adjust language settings backlight Date and time bluetooth settings volume to align screen and to view system information tap to back to the main menu tap to move to the next page ...

Страница 21: ...creen resolution and color information Language You can choose the language for displaying the text Simply tap the bars behind the Text to select the language Date and Time To set the date and time tap Date and Time from the settings menu Tap the bars behind Date Time and Time Format to adjust them ...

Страница 22: ...t by environment brightness To adjust LCD brightness in Fix backlight brightness mode simply tap or To adjust LCD brightness in Adjustment by environment brightness mode tap the or behind the sun light icon to adjust the LCD brightness in a lighter environment tap the or behind the moon light icon to adjust the LCD brightness in a darker environment ...

Страница 23: ...librate screen 1 Carefully press and briefly hold stylus on the center of the target Repeat as the target moves to other coordinates on the screen 2 When done tap anywhere on the screen for the settings to take effect otherwise the new settings will be canceled after 30 seconds 3 Tap on the screen to exit ...

Страница 24: ... or mute the device and the phone Bluetooth Enable bluetooth function to connect to a cell phone Refer to the bluetooth section on page 106 for the detailed information Battery Allows you to view battery status Refer to page 18 for more information about battery charging ...

Страница 25: ...to secure the cupule on the windowshield surface Note Rise the lever 2 to release the cupule from the windowshield 4 Adjust the angle of the gooseneck and secure it by fasten screwcap A 5 Adjust the angle of the cradle and secure it by fasten screwcap B 6 Carefully put the device into the cradle 5 screwcap A screwcap B 1 6 Installing the car kit ...

Страница 26: ...26 Chapter 2 Destinator Navigation System Note the screens and procedures in this chapter may not be exactly the same with those of your device please take them as reference only ...

Страница 27: ...gh quality 2D 3D maps with display of street names QuickNav button for travel to a predetermined address Address input via a full size keyboard optimized for finger input Storing of any location one click away Cross border navigation without switching maps Address retrieval from History Favorites or Points of Interest POI Planning and optimizing of multi stop trips Car navigation with fastest or s...

Страница 28: ...tapping the Tutorial button from the Extras menu Technical Support If you have other questions about the Destinator software contact your supplier or Technical Support Telephone 49 0 1805 123012 Email support eu destinatortechnologies com Web Address www destinatortechnologies com Using the 5 way key The 5 way key perform some hot key functions as shown in the table below navigation map up volume ...

Страница 29: ...t to review the information provided before tapping the Agree button Select the Do not display this warning again checkbox to skip this message when starting Destinator Menus Destinations Provides the central navigation features such as Addresses Recent Locations My Favorites and POI Points of Interest Options Provides 2D 3D and Day Night map view options Traffic Info functionality and the followi...

Страница 30: ...n address as described in Enter Address The Recent Locations button lets you navigate to a previously visited destination as described in Recent Locations The Points of Interest button lets you navigate to thousands of interesting places For more information see POI Points of Interest The My Favourites button lets you navigate to a favourite location as described in My Favourites The Cancel Route ...

Страница 31: ...PS receiver and monitored by your navigation software For more information see Traffic Information The Route Manager button displays a menu that lets you select from the following route buttons Show Route Turn by Turn Route Playback Avoid Road and QuickNav For more information see Route Manager The Map Manager button displays a menu that lets you select from the following map buttons Select Map Pe...

Страница 32: ...This button is disabled when no route exists The Route Playback button lets you record your route and play it back later For more information see Route Playback The Avoid Roads button lets you avoid a road type such as toll roads or selected streets as described in Avoid Roads The QuickNav Settings button lets you specify an address or place to which you can navigate with a single tap on the Quick...

Страница 33: ...rmation see Map Settings The Pedestrian Mode Driving Mode button lets you toggle between travelling as a pedestrian or in a vehicle When in Pedestrian Mode you are not limited by vehicle constraints such as one way streets Note that you can only generate a route up to ten kilometres and Voice prompts are not available The Free Map Browsing button lets you browse the map unconnected to the current ...

Страница 34: ...s menu Extras The Multi Stop Planner button lets you designate several stops on a route as described in Multistop Planner The Tutorial button opens the Destinator Guide Tour program The Guided Tour is an excellent way of becoming familiar with the different navigation features available ...

Страница 35: ...gation features are disabled when the Demo is running You can end the Demo by tapping the Stop Demo button The Factory Restore button lets you revert the device settings to that of the initial settings after installation The About button opens an information box providing version and copyright information Menu Command Buttons The following command buttons let you navigate between menus and from th...

Страница 36: ...on this screen to plan and view your route Note The Phone icon only appeaers when the bluetooth connection to a cellphone works Current location in Vehicle Mode Current location in Pedestrian Mode Last known location when GPS signal is unreliable ...

Страница 37: ...ted time of arrival street name and address number and speed and altitude When you have calculated a route the Directions bar displays information about your next turn Click this bar for a complete list of turn by turn directions You can define the QuickNav location by selecting either the To Predefined Address or To Nearest POI Category in the QuickNav Settings screen When the location is selecte...

Страница 38: ...cates the Bluetooth connection status Bluetooth is On but the navigation device is not connected to a Bluetooth cell phone The navigation device is connected to a Bluetooth cell phone When you tap the icon the dial pad appears Enter a phone number and tap the green phone icon to call When you are engaged in a phone call the Dialler icon is displayed in orange To hang up tap the red phone button th...

Страница 39: ...a or the antenna is not properly installed Please check that The GPS antenna is extended or flipped up The GPS antenna has a clear view of the sky for uninterrupted GPS reception Destinator cannot calculate the route if there is no GPS reception for example in a tunnel The navigation device is charged or connected to the cigarette lighter slot Map Views From the Options menu you can determine whet...

Страница 40: ...address When you tap on the map the context menu appears Go There This button lets you calculate a route from the map point To Favourites This button lets you save a point on the map as a favourite destination This is helpful if you see a location that you want to return you later Set as Origin This button lets you designate the selected point as the starting point and not the designation This is ...

Страница 41: ...available for the selected address or place Save The Save OK or Done buttons confirm your value preferences and returns you to the menu or map Cycling Through Screens Every navigation function in the system such as Address POI or My Favorites consists of a sequence of screens You can cycle through the screen sequences by either Selecting an item from the list and tapping it Selecting an item form ...

Страница 42: ...board to enter the characters of the address name The characters appear in the Address field Destinator automatically searches the Address list for the first occurrence of the entered characters After you have selected a city Destinator displays the next address field such as street and address number You can also tap the Next button to move through the sequence of address screens 2 3 Search for a...

Страница 43: ...yboard and enter additional search characters The Select key lets you display lowercase numeric and special characters This button also displays different alphabet characters for example Greek The operating system installed on the device must be able to support these characters The Erase key lets you delete the last character in an address field You can change your address search method by tapping...

Страница 44: ... Street is the default format Street City This sequence provides the following address screens City Street Address Number This mode lets you enter a street name without having to first designate a town It is useful when you are looking for an address in a metropolitan area where there are many cities and towns Intersections This sequence provides the following address screens Post Code Street Addr...

Страница 45: ... destination Destinator automatically displays the map of France when traveling on local roads of that country a map of Major Roads of Europe when traveling on a European motorway and the map of Germany when traveling on local roads of that country Address Actions When you have specified an address tap the Actions button to select from the following Address commands Set as Origin Lets you designat...

Страница 46: ... Destination After you have specified the address tap the Next button Destinator shows your destination on the Show on Map screen before calculating a route Check that the destination address is correct at the top of the screen If you want to change the destination tap the Back button and change your address entries Calculate your Destination ...

Страница 47: ...y tapping either the Quick or Short button Note Route generation excludes any detours stops or delays along the route Recent Locations The Recent Locations screen lets you select an existing destination from a list of destinations that you have previously traveled to Destinator automatically stores the last 64 destinations in memory As each new route is added to the top of the list the older desti...

Страница 48: ...tion as the route origin You would use this command when calculating a route from a point other than your current location Delete Item Lets you delete a recent location Clear List Lets you clear all locations in the Recent Locations screen Information This button displays the location s address information To Favorites Lets you add an address to your list of favorite locations ...

Страница 49: ...ps When you tap on a selected group Destinator automatically displays its stored locations Tap the selected location to show your destination on a map Tap the GO button to calculate your route Note The My Favorites folder is the default folder where all favorites are stored if not assigned to a group The Show Map screen also lets you set your route type Quick or Short For more information see Go t...

Страница 50: ... identify the group as shown below The icon identifies all destinations located in that group as displayed on the map Edit Group When you tap this button the Favorites Group screen appears with the name and selected image of the highlighted group You can change the name and icon Delete Group When you tap this button the selected group and its associated entries are removed The My Favorites group c...

Страница 51: ...ou can disable the alerts for all groups by selecting the 1st Alert setting to Off You can disable the alerts for a particular group by clearing the checkbox next to the selected group Activate that disabled alert by selecting the checkbox next to the group Favorite Alerts Alerts let you know that you are within a certain distance of a favorite location You can tap the Alerts button to set the dis...

Страница 52: ...nate the selected location as the route origin You would use this command when calculating a route from a point other than your current location Show Map Lets you see the selected address on the map Edit Favorite Location Lets you change the name comment or group location for the selected location Delete Favorite Location Tap the button to remove the selected location Information This button displ...

Страница 53: ...ntered If you didn t find the category through the initial search you can also use the Find button to do a sub search particularly useful when the category name consists of two or more words You can always browse the POI Category list by using the Scroll buttons When selecting a category Destinator automatically displays the category entries and the distance each entry is from your current positio...

Страница 54: ... POI Subcategories Many categories have subcategories to provide for an even greater list of choices For example Petrol Station may have many subcategories each representing a particular brand name The same is also true for Hotels Restaurants have subcategories that represent different types of food such as Indian Italian and French as shown below ...

Страница 55: ...d Other Address Lets you search near another address For example you have set a destination but on the way you want to stop at another location You can use this feature to search near that location for restaurants lodging historical sites or other locations Search Radius Enter the location distance to search for a designated place For example if you enter 5 km Destinator only searches within a fiv...

Страница 56: ...n calculating a route from a point other than your current location Show on Map Lets you see the selected address on the map Add to My Favorites Lets you add an address to your list of favorite locations as shown in the figure below For more information see My Favorites on page 42 Sort By ABC or Distance Lets you sort the entries of the selected category alphabetically or by distance from your cur...

Страница 57: ... TMC Service provides traffic information for monitored roads only motorways and main roads TMC radio transmissions reception can change from area to area depending on weather conditions static electricity power lines and other natural or man made conditions Disclaimer Destinator Technologies is not responsible for any damage caused by an accident due to unreliable TMC radio transmissions by natio...

Страница 58: ...on Roadworks and Weather are also monitored to let the user avoid these events manually Destinator Traffic Service Destinator provides the following traffic service 1 The Destinator Traffic Engine monitors the events relevant to your route only 2 Destinator automatically calculates the best alternative route 3 Every 5 minutes Destinator re evaluates the traffic conditions and route accordingly 4 F...

Страница 59: ... Alert icon Note Some car models especially French use coated windscreen glass and placing the radio antenna on other windows is therefore recommended on these cars An alternative solution is to install an Antenna Splitter that lets you use your usual radio antenna For more information about the Antenna Splitter please go to http www gns gmbh com TMC information is received by your TMC enabled GPS...

Страница 60: ...tinator recalculates your route Note that if the event was avoided the Show Map screen displays the Allow button to recalculate to that previously avoided route section All TMC messages are delivered to the TMC Inbox but only messages relating the direct route and a 200 metre radius are displayed The radius is set to 160 kilometres when no route has been selected Note It is strongly recommended th...

Страница 61: ...on Destinator continues to scan until a radio station with TMC data is located Lets you make minimal 0 1 steps toward a lower frequency to bring in the channel Lets you make minimal 0 1 steps toward a higher frequency to bring in the channel Lets you scan for a traffic channel with TMC data at a higher frequency TMC Options You can tap the Options button The Traffic Information Options dialogue bo...

Страница 62: ...you tap this button Destinator expands the search radius for to the Whole Map for one minute switches automatically to the TMC Inbox screen and displays a test message called Testing TMC Service After one minute Destinator reverts to the route and the 200 metre radius If you do not receive a message after tapping this button please check in the following sequence The TMC receiver is locked on to a...

Страница 63: ...s in place of the TMC icon when a Hazard message is sent Hazards are events that demand your immediate attention such as a spillage on the road or a driver going against the traffic Destinator notifies you of these potential hazards but does not automatically recalculate your route Hazard messages always appear at the top of the TMC Inbox screen Route Manager From the Options menu tap the Route Ma...

Страница 64: ...t turn direction The distance to the next turn The street name of the next turn When you tap the Directions bar Destinator displays a complete set of turn by turn directions from your current point to your selected destination You can also tap the Turn by Turn button to display the direction list Use the Scroll buttons to move up or down the directions list ...

Страница 65: ...d the selected turn in the directions list Destinator recalculates the route automatically Note that when you exclude a turn the recalculated route may take longer Route Summary or Cancel Route The Route Summary button lets you display an overview of your complete route on the Map Manager screen the total driving distance to your destination the estimated travel time and the complete destination a...

Страница 66: ... excluded from your route calculations Use this feature when you want to avoid congested roads toll roads or unsafe streets From the Route Manager menu tap the Avoid Roads button The Avoid Roads screen appears displaying the Toll Roads Ferries and My Roads to Avoid ...

Страница 67: ...Edit Group button the Avoid Roads Group screen appears displaying the group name Change the group name and tap Save The new name is displayed on the Avoid Roads screen Delete Group Select a group and tap this button to remove the group from the Avoid Roads screen The road entries in this group are also removed When selecting a group route you can tap the Allow or Aviod buttons to include or exclud...

Страница 68: ...es tap Save Delete Road Select a road and tap this button to remove the road from your group Destinator no longer avoids the removed road Show on Map Lets you show the map with the displayed destination for you to review before creating a route Information This button displays the address information Adding a Road to Avoid Note You cannot specify a particular toll road You can tap the Actions butt...

Страница 69: ... screen To stop the playback return to the Route Playback screen and tap the Stop button Route Playback Actions You can tap the Actions button to display the following commands Delete Recording This button lets you remove a selected recording Clear All Recordings This button removes all recordings Playback Speed Use the arrow keys to adjust the playback speed The range is from 100 to 300 Quick Nav...

Страница 70: ...er From the Options menu tap the Map Manager button to display Destinator s map navigation features as described in the sections below Select Map This feature lets you change the currently selected map to another map saved on your SD memory card You can tap the Select Map button to display the maps saved on your SD memory card The Select Map screen displays map details and version numbers The map ...

Страница 71: ...ets you designate a selected map as the current map Pedestrian Mode The Pedestrian Mode button lets you toggle between traveling as a pedestrian or in a vehicle When in Pedestrian Mode you can generate a route up to ten kilometers and you are not limited by vehicle constraints such as one way streets When creating a pedestrian route Destinator avoids motorways or other roads where pedestrians woul...

Страница 72: ...on to disconnect from the GPS receiver Tap the GPS Navig Button to reconnect to the GPS receiver Units of Measure You can tap the Units of Measure button to specify the measurement system you would want to use You can select Miles Yards Miles 10th of a Mile Kilometers Meters Map Settings You can tap the Map Settings button to customize your map display ...

Страница 73: ...p area If you manually change the zoom the Automatic Zoom returns to a system defined zoom level after several seconds of inactivity Use Larger Print This option increases the size of street names to make the map easier to read Extras From the Options menu tap the Extras button to display the Destinator add ons as described in the next page Multistop Planner The Multistop Planner lets you plan a r...

Страница 74: ...following route types Faster and Shorter You can select Shorter the default value to calculate a route with the shorter physical distance between your current location and the selected designation When you tap the GO button Destinator automatically calculates the faster route ...

Страница 75: ...e Actions button and tap Add Group From the Add Group screen enter the Group name and tap Save The Actions screen also lets you edit or delete a selected group Defining the Route Group Defining Route Groups A Route Group represents a group of stops ...

Страница 76: ... the Actions button to add rename or delete a destination Add a stop by Address POI My Favorites or Recent Locations Select one of these options specify a location and tap the OK button The Add Stop screen appears You can change the location name enter a comment or designate a different group When you are done tap Save Specifying a Stop ...

Страница 77: ...uld use this command when calculating a route from a point other than your current location Note You are still connected to the GPS signal Add Stop Lets you add a location by specifying an address from recent locations favorite locations or pre defined POIs such as gas food or lodging Rename Stop Lets you change the stop information such as name comments or route group Delete Stop Lets you remove ...

Страница 78: ...r recalculates a new route This prompt is not active by default Unreliable GPS Signal Warns that the GPS signal is too low and unreliable for navigation This prompt is automatically active by default GPS Not Found Alerts you if the GPS signal is lost or if the power has been removed from the GPS receiver Drive Carefully Reminder at the start of each journey This prompt is automatically active by d...

Страница 79: ...al location For best results ensure that the GPS receiver has a clear view of the sky The following GPS information is displayed Longitude The angular distance east or west on the earth s surface Latitude The location of a place north or south of the earth s surface Speed The rate of movement as expressed by kilometres or miles per hour Altitude The height above sea level The GPS On and GPS Off bu...

Страница 80: ...ed route Many of the Destinator navigation features are disabled when the Demo is running You can end the Demo by tapping the Stop Demo button Factory Restore The Factory Restore button lets you revert the device settings to that of the initial settings after installation ...

Страница 81: ...anguage selection or the directory location before installing click Back and change the language selection When you are ready to install the Destinator PC Portal click Next The Installation Status box displays the progress of the installation process 5 When the installation is complete click the Finish button The Select Language box appears 6 From the Select Language dialog box you can select the ...

Страница 82: ...stinator PC Portal CPU AMD Intel Processor 300 MHz or faster Operating system Windows 2000 XP Vista Memory 128 MB RAM minimum Hard drive free space 500 MB minimum CD ROM 4x drive or higher USB Version 1 1 or 2 0 connection Card Reader Microsoft ActiveSync not supported Using the Destinator PC Portal Wizard ...

Страница 83: ... s Favourites screens Multistops All locations that appear in Destinator s Multistops screens My Destinator Setting configurations such as map views 2D 3D and Day Night prompts units of measurement and map and route setting preferences When you select Backup Destinator PC Portal makes a copy and stores the information to your computer To backup Destinator data to your PC 1 Connect the card reader ...

Страница 84: ...ce and insert it into the card reader 3 From the Backup Restore screen select Restore 4 Select the Destinator items that you want to restore 5 Click the Restore button 6 Destinator PC Portal restores the selected Destinator items on the SD card 7 When you insert the SD card into the navigation device Destinator searches for restored information and automatically updates the application Select Lang...

Страница 85: ... device you must install at least one map To install a map 1 Connect the card reader to your PC by using a USB cord 2 Remove the SD card from your device and insert it into the card reader 3 From the Main menu tap the Manage Maps button The Manage Maps screen appears 4 From the Desktop Maps pane select a map ...

Страница 86: ... required is equal to or greater than the free space available Destinator PC Portal will not install the selected map 7 Click the OK button 8 The selected map is installed and displayed in the Device Maps pane 9 Remove your SD card from the card reader and insert it into the navigation device 10 From the Destinator application on your device tap the Select map button displayed on the Map Manager m...

Страница 87: ...rated values csv file You can import favourites to your device by following the procedure as displayed on the Import Favourites screen Importing favourite locations to Destinator You must insert your SD card into the card reader and then tap the Import Favourites button on the Main menu Destinator imports the selected favourite categories to your SD card When finished insert your SD card into the ...

Страница 88: ...es Even if the csv file does not contain all values the separating commas must still be included The csv file contains the values in a table as a series of ASCII text lines organised so that each column value is separated by a comma from the next column s value and each row starts a new line If a string contains a comma the entire string must be enclosed in double parentheses Exporting Favourite L...

Страница 89: ...s from your SD card to the PC General Warning Messages The following warning messages can appear when you re working with Destinator PC Portal Lost connection transfer If at any point during the installation or data transfer the connection to the device is lost the following message is displayed Connection to the device has been lost Please check your connection ...

Страница 90: ...install It is recommended that the previous Destinator Console be uninstalled before installing Destinator PC Portal Uninstalling Destinator PC Portal When an earlier version of Destinator PC Portal is located on your computer the following message is displayed A previous version of Destinator PC Portal was found Do you wish to uninstall It is recommended that a previous version of Destinator PC P...

Страница 91: ...elected maps will be removed from your device Are you sure you wish to continue Data Transfer If you close the Destinator PC Portal while install Destinator software or a map importing or exporting a Favourite location or backing up Destinator data the following message appears If you close the Destinator PC Portal now the Process will not be completed Are you sure you wish to close Backup Data If...

Страница 92: ...92 Multimedia features Chapter 3 ...

Страница 93: ...s Songs on a play list will be played sequentially Launch the Music player 1 Tap Music Player from the Main Menu to open the Music Player Main Screen see figure 1 The Music player main screen appears 2 Tap Playlist from the Music player main screen to display the playlist figure 2 3 1 Music Player figure 1 figure 2 ...

Страница 94: ... When you open the playlist the system searches for Mp3 and WMA files on the SD card to create a playlist refresh playlist Remove a song from the playlist play songs Return to the main screen Add songs Remove all songs from the playlist Previous page Next page ...

Страница 95: ...following screen appears Note use the up and down button of the 5 way key to adjust volume and the left and right button to switch to the previous and next songs 8 play randomly circulate playlist circulate one song back to the main menu launch the playlist adjust the volume ...

Страница 96: ...on recognizes JPG and BMP files The Photo Viewer s main features let you zoom in or zoom out rotate an image and display a series of photos through a slide show Launch the Photo Viewer You can open the Photo Viewer by tapping the Photo Viewer button on the Main menu 3 2 Photo Viewer ...

Страница 97: ...ur device as shown below page up back to the main menu tap to view the photos as a slide show page down Note When you open the photo viewer the system searches for photos on the SD card to create a playlist Note use the up and down button of the 5 way key to scroll up and down on the screen ...

Страница 98: ...y it by full screen Tap the full screen photo to back to its previous size Note use the up and down button of the 5 way key to move to the previous and next photo use the left and right button to zoom in or zoom out zoom out zoom in back to the main menu tap to show the photo s infomation previous next ...

Страница 99: ...ew videos from your handheld device This application recognizes wmv files Launching the Video Player You can open the Photo Viewer by tapping the Video Player button as shown below The Video Player main menu appears 3 3 Video Player ...

Страница 100: ... display the Playlist screen see the figure below Note When you open the photo viewer the system searches for photos on the SD card to create a playlist Tap a video name and tap play to play it back to the main menu play a video page up page down ...

Страница 101: ...t by full screen tap the full screen video to back to its previous size Note Using the up and down button of the 5 way key to adjust the volume and the left and right key to move to the previous and next video the name of the movie the length of the movie time remains back to the main menu launch the playlist adjust the volume ...

Страница 102: ...102 Phone features Chapter 4 ...

Страница 103: ...uetooth connection to your phone You can open the Phone by tapping the Phone button The Phone main menu appears as show below 4 1 Phone menu bluetooth settings call log Tap to back to the main menu tap to start to connect R600 to your cellphone tap to display the phone pad ...

Страница 104: ...oth Status You can choose to turn on off the bluetooth function Connect Status You can choose to connect disconnect R600 from a bluetooth cellphone Auto connect You can choose to enable disable Auto Connect function Answer mode If you choose Answer 5 Secs the incoming call will automatically get through in within 5 seconds Or you can choose to disable this function 4 2 Bluetooth settings ...

Страница 105: ...phone 1 Tap Bluetooth Connect from the phone main menu 2 Tap Search to search the available devices with bluetooth function The screen displays the devices 3 Tap a device to select it and tap Pair 4 3 Connecting R600 to your cellphone ...

Страница 106: ...e password to your cellphone 5 After the R600 is paired up with your cellphone tap the cellphone name and then tap Connect 6 The following screen appears when your R600 is successfully connected to your cellphone Tap Back to back to the phone main menu ...

Страница 107: ...The phone pad screen appears 2 Input a number in the phone number bar and tap the green phone icon to dial After talk tap the red phone icon to end a call You can also press Volume key to adjust volume or tap Mute to mute the phone 4 4 Making and Receiving Calls ...

Страница 108: ... as shown when there is a incoming call Press the green phone icon to receive the call Press the red icon to end the call Call Log Tap the Call Log button on the phone menu to display the call record list Tap a record to dial or delete it ...

Страница 109: ...STeK COMPUTER INC Asia Pacific Hotline 886 2 2894 3447 Fax 886 2 2890 7698 Online service http vip asus com eservice techserv aspx WWW http www asus com ASUS COMPUTER GmbH Germany Austria Hotline 49 2102 9599 10 Fax 49 2102 9599 11 Online service http vip asus com eservice techserv aspx WWW http www asus de ASUS COMPUTER China Tel 86 10 82667575 Online service http vip asus com cn eservice techser...

Отзывы: