background image

6

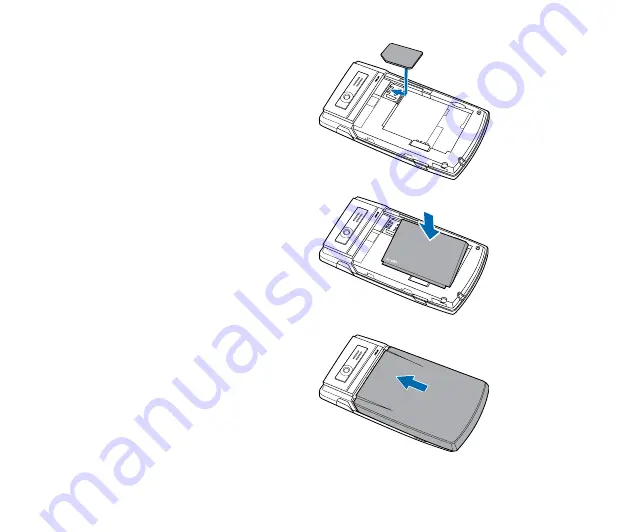
.   Insert the SIM card with its gold contacts 

facing down and the notched corner oriented 

to the upper left corner of the slot as shown.

3.   Install the battery into the compartment with its 

copper contacts properly aligned to the copper 

conductor on the device.

.   Replace the battery compartment cover.

Содержание P560

Страница 1: ...P560 User Manual ...

Страница 2: ...ABILITY OR FITNESS FOR A PARTICULAR PURPOSE IN NO EVENT SHALL ASUS ITS DIRECTORS OFFICERS EMPLOYEES OR AGENTS BE LIABLE FOR ANY INDIRECT SPECIAL INCIDENTAL OR CONSEQUENTIAL DAMAGES INCLUDING DAMAGES FOR LOSS OF PROFITS LOSS OF BUSINESS LOSS OF USE OR DATA INTERRUPTION OF BUSINESS AND THE LIKE EVEN IF ASUS HAS BEEN ADVISED OF THE POSSIBILITY OF SUCH DAMAGES ARISING FROM ANY DEFECT OR ERROR IN THIS ...

Страница 3: ...age contents 20 Chapter 1 Knowing your device Getting to know your device 22 Layout 22 Getting your device ready 25 Installing the SIM card and battery 25 Charging the battery 27 Installing and removing a microSD card 28 Starting up 29 Powering your device 29 Using the stylus 29 Calibrating your device 30 Locking your device 30 ...

Страница 4: ...nput Panel 48 Using the Block Recognizer 48 Using the onscreen keyboard 48 Using the Letter Recognizer 49 Using the Transcriber 50 Writing and drawing on the screen 51 Recording voice 52 Chapter 3 Device Synchronization Synchronizing your device 54 Microsoft ActiveSync 54 Synchronizing via mini USB 56 Synchronizing via Bluetooth 57 Synchronizing with an Exchange Server 58 ...

Страница 5: ...gency calls 67 Making international calls 67 Making a video call 67 Video Call Setting 69 Receiving a call 70 Options during a call 71 Managing multiple calls 72 ASUS CallFilter 73 Launching the shortcut menu 73 Managing the Accept list 74 Managing the Reject list 75 Chapter 5 Messaging E mail messaging 78 Setting up an e mail account 78 Sending an e mail message 80 ...

Страница 6: ...ing an MMS message 85 Windows Live 87 Using Hotmail 87 Using Windows Live Messenger 88 Chapter 6 Organizing your life Using Contacts 92 Viewing Contacts 92 Using SIM Manager 94 Using Calendar 95 Scheduling an appointment 95 Viewing an appointment 96 Viewing your schedule 96 Using Tasks 97 The Tasks list 97 ...

Страница 7: ...ng the date time and alarm 104 Setting ring tone 105 Adding ring tone to selection 105 Changing the ring tone 105 Wake up settings 106 Chapter 8 Getting connected Using the Wireless Manger 108 Using Bluetooth 108 Activating Bluetooth in your device 109 Adding Bluetooth devices 109 Using Wi Fi 110 Turning on Wi Fi 110 Configuring wireless networks 111 Adding a wireless network 112 Using Wi Fi Manag...

Страница 8: ...iguring the network 117 Setting your preferred networks 117 GSM 3G Networks 118 Chapter 9 GPS features GPS Catcher 120 Updating GPS data 120 Setting GPS Catcher 120 External GPS 121 Chapter 10 Multimedia features Using the camera 124 Launching the camera 124 Camera mode 125 Taking photos 128 Video mode 129 Recording videos 131 ...

Страница 9: ...laying a streaming file 135 Connecting with bookmarks 135 EziMusic 137 EziPhoto 138 YouTube Flickr 139 Using YouTube 139 Using Flickr 140 Chapter 11 Business features Ur Time 142 Setting time 142 Setting alarm 142 Setting the World Cock 142 Remote Calendar 143 Synchronizing your calendar 143 Setting Remote Calendar 144 ...

Страница 10: ...Enabling the Gesture feature 152 Using the Gesture 152 ASUS status icon 154 ASUS Zip 156 Backup 157 Backing up files 157 Restoring files 158 Newstation 159 Using Newstation 159 Using Newstation menus 160 Chapter 13 Other features Microsoft Office Mobile 162 Excel Mobile 163 OneNote Mobile 165 PowerPoint Mobile 165 Word Mobile 166 ...

Страница 11: ...8 My Secrets 169 Auto Cleaner 170 Restoring default factory settings 170 System information 171 Task Manager 171 Removing programs 172 Appendices Notices 174 Specific Absorption Rate SAR 176 ASUS Contact information 179 ...

Страница 12: ...play Remember to switch off your wireless connections during air travel As with all other radio devices touching the built in antenna area during telephone conversation may impair the quality and lead to shorter standby time due to increased power consumption The battery Your phone is equipped with a high performance Li Ion battery Observe the maintenance guidelines for a longer battery life Avoid...

Страница 13: ...it from the mains pull the charger itself WARNING There is a risk of explosion if the battery is replaced by an incorrect type Memory card Do not remove or insert a memory card or turn off the handset while data on the card is being read Do not touch the metal terminals with your hands or metal objects Do not bend the memory card or subject it to violent impacts Keep it away from water and high te...

Страница 14: ...ce function Do not place stickers that may block the keypad or disturb other functions such as microphone earpiece or camera lens WARNING Failure to follow these instructions may lead to serious personal injury and possible property damage Driving safely Never use handheld phones while driving It is an offence that while driving to hold a phone or cradle it in your neck at any point during the set...

Страница 15: ...d recommendations of Wireless Technology Research If you have a pacemaker Always keep your phone more than six inches 15cm from your pacemaker when turned on Do not carry your phone in your breast pocket Use the ear opposite the pacemaker to minimize the potential for interference If you have any reason to suspect that interference is taking place turn your phone off immediately Hearing aids Some ...

Страница 16: ...ies Turn your phone off where posted notices so require Magnetic media Magnetic fields generated by mobile devices may damage data on magnetic storage media such as credit cards computer discs or tapes Do not place your phone next to such media You should never expose your phone to strong magnetic fields as this may cause temporary malfunction Other Safety Guidelines Aircraft Regulations prohibit ...

Страница 17: ... children as the SIM card and other small parts present a choking hazard Cautions Your device is a high quality piece of equipment Before operating read all instructions and cautionary markings on 1 AC Adapter 2 Battery and 3 Product Using Battery Do not use this device in an extreme environment where high temperature or high humidity exists Do not abuse the device Avoid striking shaking or giving...

Страница 18: ...ng shopping banking waiting in line or conducting other personal business Avoid using annoying ring tones Avoid taking a call on your mobile phone during business meetings appointments or interviews Look for a private place to take a call and keep your phone conversations brief Talk on your mobile phone quietly and do not shout Put your mobile phone on silent or vibrator mode to avoid disturbing o...

Страница 19: ...0 GPS Built in SiRF star III chipset GPRS Class B Multi slot class 10 Camera Back 3 0 mega pixel auto focus camera Front VGA camera Connectivity Bluetooth V2 0 EDR USB USB 2 0 compatible WLAN 802 11b g Battery capacity 1100 mAh Lithium Ion Expansion slot MicroSD card slot Audio Mini USB audio port Built in microphone and output speaker Weight 120 5g with battery Dimension 116 4 x 64 2 x 13 4 mm Ta...

Страница 20: ...the above items is damaged or missing contact your retailer Standard items ASUS P560 device Battery AC Adapter Mini USB cable Headset Stylus Protection case Getting Started CD Quick Start Guide Warranty Card microSD Card Car mobile phone charger Car Kit PDA holder and windshield suction pedestal ...

Страница 21: ...21 Knowing your device Chapter 1 Getting to know your device Getting your device ready Starting up The Home screen AnyTime Launcher Searching for information Getting Help ...

Страница 22: ...22 Getting to know your device Layout 1 2 3 4 5 6 7 8 9 10 11 12 13 14 15 16 17 18 19 20 21 22 23 24 ...

Страница 23: ...hscreen TFT LCD allows you to write draw or make selections using the stylus 5 Left Soft key Performs the command indicated above the button 6 Call key Press to receive an incoming call or to make a voice call Press and hold to make a video call 7 Anytime Launcher key Press to launch the Anytime Launcher application 8 Navigation key This nine direction navigation key allows you to navigate through...

Страница 24: ...era lens 3 0 megapixel lens for taking pictures and video clips 17 Carrying strap hole Allows you to attach a strap to the device 18 MicroSD card slot Insert a microSD storage card into this slot 19 Hold button Slide downward to disable all keys including the LCD touch screen 20 Reset hole Using the stylus press the reset hole to soft reset your device 21 Battery compartment Contains the battery t...

Страница 25: ... card The SIM card contains your phone number subscriber details phonebook and additional phone memory Your device comes with a rechargeable Lithium Ion Li Ion battery New batteries come partially discharged and should be fully charged before using them 1 Remove the battery compartment cover CAUTION Use only an ASUS qualified battery To install a SIM card and battery ...

Страница 26: ...acing down and the notched corner oriented to the upper left corner of the slot as shown 3 Install the battery into the compartment with its copper contacts properly aligned to the copper conductor on the device 4 Replace the battery compartment cover ...

Страница 27: ... connector cover hardly nor rip it with any sharp or hard stuff 2 Connect the AC adapter plug into the mini USB connector at the right side of the device 3 Connect the AC power plug into a grounded wall socket or power strip NOTES The notification LED turns red and the charging battery icon appears on the status bar indicating that the battery is charging If your battery gets totally discharged yo...

Страница 28: ...re you can store your files and data To install a microSD card 1 Locate the microSD card slot at the left side of the device 2 With the golden fingers facing down insert the microSD card into the slot until it snaps properly 3 To remove push the card until it ejects out then remove the card safely NOTE The microSD card is an optional accessary ...

Страница 29: ...tton on top of the device Using the stylus The stylus is a pen like device found behind the upper left corner of your device Stylus Use the stylus to write draw select or drag an item on the screen Single tap an item to select or open it Tap and hold an item to see a menu 2 Follow the onscreen instructions to align the screen and set the local time zone Power button ...

Страница 30: ...evice ensures that the item you tap on the screen is activated This involves tapping the center of targets that appear in various locations on the screen To calibrate your screen 1 Tap Settings System tab then tap Screen icon 2 On the General tab tap Align Screen then follow the calibration screen instructions Release Lock Locate the Hold button and slide downward to lock Slide upward to unlock ...

Страница 31: ...31 The Home screen The Home screen on your device displays two parts the ASUS Today and the Today screens ASUS Today screen Today screen ...

Страница 32: ... you to add and play media files on your device Tap to open missed calls new messages Tap to launch Newstation Tap to view the weather updates Tap to view time information Tap to open Calendar Tap to move through icons to your left Tap to move through icons to your right NOTE You can disable the ASUS Today from your Home screen following the instructions below To disable the ASUS Today 1 Tap Setti...

Страница 33: ...u on your missed calls Alerts you on your new SMS messages Alerts you on your new MMS messages Alerts you on your new e mail messages Calendar icon Displays your appointment for the day Date time icon Displays your date time settings Media icon Enables you to add and play media files News icon Displays the latest news Weather icon Displays the current weather ...

Страница 34: ...ed to the Internet via Wi Fi or GPRS connection Refer to the Wi Fi or GPRS sections in this user guide for more details Viewing your day s appointment To view your day s appointment Tap to view your day s appointment in the display screen If you want to change the information just click the display screen then make the necessary changes on the Calendar screen NOTE You may also enter your calendar ...

Страница 35: ... Setting the network in Chapter 8 of the user guide bundled in your Getting Started CD To configure the weather settings 1 Tap Settings ASUS Today 2 Select Enable Weather Update 3 Select the Country and City that you want to obtain the latest weather data for 4 Tap when done To configure the network settings 1 Tap Settings Connections Network Setting 2 Select the Country and Operator from the drop...

Страница 36: ...en tap the display screen The Newstation screen is displayed 2 From the Categories list select the channel that you want to obtain the latest news updates from NOTE Ensure that you are connected to the Internet to get the latest news updates 3 Tap Menu Update Your news downloads are stored as RSS news feeds on your device and displayed on the ASUS Today screen NOTE You may read these stored RSS ne...

Страница 37: ...a files through the speaker of your device or through a headset NOTE Your device may run low on memory and slow down if you store files on your device We recommend that you store audio and video files in a storage card To play media files Tap then tap the display screen The EziMusic is launched Refer to the section of EziMusic in this user guide for more details on how to play media files ...

Страница 38: ...on Customizing the Today screen in Chapter 7 of this user guide Tap to open the Start menu Status bar Indicates the battery status Tap to adjust volume Tap to launch MultiHome Tap to view connectivity status Tap to launch the phone function Tap to launch Contacts list ASUS Today screen Refer to section ASUS Today in this User Guide Displays the signal status The icon shows no SIM card and no signa...

Страница 39: ...s This icon depends on your location and mobile service provider GPRS available Connecting via GPRS Connected via GPRS 3rd Generation 3G service available Messaging status New Short Messaging Service SMS message New voice mail New Multimedia Messaging Service MMS message Status indicators Refer to the table below for the status indicators ...

Страница 40: ...charging Battery low Signal status No cellular phone service No signal Searching for cellular phone service Indicates signal strength Phone off ActiveSync connection status ActiveSync synchronization in progress Connecting with ActiveSync ActiveSync connection not active Synchronization error ...

Страница 41: ...Bluetooth stereo headset connected Hands free on Roaming service Roaming service This icon appears if you have international roaming feature Mode status Vibrate or Meeting mode on Speakerphone status Speakerphone on Alarm status Appears when you set the alarm SIM card status No SIM card installed Notification status Notice indicator ...

Страница 42: ... viewing longer text files To change the screen orientation tap Settings System tab Screen then select the orientation you want Start menu The Start menu contains various programs and applications that you commonly use Tap to display the Start menu items You can also customize the items that appear in the Start menu To customize the Start menu 1 Tap Settings Personal tab Menus 2 Select the check b...

Страница 43: ...he ASUS Today screen to launch MultiHome 2 To navigate through the Original Business and Life themes push the navigation key leftward or rightward or draw a horizontal line on the screen with the stylus 3 Tap the screen to apply your selected theme Tap the screen to apply the theme to the ASUS Today screen Life theme Tap the screen to apply the theme to the ASUS Today screen Business theme ...

Страница 44: ...To run the AnyTime Launcher do any of the following Tap Programs AnyTime Launcher Press the AnyTime Launcher key Tap to open an application Use the navigation key to select Tap to add an application to the Favorite Programs list Tap to remove an application from the Favorite Programs list Tap to open the selected application Tap to view all applications on the device ...

Страница 45: ...d your favorite programs Recent Programs Displays the recent opened programs Favorite Contacts Allows you to add your favorite contacts Message Center Allows you to access Messaging function and view missed calls Internet Allows you to use Internet related applications Multimedia Allows you to use multimedia applications My Settings Allows you to configure your device settings ...

Страница 46: ... MicroSD card You can search by file name or by words located in various applications including the Calendar Contacts Excel Mobile Word Mobile Help Messages Notes and Tasks You can also filter your search to files larger than 64 KB To search for a file or an item 1 Tap Programs Search 2 In Search for field enter the file name word or other information you want to search 3 In Type field select the ...

Страница 47: ...47 Entering data Chapter 2 Using the Input Panel Writing and drawing on the screen Recording voice ...

Страница 48: ... user input tap the Input Panel arrow then tap Block Recognizer 2 Write letters numbers symbols or punctuations in the designated writing area Write letters on the abc left area of the box Write numbers on the 123 right area of the box Tap the space button to input a space Tap the special symbols button to input symbols punctuations and other special characters Tap Help button for help on how to w...

Страница 49: ...nizer 1 In an application that accepts user input tap the Input Panel arrow then tap Letter Recognizer 2 Write letters numbers symbols or punctuations in the designated writing area Write capital letters on the ABC left area of the box Write lower case letters on the abc middle area of the box Write numbers on the 123 right area of the box Tap the space button to input a space Tap the special symb...

Страница 50: ... Input Panel arrow then tap Transcriber 3 The Transcriber Intro screen appears Tap to close the introduction or tap Help to find more instructions To write using Transcriber 1 Tap screen to position the cursor where you want the text to appear 2 Use the stylus to write on the screen The handwriting will be converted to text after you lift the stylus from the screen To edit text 1 Tap the text you ...

Страница 51: ...any of the following Writing if you want to draw or enter handwritten text in a note Typing if you want to create a typed note 4 Set the other options according to your preference 5 Tap when finished To write draw in a note 1 Tap Programs Notes 2 From the Notes list tap New If you set the Default mode to Typing a blank page appears for typed text If you set the Default mode to Writing a page with ...

Страница 52: ... near your mouth or source of sound 6 Tap when finished recording A voice record icon appears on the note You can tap to play the voice record 7 Tap To add a recording to a saved note 1 Tap Programs Notes 2 From the Notes list tap a saved note to open it 3 If you do not see the recording toolbar tap Menu View Recording Toolbar 4 Tap the record button to begin recording 5 Place the receiver near yo...

Страница 53: ...53 Device Synchronization Chapter 3 Synchronizing your device Microsoft ActiveSync ...

Страница 54: ...Microsoft ActiveSync ActiveSync allows you to synchronize data in your device with data in your computer ActiveSync can also synchronize over a wireless or mobile network with Microsoft Exchange Server provided that your mobile phone service or company is running Microsoft Exchange Server with Exchange ActiveSync When synchronized directly with Exchange Server you can stay up to date even when you...

Страница 55: ...rovider obtain the name of the Exchange Server user name password and domain name from your network administrator before starting the Sync Setup Wizard To install and configure ActiveSync Microsoft Windows Mobile Device Center in your computer 1 Insert the Getting Started CD that came with your device package 2 Follow the screen instructions 3 After the setup is complete the Sync Setup Wizard auto...

Страница 56: ...Refer to your Windows Mobile Help for more information about ActiveSync synchronization Wireless connection may require separately purchased equipment eg Wireless router or Access Point Synchronizing via mini USB You can connect to your device using the bundled mini USB cable to synchronize to your computer To synchronize your device via mini USB 1 After installing ActiveSync to your computer conn...

Страница 57: ...our computer using Bluetooth NOTE Refer to the section Using Bluetooth in this user guide for more details 3 From the list of connected devices tap the name of the computer you want to synchronize with 4 Select ActiveSync then tap Save 5 Tap to exit the Bluetooth settings 6 From your device tap Programs ActiveSync Menu Connect via Bluetooth The devices starts to connect to your computer 7 When con...

Страница 58: ...nge Server To synchronize your device with Exchange Server 1 From the ActiveSync screen tap Menu Add Server Source 2 Key in your e mail address then tap Next If you prefer the device to detect the Exchange Server Settings automatically select the check box 3 In the Server Address field key in the name of the server running Exchange Server then tap Next If necessary tap the check box This server re...

Страница 59: ...59 Phone features Chapter 4 Using the phone Making calls Receiving a call Options during a call ASUS CallFilter ...

Страница 60: ...stalled SIM card to your device Phone pad The phone pad allows you to easily dial and access the Contacts Call History and Phone settings To launch the phone pad do any of the following Tap Programs Phone Press Turning off the phone function You may use other functions even when your device s phone function is turned off To turn off the phone function 1 Tap the signal icon or tap Settings Connecti...

Страница 61: ...volume menu you can Move the slider to adjust device or phone volume Tap On Vibrate or Off to change the mode and ringer volume settings NOTE You can also press the volume button at the left side of the device to adjust the volume Press to increase volume Press to decrease volume or turn volume off ...

Страница 62: ...aking a voice call Calling using the phone pad To make calls using the phone pad 1 Tap Programs Phone or press to launch the phone pad 2 Tap the number or choose a contact or a recently dialed number from the list above the phone pad If you tapped the wrong number tap to erase number to the left 3 Press to make the call 4 When finished press to end the call ...

Страница 63: ...p to launch Menu Displays the current call status Tap to mute unmute a call Tap to launch the Contacts list Tap to switch between keypad and call status screen Tap to launch Call History Tap to take notes Back arrow Contacts Call history Tap to show hide the keypad Tap to launch Menu ...

Страница 64: ...r phone number then tap Call or press Tap Menu to do other tasks such as saving a caller s contact information to your Contacts list or send a text message to a caller 3 Press to end the call Calling from Contacts To make a call from Contacts 1 Press the Right Soft key or from the Today screen tap Contacts 2 You can do any of the following to make a call Tap name of contact then tap Call Tap name ...

Страница 65: ...er and select a numeric key for this contact 5 Tap when finished To call a Speed Dial number 1 Tap Phone Tap and hold the numeric key assigned to the contact you want to call 2 To end the call press Calling using Smart dialer The Smart dialer feature in your device enables you to find a contact more quickly Just key in the first letters of the contact you want to call Your device smartly matches i...

Страница 66: ...ice Commander while using a headset press the answer button on the headset then follow given instructions Answer button may not be available in some headset models Some languages may not support the Voice Commander function To delete a Speed Dial entry 1 Tap Phone Menu View Speed Dial 2 Tap the contact that you want to delete from the speed dial list then tap Delete 3 Tap Yes from the pop up messa...

Страница 67: ...phone number with the country code area code and phone number and then press Making a video call Using the phone pad To make a video call using the phone pad 1 Tap Phone or press then key in the number you want to call 2 Tap Menu Video Call then the device begins to establish the connection 3 When finished press to end the call IMPORTANT Before using the video call function apply for a 3G SIM card...

Страница 68: ...Call History To make a video call from the Call History list 1 Tap Phone The Call History screen displays the following tabs All default Displays all calls made received or missed Missed Displays all missed calls Outgoing Displays all the calls you made Incoming Displays all the calls you received 2 Scroll to the desired contact or phone number then tap Menu Video Call 3 When finished press ...

Страница 69: ... enable the vibration alert when a video call is established Select the profile you want to show in a video call The default is video profile You can also set a picture as your profile Set the default audio path for video call 3 Tap Done or when finished Service Settings To set the Service settings 1 Tap Settings Personal tab Video Call Setting Service tab 2 Select the service item that you want t...

Страница 70: ...ts and allows you to answer or reject the incoming call To answer or reject an incoming call To answer a call tap Answer or press To reject an incoming call tap Ignore or press TIP Press and hold to switch receiver to speakerphone mode To terminate a call Press ...

Страница 71: ...nnot hear you Unmute Turns the microphone for the active call back on Speakerphone On Off Activates deactivates the speakerphone Turn Hands free On Off Turns on the hands free function You can also press and hold to turn on off the hands free function Conference Joins together all existing calls if you have subscribed to this service Paste Pastes the phone number you copied from your messages note...

Страница 72: ...ond call and return to the first call press To hold a call to make a second call Tap to place the first call on hold and call a second number Press to end the second call and go back to the first call To switch between calls To switch between two calls tap To set up a multiple call With multiple calls in progress tap Menu Conference ...

Страница 73: ...a list of telephone numbers from your Contacts list call log message log or any unlisted telephone number that you want to accept or reject Launching the shortcut menu The shortcut menu allows you to conveniently activate either the Accept or Reject list To launch the shortcut menu Tap Programs Call Filter ASUS CallFilter ...

Страница 74: ...list 1 Tap Programs Call Filter 2 Select Accept List from Edit List box 3 Select source of data You can get data from your Contacts Call log Message sender number or you can add anonymous number and key in new numbers 4 From the list e g Contacts select an item then tap Add or to add a new Accept list item 5 Click to exit To remove items from the Accept list select a contact from the Accept list t...

Страница 75: ...ams Call Filter 2 Select Reject List from Edit List box 3 Select source of data You can get data from your Contacts Call log Message sender number or you can add anonymous number and key in new numbers 4 From the list e g Contacts select an item then tap Add or to add a new Reject list item 5 Click to exit To remove items from the Reject list select a contact from the Reject list then tap Remove o...

Страница 76: ...76 ...

Отзывы: