


19
The drop down menus duplicates the function of some of the icons. For the purpose of
this tutorial, we will use the icon buttons to set up a sample job.
Setting up the Job
When you first opened the job you set the size of the piece. The piece size may be
changed at any time during or after the setup of the job by clicking on
Setup
and then
Envelope Size
or by clicking on the Envelope Size icon on the menu bar.
Click on this icon and the Envelope Properties window will open. Select either
Standard
or
Custom
. Press the
OK
button. If you choose
Custom
you may use any
number or fraction from 3 inches up to 15 inches in width and from 5 inches up to 17
inches in length. When you press the
OK
button, the Layout screen will adjust the view
of the media to the size selected automatically. If you intend to use the Custom size
again, save it by giving it a name and clicking on
Save As
next to Custom. You must
enter a name for this feature to work.
Refer to the screen image on page 18. The corresponding print banks will show on the
screen in white. These banks can be moved together or separately in sets in the same
way that they can be changed on the printer. The maximum printing area on the Image
Blaster with 6 heads is 3 inches.
To the right of the template image are numbers. These correspond to the printheads
and are marked with the same numbers on the AstroJet Printer. Also, to the right is a
line. This guideline can be moved to any point on the layout to assist you in lining up
the fields or information that you will be adding. To get all of the information to line up
on a particular bank move the line close to the position desired for the lines and right
click on the mouse while the guideline is selected with the mouse pointer.
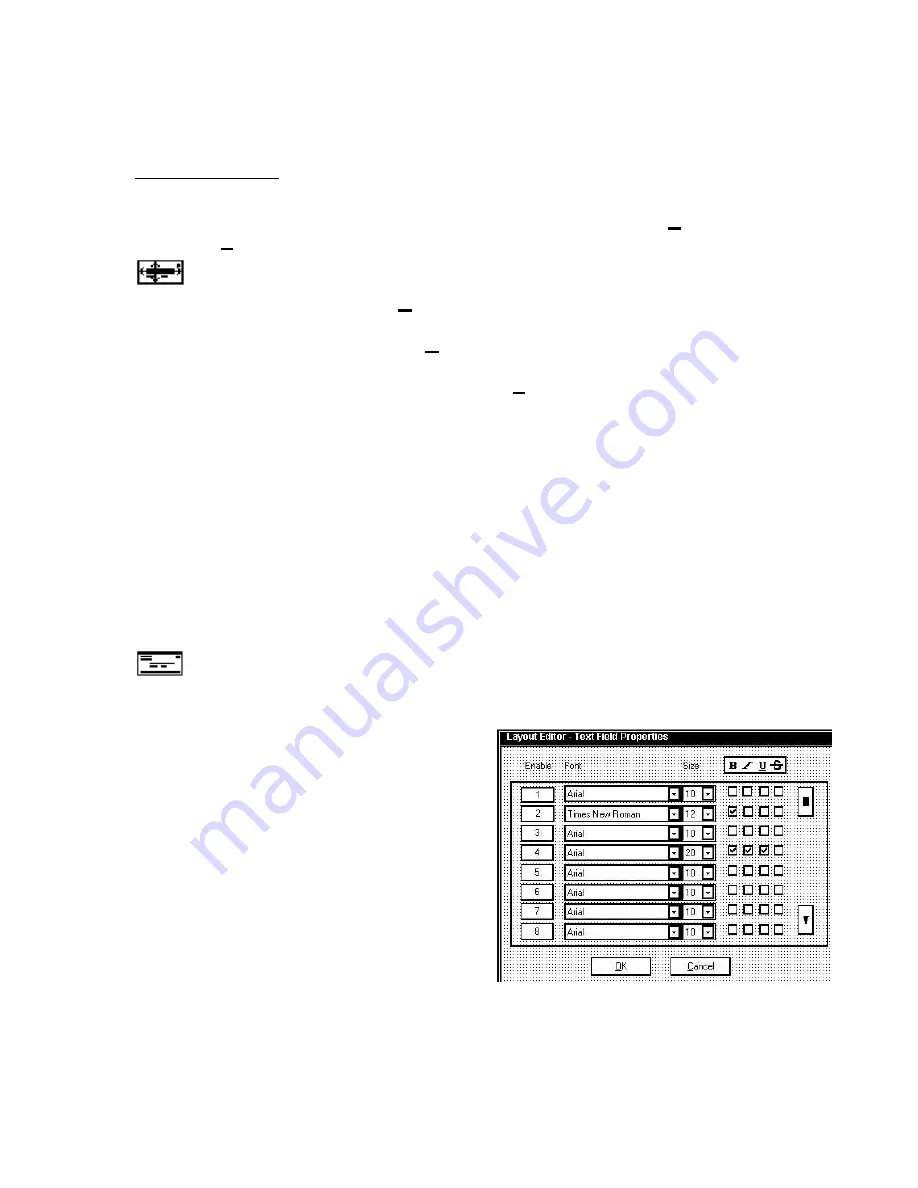
The next step is to build the job on the layout. When you click on the “Text Field
Properties” icon the
“Layout Editor – Text Field Properties”
window will open. This
window permits you to enable up to 24 lines of information and data with up to 4000
characters per Text Field. Enable one
button for each line of type style in the
layout. If you wish to make additions,
deletions, changes in the style of type, or
the number of lines, you can click on this
icon anytime during the setup or before
you run the job to make changes. For the
purposes of this tutorial, we are going to
enable the first 4 lines and set them up
according to the picture. Line 1 will be for
the database address. Line 2 will be for
the company name in the return address.
Line 3 will be for the rest of the return
address. Line 4 will be for an additional message on the media.
Содержание astrojet II plus
Страница 1: ...ASTRO ASTROJET IMAGE BLASTER High Speed Inkjet Printer Installation Operating and Parts Manual...
Страница 4: ...ii Notes...
Страница 6: ...2 Notes...
Страница 18: ...14 Notes...
Страница 38: ...34 8 Click Okay and Yes to make structures permanent 9 Exit FoxPro...
Страница 46: ...42 Notes...
Страница 52: ...48 Notes...
Страница 55: ...51 IMAGE BLASTER PARTS LIST...
Страница 56: ...52...
Страница 58: ...54...
Страница 60: ......
Страница 61: ...Notes...
Страница 62: ...Copyright 2000 Astro Machine Corporation Elk Grove Village Illinois 60007 12 20 2000...


