Ashly digiMix24 Скачать руководство пользователя страница 16

Operating Manual - digiMIX24 Digital Mixer

16


7) Adjust PEQ (

sec. 2.40

), expander/gate (

sec. 2.42

), and compressor/limiter (

sec. 2.43

) on each input channel as needed. For 

greater details and examples of how to use these functions, see sections 

4.2

4.4

, and 

4.5

.


8) Assign the aux output(s) for all used input channels, adjusting their level to each monitor mix. (sec. 

2.10

2.38

, or 

2.45

)


9) Use the master aux level controls to set each overall monitor level (

sec. 2.10

)


10) Apply effects to input channels if desired. See sections 

2.12

2.44

, and 

4.8 

for details and examples.


11) Adjust GEQ graphic equalizer for main, aux, or subgroup outputs. (

sec. 2.41

)


12) To create a vocal or other subgroup, follow the instructions in 

section 2.11

, then select the subgroup to adjust the group 

level using the main fader.
 

13) To create a DCA level or mute group for all vocals or other groups, follow instruction in 

section 2.16

, then select the DCA 

group before using the main fader or mute button.
 

14) Save settings as scene presets, DSP channel presets, 

FX presets, or GEQ presets (

sec. 2.31

).

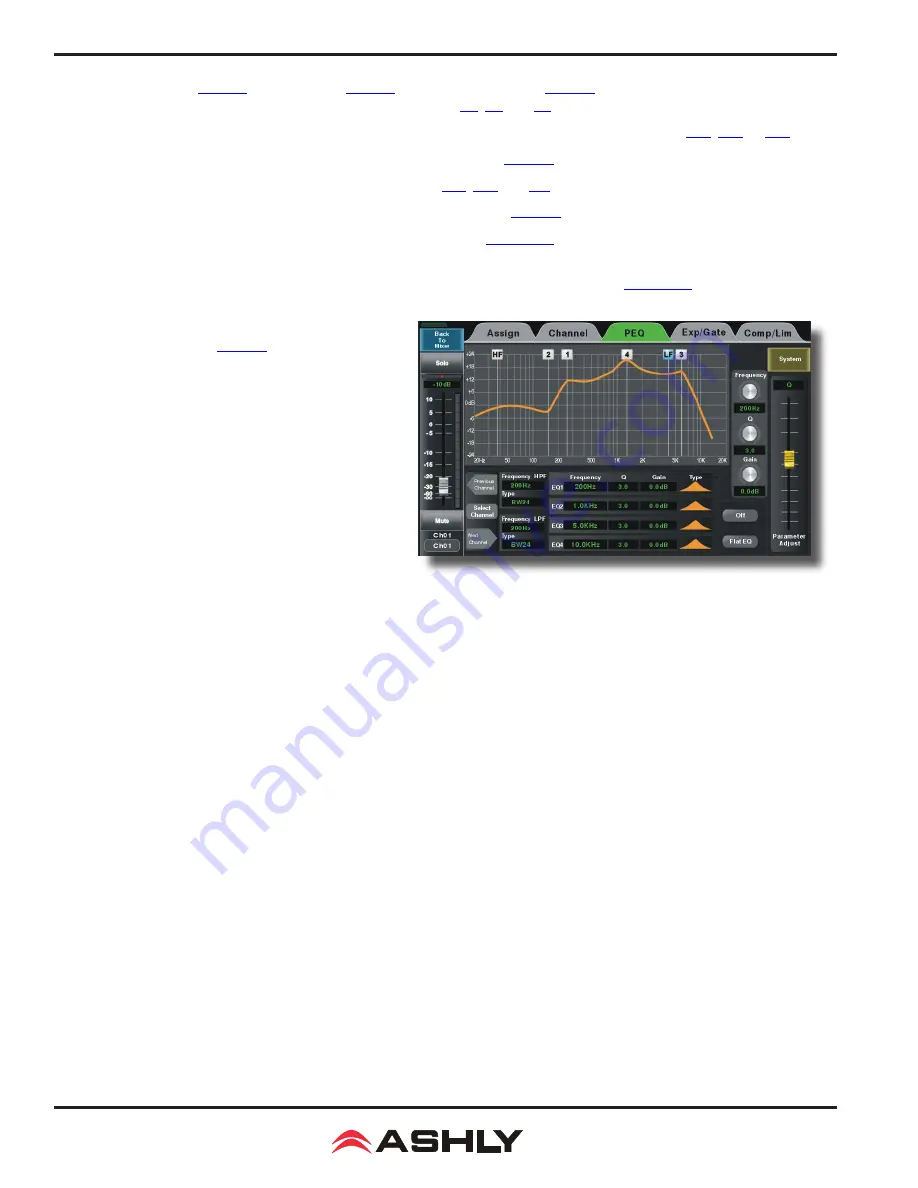
4.2 PEQ Parametric EQ

Press the PEQ button to engage the parametric EQ for the 

currently selected input channel, subgroup, main output, FX, 

or aux output. The four filters EQ1-EQ4 can be shelving 

or parametric, with additional hi-pass and low-pass filters.

Shelving Filters:

 EQ1-EQ4 can be set as tuneable shelving 

filters, typically used as the high and low boost/cut controls. 

Press the filter <Type> image on the touchscreen to toggle 

between low shelf, high shelf, or parametric peak filter. 

Parametric Filters

 can adjust frequency, bandwidth (Q), 

and filter gain/cut. Think of one band of parametric EQ as a 

single graphic equalizer fader where the frequency is variable, 

and the bandwidth (Q) is also variable. The smaller the bandwidth, the less the audio signal on either side of the frequency center 

is boost or cut, whereas a wider bandwidth produces a more audible change to the overall tone of a signal. In addition to basic 

tone controls, parametric filters are ideal for eliminating problem feedback frequencies without greatly affecting the overall 

sound. They are also useful for adding or removing a characteristic hot spot from microphones or for precisely compensating 

for room resonance. It is well worth the time becoming proficient with parametric EQ filters, as they offer the best solution to 

many EQ problems. 

HPF/LPF:

 The hi-pass and low-pass filters are cut only, with adjustable frequency and slope. There are 20 different filter types 

to choose from including Butterworth, Bessel, and Linkwitz-Riley, with filter slopes ranging from 6db/oct to 48dB/oct. These 

filters are typically used to limit bandwidth. A common application is to use an aux output to drive 70V transformer tapped 

speakers that are not suited for signal below 80Hz. Set the HPF for that Aux output to 80Hz, then select the desired filter type. 

Tone Control:

 The four EQ filters can be used as basic tone controls with tuneable frequencies, ie high, high-mid, low-mid, 

and low. High and low typically use shelving filters. Press the <Flat EQ> button to restore all filters to 0dB gain, medium Q, 

and default starting frequencies and filter types. A lower Q broadens the filter to have a much greater effect, while a higher Q 

narrows the bandwidth and makes less of an overall difference when boost or cut.

Notch EQ for Feedback Control:

 To eliminate a feedback problem on a live mic input, set the PEQ flat and turn up the mi

-

crophone level until it is on the edge of feedback. Then using the frequency control, sweep a narrower bandwidth (higher Q) 

filter through a problem feedback area, with just a slight amount of gain on that filter, until finding the exact frequency causing 

feedback. Once the feedback frequency has been identified, reduce the filter's gain until feedback is gone. Adjust the bandwidth 

(Q) as narrow as possible while still eliminating feedback. Repeat with additional filters and frequencies as necessary. Finding 

the problem frequency is relatively easy, but finding the best combination of minimal cut and bandwidth takes a little practice. 

Notch EQ for Room Resonance:

 To reduce excess reverberation or boominess in a room, use the parametric filter on the main 

or aux outputs. With music playing through the speakers, engage a PEQ filter on the output, then sweep the filter's frequency 

with a slight boost and medium Q until you hear a disproportionate increase in the boominess of the music. This frequency is a 

room resonance, and can be notched to compensate. Adjust the bandwidth and cut only as little as necessary to fix the problem.

Figure 4.2: PEQ Parametric EQ Screen

Содержание digiMix24

Страница 1: ...585 872 0739 ashly com All Trademarks referred to herein are the property of their respective owners 2016 2018 Ashly Audio Inc All rights reserved worldwide Operating Manual 24 Channel Digital Mixer T...

Страница 2: ...the point where they exit from the apparatus 12 Only use attachments accessories specified by the manufac turer 13 Use only with the cart stand tripod bracket or table specified by the manufacturer or...

Страница 3: ...al to fully understand the features and capabilities of this product FCC Compliance This device complies with part 15 of the FCC Rules Operation is subject to the following two conditions 1 This devic...

Страница 4: ...ader or mute groups Cross fade mode for panning between any two assigned channels Stereo link for inputs subgroups and aux outputs EZ Mode for secure simplified touchscreen or iPad control TRS inserts...

Страница 5: ...hortcut to EZ Mode sec 6 4 Password Protection Access password and security settings by pressing the System button Passwords are always four character alpha numeric and case sensitive The password ent...

Страница 6: ...an alternately indicate every channel s current fader position by pressing the Faders Meters button sec 2 23 2 3 Select Button Every input subgroup main output aux and effect FX has a dedicated select...

Страница 7: ...st Parameter knob The second method is to press the Send button associated with each aux level control to quickly view and adjust all input chan nels sent to that aux mix Use the touchscreen to select...

Страница 8: ...ect button is pressed sec 2 3 this control works together with the motorized fader and touchscreen 2 14 Ctrl Room Level Control This adjusts the level of the control room outputs Control room outputs...

Страница 9: ...or show the current fader position of all channels 2 24 Pan Control The pan control is dedicated to fading the selected channel from left to right in the mix It is also used for Crossfade mode sec 6...

Страница 10: ...nd PEQ GEQ settings Up to 48 different DSP channel presets can be saved 3 FX FX presets are used to save load up to 104 different user defined FX1 and FX2 effects 4 GEQ The 48 GEQ presets are only use...

Страница 11: ...signed Assignment status can also be edited using the touchscreenAssign window sec 2 38 or the Main Sends button sec 2 45 2 34 Sub 1 4 Press the sub 1 4 buttons to assign the currently selected input...

Страница 12: ...adjust filter level Up to 48 different GEQ presets can be saved to memory and loaded later for use with specific rooms or loudspeakers Press the EQ bypass button sec 2 25 or the touchscreen ON button...

Страница 13: ...bus for DSP processing 3 3 Channel 17 18 19 20 Stereo Line Inputs These inputs function as two stereo line level inputs sec 2 7 or as four mono inputs There is no adjustable preamp on these inputs so...

Страница 14: ...ith wifi for remote iPad control sec 9 or for using with digiMIX24 Preset Utility software sec 6 2 For firmware update Ashly recommends using the USB control jack not Ethernet 3 14 USB Control Jack Th...

Страница 15: ...power amplifiers turned down at first 2 One input at a time set input trim controls so their loudest signal peaks are around 0dBu on the input meters sec 2 1 3 Assign all desired inputs to the main ou...

Страница 16: ...compensating for room resonance It is well worth the time becoming proficient with parametric EQ filters as they offer the best solution to many EQ problems HPF LPF The hi pass and low pass filters a...

Страница 17: ...to pass through unchanged Attack sets the amount of time from when the input signal reaches threshold to when the gate actually opens up Ame dium attack time helps the gating action sound more natura...

Страница 18: ...using the pan control when either channel is selected Their signal is routed to the main stereo output 3 In the Long Faders mode example shown the selected channel in a linked channel pair is indicate...

Страница 19: ...igned toAux1 and also to the main mix 1 The channel fader is now named Ch1 2 2 The Pan bars appear for both Ch1 2 initially panned full left and full right 3 The orange bar shows the currently selecte...

Страница 20: ...sion Wet Dry Out Reverb Plate Simulate the transducer s sound like classic bright vocal plate Pre Delay Decay Room Size Brightness Diffusion Wet Dry Out Delay Echo of the input signal Time Decay Brigh...

Страница 21: ...t Password To delete the password make sure the Delete Password box is active with the orange bar beneath it and press Enter The screen prompts for the current password to be entered into both text bo...

Страница 22: ...d there will be a root folder called digiMIX24 Firmware Utility containing an executable file named digiMIX24 Firmware Utility exe plus a sub folder called Lib see figure 6 1a Click on the executable...

Страница 23: ...ection can be used for preset backup restore Windows Download and install digiMIX24 Preset Utility file bundle from the Ashly website Software digiMIX downloads section Once installed there will be a...

Страница 24: ...uts 1 8 and Stereo Main output level with on off switch for each fader To use EZ mixer 2 DCA groups must first be defined and named and Sub 1 4 outputs must be configured to function as Aux 5 8 sec 5...

Страница 25: ...the System menu press the shortcut button for Automix Assign 2 Assign the desired input channels to the automixer Make sure the Automix Active button is pressed 3 Select one of the assigned main speec...

Страница 26: ...be group selected pre post DSP from the mixer s System screen Whether pre or post DSP digital outputs from Mic channels 1 16 are always pre fader and pre mute Note the mixer will not allow digital in...

Страница 27: ...USB 32 optional Digital audio workstations DAW often use multitrack USB audio streams for I O The USB 32 module provides the digiMIX24 with up to 32 digital outputs and 24 inputs See section 7 for det...

Страница 28: ...eft side of this screen always controls the currently selected channel or channel pair if two channels are stereo linked 9 1e To access the Assign Channel PEQ Expander Gate or Compressor Limiter contr...

Страница 29: ...properly defined Press FX1 or FX2 to define edit or load an effect Make sure the Wet Dry mix control is properly set 2 Inputs must have their signal sent to the FX1 or FX2 bus Select an input and use...

Страница 30: ...Frequency response to main output 20Hz 20kHz 0 5dB Distortion THD N to main output 0 01 at 0dBu 20Hz 20kHz Gain 10dB Maximum input level 20dBu USB 2 Track I O USB type B connector 16 bit 48kHz sample...

Страница 31: ...rter dynamic range 110dB unweighted Internal processor 32 bit floating point D A converter dynamic range 106dB unweighted ADC DAC bit depth and sampling rate 32 bit 48kHz Optional digital audio module...

Страница 32: ...Operating Manual digiMIX24 Digital Mixer 32 12 DIMENSIONS...

Страница 33: ...PFL alt AUX 5 8 AUX 1 4 OUTPUTS 3c 4d 2b 1a 5e AUX 1 4 BUS AUX 1 4 OUTPUT DSP MUTE DIGITAL OUTPUTS Aux 1 4 D A AUX1 4 SOLO PFL SOLO L R D A SOLO L R BUS FX1 FX2 OUTPUT DSP Stereo POST PRE ASSIGN MAIN...

Страница 34: ...duct This warranty is void if the serial number is altered defaced or removed ASHLY AUDIO INC reserves the right to make changes in design or make additions to or improvements upon this product withou...

Страница 35: ...35 Operating Manual digiMIX24 Digital Mixer This page intentionally left blank...

Страница 36: ...one 585 872 0010 Fax 585 872 0739 Toll Free 800 828 6308 www ashly com DM24 R05 0418 2016 2018 Ashly Audio Inc All rights reserved worldwide Ashly Audio is a division of Jam Industries Ltd All feature...

Отзывы: