background image

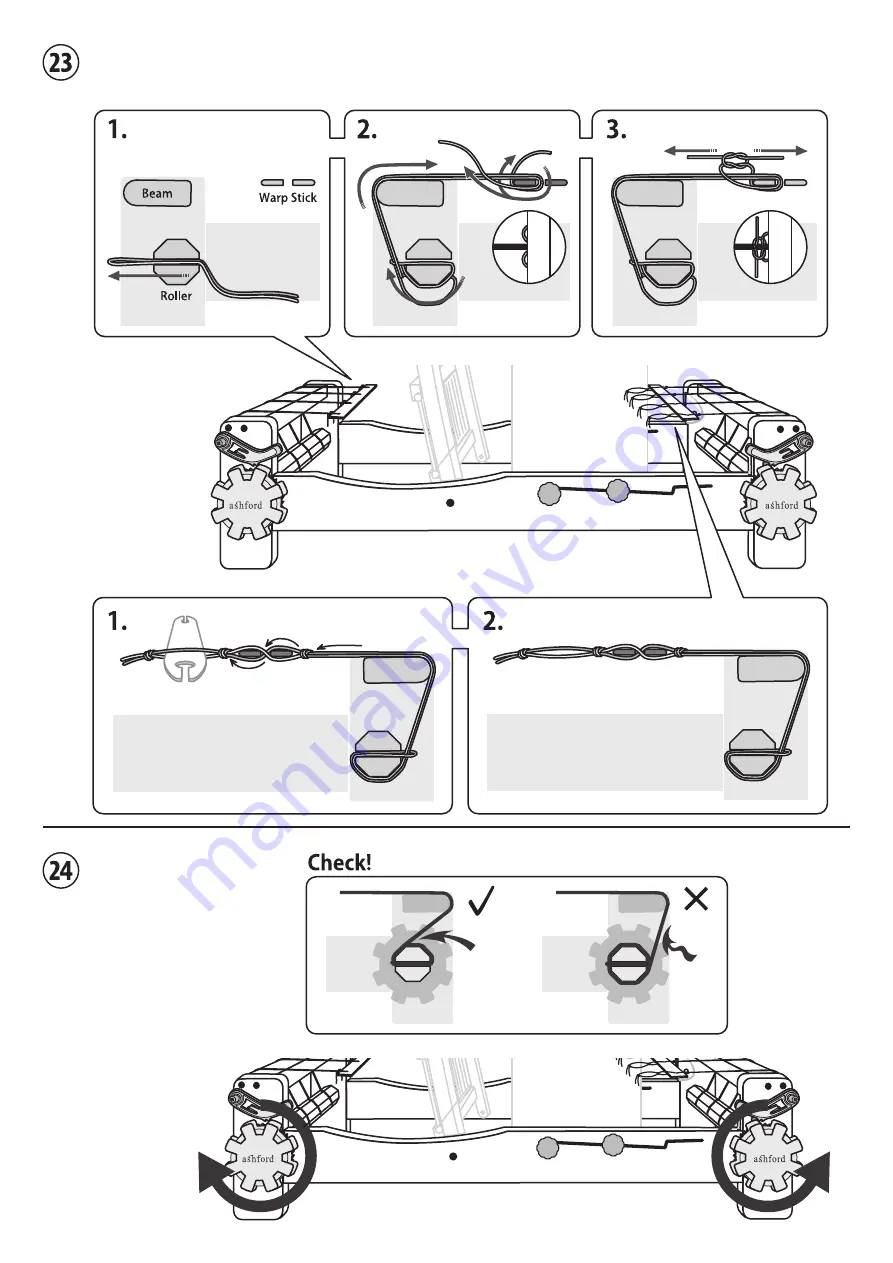
Tie the front and back warp sticks to the front and back rollers. Tie the loops onto the back warp sticks as 
illustrated. Refer to step 14 and 15 of the learn to weave on the table loom booklet for attaching warp to loom.

To release the warp tension 
to advance the warp, turn the 
handle slightly and then lift the 
pawls on both ends out of the 
teeth.

Now follow the easy step by step 
“Learn to weave on the Table 
Loom booklet” for your first 
woven sample!

Happy weaving!

Tying on the front warp stick

Tying on the back warp stick

Knot

Knot

Shuttle as spacer

Back warp stick

Knot

Содержание TABLE LOOM - SIXTEEN SHAFT

Страница 1: ...m To validate our guarantee please visit our website or write to us Ashford Handicrafts Limited Factory and Showroom 415 West Street PO Box 474 Ashburton 7700 New Zealand Telephone 64 3 308 9087 Facsi...

Страница 2: ...Tap the 32 nylon loom cord guides into the castle top Rest the castle front on a table edge for support Tap the nylon guides into the cord holes from the back...

Страница 3: ...1 screws Longer screws may damage the sides Attach the castle front to the castle top and sides with 30mm 1 screws Locate the beater pins into the holes in the top of the castle front Use these pins...

Страница 4: ...es Note The head of the bolt MUST be level with or below the surface of the side otherwise the pawl will catch on it Tap the clicker pins for the pawls to the bottom of the holes in both sides NOTE We...

Страница 5: ...d edge of the beams face out Attach the 4 pawls to the loom sides with 30mm 1 machine screws Note The clicker pin fits into the gap in the pawl Take care to ensure the clicker pin does not damage your...

Страница 6: ...washers with small holes and 25mm 1 screws Check the diagonal support arms are the correct way around locate them onto the bolts and secure with washers and nuts Leave a 0 5mm 1 32 gap under the nut...

Страница 7: ...s and nylon knobs Tap the heads of the bolts into the counter bored hole in the inside of the castle side and tighten the knobs Place a washer onto the nylon knobs with the thread rod thread them thro...

Страница 8: ...and leave a 5mm 3 16 gap to loop the Texsolv nylon cord over Lift the support rails up and attach them to the castle top with 30mm 1 screws Leave a 0 5mm 1 32 gap Note Do not use an electric screwdri...

Страница 9: ...frame on a flat surface and check the two ends are parallel Remove the 2 knobs threaded into the rear of the castle Lift the castle and fold it flat Be careful to hold as directed so you don t jam yo...

Страница 10: ...r the front 8 heddle frames Start with the front heddle frame 1 and lever 1 as shown Then repeat for all the heddle frames until the back heddle frame 16 is attached to the lever 16 Slide the 16 heddl...

Страница 11: ...Use the threading hook Note If necessary slide the cord around the handle until the heddle frame hangs level...

Страница 12: ...m 1 below the castle top and the rear heddle frame hangs approx 10mm below The holes in the levers are drilled so that the back heddles frames lift more than the front This results in all the warp thr...

Страница 13: ...ail the hole in the castle front and knot the other end To fold the castle loosen the front knobs slightly and completely remove the back knobs Lift and slide the castle down the slots When it reaches...

Страница 14: ...ooklet for attaching warp to loom To release the warp tension to advance the warp turn the handle slightly and then lift the pawls on both ends out of the teeth Now follow the easy step by step Learn...

Страница 15: ...West Street PO Box 474 Ashburton 7700 New Zealand Telephone 64 3 308 9087 Facsimile 64 3 308 8664 Email sales ashford co nz Internet www ashford co nz x8 x8 x12 x2 x4 x2 x4 x4 x2 x32 x8 x2 x4 x2 x4 x2...

Отзывы:

Похожие инструкции для TABLE LOOM - SIXTEEN SHAFT