background image

Maintenance & Repair Manual 


SECTION 3 

VIRTUOSO 5460P 


24


110057 REV K  

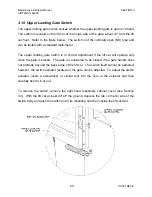
3.10  Upper Landing Gate Switch 

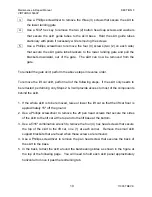
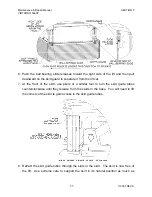
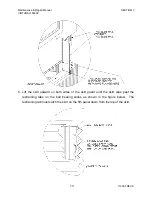
The upper landing gate switch senses whether the upper landing gate is open or closed.  

The switch is located on the lift car at the hinge side of the gate, about 12" from the lift 

car floor.  Refer to the figure below.  The switch is of the normally open (NO) type and 

can be tested with a standard multi-meter. 


The upper landing gate switch is in correct adjustment if the lift car will operate only 

when the gate is closed.  The gate is considered to be closed if the gate handle does 

not protrude beyond the back edge of the lift car.  The switch itself cannot be adjusted; 

however, the switch actuator located on the gate can be adjusted.  To adjust the switch 

actuator, insert a screwdriver or similar tool into the hole in the actuator and then 

carefully bend it in or out.  


To remove the switch, remove the right-hand machinery cabinet cover (see Section 

3.3).  With the lift car at least 24" off the ground, depress the tab on the far side of the 

switch body and push the switch out of its mounting hole from inside the lift car wall. 

Содержание VIRTUOSO 5460P Series

Страница 1: ...MAINTENANCE REPAIR MANUAL Patented see www wheelchairlift com patents ASCENSION VIRTUOSO PORTABLE WHEELCHAIR LIFT 5460P MODEL SERIES...

Страница 2: ...ASCENSION VIRTUOSO PORTABLE WHEELCHAIR LIFT 5460P MODEL SERIES MAINTENANCE REPAIR MANUAL...

Страница 3: ...Copyright 2014 Ascension A Division of AGM Tucson Arizona This document or parts thereof may not be reproduced in any form by any method for any purpose without written permission of Ascension...

Страница 4: ...e Machinery Cabinets from the Top 8 3 4 Retracting Removing and Reinstalling the Safety Skirt 9 3 5 Lower Landing Gate Closer 15 3 6 Upper Lock Rollers 16 3 7 Lower Lock Rollers 18 3 8 Upper Stop Mech...

Страница 5: ...ng the Power Supply 42 4 5 Testing the Power Relay 43 SECTION 5 Lift Compression Expansion 44 5 1 Compressing the Lift 45 5 2 Expanding the Lift 49 5 3 Verification of Operation 55 SECTION 6 Troublesh...

Страница 6: ...through completely before any repairs are begun About This Manual This manual is divided into six sections Section 1 defines terms that are used throughout the remainder of this manual Section 2 desc...

Страница 7: ...this manual In particular be sure to review the troubleshooting guide in Section 6 If you are not able to resolve the problem please contact Ascension as indicated below making sure that you have the...

Страница 8: ...End The end of the lift where the lower landing gate is located Lift Car The compartment in which the passenger rides Lower Landing Gate The gate that serves the lower landing ground level Machinery...

Страница 9: ...Maintenance Repair Manual SECTION 1 VIRTUOSO 5460P 110057 REV K 4...

Страница 10: ...s Texaco Rando HD32 or 76 Unax AW32 filtered to 10 microns for lifts primarily used indoors For outdoor lifts use a low temperature oil such as Amsoil AWF oil In order to add fluid to the reservoir pu...

Страница 11: ...th the lift 3 2 Electrically Isolating the Lift This section describes the procedures for electrically isolating the lift which is necessary in order to safely perform some of the repairs covered in t...

Страница 12: ...Maintenance Repair Manual SECTION 3 VIRTUOSO 5460P 7 110057 REV K 2 Plug the power cord into a wall outlet with 120 VAC power 3 Press Reset on the GFCI if necessary 4 Turn the lift on...

Страница 13: ...et can be removed by performing the following steps 1 Remove the window located above the machinery cabinet from its frame See Section 3 15 2 Use a Phillips screwdriver to remove the ten 10 flat head...

Страница 14: ...ll portion of the skirt may need to be retracted however sometimes it may be necessary to remove the whole skirt To remove the gate skirt perform all of the following steps If the skirt only needs to...

Страница 15: ...the skirt only needs to be retracted performing only Steps 2 3 will provide access to most of the components behind the skirt 1 If the whole skirt is to be removed raise or lower the lift car so that...

Страница 16: ...car 7 At the front of the skirt use pliers or a similar tool to turn the skirt guide tubes counterclockwise until they release from the studs in the base You will need to lift the corners of the skirt...

Страница 17: ...nto the base studs using pliers to tighten them 4 In the back reinstall the skirt guard onto the lift car by performing the following steps Refer to the figure at the top of the following page as nece...

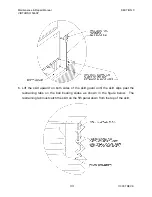
Страница 18: ...57 REV K 5 Lift the skirt upward on both sides of the skirt guard until the skirt slips past the restraining tabs on the ball bearing slides as shown in the figure below The restraining tab must catch...

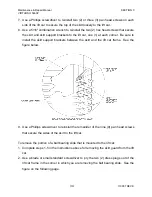
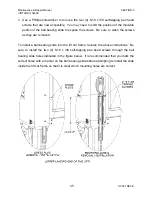
Страница 19: ...hex head screws that secure the top of the skirt to the lift car one 1 at each corner Be sure to install the skirt support brackets between the skirt and the lift car frame See the figure below 8 Use...

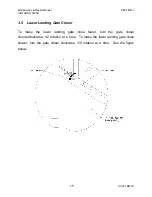
Страница 20: ...REV K 3 5 Lower Landing Gate Closer To make the lower landing gate close faster turn the gate closer counterclockwise 1 2 rotation at a time To make the lower landing gate close slower turn the gate...

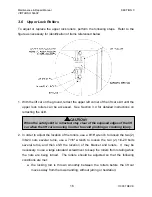
Страница 21: ...use a 9 16 wrench to loosen the two 2 3 8 24 nuts several turns use a 7 16 wrench to loosen the two 2 1 4 20 bolts several turns and then shift the location of the bracket and rollers It may be neces...

Страница 22: ...Take care not to pinch or damage the skirt when raising or lowering the lift car while the skirt is retracted Also be careful not to damage the sensing switch terminals and wiring harness while adjus...

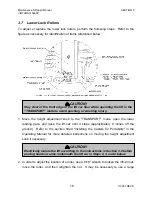
Страница 23: ...titled Installing the Casters for Portability in the Operating Manual for more detailed instructions on moving the height adjustment knob if necessary 2 In order to adjust the location of a roller use...

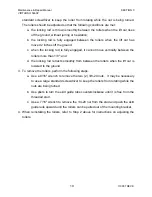
Страница 24: ...between the rollers more than 1 8 and d the locking rod retracts smoothly from between the rollers when the lift car is lowered to the ground 3 To remove the rollers perform the following steps a Use...

Страница 25: ...rect height refer to the section titled Setup Instructions in the Operating Manual The upper stop mechanism can be accessed either through the outer left access panel or through the top of the left ha...

Страница 26: ...ers and or a 5 8 wrench to move the nuts on the barrel of the switch To check the adjustment of the 2 switch return the lift car to the ground Then a With the lower landing gate open depress the lower...

Страница 27: ...f the lift car will operate only when the gate is closed The gate is considered to be closed if the upper locking rod in the gate engages in the lock cutout as the lift car moves off the ground See th...

Страница 28: ...the lift car If necessary see Section 3 4 for instructions on retracting the skirt The switch is held in place by two 2 14 mm nuts To adjust the switch i e to extend it or recess it use a 14 mm wrench...

Страница 29: ...f the lift car will operate only when the gate is closed The gate is considered to be closed if the gate handle does not protrude beyond the back edge of the lift car The switch itself cannot be adjus...

Страница 30: ...the lift car is on the ground See Section 3 4 for detailed instructions on retracting the skirt To remove the switch perform the following steps Refer to the figure below for identification of compon...

Страница 31: ...plate away from the lift car A standard multi meter can be used to test the switches To remove the rocker switch depress the mounting tabs and push the switch out of its mounting cutout To remove the...

Страница 32: ...ry ON type and can be tested using a standard multi meter To remove the keyswitch first remove the operating station on the lower landing end of the lift see Section 3 12 Then use a 7 8 wrench to remo...

Страница 33: ...hten the lock nut Test and repeat as necessary until the bouncing has been eliminated To remove this valve use a 7 8 wrench When reinstalling the counterbalance valve torque it to 18 5 22 0 ft lbs Che...

Страница 34: ...mp can be removed while the lift car is not at the lower landing provided that the counterbalance valve is working correctly However if the lift car starts to descend while you are turning the pump ou...

Страница 35: ...each of the screws attaching the four glazing strips to the lift s exterior The window and strips can then be removed as a single unit To reinstall a window position the window assembly in its origina...

Страница 36: ...ing the nine 9 pan head screws on each side that secure the sides of the skirt to the lift car 3 Use a 5 16 combination wrench to remove the two 2 hex head screws that secure the top of the skirt to t...

Страница 37: ...wrench to secure the skirt to the skirt guard with the 3 hex head screws removed in Step 6 above 3 Position the skirt guard underneath the ball bearing slides on the lift car so that the slide rails...

Страница 38: ...57 REV K 6 Lift the skirt upward on both sides of the skirt guard until the skirt slips past the restraining tabs on the ball bearing slides as shown in the figure below The restraining tab must catch...

Страница 39: ...ll the skirt support brackets between the skirt and the lift car frame See the figure below 9 Use a Phillips screwdriver to reinstall the remainder of the nine 9 pan head screws that secure the sides...

Страница 40: ...ws Be sure to catch the screws as they are removed To install a ball bearing slide into the lift car frame reverse the above instructions Be sure to install the two 2 8 18 x 3 8 self tapping pan head...

Страница 41: ...electrical cord to advise personnel that the lift is being serviced Additionally the plug should be locked out according to the procedures established in OSHA s Lockout Tagout Hazardous Energy Source...

Страница 42: ...Maintenance Repair Manual SECTION 4 VIRTUOSO 5460P 37 110057 REV K...

Страница 43: ...cal panel can be accessed through both access panels in the left hand machinery cabinet If additional access space is needed the top of the left hand machinery cabinet can be removed refer to Section...

Страница 44: ...Gate Switch SPST NO 3 10 Locking Rod Switch SPST NO 3 11 Emergency Stop Switch Push to break 3 12 Rocker Switch Mom On Off Mom On 3 12 Override Keyswitch Off Mom On 3 13 ON OFF Switch On Off 4 1 Alte...

Страница 45: ...ff the ground Lift car is more than 2 off the ground Locking Rod Switch I4 L Upper locking rod is engaged lift car is more than 2 off the ground Upper locking rod is disengaged lift car is less than 2...

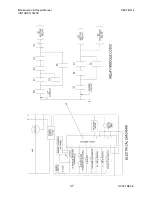
Страница 46: ...initialize before performing any testing on it To test the function of the relay module refer to the logic diagram on page 37 If the relay module is not receiving power check for and correct the foll...

Страница 47: ...elow To test that the power supply is receiving power disconnect the harness that plugs onto the power supply input and check for a 120 VAC drop across the harness connector sockets that correspond to...

Страница 48: ...le to the 3 contact on the power relay If this causes the lift car to rise then the power relay is functional If it does not then measure the voltage drop across contacts 1 and 2 on the power relay wh...

Страница 49: ...lowing tools are required for the compression expansion process Items with an asterisk are included in the Ascension Toolkit Operating Manual 6 length of duct tape or similar Safety glasses for all pe...

Страница 50: ...e by removing the two 2 Phillips 10 x 3 4 flat head screws that secure the footman s loop to the gate 5 Refer to Figure 5 1 Disconnect the closer spring from the upper landing gate To do so use a stan...

Страница 51: ...Then use a 3 16 or 1 4 punch to remove the five 5 spring pins from the back cross members After removing the spring pins use the hand pump to move the lift car downwards until the lift car floor is a...

Страница 52: ...e lift car brackets Use the lock pins to secure the casters on the left side of the lift car Use two 2 spring pins removed in Step 8 above or two 2 1 to 1 5 long flat head screws to secure the casters...

Страница 53: ...screw removed in Step 11 into the back base cross members and one 1 1 4 20 x 1 hex cap screw with 1 4 20 nut removed in Step 9 into the front base cross members in the locations shown 16 Refer to Figu...

Страница 54: ...ers and the hex cap screw and nut from the front cross members 5 Spread the lift car apart to its normal width Spread the lift manually by gripping at the locations shown in Figure 5 3 Or if necessary...

Страница 55: ...embers before tightening these screws 7 Refer to Figure 5 3 Use two 2 7 16 wrenches to reinstall the four 4 1 4 20 x 1 hex cap screws four 4 1 4 20 nuts and eight 8 washers into the front base support...

Страница 56: ...utton head screw 9 2 two 2 5 16 18 x 1 2 button head screws Tighten the screws and then back them off one 1 full turn counterclockwise You may need to use a hammer or pry bar to align the holes in the...

Страница 57: ...emove the two 2 clamps installed in Step 3 12 Refer to Figure 5 4 Install two 2 spring pins into the back base cross members You may need to use a hammer or pry bar to align the holes in the cross mem...

Страница 58: ...Four 4 1 4 20 x 1 2 button head screws with lock washers that secure the dock plate hinge bracket to the lift car sides two 2 on each side Use a 5 32 hex key 18 Refer to Figure 5 4 Reconnect the gate...

Страница 59: ...Maintenance Repair Manual SECTION 5 VIRTUOSO 5460P 54 110057 REV K Ratchet buckle instructions for the straps supplied with the Ascension Toolkit Figure 5 6...

Страница 60: ...gate is locked when the lift is more than 2 off the ground If the operation of the lift does not satisfy the above conditions review and or repeat the reassembly steps as necessary to correct the pro...

Страница 61: ...d off Turn the lift on N A GFCI is tripped Reset the GFCI N A No power at the service outlet Check breaker for the outlet or plug electrical cord into another outlet N A One or both gates are open Clo...

Страница 62: ...nding Upper height knob is not set correctly Set the upper height knob properly per the Operating Manual N A Upper stop switch failure Replace upper stop switch 3 8 Upper stop mechanism is out of adju...

Страница 63: ...Printed in the U S A 110057 REV K...

Отзывы: