background image

DFU-0332r0_fmt_en-US 


Page 23 of 64


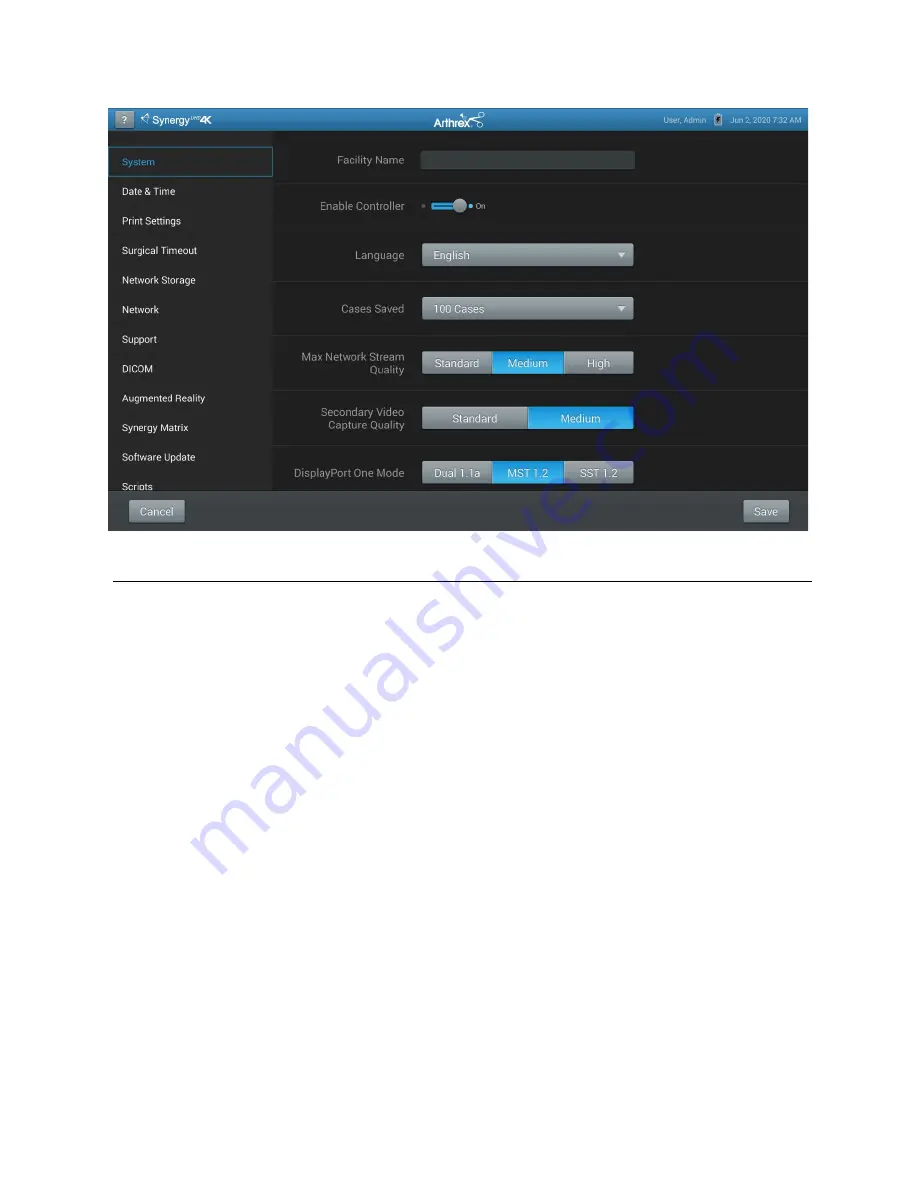
Figure 15-System Maintenance Screen 


2.3.2 

Selecting “

System

” enables several facility preferences to be setup; 


User can input the facility name associated with that specific Synergy

ID

.


User can select the language used with Synergy

ID

.


User can select number of cases saved to system before data is automatically purged.


Other configuration options are also available to users. 


Содержание AR-3210-0018

Страница 1: ... important information for the safe operation of all components of the SynergyID Camera System including accessories Read this User s Guide thoroughly prior to using this system and keep it in an easily accessible place for use by all operating personnel Read and follow all safety warnings cautions and precautions Arthrex Inc 1370 Creekside Blvd Naples FL 34108 USA 1 800 934 4404 www arthrex com T...

Страница 2: ...anty information including disclaimers exclusions terms conditions and related provisions refer to the Arthrex U S Product Warranty section of the Arthrex Inc website found at www arthrex com whose provisions are incorporated herein by reference ...

Страница 3: ...on 18 2 2 Accessories for Intended Use 20 2 3 System Setup Facility and Surgeon Settings 22 2 4 Icon Guide 31 2 5 Scheduling and Starting Cases 33 2 6 Status Notification Icons 39 2 7 System Operation without Tablet Data Input Device 42 3 0 Maintenance 44 3 1 Life Expectancy 44 3 2 Periodic Maintenance 44 3 3 Cleaning and Sterilizing 45 3 4 Troubleshooting 49 3 5 Resolving Error Messages 51 3 6 Re...

Страница 4: ...Camera Head autoclavable 17 Figure 12 SynergyID Typical Interconnect Diagram With OPTIONAL Digital Documentation Tablet Integrated Optics Heads 19 Figure 13 SynergyID Typical Interconnect Diagram With OPTIONAL Digital Documentation Tablet C Mount Heads 20 Figure 14 System Maintenance 22 Figure 15 System Maintenance Screen 23 Figure 16 Date Time Screen 24 Figure 17 Print Settings Screen 25 Figure 1...

Страница 5: ...real time endoscopic visible and near infrared fluorescence imaging The SynergyID System enables surgeons to perform minimally invasive surgery using standard endoscope visible light as well as visualization of vessels blood flow and related tissue perfusion and at least one of the major extra hepatic bile ducts cystic duct common bile duct or common hepatic duct using near infrared imaging Fluore...

Страница 6: ...n must determine the specific technique and procedure that will accomplish the desired clinical effect 8 This device and its accessories are to be used only by physicians and medical assistants under the direction of a physician with appropriate technical qualifications 9 This device shall only be used with original and manufacturer s accessories and replacement parts Use of other parts or materia...

Страница 7: ...n not in use The endoscope light guide connection can get extremely hot as result of high intensity light giving rise to high temperatures in front of the light emission window which may cause severe burns Surface temperatures of the insertion portion of the endoscope as well as light guide connectors on the Camera Control Unit CCU and the endoscope rise during use Potential thermal injury to the ...

Страница 8: ...ration 2 Only use the device with Arthrex compatible equipment listed in Section 2 2 3 Inserting an incompatible Camera Head into the camera receptacle see Figure 1 can result in damage to the CCU 4 The warranty becomes void and the manufacturer is not liable for direct or resulting damage if The device or the accessories are improperly used prepared or maintained The instructions in the manual ar...

Страница 9: ...e fact that local laws take priority over the above mentioned requirements If in doubt consult your local representative or the technical department 16 Any person who connects external equipment to signal input and signal output ports or other connectors has formed a system and is therefore responsible for the system to comply with the requirements of IEC 60601 1 If in doubt contact a qualified Bi...

Страница 10: ...ces may be used on the general population 20 In CE accepting Countries The clinical benefits associated with the use of these devices outweigh the known clinical risks 21 In CE accepting Countries There are no unacceptable residual risks or uncertainties associated with the clinical use of these devices ...

Страница 11: ...tricts this device to sale by or on the order of a Physician Power Standby On Not for use in the Presence of Flammable Anesthetics ON OFF Push Push USB Tablet Computer Connection Attention Consult Accompanying Documents Fragile Precaution of Warning Notice This Side Up Electrical Hazard Dangerous Voltages are Present Never attempt to repair the equipment Only Trained Service Personnel may remove t...

Страница 12: ...midity Limits for Storage and Transport Equipotential Equipment Potential Universal Serial Bus WEEE Waste Electronics and Electrical Equipment Symbol Regarding European Union End of Life of Product RF Symbol Non ionizing Electromagnetic Radiation White Balance Symbol Color Video Camera LED Light Do Not Use if Damaged MFi Made for iPad EC Rep Catalog Number Serial Number ...

Страница 13: ...ries contain Perchlorate Material special handling may apply See www dtsc ca gov HazardousWaste Perchlorate In the US a list of recyclers in your area can be found at www eiae org 1 6 Initial Use of the Device WARNINGS 1 The device is only completely isolated from the mains if the power plug is disconnected from the device s power inlet module Avoid positioning equipment such that removal of plug ...

Страница 14: ...ce If it becomes necessary to return the device always use the original packaging The manufacturer does not take responsibility for damage that has occurred during transportation if the damage was caused by inadequate transport packaging Please make sure that all required information has been supplied Call Arthrex for an RMA Number for the device return for service Owner s Name Owner s Address Own...

Страница 15: ...ght Guide 3 USB Port Connect USB devices here 4 iPAD USB Port Connect iPAD to this port 5 WHITE BALANCE Button Press to initiate camera white balance 6 CAMERA Input Connection Insert the camera head connector here The camera head connector and receptacle are specially keyed to prevent the camera head from being improperly connected Ensure that the UP label on the camera head connector is facing up...

Страница 16: ...y ports allow for control of the CCU with a footswitch or external device or for the CCU to control external devices via the camera head buttons 10 Tablet Connection Connection for Tablet Data Input device Provides for data interchange and tablet charging 11 3G SDI Out 1080P 60 Output 12 Ethernet Connector Isolated 10 100 Mb sec 13 Potential Equalization Connector POAG Potential Equalization Conne...

Страница 17: ...DFU 0332r0_fmt_en US Page 13 of 64 Figure 3 AR 3210 0023 4K SynergyUHD4 Camera Head autoclavable Figure 4 AR 3210 0029 4K SynergyUHD4 Broadband Camera Head autoclavable ...

Страница 18: ...DFU 0332r0_fmt_en US Page 14 of 64 Figure 5 AR 3210 0018 HD SynergyUHD4 Camera Head autoclavable 1 2 3 4 Figure 6 AR 3210 0031 4K Ultra SynergyUHD4 Camera Head autoclavable ...

Страница 19: ...ons of the camera See Optional Tablet Data Input Device for programming information 2 Button 2 A programmable button that can activate various functions of the camera See Optional Tablet Data Input Device for programming information 3 Focus Ring Used to sharpen or bring into focus the image detail 4 Grasping Mechanism Accepts and locks into place the compatible scope DIN 58105 compliant endoscope ...

Страница 20: ...4 C Mount Camera Head autoclavable AR 3210 0028 4K SynergyUHD4 C Mount w 20 foot cable autoclavable and Not Pictured AR 3210 0026 4K SynergyUHD4 C Mount Camera Head 0 Degree autoclavable 1 2 3 Figure 9 AR 3210 0030 4K SynergyUHD4 C Mount Broadband Camera Head autoclavable ...

Страница 21: ... SynergyUHD4 C Mount Camera Head autoclavable 1 9 4 C Mount Camera Heads 1 Button 1 A programmable button that can activate various functions of the camera See Optional Tablet Data Input Device for programming information 2 Button 2 A programmable button that can activate various functions of the camera See Optional Tablet Data Input Device for programming information 3 C Mount Threads Accepts sta...

Страница 22: ...f connection is lost 5 If using a printer connect the printer cable to the USB connector on the rear panel of the SynergyID CCU Connect the other end of printer cable to the printer 6 If using a Synergy Laser Light Source connect the laser light source cable from the laser light source to the connector labeled Laser Input on the back of the SynergyID CCU 7 Plug the AC power cord into the SynergyID...

Страница 23: ...DFU 0332r0_fmt_en US Page 19 of 64 Figure 12 SynergyID Typical Interconnect Diagram With OPTIONAL Digital Documentation Tablet Integrated Optics Heads ...

Страница 24: ...ended Use Arthrex SynergyID System Accessories Part Number Description AR 3250 XXXX Arthrex Monitors SONY UP PR80MD SONY UP PR80MD with UP DR80MD NKIT Medical Grade Printers AR 3350 XXXX AR 3351 XXXX AR 3352 XXXX AR 3355 XXXX Arthrex Arthroscopes Arthrex Laparoscopes Arthrex Hi Mag Laparoscopes Arthrex C Mount Arthroscopes AR 3200 1013 Synergy Documentation Tablet ...

Страница 25: ...BioOptico Licenses DICOM Licenses Synergy net Licenses AR 3210 XXXX AR 3200 1010 1012 AR 3200 1040 AR 3370 0006 AR 3370 0008 Arthrex C mount couplers Arthrex encrypted USB sticks Arthrex Synergy System Integration Cable Kit Arthrex Starfish Arthrex C Mount Starfish AR 3200 1018 Synergy Laser Light Source AR 3201 1005 Video Input Output 1080P Converter AR 3240 XXXX Arthrex Light Guides ...

Страница 26: ...e SynergyID s Tablet Data Input Device Screens may appear slightly different than those shown in this document depending on the particular features enabled on SynergyID Figure 14 System Maintenance 2 3 1 System Set Up can be accessed by pressing the Maintenance Icon on the SynergyID Tablet Data Input Device and then selecting Advanced Settings ...

Страница 27: ... several facility preferences to be setup User can input the facility name associated with that specific SynergyID User can select the language used with SynergyID User can select number of cases saved to system before data is automatically purged Other configuration options are also available to users ...

Страница 28: ... US Page 24 of 64 Figure 16 Date Time Screen 2 3 3 Selecting Date Time enables adjustment of the SynergyID date and time settings User can use a network time server or user can select the date and time options manually ...

Страница 29: ...n US Page 25 of 64 Figure 17 Print Settings Screen 2 3 4 Selecting Print Settings enables adjustment of the SynergyID print settings User can enable the use of a local printer and select the paper size for that printer ...

Страница 30: ...ID system to a facility network Fields are Host Name Show Network Status IP Address Subnet Mask Default Gateway Primary DNS Enable Wi Fi Wi Fi Security Certificate Upload Wi Fi Network Selection Note If DHCP Ethernet IP Mode option is selected then the Ethernet address is acquired automatically and no fields need to be completed ...

Страница 31: ...he SynergyID Tablet Data Input Device and then select Surgeon Management A list of surgeons will appear 2 3 8 To add a surgeon press the Add New Surgeon button enter the first and last name of a surgeon then press the Preferences button Note When a new surgeon is created it will automatically inherit all of the procedures and preferences associated with the default Surgeon account Figure 20 Surgeo...

Страница 32: ...efined for the following Camera Buttons NIR Camera Buttons Printer Settings Print Settings Multimedia Web Server Access Display DICOM Augmented Reality There are two sets of camera button settings One set is specific for 4MOS camera heads and the other set applies to all other camera head connected to the CCU ...

Страница 33: ...o individual surgeon preferences On the surgeon management list select a surgeon and a list of procedures will appear 2 3 11 Select the appropriate Procedure for the Surgeon If the procedure is not currently in the list select the Create New Procedure from the Procedures drop down list and enter the name of the new procedure ...

Страница 34: ... Page 30 of 64 Figure 23 Surgeon Procedure Settings 2 3 12 Once a Procedure has been added select the Procedure Settings next to the Procedure name to configure camera pump and shaver settings associated with the Procedure ...

Страница 35: ...In the lower left corner of the screen are icons that represent connectivity with SynergyID The icons shown below represent tablet network and Synergy net connectivity 2 4 3 The icons on the lower right of the monitor represent local and external peripheral connectivity e g printer USB iPad DICOM network export as shown in the figures below Printer USB iPad DICOM Network Synergy net ...

Страница 36: ...e is not connected to SynergyID 2 4 5 A yellow status bar event should be investigated prior to the start of a case as data transfers may not occur to any device where connectivity with SynergyID has not been established or has been lost 2 4 6 Once a case is started a smaller subset of connectivity icons will appear in the lower right corner of the surgical monitor These status icons represent con...

Страница 37: ...DFU 0332r0_fmt_en US Page 33 of 64 2 5 Scheduling and Starting Cases Figure 25 Scheduling a case 2 5 1 To schedule a case press the Add New Case icon ...

Страница 38: ...f present optional field depending on how system is configured Surgeon and or Procedure and enter data in the following required fields Patient First Name Patient Last Name Patient I D 2 5 3 Input any of the other optional data elements in the appropriate fields 2 5 4 Press the Save icon ...

Страница 39: ...64 Figure 27 Starting a Case 2 5 5 To start a case select the case patient from the Case List and press the Start icon NOTE Cases may also be started from the Add Case screen by entering the required fields and pressing the Start icon ...

Страница 40: ...DFU 0332r0_fmt_en US Page 36 of 64 Figure 28 Confirming a Case 2 5 6 A Case Confirmation window will appear showing the patient and case demographics If the information is correct press the Start icon ...

Страница 41: ...nance Icon Changes may be made to the following Camera System Settings Camera Button Settings System Output Display Settings System Capture Settings Print Settings Arthrex Resection Integration Settings Arthrex RF Integration Settings Arthrex Fluid Management Integration Settings Arthrex Insufflation Integration Settings Augmented Reality Settings NIR Settings ...

Страница 42: ...30 Ending a Case 2 5 8 Ending a Case to end a case press the End Case Icon NOTE An End the Case confirmation message will appear If confirmed the case will end and the SynergyID Tablet Data Input Device will transition to the case review screen ...

Страница 43: ...ns 2 6 1 When a manual export print is performed the status notification for the action will appear on the tablet The blue progression bar will indicate that the export is in progress Once the export is complete the status bar will turn green Green arrows for each image indicate a successful export ...

Страница 44: ...DFU 0332r0_fmt_en US Page 40 of 64 Figure 32 Export Status 2 6 2 The system in Figure 33 displays a successful USB export and an iPad export in progress ...

Страница 45: ...enabled for the surgeon using the system A successful export will display a green checkmark for the images completed A failure will be displayed by a yellow caution triangle Note Print statuses are not reflected in the individual image status icons The external devices statuses and connectivity status will also be displayed during the case in the lower right corner of the tablet ...

Страница 46: ... on the LEFT BUTTON pressing the Left Button will DECREASE Brightness 6 Long Press on the RIGHT BUTTON will control Digital Zoom After a LONG PRESS on the RIGHT BUTTON pressing the RIGHT Button will INCREASE ZOOM After a LONG PRESS on the RIGHT BUTTON pressing the LEFT Button will DECREASE ZOOM 7 The SynergyID Initial Screen will also indicate that the Printer is Active and that it is set to 8 pri...

Страница 47: ...ure 36 White Balance Fail 13 If the White Balance Operation has been successful the camera will enter the Surgical Ready Mode and be ready for surgical operation 14 If the White Balance Operation has not been successful you must move the Tip of the Endoscope closer or farther from the White Gauze until the operation can be completed successfully 15 Once the White Balance Operation has been success...

Страница 48: ...s the most knowledgeable about the Arthrex Medical Camera Systems and or camera heads and will provide competent and efficient service Any services and or repairs done by any unauthorized repair facility may result in reduced performance of the instruments or instrument failure 3 1 Life Expectancy Life expectancy for the product is expected to meet and exceed the warranty period for approximately ...

Страница 49: ...ra Control Unit CCU 1 Turn the CCU power off Disconnect the power cord from the electrical power source and from the rear of the CCU 2 Remove the camera head from the CCU 3 Use a fresh CaviWipe or equivalent to remove any gross contamination from the device 4 Use a second fresh CaviWipe or equivalent to thoroughly wet the surface of the device and ensure that it remains visibly wet for 3 minutes A...

Страница 50: ... to the unit s trays or baskets Make sure that the camera head does not touch other instruments 3 Do not overload the washer 4 Remove the camera heads immediately after the automatic procedure has stopped 5 Set up and run washer for the wash cycle listed below Automatic Washer Cycle Definition Phase Recirculation Time Minutes Temperature Detergent Type and Concentration Pre Wash 1 02 00 COLD TAP W...

Страница 51: ... to reach areas Activate while rinsing until all visible evidence of detergent is removed 6 Visually inspect the camera head for visible soil and remove if required 7 Dry the equipment with a lint free soft cloth Wipe the card edge connector with 70 isopropyl alcohol to remove any residual detergent a Do not allow exposed glass windows to air dry 70 isopropyl alcohol may be applied to glass surfac...

Страница 52: ... Sterilization System Lumen and Non lumen Cycles Sterrad Systems Sterrad System 100S Short Cycle Sterrad System NX Short Cycle Sterrad System 100NX Standard Cycle 3 3 6 Material Compatibility In addition to the Sterilization chemicals listed above the AR 3210 XXXX camera heads are Material Compatible with Cidex OPA No SAL claims are made with Cidex OPA WARNING Use of Sterilants or Chemicals other ...

Страница 53: ...cables If picture is affected inspect cables and replace as necessary Flex camera cable If picture is affected return to factory for repair or replacement Camera will not white balance Too much light Too little light Wrong Color Temperature light If monitor indicates White Balance Fail move the scope further away from the white gauze when you white balance or turn down the LED Light Engine brightn...

Страница 54: ...CCU Try the CCU on a different monitor Poor color reproduction White Balance Issues White Balance camera head Check monitor settings using color bars from the CCU Try the CCU on a different monitor System does not boot up correction Banners do not display or do not display properly Improper shut down of CCU Power down device wait 3 minutes and restart system Tablet continually restarts or will not...

Страница 55: ...y we were unable to restore the following items and they have been reset back to their default values Contact Arthrex Technical Support for further assistance An error occurred while fetching version info Contact Arthrex Technical Support for further assistance The Synergy console cannot be reached Contact Arthrex Technical Support for further assistance Failed to install updated controller Contac...

Страница 56: ...ification ANSI AAMI ES60601 1 A1 2012 Canadian Certification CAN CSA C22 2 No 601 1 M90 CAN CSA C22 2 No 60601 1 2014 EU Certification ANSI AAMI ES60601 1 A1 2012 IEC 60601 1 2005 Corrigendum 1 2006 Corrigendum 2 2007 AM1 2012 IEC 60601 1 2012 EMC Certifications CISPR 11 EMC Class Class A CISPR 11 EMC Group Group 1 RF internally generated for the operation of the device EMC Certification Certifica...

Страница 57: ...uitable for use in the presence of flammable anesthetics According to the mode of operation Continuous Specifications Parameter Parameter Value Power Requirements Rated Voltage 100 240 VAC Supply Frequency 50 60 Hz Power Input 160 VA 174 VA AR 3200 0025 Only Fuses No user serviceable fuses Video Outputs Video Output Description Display Port 2x 3840 x 2160 pixels 4K UHD 10 bit color DVI 1x 1920 x 1...

Страница 58: ...x 1 65 W x 1 7 H 7 1 cm L x 4 2 cm W x 4 3 cm H AR 3210 0026 Approximately 2 9 L x 1 2 W x 1 3 H 7 3 cm L x 3 0 cm W x 3 3 cm H AR 3210 0028 Approximately 2 8 L x 1 65 W x 1 7 H 7 1 cm L x 4 2 cm W x 4 3 cm H AR 3210 0029 Approximately 4 1 L x 1 8 W x 1 8 H 9 9 cm L x 4 6 cm W x 4 6 cm H AR 3210 0030 Approximately 2 8 L x 1 65 W x 1 7 H 7 1 cm L x 4 2 cm W x 4 3 cm H AR 3210 0031 Approximately 4 5...

Страница 59: ...y 27 4 ounces 0 8 kg AR 3210 0029 Approximately 21 0 ounces 0 6 kg AR 3210 0030 Approximately 17 4 ounces 0 5 kg AR 3210 0031 Approximately 20 8 ounces 0 6 kg AR 3210 0032 Approximately 17 5 ounces 0 5 kg AR 3210 0033 Approximately 30 0 ounces 0 9 kg Transport Storage Conditions Ambient Temperature 40 F to 122 F 40 C to 50 C Relative Humidity 10 to 90 non condensing Atmospheric Pressure 500 hPa to...

Страница 60: ...tandard Minimum 1600 Lumens Typical 1800 Lumens Color Temp Standard 70 CRI Typical 65 Minimum 5500 8500K 70 CRI Typical 60 Minimum 5500 8500K AR 3200 0025 Only LED Life 30 000 hours Light Guide Port Turret ACMI Standard Storz Wolf and Olympus DICOM Specifications DICOM Statement DICOM Compatible with installation of AR 3200 1020 DICOM Key ...

Страница 61: ...undesired operation CAUTION changes or modifications not expressly approved by Arthrex will void the user s authority to operate this equipment Industry Canada Information Contains IC 6158A 261ACNBT IC Model WPEQ 261ACN BT This device complies with Industry Canada license exempt RSS standard s Operation is subject to the following two conditions 1 this device may not cause harmful interference and...

Страница 62: ...Manual provide information to the customer or user that is essential in determining the suitability of the Equipment or System for the Electro magnetic Environment of use and in managing the Electromagnetic Environment of use to permit the Equipment or System to perform its intended use without disturbing other Equipment and Systems or non medical electrical equipment NOTE Medical Electrical Equip...

Страница 63: ... directly connected to the public low voltage power supply network that supplies buildings used for domestic purposes provided the following warning is heeded Warning This equipment system is intended for use by healthcare professionals only This equipment system may cause radio interference or may disrupt the operation of nearby equipment It may be necessary to take mitigation measures such as re...

Страница 64: ... mode 2 kV common mode Mains power should be that of a typical commercial or hospital environment Voltage dips short interruptions and voltage variations on power supply input lines IEC 61000 4 11 UT 0 0 5 cycle 0 45 90 135 180 225 270 and 3150 UT 0 1 cycle UT 70 25 30 cycles 0 degrees UT 70 250 300 cycles UT 0 0 5 cycle 0 45 90 135 180 225 270 and 3150 UT 0 1 cycle UT 70 25 30 cycles 0 degrees UT...

Страница 65: ...engths from fixed RF transmitters as determined by an electromagnetic site survey a should be less that the compliance level in each frequency range b Interference may occur in the vicinity of equipment marked with the following symbol NOTE 1 At 80 MHz and 800 MHz the higher frequency range applies NOTE 2 These guidelines may not apply in all situations Electromagnetic propagation is affected by a...

Страница 66: ...imum output power of transmitter W Separation distance according to frequency of transmitter m 150 kHz to 80 MHz 80 MHz to 800 MHz P E d 1 5 3 800 MHz to 2 7 GHz P E d 1 7 0 01 0 12 0 12 0 23 0 1 0 37 0 37 0 74 1 1 17 1 14 2 33 10 3 70 3 70 7 37 100 11 70 11 70 23 3 For transmitters rated at a maximum output power not listed above the recommended separation distance d in meters m can be estimated ...

Страница 67: ...IX SW Version access ACCESS to SW Version on Synergy ID 1 On POWER ON the screen below appears 2 Double click on screen to pull up SW Version 3 Then Tap About Figure 37 Logging On to System Figure 38 About Screen Figure 39 Software Version Screen ...

Страница 68: ... Arthrex Inc 1370 Creekside Blvd Naples FL 34108 USA 1 800 934 4404 www arthrex com Toll Free Technical Support 1 800 391 8599 Monday through Friday 8 00 AM 8 00 PM ET Arthrex GmbH Erwin Hielscher Strasse 9 81249 München Germany 49 89 909005 0 www arthrex de All rights reserved Printed in USA ...

Отзывы: