


Chapter 5
:
Installing and Connecting your Telephony Gateway
Release 8 STANDARD 1.5 August 2016
Touchstone TG862G Telephony Gateway User Guide
© 2011-2016 ARRIS Enterprises LLC. All Rights Reserved.
26
Mounting the Telephony Gateway
You can either mount the Telephony Gateway on a wall or place it on a desktop. For wall-
mount applications, you can mount the Telephony Gateway with the indicators facing upward
(vertical) or to the side (horizontal).
Tools and Materials
For wall-mounted installations, make sure you have the following tools and materials before
proceeding:
for mounting on drywall: Two 1/4” (6mm) drywall anchors (not included), two #6 x 1.5”
(38.1 mm) self-tapping panhead screws (not included), and a drill with 1/4” (6mm) bit (not
included)
for mounting on plywood or studs: two #6 x 1.5” (38.1 mm) self-tapping panhead wood
screws (not included)
screwdriver (flat-blade or Phillips, depending on what kind of screws you use)
wall-mount template (included)
transparent tape: for temporarily securing the mounting template to the wall (not
included)
Wall Mounting Instructions
Note: When mounting the Telephony Gateway on drywall, try to position the Telephony
Gateway so at least one of the screws is fastened to a stud. This may prevent the Telephony
Gateway from pulling out of the wall in the future. To prevent overheating of the Telephony
Gateway, do not block the ventilation holes on the sides of the unit.
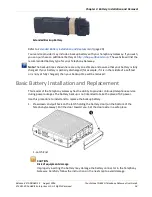
1.
Position the mounting template on the surface where you intend to mount the Telephony
Gateway and sercure in place with transparent tape.


