background image

Issue 1 25/2/2019  

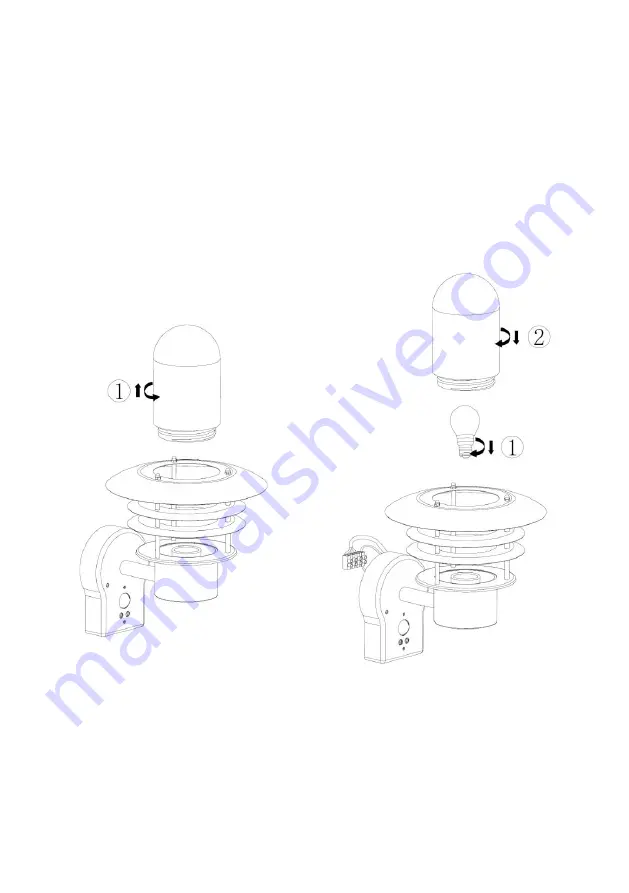
Fitting and replacing the bulb (not included) 

1.  Switch off the lantern and allow the fitting to cool completely. 
2.  Carefully  unscrew  the  glass  cover  and  place  to  one  side  (fig.  8).  

Take  care  of  the  glass  cover  supplied,  as  replacements  are  not 
available. 

3.  Remove (unscrew) any spent bulb and replace with one of the same 

type  (Max  60W  E27  (Edison  screw)  GLS  or  8 

–  10  W  LED  Energy 

Saving  bulb).    Handle  the  new  one  carefully  and  screw  in  firmly, 
taking  care  not  to  cross  threads  (fig.  9).   

Always  use  the  same  or 

lower wattage bulb

.  Please use low energy bulbs where possible. 

4.  Refit the glass cover (fig. 9). 


Fig. 8 

Fig. 9 

Содержание G03131P

Страница 1: ...Issue 1 25 2 2019 1 Stainless Steel PIR Lantern G03131P Care Instruction Manual Please read and retain these instructions for future reference...

Страница 2: ...his product should not be modified any modification may make the fitting unsafe Wear safety goggles and dust mask when drilling The use of a residual current device RCD is recommended when working wit...

Страница 3: ...he glass cover 4 The chosen location should allow for the product to be securely mounted and safely connected to the mains supply lighting circuit If an existing lighting point is not available consul...

Страница 4: ...tly pull the terminal block to separate from the back plate fig 2 4 Position the back plate in the desired location and check with a spirit level that the straight sides are vertical Using the back pl...

Страница 5: ...ctions fig 5 see section Connecting to the mains supply 9 Ensure that the gasket is fitted onto the rim of the back plate and refit the terminal block Carefully arrange wires into the back plate reces...

Страница 6: ...qualified electrician do not try to identify the cables yourself Colours indicated in brackets are wiring colours used prior to April 2004 Incoming cable should be connected into the terminal block as...

Страница 7: ...g rose or loop must be transferred to the terminal block as per the diagram below It is recommended that a qualified electrician carries this out only attempt to connect the fitting if electrically co...

Страница 8: ...the glass cover supplied as replacements are not available 3 Remove unscrew any spent bulb and replace with one of the same type Max 60W E27 Edison screw GLS or 8 10 W LED Energy Saving bulb Handle t...

Страница 9: ...is detected the lamp will illuminate Activation time interval The length of time that the lamp will illuminate can be set between 10 seconds and 5 minutes from last time movement is detected Adjust th...

Страница 10: ...ective of daylight level or only to operate in the hours of darkness Adjust the right hand control using a flat head screwdriver Turn knob fully anticlockwise for the sensor to operate in daylight Tur...

Страница 11: ...household wastes throughout the EU To prevent possible harm to the environment or human health from uncontrolled waste disposal recycle it responsibly to promote the sustainable reuse of material res...

Отзывы: