


18
ARES™ HIGH-SECURITY STEEL FENCING
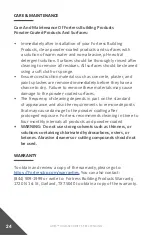
7. Once panel is installed, the bracket
SHOULD NOT block the
square hole in the I-Beam Post. As shown in Fig. 31 on
page 17. Adjust if needed.
8. Rake then mount panel to the third I-Beam Post in fence
run at connection points marked “4” in Fig. 36.
9. If adding more panels to fence run, repeat steps 2: 9 & 10
on page 15 and step 3: 1 - 8 on pages 17 & 18.
10. If not adding more panels to fence run, repeat
steps 2: 5 & 6 on page 15 to fasten second end of second
panel onto the third I-Beam Post.
11. Once all panels in fence run are mounted, Use a Tri-Groove
Socket to tighten all Tri-Groove Bolts.
Note:
• ARES panels are heavy. For installer safety, it is
recommended to use a Crane or Forklift when installing.
• Recommended method of panel installation is to install
starting with the top or highest I-Beam Post in fence run
and work down to the bottom or lowest I-Beam Post.
Fig. 34
Fig. 35
Fig. 36
2
3
1
4
First Panel
Second Panel
Содержание Citadel Panel
Страница 1: ...ARES HIGH SECURITY STEEL FENCING 1 ARES HIGH SECURITY STEEL FENCING INSTALLATION INSTRUCTIONS ...
Страница 11: ...ARES HIGH SECURITY STEEL FENCING 11 Fig 10 Fig 9 Fig 8 Fig 11 Fig 14 Fig 13 Fig 12 ...
Страница 13: ...ARES HIGH SECURITY STEEL FENCING 13 Fig 20 Fig 19 Fig 18 Fig 21 Bolt holes on rail bracket aligned ...
Страница 25: ...ARES HIGH SECURITY STEEL FENCING 25 ...


