- 33 -
Installation and Maintenance
3.6 Wiring the DC-Input Power Source
Warning
Only trained and qualified personnel are allowed to install
or replace this equipment.
Follow the instructions below for connecting the computer to a DC-input power
source.
1. Before wiring, make sure the power source is disconnected.
2. Find the terminal block in the accessory box.
3. Use the wire-stripping tool to strip a short insulation segment from the
output wires of the DC power source.
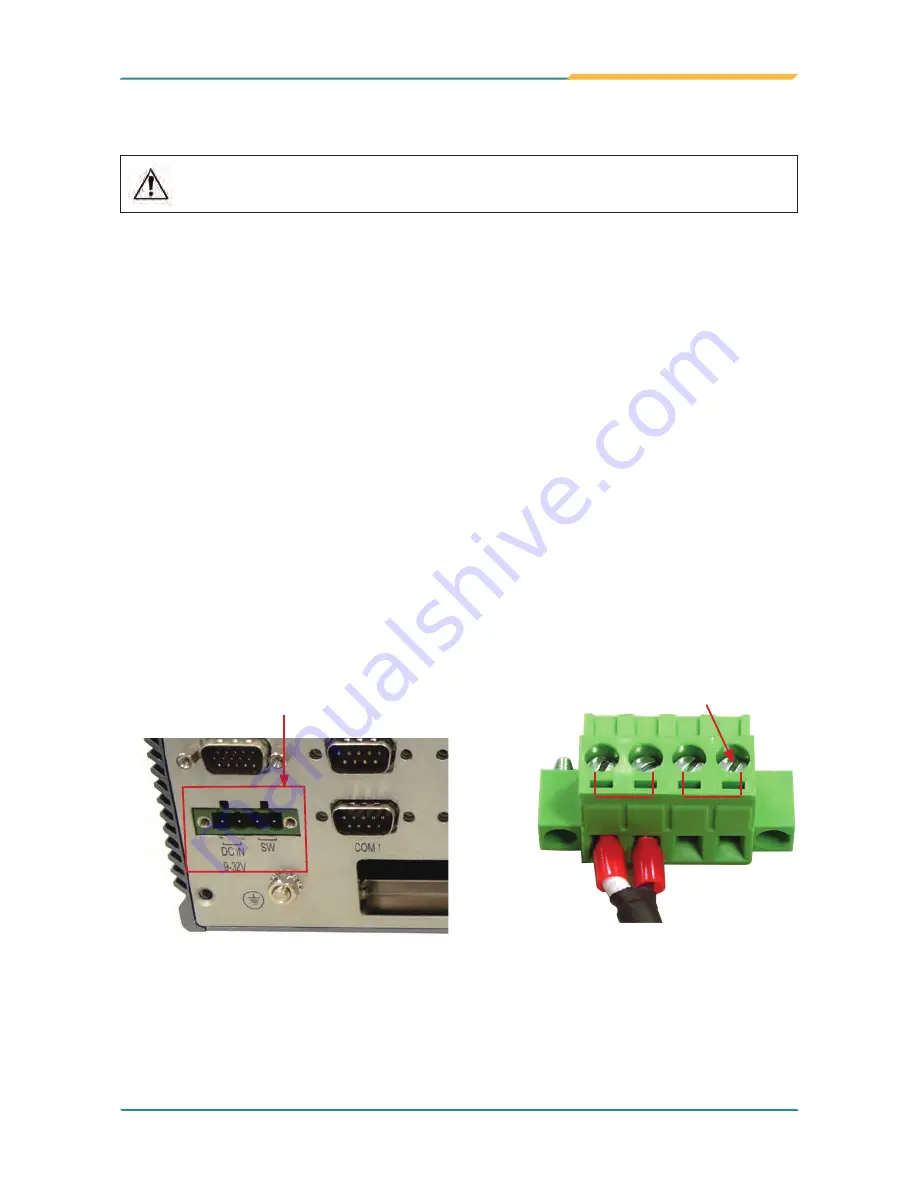
4. Identify the positive and negative feed positions for the terminal block
connection. See the symbols printed on the rear panel indicating the
polarities and DC-input power range in voltage.
5. Insert the exposed wires into the terminal block plugs. Only wires with
insulation should extend from the terminal block plugs. Note that the
polarities between the wires and the terminal block plugs must be positive
to positive and negative to negative.
6. Use a slotted screwdriver to tighten the captive screws. Plug the terminal
block firmly, which wired, into the receptacle on the rear panel.
+ −
DC-IN SW
terminal block
captive screw
receptacle
Содержание FPC-7200 Series
Страница 1: ...FPC 7200 Series Fanless Intel Atom D2700 Box PC User s Manual Version 1 0 2012 03 P N 4012720000100P...
Страница 2: ...This page is intentionally left blank...
Страница 10: ...vi This page is intentionally left blank...
Страница 11: ...1 General Information 1 Chapter 1 General Information...
Страница 23: ...13 The Engine of FPC 7200 2 Chapter 2 The Engine of FPC 7200...
Страница 30: ...20 This page is intentionally left blank...
Страница 31: ...21 Installation and Maintenance 3 Chapter 3 Installation and Maintenance...
Страница 38: ...28 Installation and Maintenance 5 To remove the CFast SIM card push that inwards to pop it out...
Страница 44: ...34 This page is intentionally left blank...
Страница 45: ...35 Driver AP 4 Chapter 4 Driver AP...
Страница 48: ...38 Driver AP 4 Click Yes 3 Wait for extracting...
Страница 49: ...39 Driver AP 6 Click Finish 5 Click Next...
Страница 50: ...40 Driver AP 1 Execute Setup exe in the suggested path GRAPHICS INTEL_ WIN7_32 2230 4 2 2 VGA 2 Click Next...
Страница 51: ...41 Driver AP 3 Click Yes 4 Click Next...
Страница 52: ...42 Driver AP 5 Wait for the process 6 Click Next...
Страница 54: ...44 Driver AP 2 Wait for extracting 3 Keep waiting...
Страница 55: ...45 Driver AP 4 Click Next 5 Wait for the process...
Страница 57: ...47 Driver AP 2 Click Next 3 Click Install...
Страница 58: ...48 Driver AP 4 Wait for the process 5 Click Finish...
Страница 59: ...49 BIOS 5 Chapter 5 BIOS...
Страница 75: ...65 Appendix Appendix...


