AquaReef 200
Skimmer Instructions:
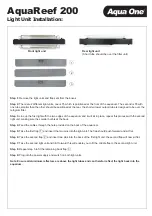
Step 1.
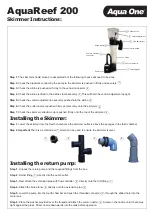
Unpack the return pump and the required fittings from the box.
Step 2.
Screw fitting directly into the pump outlet.
Step 3.
Next attach the extension pipe with flow controller directly onto the first fitting.
Step 4.
Attach the blue elbow directly onto the extension pipe.
Step 5.
Lower the pump into the fourth chamber and push the threaded connector through the drilled hole into the
main tank.
Step 6.
Place the washer provided over the thread and attach the return nozzle. Screw on the nozzle until it becomes
tight against the glass. Direct nozzle downwards into the tank before operation.
Installing the Skimmer:
Collection cup
6
Flow adjustment
5
7
1
2
Outlet nozzle
Airline
Pump
Pump to skimmer
connector
3
Airline clamp
Venturi connector
Level adjuster
Venturi adjustment
4
Step 1.
The skimmer should arrive pre assembled but the following checks will need to be done.
Step 2.
Check the pipework connecting the pump to the skimmer is pushed in firmly and securely.
Step 3.
Check the airline is pushed on firmly to the venturi connector.
Step 4.
Check the airline is fitted to the airline clamp securely. This will hold the venturi adjustment upright.
Step 5.
Check the venturi adjustment is securely pushed into the airline.
Step 6.
Check the outlet nozzle is pushed firmly and securely onto the skimmer.
Step 7.
Check the skimmer collection cup is pushed firmly onto the top of the skimmer.
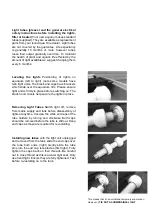
Step 1.
Lower the skimmer into the fourth chamber so the skimmer outlet is above the sponges in the third chamber.
Step 2. Important
There is a small screw which can be used to ensure the skimmer is level.
6
5
7
1
2
3
4
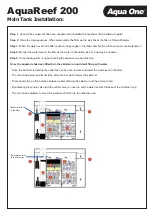
Installing the return pump:
1
1
1
2
2
2
3
3
3
4
4
Содержание AquaReef 200
Страница 1: ...AquaReef 200 Instruction Manual ...
Страница 10: ...Notes ...


