Button Labeling
14
Instruction Manual - Novara Ethernet Keypads
Replacing Key Caps/Button Labels
Once the circuit board has been removed, you have full access to the pushbuttons with Key Caps installed.
1.
Carefully pry the Key Cap off of each pushbutton that you need to re-label.
2.
Remove the existing acetate Button Label and insert the replacement label in each Key Cap. Be sure to place the
Button Label face-down inside the Key Cap, otherwise the label will be seen in reverse once the Key Cap is
installed.
3.
Gently replace the Key Cap on the pushbutton:
Verify that the vertical orientation of the Button Label is correct relative to the Novara keypad.
Align the Key Cap with the target pushbutton, and gently push the Key Cap down over the pushbutton.
Once seated properly on the pushbutton, the Key Cap will snap into place.
Re-Assembling the Keypad
Follow the steps in reverse to re-assemble the keypad. Take care of the following:
Be certain that the circuit boards are oriented correctly
Use the three screws to secure the circuit board onto the faceplate.
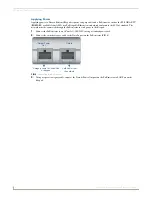
FIG. 12
Placing a Button Label inside a Key Cap
Pushbutton on Novara keypad
Key Cap
Acetate Button Label (inside the Key Cap)
Содержание Novara SP-08-E-US
Страница 2: ...Instruction Manual Keypads Novara Ethernet Keypads SP 08 E US Latest Release 05 18 2015...
Страница 7: ...iv Instruction Manual Novara Ethernet Keypads Table of Contents...
Страница 15: ...Installation 8 Instruction Manual Novara Ethernet Keypads...
Страница 25: ...Upgrading Firmware 18 Instruction Manual Novara Ethernet Keypads...
Страница 36: ...Programming Ethernet Keypads 29 Instruction Manual Novara Ethernet Keypads...


