L0086, Rev. D
AMS SENSIT II GLASS FRONT VRM VENDOR
7-2
7.2.3 Error Code Causes and Solutions
- Continued
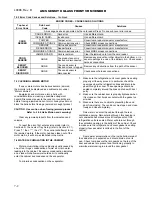
ERROR CODES – CAUSES AND SOLUTIONS
Top Level
Error Code
Sub Level
Code
Causes Solutions
A message has been generated by the card reader.Press
1
to see sub-level error codes.
CARD ERROR –.
Card error
Use a different card.
INVALID CARD –
Invalid card
Use a different card
TAMPER
Tamper error.
Consult card reader manual or manufacture
COMMUNICATIONS 4 Communications error.
Check MDB harness connections
SERVICE
Unit needs service.
Consult card reader manual or manufacturer.
READ ERROR
Reader failure.
Consult card reader manual or manufacturer.
COMMUNICATIONS 9 Communications error
Check MDB harness connections.
CARD
READER
JAMMED CARD
Card is jammed.
Clear the jammed card from the card reader.
PROD.
SENSOR
NONE
The product sensor is
blocked or disconnected.
Remove any products or other objects in the bottom, or in
sensor openings in ends, of the delivery bin. Check sensor
harness connections.
SENSIT
BLOCKED
NONE
The vend sensor is
blocked or lens is fogged.
Remove any obstructions from the path of the sensor.
SENSIT
DISCONN’D
NONE
The vend sensor is
disconnected.
Check sensor harness connections.
7.3 CLEARING JAMMED MOTOR
If one or more motors and helixes become jammed,
the motor(s) will be displayed as a sublevel error under
“Motor Jammed”.
Energized vend motors can turn a helix with
considerable torque, creating a possible entrapment
hazard. Disconnect power to the vendor or control board
before freeing a jammed helix or motor. Always restrain or
block the helix before freeing a jammed or caught product.
CAUTION
:
Use caution when freeing jammed product!
Refer to
2.2.4 Helix Motion and Jamming!
Clear any jammed products from the indicated vend
columns.
To reset the error, first enter service mode (refer to
Section 6.0), then select Tray Setup (refer to Section 6.7.1).
Press “1”, then “ * “, then “3”. The control will attempt to run
the jammed motors. If the motor had been taken out of the
motor matrix, it will be re-established in the matrix.
7.4 WATER ACCUMULATION IN THE CABINET
Water accumulating in the cabinet is usually caused by
one of two things: condensation of moist air or rain water
leaking into the cabinet. Excessive condensation indicates
an air leak which allows moist outside air to continually
enter the cabinet and condense on the evaporator.
To minimize condensation on the evaporator:
1.
Make sure the refrigeration unit cover gasket is sealing
properly all the way around. In particular, check the
openings where the refrigeration lines and drain tube
pass through the cover. These openings should be
sealed completely around the lines and tube with duct
putty.
2.
Make sure the cabinet door is properly tightened when
it is closed so that it makes contact with the gasket on
all sides.
3.
Make sure there are no objects preventing the vend
door from closing. The vend door must open and close
freely and close completely.
Rain water can enter the cabinet through the rear
ventilation opening. Rain entering through this opening is
not considered hazardous since all components of the
refrigeration unit are sealed. Water will drain out through
the ventilation opening in the bottom of the cabinet. Check
to make sure the refrigeration unit cover gasket is seating
properly if excess water is noticed in the front of the
cabinet.
Some water accumulation on the inside bottom area of
the cabinet door is expected and should drain out on its
own. Check to make sure the rain guards on the top of the
door and cabinet are present and functioning properly to
minimize water coming in around the door gasket
Содержание 39-VRM
Страница 2: ......
Страница 6: ...L0086 Rev D AMS SENSIT II GLASS FRONT VRM VENDOR iv ...
Страница 16: ...L0086 Rev D AMS SENSIT II GLASS FRONT VRM VENDOR 3 4 ...
Страница 24: ...L0086 Rev D AMS SENSIT II GLASS FRONT VRM VENDOR 5 4 ...
Страница 30: ...L0086 Rev D AMS SENSIT II GLASS FRONT VRM VENDOR 6 6 ...
Страница 40: ...L0086 Rev D AMS SENSIT II GLASS FRONT VRM VENDOR 8 6 ...
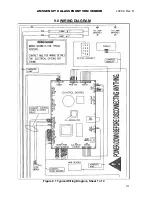
Страница 42: ...L0086 Rev D AMS SENSIT II GLASS FRONT VRM VENDOR 9 2 Figure 9 1 Typical Wiring Diagram Sheet 2 of 4 ...
Страница 43: ...AMS SENSIT II GLASS FRONT VRM VENDOR L0086 Rev D 9 3 Figure 9 1 Typical Wiring Diagram Sheet 3 of 4 ...
Страница 44: ...L0086 Rev D AMS SENSIT II GLASS FRONT VRM VENDOR 9 4 Figure 9 1 Typical Wiring Diagram Sheet 4 of 4 ...
Страница 48: ...L0086 Rev D AMS SENSIT II GLASS FRONT VRM VENDOR 11 2 ...
Страница 50: ...L0086 Rev D AMS SENSIT II GLASS FRONT VRM VENDOR 12 2 ...


