AMS SENSIT II GLASS FRONT VRM VENDOR
L0086, Rev. D
6-3
turn then stop. If the sensors did not detect a drop then
“PLEASE MAKE ANOTHER SELECTION” will be
displayed. Note that if the motors are non-switched (as in
the 1.5” helix trays) the helix will turn for 4 seconds -
typically vending more than one item.
When the state is N for NO, the switches on all of
the motors are disabled. When a product selection is made
the motor will turn until the sensors detect a drop. If after
several seconds no drop occurs the motor will stop and
“PLEASE MAKE ANOTHER SELECTION” will be
displayed.
6.7.4 Delayed Stop
The user can program a delayed stop of up to one
second to allow a motor to continue running after the
product has been dispensed.
1.
ENTER SELECTION
– Enter the number of the selection
to be delayed, enter 9 to edit, then enter the time in
tenths of a second. The decimal point is placed
automatically.
Example: Entering
8
will program a delay of 0.8
seconds.
2. The user can save the programmed delay to the
selection, the entire tray, or all selections in the vendor.
Linked selections will use the delay programmed for the
master selection.
6.7.5 Number
– This allows the user to designate the trays
in the vendor (from the top tray down) with the letters
(A-H) instead of numbers (1-8). This feature requires
an alpha-numeric keypad which is not available on
the AMS 39-VRM Outdoor Vendor and therefore
should always be set to “Number”. Note that when
replacing the control board or program chip, the
replacement will most likely be set at “Letter” and will
need to be reset to “Number” using the
Letter/Number function.
6.7.6 Configure
–
The control will find all connected motors
in the vendor and display the total number. The
configuration of connected motors is stored in
memory. If a configured motor is later found to be
missing during a vend, an error message will be
generated in service mode to alert the service
person that the motor is disconnected.
6.8 MDB (MULTI-DROP BUS) SETTINGS
6.8.1 Force Vend –
The factory default is “
N
” for no. If set
to “
Y
”, the customer is forced to make a selection
before the control will allow a refund. If the
selected product cannot be dispensed, a full refund
can be returned to the customer. This setting will be
over-ridden by the CHANGE BILL setting. (refer to
Section 6.8.3).
6.8.2 No Cheat –
The factory default is “
Y
” for yes. If set to
“
Y
”, the control will not allow a vend unless correct
change can be returned to the customer. If
disabled, the control will allow the customer to be
short-changed up to $1.00.
6.8.3 Change Bill –
The factory default is “
N
” for no. If set
to “
Y
”, the customer can insert a bill and receive a
full refund in coins by pressing the coin return
button. Note that using CHANGE BILL will override
force vend.
6.8.4 Hold Lost Credit –
The factory default is “
Y
” for yes.
If set to “
Y
”, any remaining credit after a vend that
can’t be returned to the customer will be maintained
on the display for 15 minutes. The customer can
add to this credit to purchase additional items.
6.8.5 Multi-Vend –
The factory default is “
N
” for no. If set to
“
Y
”, the vendor will hold the change following a
vend. The customer can make additional purchases
with the remaining credit. The customer may push
the coin return button at any time to refund this
credit.
6.8.6 Lev2 Coin Mech –
The factory default is “
N
” for no. If
set to “
Y
”, the vendor will treat the coin mechanism
as a level 2 device. Vendor must be powered down
before change will take effect. AMS recommends
that this option remain as “
N
” for no.
6.9 OPTIONS
6.9.1 Message
The user can customize the scrolling message that is
displayed when the vendor is idle. Other words can be
customized by using the CREATE CUSTOM option in the
LANGUAGE menu (refer to Section 6.9.3).
Write out the desired scrolling message first. The
message to be displayed on the scrolling display can be
up to 50 characters, including letters, numbers,
punctuation and spaces.
Select the message option to enter a message. The
controller will prompt the user to press “1” to change the
message, or press “#” to exit.
To enter message text, the user repeatedly presses a
particular key to cycle through a list of characters that
have been defined for that key. When the keypad is left
idle for a short time, the last-displayed character is added
to the end of the message. The key definitions are similar
to those of telephones and cell phones:
KEY 0:
(space)0
KEY 5:
JKL5
KEY 1:
!?,.$:;*&”+-/<>=#%’1
KEY 6:
MNO6
KEY 2:
ABC2
KEY 7:
PQRS7
KEY 3:
DEF3
KEY 8:
TUV8
KEY 4:
GHI4
KEY 9:
WXYZ9
Pressing the * key will back space through the
message. Pressing the # key will save the message.
The user can also customize the scrolling message
by using a computer running the AMS Sensit II utility
software and the cable connection on the control board.
Contact your local AMS distributor for information on the
AMS Sensit II utility software.
Содержание 39-VRM
Страница 2: ......
Страница 6: ...L0086 Rev D AMS SENSIT II GLASS FRONT VRM VENDOR iv ...
Страница 16: ...L0086 Rev D AMS SENSIT II GLASS FRONT VRM VENDOR 3 4 ...
Страница 24: ...L0086 Rev D AMS SENSIT II GLASS FRONT VRM VENDOR 5 4 ...
Страница 30: ...L0086 Rev D AMS SENSIT II GLASS FRONT VRM VENDOR 6 6 ...
Страница 40: ...L0086 Rev D AMS SENSIT II GLASS FRONT VRM VENDOR 8 6 ...
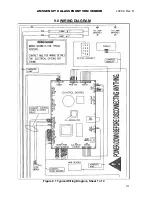
Страница 42: ...L0086 Rev D AMS SENSIT II GLASS FRONT VRM VENDOR 9 2 Figure 9 1 Typical Wiring Diagram Sheet 2 of 4 ...
Страница 43: ...AMS SENSIT II GLASS FRONT VRM VENDOR L0086 Rev D 9 3 Figure 9 1 Typical Wiring Diagram Sheet 3 of 4 ...
Страница 44: ...L0086 Rev D AMS SENSIT II GLASS FRONT VRM VENDOR 9 4 Figure 9 1 Typical Wiring Diagram Sheet 4 of 4 ...
Страница 48: ...L0086 Rev D AMS SENSIT II GLASS FRONT VRM VENDOR 11 2 ...
Страница 50: ...L0086 Rev D AMS SENSIT II GLASS FRONT VRM VENDOR 12 2 ...


