background image


AST 560 Semi-automatic Cryostat Microtome 

201911119 

---13--- 

2Value adjustment 

Double arrows can be adjusted once 5 ℃, single arrow can be adjusted 1 ℃ 

3Quick value 
selection 

Select temperature value quickly. 

4Back 

After setting the parameters, click it back to the main interface. 

4.6

 Section, Trimming and Retraction setting


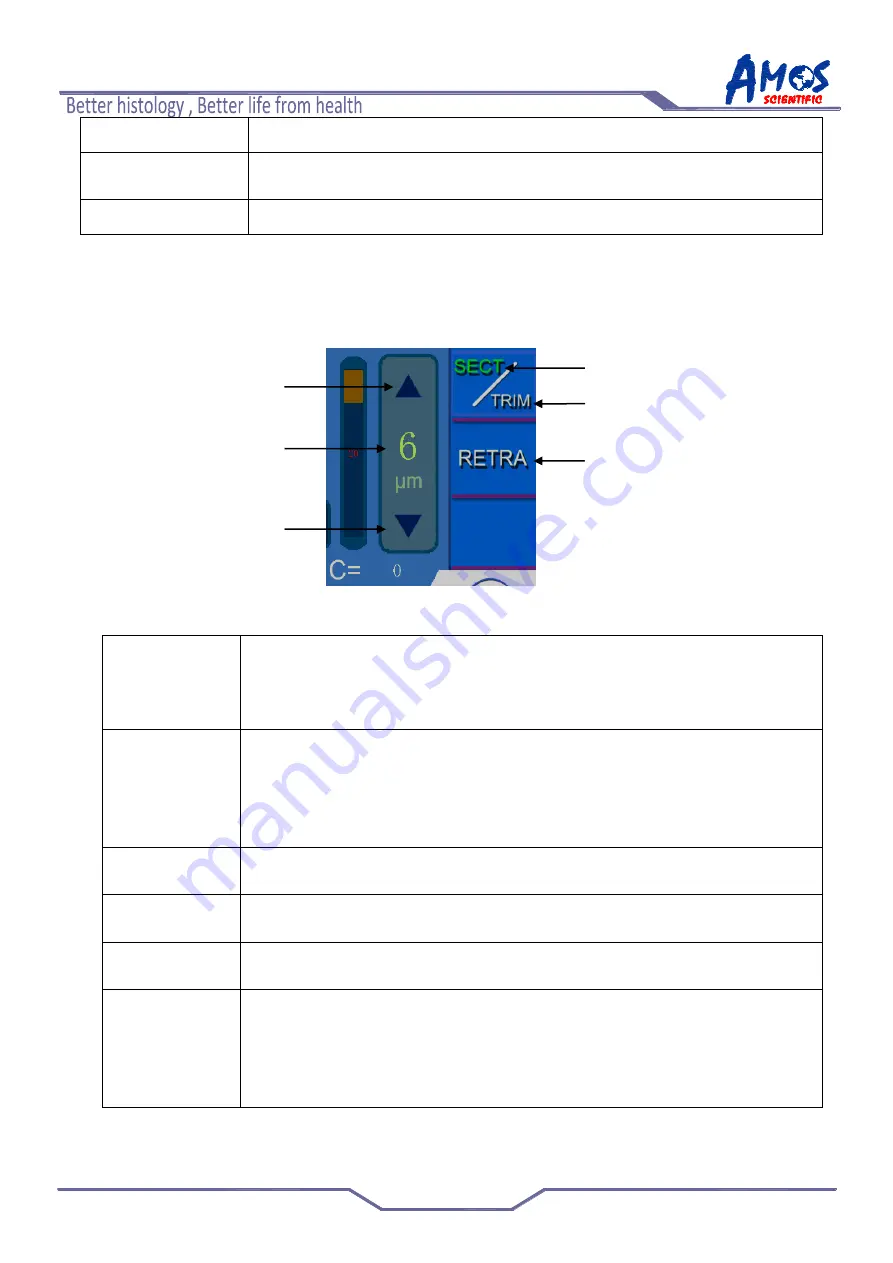
The section, trimming and traction options are located on the right side of the main interface 

as below fig 14


Fig 14


1.Section Option 

When the current mode is trimming (TRIM is green), click SECT/TRIM icon 
once, it turns to section  mode, while SECT turns to green. When the current 
mode  is  retraction  (RETRA  is  green),  click  RETRA  icon  once,  it  turns  to 
white, while SECT turns to green which means the current mode is section. 

2.Trimming 
Option 

When  the  current  mode  is  section  (SECT  is  green),  click  SECT/TRIM  icon 
once, it turns to retraction mode, while TRIM turns to green. When the current 
mode  is  retraction  (  RETRA  is  green)  ,click  RETRA  icon  once  ,  it  turns  to 
white  ,while  SECT  turns  to  green  which  means  the  current  mode  is 
section .And then click SECT/TRIM once to turn to trimming mode . 

3.Retraction 
Option 

Click RETRA icon once, RETRA turns to green, it means the retraction mode 
is selected.


4.Up arrow 

Click the up arrow icon, increase the value for item 6. The increments refers 
to section 2.4 –technical parameters. 

5.Down arrow 

Click  the  down  arrow  icon,  decrease  the  value  for  item  6.  The  increments 
refers to section 2.4 –technical parameters. 

6.Thickness and 
Setting 

It shows corresponding item thickness value, and click this value, it pops up a 
numeric  keypad  where  can  input  the  required  value.  The  thickness  range 
refers  to  section  2.4-Technical  parameters.  For  example,  when  the  thickness 
range  is  0~3μm,  the  increment  is  0.5μm.  When  you  set  2.8μm,  the  default 
thickness is 3μm. 

Содержание AST 560

Страница 1: ...AST 560 Semi automatic Cryostat Microtome Operation Manual www amos scientific com AMOS SCIENTIFIC PTY LTD ABN37 159 778 140...

Страница 2: ......

Страница 3: ...Presented in this Operation manual are the structure functions and using notice Reading carefully prior to operating the instrument...

Страница 4: ...ly it is necessary to read the operation manual carefully Our companies are not only responsible for the repair but also train distributors ability of repairing To repair the product smoothly in time...

Страница 5: ...INSTALLATION 6 3 4 ELECTRICAL CONNECTION 7 4 OPERATION 8 4 1 OPERATION PANEL FUNCTION CONTROL 8 4 3 AUXILIARY FUNCTION 10 4 4 CRYO CHAMBER TEMPERATURE SETTING 11 4 5 SPECIMEN CLAMP TEMPERATURE SETTIN...

Страница 6: ...the factory please check this setting complies with your local power requirement before connecting to the main power Please use the power cord provided If need to replace it please use the power cord...

Страница 7: ...cord before changing the fuse Please use the fuse according to the requirement and specification in operation manual 1 3 Safety Device Handwheel locking mechanism As showed in Fig1 it is the lock lev...

Страница 8: ...sing etc which is for the pathological analysis of tissue samples 2 2 Overview Instrument Components The main structure of cryostat microtome is shown in Figure 3 as below 1 Touch Panel 7 Heating glas...

Страница 9: ...on is enabled or disabled Defrosting at fixed time or manually Sterilization at fixed time or manually Sleep at fixed time or manually Large freezing shelf could load 17 samples simultaneously Quickly...

Страница 10: ...wo fixed support feet and make the front wheels disabled Start the instrument after let it rest for at least 2 hours Ensure no other goods around the instrument At least 300mm distance must be kept fo...

Страница 11: ...in order Upholder 2 Corner Support 1 3 Corner Support 2 6 Corner Support 3 7 Corner Support 4 11 Handwheel 8 Blade Holder 9 Cryostat Microtome 12 Glass Support 5 Then take out other accessories in th...

Страница 12: ...check that this setting complies with the local power requirements Connect the instrument to a ground power socket to avoid accident Please use the power cord provided If need to replace it please us...

Страница 13: ...he icon pop up sub interface select the auxiliary function 3 Lamp Click the icon turn on off the lamp 4 Time display and set Display current date and time Click the icon set the date and time 5 Cryo c...

Страница 14: ...number sum Section number sum when exchange between slicing and trimming the value will return to zero automatically 14 Progress display Display the sample clamp progress 15 Section thickness set Acc...

Страница 15: ...ate to continue setting 3 Right arrow Use cooperatively with left arrow 1 select one date and set its working time for each function 4 Automatic defrosting time Set the selected date and set the autom...

Страница 16: ...an 8 click this icon to activate this function It will work for 15 minutes and stop 5Pump waste sweeps Prepare the related tools click on this icon the device automatically pump cutting waste sweeps 6...

Страница 17: ...Value adjustment Double arrows can be adjusted once 5 single arrow can be adjusted 1 3Quick value selection Select temperature value quickly 4Back After setting the parameters click it back to the mai...

Страница 18: ...n click SECT TRIM icon once it turns to retraction mode while TRIM turns to green When the current mode is retraction RETRA is green click RETRA icon once it turns to white while SECT turns to green w...

Страница 19: ...ction status the icon is highlighted or it is dark 6 Heating glass opened When the heating glass is open the icon is highlighted or it is dark 7 Alarm When the device has alarm information the icon is...

Страница 20: ...tion of blade holder and base As showed in fig 17 slide the blade holder along the track in cryo chamber turn the fixed lever 2 to horizon position to lock the blade holder The blade is close to speci...

Страница 21: ...e and put it into box when not in use Fig 17 Adjust the angle As showed on fig 18 the rotating angle is from 0 to 10 degree the user can adjust the angle in this range according to requirement Fig18 F...

Страница 22: ...er 2 Always clamp the specimen before installing the blade to avoid injury Fig 20 Blade inserting As showed in fig 21 loosen the fixed lever 5 and push the blade 6 into blade holder 4 then rotate the...

Страница 23: ...ntion to the following aspects 1 Proper cryo chamber temperature selection 2 Correct section operation 3 careful anti roll plate adjustment 4 Sharp blade and appropriate sectioning angle 5 The blade i...

Страница 24: ...ction To obtain a high quality section it is important to keep cleaning the instrument So the user must clean the instrument periodically or irregularly according to the total sectioning quantity to o...

Страница 25: ...e white tie tightly along the edge to fix firmly Fig 26 Fig 25 Fig 26 Pull off the silica plug of sucking hole as the Fig 27 and properly placed Fig 27 Plug the adaptor with filter bag into the suctio...

Страница 26: ...and then removed the scrap bag to clean the waste scraps or change a new scrap bags to continue work 5 3 Maintenance Fuse replacement Put the fuse 1 in the installation part 2 and then insert the ins...

Страница 27: ...than the blade Adjust the anti roll plate Section soften The temperature of blade or anti roll plate is too high Extend the cooling time of blade or anti roll plate The section sticks to the blade or...

Страница 28: ......

Страница 29: ......

Страница 30: ...Published by AMOS SCIENTIFIC PTY LTD Address 1 Prestige Dr Clayton South VIC 3169 Melbourne Australia Tel 61 4 10190188 Fax 61 3 98081503 Website www amos scientific com Email info amos scientific com...

Отзывы: