background image

Controller / User Interface   

|


 4-5

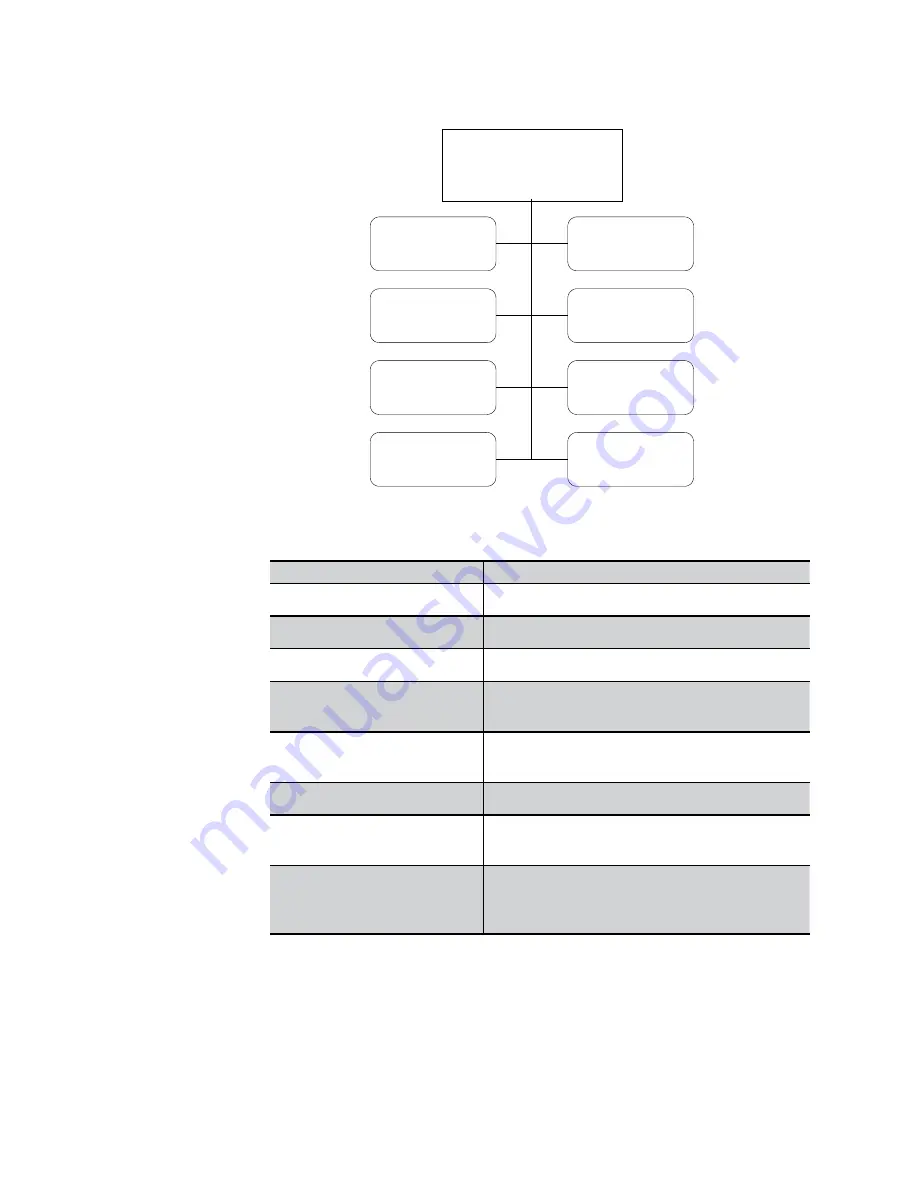
Setup Key

Display

System Tests

Primary Calib

Pump

Passwords

System Serial #

Communications

Carrier Gas

SETUP KEY

Figure 4-1.    Setup Key menu options.

Setup Key Menu

Function/Options

Display

Select info for Display Lines 1, 2 and 3

Passwords

Create a system password

System Tests

Perform internal diagnostics

System Serial #

View Serial Number and manufacturing num-

ber

Primary Calibration

Perform an automatic, remote, or manual pri-

mary calibration

Communications

Define communication parameters

Pump

Turn thepump on or off. Applies only ifyou have 

the optional pump installed.

Carrier Gas

Define the carrier gas to deliver the calibration 

gases. This menu option also allows you to 

calibrate your flow sensor.

Содержание Thermox CG1000

Страница 1: ...Thermox CG1000 Oxygen Analyzer User Manual Thermox 150 Freeport Road Pittsburgh PA 15238 PN 90291VE Rev S ...

Страница 2: ...E Calgary AB T1Y 7H9 Ph 403 235 8400 Fax 403 248 3550 GERMANY AMETEK GmbH Rudolf Diesel Strasse 16 D 40670 Meerbusch Ph 49 21 59 91 36 0 Fax 49 21 59 91 3680 MIDDLE EAST Dubai AMETEK PO Box 17067 Jebel Ali Free Zone Dubai UAE Ph 971 4 881 2052 Fax 971 4 881 2053 SINGAPORE AMETEK Singapore Pte Ltd No 43 Changi South Avenue 2 04 01 Singapore 486164 Ph 65 64842388 Fax 65 64816588 2012 AMETEK This man...

Страница 3: ... Calibration Gases and Tubing 3 5 PPM Measurement Suggestions 3 7 Wiring 3 8 Current Output Connections 3 8 Alarm Contact Connections 3 9 RS 485 Communications Connections 3 10 Termination Resistor 3 11 Select 115 230 Volt Operation 3 11 Select 50 60 Hertz Operation for Pump 3 12 CHAPTER 4 Controller User Interface System Start up 4 1 Password Restrictions 4 2 Display 4 2 Auto Ranging Feature 4 2 ...

Страница 4: ... Service Alarm 4 23 Watchdog Relay 4 23 Exception Log 4 23 CHAPTER 5 Calibration Calibration 5 2 Calibration vs Verification Operations 5 2 Span vs Zero Gas 5 2 Overview 5 2 Initiate Cal 5 3 Initiate Verify 5 6 Cal Verify Data 5 8 Calibration Data 5 8 Verify Data 5 9 Cal Gas Value 5 10 Configure Verify 5 11 Set Clock 5 12 Set Time and Date 5 12 Recovery Duration 5 12 CHAPTER 6 Maintenance Troubles...

Страница 5: ...he Backplane Board 7 12 Replacing Display Keypad Modules 7 14 APPENDIX A Serial Communications Communication Protocol A 1 General Serial Communication Commands A 3 Development Serial Communication Commands A 4 Command List A 5 Variable Table A 7 APPENDIX B Menu Option Charts Setup Key Menu B 1 Calibrate Key Menu B 2 Alarm Key Menu B 2 Analog Range Key Menu B 3 ...

Страница 6: ...fety Up to 5 kV may be present in the analyzer housings Always shut down power source s before performing maintenance or troubleshooting Only a qualified electrician should make electrical connections and ground checks Any use of the equipment in a manner not specified by the manufacturer may impair the safety protection originally provided by the equipment Grounding Instrument grounding is mandat...

Страница 7: ... residential trash The Wheelie Bin marking on this product is a reminder to dispose of the product properly after it has completed its useful life and been removed from ser vice Metals plastics and other components are recyclable and you can do your part by doing one of the following steps When the equipment is ready to be disposed of take it to your local or re gional waste collection administrat...

Страница 8: ...ns to the input or output terminals of this product ensure that the product is properly grounded Do Not Operate Without Covers To avoid electric shock or fire hazard do not operate this product with covers or panels removed Use Proper Fuse To avoid fire hazard use only the fuse type and rating speci fied for this products Do not Operate in Explosive Atmosphere To avoid injury or fire hazard do not...

Страница 9: ...ent EN 61326 1997 Measuring Equipment Heavy Industrial Emissions EN 55011 1998 Class B ISM Equipment EN 61000 3 2 1995 Class A Harmonic Current Emission EN 61000 3 3 1995 Limitation of Voltage Fluctuations FCC Part 15 Class B Computing Equipment Safety Compliance UL 3101 1 UL Listed Inspection and Measuring Electrical Equipment CAN CSA 22 2 No 1010 1 92 cUL Listed Inspection and Measuring Electric...

Страница 10: ...r on the documentation accompanying the equip ment being returned declaring that the goods being returned for repair are American goods the name of the firm who purchased the goods and the shipment date The warranty shall not apply to any equipment or part thereof which has been tampered with or altered after leav ing our control or which has been replaced by anyone except us or which has been sub...

Страница 11: ... Sensor The CG1000 analyzer consists of the following basic systems The Plumbing All inlet and outlet tubing cell housing Also includes the calibration gas inlet and aspirator assembly with the aspirator used to pull the sample into the sensor The Measuring System Zirconium oxide cell The Temperature System The electrical cell heater furnace sensor case heaters the type K thermocouple maintains ce...

Страница 12: ...ltage is produced See Figure 1 1 The magnitude of this voltage is a function of the ratio of the two oxygen par tial pressures If the oxygen partial pressure of one gas is known the volt age produced by the cell indicates the oxygen content of the other gas A reference gas usually air 20 9 O2 is used for one of the gases Since the voltage of the cell is temperature dependent the cell is main taine...

Страница 13: ... actually in the gas Hydrocarbons When hydrocarbons are present in the gas sample a combustion process occurs when this gas sample is exposed to the high temperature of the zirconia cell An indication that hydrocarbons may be present in the gas sample is that the oxygen reading will be lower than expected For ex ample if a calibration gas cylinder has an oxygen value of 20 ppm and 5 ppm of hydroge...

Страница 14: ...r turn the power off The heater has exposed windings and a short to the plumbing will blow the fuse and could damage the furnace or thermocouple Do not handle the cell excessively Do not try to clean the cell except by rinsing Do not remove a cell or type K thermocouple that you may want to use again when the inside of the furnace is still hot severe thermal shock can be destructive to either of t...

Страница 15: ...actory to pro vide this information when receiving service Cell millivolts Thermocouple millivolts Cell temperature See the Display under Setup Key in the Controller User Interface chap ter for help on how to get this information displayed on your CG1000 analyzer If you need to return equipment you will be asked to provide the follow ing information before obtaining a Return Material Authorization...

Страница 16: ...1 6 Thermox CG1000 Oxygen Analyzer This page intentionally left blank ...

Страница 17: ...s can be assigned as oxygen flow calibrate or verify Set relays to energize or de energize on alarm Contact Rating 0 5A 30V 10VA max noninductive load AC or DC Diagnostics Watchdog timer and service alarms System test for A D RAM EEPROM and keypad Display Line 4 reserved for full text error and diagnostic mes sages Twenty entry event log for automatically detected system events Calibration Oxygen ...

Страница 18: ...t Temp 5 C to 40 C 41 F to 104 F 10 C to 40 C 14 F to 104 F with optional built in pump Relative Humidity 10 to 90 non condensing Max Altitude 2000 meters IEC Installation IEC Pollution Category II Degree 2 Enclosure Lift off NEMA 3R weather resistant stainless steel Optional hinged NEMA 4X IP56 explo sion proof purged and floor mount versions available Power Requirements 115 VAC 60 Hz 150VA 230 V...

Страница 19: ... Inspect Shipping Contents Mechanical Installation Wiring No operator serviceable components are inside the CG1000 Never open the analyzer cover Refer servicing to qualified personnel Inspect Shipping Contents Remove any packing material from the CG1000 analyzer Check for dam age If any damage is found notify the shipper ...

Страница 20: ...s 10 C to 40 C 14 F to 104 F Figure 3 1 Rear of CG1000 analyzer Sample Gas Requirements Connection Figure 3 1 shows the inlet and outlet ports on the CG1000 The sample gas should be clean and dry If the sample contains any condensing moisture the entire sample line should be heat traced If the sample contains par ticulates greater than 15 microns install a filter on the sample gas inlet Maximum sa...

Страница 21: ...tween 15 water column H2 O and 20 psi 38 to 1380 millibar gauge The minimum pressure requirement of 15 water column allows for any minor pressure drops within the analyzer sample inlet connec tions to ensure a 150 sccm flow rate through the sensing cell Figure 3 3 For pressure below 15 water column you must use the pump option If you find that you need the optional pump after you receive your CG10...

Страница 22: ...ent to atmosphere The outlet pressure should never exceed 5 psig 345 millibar gauge 4 Using the Setup Display key on the CG1000 analyzer front panel se lect Flow Rate for one of the display lines See Chapter 4 for setting up flow rates using the display 5 If operating under a positive pressure that is greater than 15 water column go to Step 6 If operating below 15 water column turn the pump on by ...

Страница 23: ...Gas Process Cal Control Valve Sample Gas Figure 3 4 Calibration Process gas setup example Required Calibration Gases and Tubing Us the same flow rate for calibration gases as you do for daily use of the CG1000 analyzer See the Mechanical Installation section for acceptable pressure and flow ranges for inlet gas calibration gases follow the same rules Use stainless steel tubing that is free of oil ...

Страница 24: ...9 recommended Zero gas from 0 1 to 10 O2 balance N2 2 recommended PPM O2 Range Calibration Gases The span gas must be at least a factor of 10 higher in oxygen content than the zero gas for example if zero gas is 10 ppm the span gas must be 100 ppm or higher Span gas from 10 ppm to 1000 ppm Zero gas from 1 ppm to 100 ppm ...

Страница 25: ... get the quickest response from your CG1000 analyzer use as small a sample tube diameter as possible The smaller the inside diameter of the sample tubing the better the response time will be Also ensure that the length of the sample line between the analyzer and the sample gas is as short as possible Effects of Hydrocarbons on Low PPM Oxygen Reading When hydrocarbons are present in the gas sample ...

Страница 26: ...rminals Current outputs 1 and 2 are capable of driving up to 1200 ohm loads These two current outputs 1 and 2 are isolated from the analyzer but are not isolated from each other Powering Standard Current Outputs From an External Voltage The J8 connector on the back of the CG1000 see Figure 3 5 contains a set of pins that allows you to power the standard current outputs using an external voltage so...

Страница 27: ...ntains alarm pin outs see Figure 3 5 The Watchdog Timer Alarm is associated with the following on J8 ALARM 1A Pin 5 ALARM 1B Pin 6 See the Watchdog Relay section in Chapter 4 for complete information on the watchdog timer alarm The watchdog alarm contacts are normally closed during system operations deactivated A watchdog event triggers these alarm contacts to an open condition If you have a watch...

Страница 28: ... RS 485 2 wire communications on connector J7 are labeled as follows see Figure 3 5 for location of J7 on the back of the CG1000 GND Pins 1 6 9 4WT 2WRT Pin 2 4WT 2WRT Pin 3 4WR Pin 4 4WR Pin 5 Connect all the 2 wire pluses and all the 2 wire minuses in paral lel with all the devices in daisy chain fashion including all the CG1000 analyzers on the network and the host computer In addition on the h...

Страница 29: ...nications Remember to insert a termination resistor only on the last CG1000 on the network and not on all the CG1000 analyzers The factory default setting is to have Switch 3 turned OFF allowing for no termination resistor in the circuit Select 115 230 Volt Operation To change selected voltage disconnect the AC line power cord from the analyzer open the top cover of the power entry module using a ...

Страница 30: ...on for Pump You must select whether you will be using 50 or 60 Hz for pump operation by using the switch on the backplane board To access the backplane board first disconnect the AC line power from the analyzer Open the analyzer and locate the backplane board SW1 on the backplane board is used to select the proper coil for the pump motor The switch position is set at the factory and the setting ne...

Страница 31: ...r the power cord must be changed to the proper type to match your country and or electrical code All analyzers are shipped with a U S 120 volt plug and har European power cord The European cord will have a label stating not for North American usage 2 Plug the power cord into the appropriate AC power outlet 3 Turn on the analyzer by pressing on the side of the power switch marked 1 The power switch...

Страница 32: ...nctions See Chapter 4 for help on how to create a system password Display The display allows you to view different types of information You define which information to place on the first three lines of the display using the Display option from the Setup key Note that you can also use the Display menu option to place your own text message on one of the first three lines The last display line is res...

Страница 33: ...Display from the Setup Key and then select Display Line 1 the choice selected to appear on display line 1 will have the asterisk in front of it If the menu options list is too long to display all of the items a Down Ar row Key will appear on the far right of the last display line to show that more menu options are available When the Down Arrow Key disap pears all the options have been displayed Co...

Страница 34: ... of any of the options in that menu Pressing the Help Key again exits on line help and returns to the menu options or press Cancel or Enter For example to get on line help on the Passwords option from the Setup Key select the Setup Key then move the arrow pointers to the Passwords option and press the Help Key ...

Страница 35: ...s Create a system password System Tests Perform internal diagnostics System Serial View Serial Number and manufacturing num ber Primary Calibration Perform an automatic remote or manual pri mary calibration Communications Define communication parameters Pump Turn thepump on or off Applies only ifyou have the optional pump installed Carrier Gas Define the carrier gas to deliver the calibration gase...

Страница 36: ... Select the type of information you want to place on the display line Entering user text User text can be up to 20 characters long The Down Arrow Key on Display Line 3 allows you to see where you are entering the user text message When you first select User Text the Down Arrow Key appears above the first position To enter text use the Up and Down Arrow keys on the keypad to scroll through the ASCI...

Страница 37: ...Interface 4 7 Auto ranging feature for oxygen readings If you select to display oxygen on one of the display lines and the oxygen reading falls below 0 5 O2 the display switches from the percent scale to the PPM scale ...

Страница 38: ...EK Thermox and a service password will be provided so you can access this option and enter a new password 1 From the Setup Key menu Select Passwords You will be prompted to enter a new system password 2 Enter a 4 digit password For security purposes the numbers are dis played as blocks rather than text 3 Reenter the password to verify it To disable or change the system password you must first ente...

Страница 39: ...automati cally done during system start up Test Digital In Tests the system digital input Erase RAM Erases all RAM memory locations Erase EEPROM Erases internal EEPROM memory locations if your control unit is not operating properly Be careful though because selecting this option will erase all settings in your control unit and the default values will be reinstalled Watchdog Timer Tests that the wa...

Страница 40: ...om the Calibrate Key before starting your primary calibration 1 From the Setup Key select Primary Calib 2 If you have the auto calibration card option and a remote calibra tion unit you will be prompted to select Auto Calibrate Remote Calibrate or Manual Calibrate If you don t have the auto calibration option you will default to a manual calibration and be instructed to inject your span gas into t...

Страница 41: ...plies if you have a pump installed on your CG1000 It allows you to turn the pump on or off Use the pump option if you need to pull a sample from process under vacuum To turn the pump on or off do the following Select Pump from the Setup Key menu Select Pump On or Pump Off Carrier Gas Define which carrier gas is used to deliver the calibration gases to the ana lyzer You must select the proper carri...

Страница 42: ...e 2 Connect the mechanical flow meter to the outlet port on the back of the CG1000 analyzer 3 Select Carrier Gas from the Setup key menu 4 Select the Cal Flow Sensor menu option You will be prompted to define the flow rate for the sample gas Flow Set x sccm New value 5 Enter the desired flow rate for gases entering the sensor then press the Enter key The acceptable range is 150 sccm 5 sccm You mus...

Страница 43: ... then calibrate the flow sensor Calculating ratio At this time you can remove the mechanical flow meter from the outlet port of the CG1000 After calibrating the flow sensor the system will return you to the previous menu 7 Run a regular calibration ...

Страница 44: ...ck Hold Define information sent to analog output port during a calibration Decide whether to hold the output at the last process reading taken before that start of calibration OR track the calibration reading during cal or verify Set Current Mode Define the analog output range as 4 to 20 mA 0 to 20 mA Output Filtering Decide whether to enable output filtering If enabled decide how much to smooth o...

Страница 45: ...f readings that the 0 to 20 or 4 to 20 mA milliamp out put will represent You can also choose to set a reverse analog output range so for example 0 mA can correspond to the high end of the oxygen range and 20 mA can correspond to the low end of the oxygen range The range of readings the current output represents is also a function of the type of process readings the analog output port tracks Setti...

Страница 46: ...ng a calibration or verification You can either hold the last process reading or track calibration readings Separate decisions can be made for verify and calibrate operations For example you can elect to hold the last process reading during verifications but track calibration gas readings during calibrations Setting track or hold 1 After selecting an analog output port From the Analog Range Key se...

Страница 47: ...t 1 will HOLD during Verify Set Current Mode Option Define either a 0 to 20 or 4 to 20 mA analog output range for the selected analog output port This output is dependent on both the range of readings you define see the Set Current Range section and on the function you track on the analog output Setting the current mode 1 After selecting an analog output port from the Analog Range Key select Set C...

Страница 48: ...d enter 01 to enter 1 07 to enter 7 70 for 70 etc The default value is 100 no filtering Select Function Option Select what type of information the analog output port should track Choic es are Oxygen Cell temperature Thermocouple millivolts T C mV Cell millivolts cell mV Selecting the function 1 After selecting an analog output port from the Analog Range menu choose Select Function 2 Select what yo...

Страница 49: ...a verification Select function Alarm 4 is always an oxygen alarm Alarm Configure Define whether Alarms 3 and 4 should be a high or low alarm Relay Configure Define whether alarm relays should energize or de ener gize on alarm The selection you make here applies to all alarms except the Watchdog and Service alarms which always de ener gize on alarm Select Function Define whether Alarm 3 activates b...

Страница 50: ...Set alarm limits Define whether these limits represent high or low alarms using the Alarm Configure menu option Certain restrictions may apply see the Alarm Configure section If an alarm triggers an up or down arrow will appear to the right of the process reading on the display For example if the first display line is showing O2 values and a high alarm occurs an up arrow will appear to the right o...

Страница 51: ...t value Alarm 4 xx O2 New Value 6 Enter the Alarm 4 set point value 7 Press Cancel or Enter to exit this menu option Alarm Configure Define whether alarms should trigger based on a high alarm or a low alarm condition 1 For Alarm 3 set whether to track high oxygen low oxygen or the combined high low flow 2 For Alarm 4 set whether to track high oxygen or low oxygen Whether Alarm 3 is set high or low...

Страница 52: ...lays are set to DE ENERGIZE on Alarm Select Function Select the type of reading that Alarm 3 should track If tracking the start of a calibration or verification the alarm will deacti vate once the calibration or verification has been completed including anyr ecovery duration you have specified Alarm 4 is always set to track oxygen and therefore is not included in the Select Function menu Defining ...

Страница 53: ...tem watchdog timer times out The watchdog timer will time out and cause the control unit to reset itself to prevent the control unit from becoming lost due to such things as noise spikes or power surges You can use this relay to activate a remote indicator to notify you if the watchdog timer times out In addition the control unit reads the watchdog after reset and beeps for a brief time if the res...

Страница 54: ...rded on Display Line 3 Display Line 3 also shows the order in which events are recorded into the log with number 1 indicating the most recent entry into the log The system is able to store the 20 most recent entries in this exception log Pressing the Down Arrow Key shows later exception log entries Pressing the Up Arrow Key shows more recent exception log entries Press Cancel at any time to exit t...

Страница 55: ... Cal Gas Value CALIBRATE KEY Figure 5 1 Calibrate Key menu options Oxygen alarms are disabled during calibrations including the recov ery time after a calibration For analog outputs you can set whether they should follow the calibration readings or hold at the last process reading see Chapter 4 NOTE ...

Страница 56: ...lues until they are equal Span vs Zero Gas The span gas is the high calibration gas The zero gas is the low calibration gas For verify operations only one gas is used Overview Calibrate Key Function Options Initiate Cal Start an automatic remote or manual calibration Initiate Verify Start an automatic remote or manual verify Cal Verify Data View latest calibration and verify data Cal Gas Values En...

Страница 57: ... flow rate to 150 sccm 5 sccm 1 Enter the calibration gas values to match the span and zero calibra tion gases you intend to use to calibrate your system see the Cal Gas Values section later in this chapter for help on how to do this See Chapter 3 for other calibration gas recommendations and cautions 2 From the Calibrate Key menu select Initiate Cal Have you entered the Cal Vrfy values 3 Select C...

Страница 58: ... calibration inlet port of the sensor Also when performing a primary calibration or the first calibration after a primary calibration the reading and the setpoint values often won t match Once the first regular calibration after a primary calibration is performed the readings should be close You are prompted to apply the O2 zero gas to the inlet port of the sensor Inject Zero Gas ENTER to Continue...

Страница 59: ...constant The flow rate must be adjusted again to this constant flow rate when the pump is turned on At this point a five minute calibra tion period will occur The system will display the recovery time remaining Recovery xx xx System Calibrating After the recovery time has elapsed the system returns to monitoring process readings After calibration ensure that the flow rate of your pro cess gas stay...

Страница 60: ...that you can enter the verify value Continue Verify Abort Cal Verify You are prompted to apply the verify gas to the inlet port on the back of the analyzer tubing must be free of oil and dirt Inject Span Verify Gas ENTER to Continue CANCEL to Abort 4 Press Enter when you have applied this verify gas The display then shows the following O2 xx x Set xx x Flow x sccm Press ENTER to Vrfy 5 Adjust the ...

Страница 61: ...zer If you specified a recovery time the system will display the recovery time remaining Recovery xx xx System Verifying After the recovery time has elapsed the system returns to monitoring process readings If during a verify operation the system finds that the verify gas is not within the acceptable range a Verify Failure message will appear on the bottom line of the display and the Service Alarm...

Страница 62: ...from the cal gas The term Span Drift or Zero Drift is the difference between the entered calibration gas value and the cali bration gas values read by the system Both the latest calibration and verification data will be stored in memory 1 From the Calibrate key menu select Cal Verify Data 2 Select Calibration Data or Verify Data If there are minor differences between the values and the difference ...

Страница 63: ... and date or a calibration is needed Verify Data For verify data the display shows the verify gas data Verify Value xx Verify Gas xx Verify Diff xx The term verify value on the display is the value the system read dur ing the verify operation and the term verify gas is the setpoint value entered using the Configure Verify option from the Calibrate key menu The verify difference is the difference b...

Страница 64: ...Calibrate key menu select Cal Gas Value 2 Choose whether you want to use a or ppm gas for the span gas Enter the span gas value Span Gas xx New Value 3 Press Enter If you want to keep the current span gas value un changed press Enter without entering a value 4 Choose whether you want to use a or ppm gas for the zero gas Note if a ppm gas was specified as the span gas in Step 2 above the zero gas m...

Страница 65: ...e current verify gas value un changed press Enter without entering a value 4 Enter the acceptable verify range For example if you enter a verify gas range of 1 and the verify gas value is 10 then the acceptable range is between 11 and 9 If during a verify operation Initiate Verify menu option the system finds that the verify gas is not within the acceptable range a Verify Failure message will appe...

Страница 66: ...als 4 00 AM If the current time is cor rect press Enter without changing the value The date is YY XX ZZ Enter date Mo Da Yr 4 As you type the new date it overwrites the mo da yr text on the display Enter the month the day the year then press Enter If the current date is correct press Enter without changing the value Recovery Duration Define a recovery time so the analyzer can return to reading pro...

Страница 67: ... from the controller and the sensor and the sensor has been al lowed to cool for at least one hour Always wear gloves when working on sensor components System and Error Messages System and error messages appear on the fourth line of the display at three second intervals until the condition is corrected or has ended If there is more than one message the messages will alternate on the display at thr...

Страница 68: ...bration will determine the constants needed for the Nernst equation If you see this message select the Calibrate Key and perform a calibration This message will not clear from the dis play by removing or restoring power to the control unit Cal Verify Aborted The verification was successfully aborted by the system Primary Calibration The system is performing a Primary Calibration The message con ti...

Страница 69: ...librated Wrong carrier gas selected Flow Cal Required This message only appears when the EEPROM has been erased If it appears at any other time it indicates that the flow sensor data or other programming information is corrupt Erase the EEPROM to restore the factory setting Recalibrate the flow sensor as in the Cal Flow Sensor rpocedure in Chapter 4 Memory is Corrupted The control unit s internal ...

Страница 70: ...rted thermocouple Polarity of thermocoouple wires is incorrect Display module failure Backplane board failure If this message is soon followed by a Thermocouple Failure message see that message for troubleshooting instruc tions Thermocouple Failure Indicated sensor temperature falls below 70 C Problems that can cause this error are Open thermocouple Faulty interconnecting wiring Display module fai...

Страница 71: ...and TC on the backplane board To check the continuity of the thermocouple measure resistance across TC and TC on the sensor board The resistance should be less than 5 Ohms If this doesn t solve the problem remove the thermocouple from the sensor and connect a Type K test meter Open Thermocouple Disconnect power to the analyzer Measure across terminals TC and TC on the backplane board with an Ohm m...

Страница 72: ...in 3 TB2 Pin 4 TC TC T C Yellow Lead T C Red Lead TB1 Pin 1 TB1 Pin 2 Furnace Furnace Furnace Lead Furnace Lead No Polarity Calibration Setup Checks Check that the correct calibration gas values have been entered into the analyzer From the Calibrate Key select the Cal Gas Value menu option and check that the calibration gas values entered match the analyzed concentration of the cylinders Calibrati...

Страница 73: ...rnace resistance If no voltage is present at terminal TB1 Pins 1 and 2 on the back plane board check for the DC furnace drive signal at the top of resistor R4 and the anode side side opposite the stripe of diode D1 on the backplane board The furnace drive is a 15 VDC pulse train and depending on the duty cycle of the pulse train the measured voltage will be between 4 and 15 VDC If this furnace sig...

Страница 74: ...ems that might occur with plastic melting the nozzle on hot sensor components Connect a vacuum pump to the outlet of the sensor should not exceed 5 psi and apply a low PPM calibration gas to the inlet of the sensor This pulls the low calibration gas into the sensor Allow the gas to stabilize and then measure the cell millivolts from the front panel display Remove the top cover and spray 100 oxygen...

Страница 75: ...t Furnace Replacement Pump Replacement Transformer Replacement Backplane Board Replacement Display Keypad Module Replacement Unplug the power cord from the power source and the analyzer when servicing system components High voltages are present inside the analyzer when power is applied The furnace is hot even after power has been removed from the analyzer Use caution and wear appropriate gloves if...

Страница 76: ... the knob and keep to insert the new cell 5 Remove the analyzer front panel Push the front panel to the right until it unlatches from the side tab Push to the left until it unlatches from the other side tab 6 Remove the cell clip from the cell using a pair of long nosed pliers see Figure 7 3 for location of cell clip 7 It will be easier to remove the U tube in the next step if you first re move th...

Страница 77: ...ube assembly counterclockwise until you can pull the assembly out of the furnace Push the cell towards the furnace and away from the cell inlet tube until the cell detaches from the cell inlet tube This will allow you to remove the inlet tube assembly from the analyzer Cell Cell O Ring Spacer Cell Contact Clip T Fitting Cell Inlet Tube Silicon Seal Port Connector Swagelok Nut Elbow Fitting Figure ...

Страница 78: ...611KE This cell will come with its own cell O ring 2 Place the spacer directly on the white band of the cell 3 Take the new O ring and slide it over the open end of the cell until it is midway between the white band and this open end 4 Place the cell contact clip over the open end of the cell The easiest way to do this is to lay the contact clip on a flat surface and then place the cell into it En...

Страница 79: ...d tighten the Swagelok nut then use a wrench to tighten an ad ditional one quarter turn Always use a backup wrench when working on sensor plumbing 9 Reconnect the elbow fitting to the inlet tube assembly and tighten until handtight Tighten an addition one quarter turn using a wrench Always use a backup wrench 10 Reconnect the U tube and hand tighten the U tube Swagelok nuts Use a wrench to tighten...

Страница 80: ...of backplane board remove tubing from flow sensor small black box on the left of the backplane board 5 Place a nut driver on the left and right of the furnace Take the nut driver on the left and loosen it until the kep nut can be removed Pull the plate acorn nut and all thread piece out to the right and remove 6 Carefully feed the thermocouple and furnace wires through the hole in the insulation c...

Страница 81: ...eads of Swagelok body Allow the lubricant to dry 2 Insert the thermocouple with Swagelok nut and ferrules into the Swagelok body as far as possible Hand tighten the Swagelok nut Push the thermocouple stop against the Swagelok nut then tighten with a wrench one quarter turn 3 Place the new furnace into the furnace L bracket tighten the furnace cap tive screw Make sure that the furnace sits against ...

Страница 82: ...es to TB1 AC and AC on the backplane board Polarity not required when reconnecting these wires 8 Reconnect the cell assembly as described in the Cell Replacement section 9 Reattach the power plug to the analyzer 10 Turn on the analyzer 11 Recalibrate the analyzer ...

Страница 83: ... the stud on the chassis 6 Remove the four screws and accompanying lockwashers underneath the analyzer that hold the pump to the analyzer Save these screws and lockwashers for installing the new pump 7 Remove the pump 8 Remove the four isolation pads and two kep nuts from the pump Save these to install the new pump Installing the New Pump in the Analyzer 1 Retrieve the new pump PN 38019JE Attach t...

Страница 84: ...7 Reconnect the fittings to the pump tightening until snug until touch ing the top of the pump Ensure that the pump is oriented correctly The inlet tubing shorter length tubing should go into the hole in the pump with the arrow pointing towards the hole The outlet tubing longer length tubing should go into the hole with the arrow pointing away from the hole 8 Place the top cover back on the analyz...

Страница 85: ...nplug J3 connector from the transformer 4 Unplug J7 connector from the backplane board You will need to do this to make room to remove the transformer 5 Remove the four screws the four shoulder washers and the four lock washers on the top of the transformer using a flat blade screwdriver Keep the screws and washers to insert into the new transformer 6 Remove the transformer and retrieve the new tr...

Страница 86: ...and TB1 AC AC 5 Remove J3 J4 J5 J6 and J7 connections 6 Remove the front panel and flow knob on the front panel 7 Remove the power supply and display modules see the applicable section in this appendix for help 8 Remove the two screws on the solder side of the backplane board where the backplane board is connected to the chassis 9 Take a screwdriver and loosen the screws on the bottom and top of p...

Страница 87: ...Parts Replacement 7 13 Figure 7 5 CG1000 main components ...

Страница 88: ...knob on the front of the analyzer To do this Insert a 05 allen wrench into the slot in the flow knob and turn counterclockwise to loosen it Remove the spring beneath the knob and keep for when you reinsert the flow knob 5 Remove the analyzer front panel To do this push the front panel to the right until it unlatches from the side tab then push to the left until it unlatches from the other side tab...

Страница 89: ...mmunication transfer There is one master on the communication line but there can be multiple sensors act ing as slaves Up to 32 sensors can be connected on one network Command Message Format The command message format is as follows Start Character Node Address Command Letter Data Checksum End Character ASCII charac ter 3E Hex 2 Hex ASCII char acters 00 to FF See Command Section for list of command...

Страница 90: ...as two hex ASCII characters Each sensor has a unique node address Note however that the maximum number of sensors that can be connected on the network is 32 and for the gateway we have limited the valid addresses from 01 32 The Command Letter is from ASCII A Z upper case only Data is a string of characters whose meaning depends on the command see below and where the number of characters returned a...

Страница 91: ... H This command sets a value in the analyzer The data section of this com mand is a two digit hex number 00 FF to point to the location to write from the variable table followed by the value of the variable A simple acknowledge is returned if the command was accepted Read Date and Time M This command is used to read the dates and times stored in the analyzer The data consists of a single digit whe...

Страница 92: ... Format J This command is used to check how data is output through the serial link For each variable that is accessible through the Read Number and Write Number commands a string is returned that describes the format of the number This response data consists of three characters Format Access Location Where Format is F Float H Hexadecimal U Unsigned decimal Access is as follows r read only w write ...

Страница 93: ...et Date and Time Responses An analyzer returns a variety of responses that can be broken into two categories success and failure Success All successful responses start with an A If there is data returned it will follow the A and have a checksum after it All responses end with a car riage return Success End A Success Data Checksum End Character A n characters 2 hex ASCII characters Examples A Simpl...

Страница 94: ...rn Failure Failure Code End Character N 2 hex ASCII characters Failure Codes are as follows Failure Code Description 01 Bad command letter 02 Bad checksum 03 Input overrun in serial communication 05 Parameter out of range 08 Error in receipt of a character 09 Cannot calibrate verify now 0A Internal error 0B Illegal access read only variable ...

Страница 95: ... Pending 6 Auto Verify Pending 5 System Calibrating 4 System Verifying Cal 3 Calibration Aborted 2 Cal Verify Aborted 1 T C Comp Failure 0 Thermocouple Failure Byte 2 bit 7 Calibration Required 6 Excessive Cal Error 5 Memory is Corrupted 4 Primary Calibration 3 Span Gas Range Error 2 Zero Gas Range Error 1 Cell is Over Temp 0 Temp Rise Failure Byte 3 bit 7 Available 6 Available 5 Available 4 Avail...

Страница 96: ...7 Future use 6 0 4 20 ma 1 0 20 ma 5 0 holds during verify 1 tracks during verify 4 0 holds during cal 1 tracks during cal Analog Output 1 3 Future use 2 0 4 20 ma 1 0 20 ma 1 0 holds during verify 1 tracks during verify 0 0 holds during cal 1 tracks during cal Byte 2 bit Analog Output 2 7 Future use 6 0 4 20 ma 1 0 20 ma 5 0 holds during verify 1 tracks during verify 4 0 holds during cal 1 tracks...

Страница 97: ... mV FLOAT 0E Current Output 1 function INT 0 Oxygen 2 Cell Temperature 4 T C mV 6 Cell mV 0F Current Output 2 function INT Same as Command letter 0E 12 Current Output 1 20mA SP FLOAT 13 Current Output 1 4 mA SP FLOAT 14 Current Output 2 20mA SP FLOAT 15 Current Output 2 4 mA SP FLOAT 1A Current Output 1 filter INT 0 100 1B Current Output 2 filter INT 0 100 1E Alarm 3 SP FLOAT In ppm See command 6C...

Страница 98: ... 2 Thermal cal 3 Normal operation 61 Alarm Flags HEX Bit 15 Future use 14 Future use 13 Future use 12 Future use 11 Future use 10 Future use 9 Flow low alarm 1 8 Flow high alarm 1 7 Future use 6 Future use 5 Future use 4 Future use 3 oxygen low alarm 2 2 oxygen high alarm 2 1 oxygen low alarm 1 0 oxygen high alarm1 69 Oxygen FLOAT Oxygen value in ppm 6A Alarm3_flg HEX 1 Alarm 3 is in ppm 0 Alarm 3...

Страница 99: ...rature User Text Pressure Turn Off Password Enter password System Tests Various System Serial Serial Manufacturing Primary Calibrate Perform a primary calibration Sensor Configure regular Hydrocarbon Upset Communication Baud Rate Node Address Enable Disable Pump Turn Pump On Turn Pump Off Carrier Gas Nitrogen Carbon Dioxide Helium Argon Table B 1 Setup Key menu ...

Страница 100: ...erify Gas acceptable range Set Clock Set time date Define recovery time duration after a calibration Table B 2 Calibrate Key menu Alarm Key Menu Alarm Key Menu Menu Options Alarm Set Points Alarm 3 Value Alarm 4 Value Alarm Configure for Alarms 3 and 4 High O2 Alarm Low O2 Alarm High fLOW Low Flow Relay Configure Energize on alarm De Energize on alarm Select Function applies to Alarm 3 only O2 Sta...

Страница 101: ...d Hold output at last process reading during calibration Track calibration readings during calibration Set Current Mode 4 to 20 mA 0 to 20 mA Output Filtering Enter output filter value 100 no filtering 1 maximum filtering Select Function O2 Cell Temperature Thermocouple Millivolts Cell Millivolts Table B 4 Analog Range Key menu ...

Страница 102: ...B 4 Thermox CG1000 Oxygen Analyzer This page intentionally left blank ...

Отзывы: