8 - 1
User Guide
LMG MkII
Signal Processor
8
Upgrading from LMG MkI to LMG MkII
The LMG MkII is designed to easily replace an existing old LMG already
installed
8.1 Upgrade Procedure
1) Unplug the old LMG and remove from control panel
2) Install LMG MkII in exisiting panel cut out and secure
3) Reconnect existing connectors (except power)
4) Either – Connect in an exisiting 24V dc power supply (see 2.2.6)
OR – wire in the 24Vdc DIN rail PSU supplied (see 2.2.7)
5) Configure the LMG MkII using the menu system to match the old set up.
8.2 Differences & Similarities
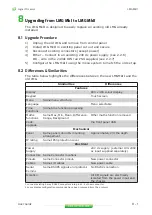
The table below highlights the differences between the new LMGMkII and the
old LMG
Similarities
Differences
Features
Display
800 x 480 colour display
Keypad
Touch screen
Menu
Same menu structure
Language
Menu selectable
Time
Functions
Same time function processing
Maths
functions
Same Max, Min, Mean, Difference,
Range, Background
Other maths function removed
Code
upgrade
Via front panel USB
Mechanical
Panel
Same panel cut-out & mounting
arrangement
Approximately 2/3 the depth
IP rating
Same IP65 protection cover
Electrical
Power
Supply
24 V dc supply (external 100-240V
ac input supplied separately)
Connectors Same Connector locations
Pinouts
Same Connector pinout
1
New power connector
Cables
Same I/O cables
New power cable
Serial
Comms
Same RS485 signals and protocol
2
No RS232 connection
Isolation
All I/O signals are electrically
isolated from the power input and
the chassis
1 connect existing 5 way RS485 connectors into pins 2-6 of new connector
2 some display configuration commands have been removed from the protocol
Содержание LMG MkII
Страница 6: ...INTRODUCTION 1 ...
Страница 10: ...INSTALLING THE PROCESSOR 2 ...
Страница 14: ...User Guide 2 4 Signal Processor LMG MkII Fig 2 4 LMG MkII Electrical System Overview ...
Страница 22: ...3 USING THE PROCESSOR ...
Страница 44: ...TIME FUNCTION PROCESSING 4 ...
Страница 50: ...SERIAL COMMUNICATIONS 5 ...
Страница 62: ...Signal Processor LMG MkII Blank ...
Страница 63: ...EXTERNAL I O MATHS FUNCTIONS 6 ...
Страница 64: ...Signal Processor LMG MkII Screws A Fig 6 1 Location of screws on back panel Screws A ...
Страница 88: ...MAINTENANCE 7 ...
Страница 92: ...User Guide 7 4 Signal Processor LMG MkII Fig 7 3 USB Export Data option ...
Страница 94: ...UPGRADING FROM LMG MkI TO LMG MkII 8 ...

