background image

StorTrends® 1300 Set Up Guide 

3

Rack Mounting Considerations 


Feature Description 

Ambient Operating 
Temperature 

If installed in a closed or multi-unit rack assembly, the ambient 
operating temperature of the rack environment may be greater than 
the ambient temperature of the room. Therefore, consideration 
should be given to installing the equipment in an environment 
compatible with the manufacturer’s maximum rated ambient 
temperature (Tmra). 

Reduced Airflow 

Equipment should be mounted into a rack so that the amount of 
airflow required for safe operation is not compromised. 

Mechanical Loading 

Equipment should be mounted into a rack so that a hazardous 
condition does not arise due to uneven mechanical loading. 

Circuit Overloading 

Consideration should be given to the connection of the equipment to 
the power supply circuitry and the effect that any possible 
overloading of circuits might have on overcurrent protection and 
power supply wiring. Appropriate consideration of equipment 
nameplate ratings should be used when addressing this concern. 

Reliable Ground 

A reliable ground must be maintained at all times. To ensure this, the 
rack itself should be grounded. Particular attention should be given 
to power supply connections other than the direct connections to the 
branch circuit (for example, the use of power strips, and so on.). 


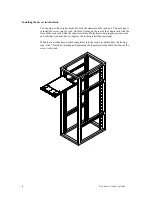
Installing the System into a Rack 

 
This section provides information on installing the StorTrends 1300 into a rack with the 
rack rails provided. If the StorTrends 1300 has already been mounted into a rack, you can 
skip this step.  
 
There are a variety of rack units on the market that may mean the assembly procedure 
will differ slightly. You should also refer to the installation instructions that came with 
the rack unit you are using. 
 

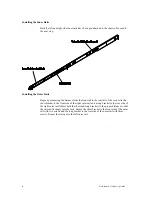
Identifying the Sections of the Rack Rails 

 
You should have received two rack rail assemblies in the rack mounting kit. Each 
assembly consists of two sections: an inner fixed chassis rail that secures directly to the 
server chassis and an outer fixed rack rail that secures directly to the rack itself. Two 
pairs of short brackets to be used on the front side of the outer rails are also included. 

Содержание StorTrends 1300

Страница 1: ...he order given should enable you to have the system operational within a minimal amount of time Note Follow the steps in the order given to complete the installation process in a minimal amount of tim...

Страница 2: ...ack resting on them In a single rack installation stabilizers should be attached to the rack In multiple rack installations the racks should be coupled together Always make sure the rack is stable bef...

Страница 3: ...pment nameplate ratings should be used when addressing this concern Reliable Ground A reliable ground must be maintained at all times To ensure this the rack itself should be grounded Particular atten...

Страница 4: ...ear rail of the rack Attach a short bracket to the front side of the right outer rail and a long bracket to the rear side of the right outer rail Adjust both the short and long brackets to the proper...

Страница 5: ...ons The first is to lock the server into place when installed and pushed fully into the rack which is its normal position Secondly these tabs also lock the server in place when fully extended from the...

Страница 6: ...ining up the rear of the chassis rails with the front of the rack rails Slide the chassis rails into the rack rails keeping the pressure even on both sides you may have to depress the locking tabs whe...

Страница 7: ...er will extend out the front of the rack Larger chassis should be positioned to balance the weight between the front and the back If a bezel is included on your server remove it Attach the two front b...

Страница 8: ...er from the chassis to gain full access to the inside of the server To remove the system from the rack completely depress the locking tabs in the chassis rails push the right side tab down and the lef...

Страница 9: ...StorTrends 1300 Set Up Guide 9 Accessing the Inside of the System...

Страница 10: ...drives Depending upon your system s configuration your system may have one or more drives already installed Step 4 Check the airflow Airflow is provided by three sets of 4 cm fans each set of fans con...

Страница 11: ...k Cable s to both the NIC ports or to just one of them located on the back of the server 4 Connect your keyboard and monitor Plug your keyboard and monitor to the proper ports located on the back of t...

Страница 12: ...owing screen Write down the IP Address listed in the Ip Address field If you have both NICs connected to your network there will be two IP Addresses STOP Once again WRITE DOWN the IP Address listed in...

Страница 13: ...ser name itxadmin Default password password Note When you login using the default itxadmin password you have full administrative powers It is advised that once you login you change the password Both t...

Страница 14: ...allows you to configure the email alerts settings in order to receive notifications on disk failures volume events system and hardware events Note You MUST have an email server setup on your network t...

Страница 15: ...e list Information Check this box to trigger an email notification to be sent whenever an informational event is recorded An Information event can be an event such as a system reboot Warning Check thi...

Страница 16: ...enerated A default NAS Share is also automatically created In the Quick and Easy Setup Wizard the SAN and NAS Volumes are configured to use Exact Provisioning Twenty percent of the physically availabl...

Страница 17: ...0 RAID 1 RAID 5 This step will create a Logical disk and a storage pool from all the physical hard disk drives available in the system controller with the RAID type you specify Note Once you select N...

Страница 18: ...are provided with the following options Only SAN Only NAS Both SAN and NAS If you want your Storage Appliance to be used for block level storage only select Only SAN If you want your Storage Appliance...

Страница 19: ...mes cannot exceed the available physical space due to the fact that they are both using Exact Provisioning by default Click Next Note You can use the slider bar to adjust the size of each Volume type...

Страница 20: ...that you have entered Note You can change the default names for volumes and containers at this point Also note that uppercase characters are not allowed in target names Additionally if you are planni...

Страница 21: ...StorTrends 1300 Set Up Guide 21 Do not close the window or click anywhere else until the operation completes...

Страница 22: ...StorTrends 1300 Set Up Guide 22 Step Six All Done No Errors STOP YOU SHOULD NOW BE UP AND RUNNING ALL THE OTHER SECTIONS CAN BE SKIPPED...

Страница 23: ...The Advanced Setup Wizard allows you to have more control of the storage being configured Step One Advanced Wizard If the storage has not been configured on your Storage Appliance you will be prompted...

Страница 24: ...pture above is from a 3U unit By default the 1U units do not display this screen because the 1U units do not use hardware RAID The 1U units only support RAID 0 RAID 1 RAID 5 and RAID 1n However if you...

Страница 25: ...StorTrends 1300 Set Up Guide 25 Step Three Select Pool Select the Disks Select the Disks that you want to use in your Storage Pool...

Страница 26: ...Keep in mind that your hardware RAID controller may not be fully supported Type in your Storage Pool s name Type in a Storage Pool Name Note The Storage Pool Name must be alphanumeric not have any spa...

Страница 27: ...is section allows you to configure a SAN Volume and a SAN Target on to the Storage Appliance If you have configured this storage appliance as a NAS Only unit SKIP THIS STEP and go to Step Five Configu...

Страница 28: ...nter a name for your SAN Volume The SAN Volume Name must be alphanumeric not have any spaces and be between one and 63 characters in length Enter Volume Size In the Enter Volume Size field enter the s...

Страница 29: ...n the actual physical size of the storage device For example if the storage device has an actual physical size of 500 GB the user can assign a size of up to 256 TB per box Based on the consumption of...

Страница 30: ...Enter a name for your Target The Target Name must be alphanumeric not have any spaces and be between one and 63 characters in length Uppercase characters are not allowed in target names Note If you ar...

Страница 31: ...ou to configure a NAS Volume and a NAS Share on to the Storage Appliance If you only want to configure this storage appliance as a SAN Only unit SKIP THIS STEP by clicking the Finish button and go to...

Страница 32: ...he case of the 1U is not typically done because the 1U unit usually ships with all drive bays occupied If you select Thin the volume can be assigned a size greater than the actual physical size of the...

Страница 33: ...re at this time otherwise click the Add button and continue on to the next step If you want to create a NAS Share now in the Share Name field enter a unique name for your NAS Share The NAS Share Name...

Страница 34: ...When you are finished adding your Volumes click the Finish button A summary will appear Your Storage Appliance will be automatically configured based on the values that you have entered Do not close...

Страница 35: ...StorTrends 1300 Set Up Guide 35 Step Seven All Done No Errors STOP YOU SHOULD NOW BE UP AND RUNNING...

Отзывы: