Amcrest NVR11H Series Скачать руководство пользователя страница 40

Motion Detection & Recording Setup 


Setting up motion detection and email alerts 


37 


This does not mean that you now have to log into a second, separate email account just 
to see your email alerts - because this email will forward all your email alerts to your 
personal email. Regardless, it is still recommended to save your email and password 
information for this new Gmail account.  
 
Start by making sure the box is checked next to 

Enable

. Then, enter the 

SMTP Server


which, for Gmail

, is: “smtp.gmail.com”. The port number will be: “465”.  

 
In the 

Username

 field, enter your new Gmail 

account‟s address. For example: 

[email protected]

”. Then, enter the password for this account in the 

Password

 field.  

 
In the 

Receiver 

field, enter your own personal email account‟s address. For example: 

[email protected]

”. 


Note

: In the above example, the Receiver and Sender


fields have the same email 

address. You can do this as well. However, it is recommended to enter your personal 
email in the Receiver field.  
 
Then, enter your new Gmail account address in the 

Sender

 field. For example: 

[email protected]

”.  

 
Make sure the box is checked next to 

Attachment

. Then, make sure 

SSL

 is selected in 

the 

Encrypt Type

 field.  

 
Finally, click 

Apply

 in the bottom-right of this window to save all your settings.  
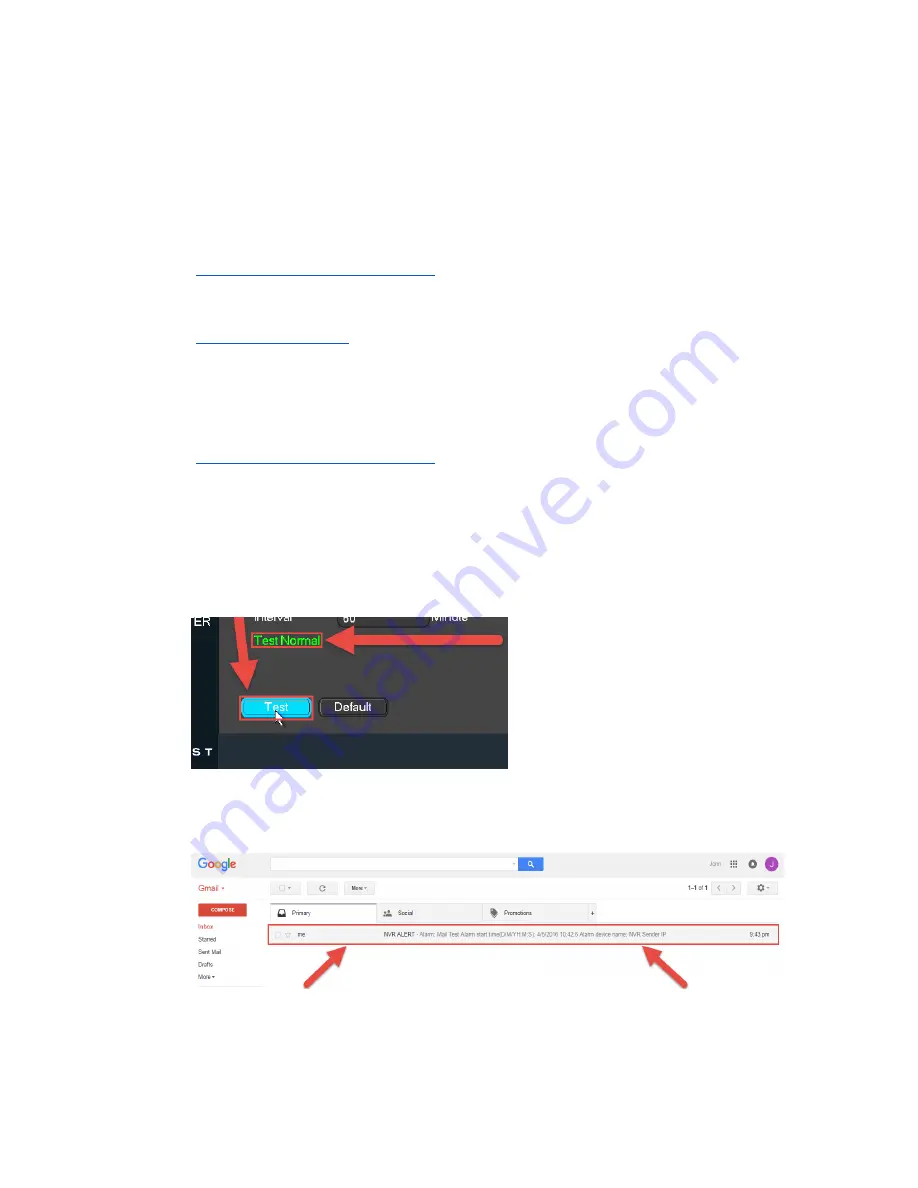
 

13. 

Now, we want to make sure the email setup is working properly. To do this, click 

Test

 in the bottom-left:  


If the setup was successful, you will get the 

Test Normal 

message after clicking 

Test

.  


14. 

Next, check your new Gmail account to see if you received the email test: 


Содержание NVR11H Series

Страница 1: ...NVR Quick Start Guide Version 4 0 7 Revised July 21st 2016...

Страница 2: ...ter Access Setup 38 Amcrest IP Config Software method 39 Built in interface method 43 Installing the Amcrest browser plugin 44 Setting up NVR Local Access home or business 45 Setting up NVR Remote Acc...

Страница 3: ...cing the battery please make sure you are using the same model Check Packaging When you receive the NVR system in the packaging unpack it and check all sides of the NVR to see if there is any physical...

Страница 4: ...e to alert you 3 HDD HDD status indicator light When an HDD error occurs or the HDD capacity is below the specified threshold this LED becomes blue to alert you 4 NET Network status indicator light Wh...

Страница 5: ...n one window monitoring push this button to display additional functions such as PTZ control and image color Backspace function in numeric text control press Fn for 1 5 seconds to delete the character...

Страница 6: ...ral Assistant function such as PTZ menu In text mode input number 1 4 English character G H I Left 2 Right 3 Shift current activated control When playback click these buttons to control playback bar I...

Страница 7: ...l playback or pause mode click this button to reverse playback In reverse playback click this button to pause playback In text mode input number 6 English character M N O Play Next 9 In playback mode...

Страница 8: ...41H 8P Series 5 Rear Panel NVR11H 11H P 41H 8P Series The NVR11H 41H rear panel is shown as in Figure 3 Figure 3 The NVR11H P panel is shown as in Figure 4 Figure 4 The NVR41H 8P rear panel is shown...

Страница 9: ...MI High Definition Multimedia Interface port High definition audio and video signal output port It transmits uncompressed high definition video and multiple channel data to the HDMI port of the displa...

Страница 10: ...audio signal to devices such as the sound box Bidirectional talk output Audio output on 1 window video monitor Audio output on 1 window video playback 8 PoE Power over Ethernet port Built in switch th...

Страница 11: ...st be installed in this NVR in order to record or save any footage If no hard drive is installed you can only use the live view functionality of this NVR which means you still can use the mobile app o...

Страница 12: ...cable connections 9 3 Connect an Ethernet cable to your router Then connect the other end of the cable to the NVR 4 Connect cameras to power a For PoE NVRs cameras connect an Ethernet cable to the Po...

Страница 13: ...the other end of the Ethernet cable to a PoE port on the NVR Note PoE cameras can either be powered with a PoE connection or with a standard power adapter sold separately b For non PoE NVRs cameras Co...

Страница 14: ...ardware Setup Setting up the cable connections 11 Then plug the adapter into a wall outlet or power strip 5 Connect the NVR s power pin attached to the brick into the power port on the back of the NVR...

Страница 15: ...re using a VGA cable 1 Connect your NVR to a computer monitor or TV screen with a VGA cable the HDMI cable should not be connected during this process 2 Boot up your NVR When the interface loads you w...

Страница 16: ...Hardware Setup Setting up the cable connections 13 Display Settings Screen...

Страница 17: ...NVR including playing back previously recorded footage The NVR has connections for only 1 hard drive inside the case and the hard drive must be no bigger than 4TB Terabytes In order to install your ha...

Страница 18: ...llation 15 Once the hard drive is installed boot your system and for any cameras that are configured to be recording you will see the following recording icon appear in the bottom left corner of the l...

Страница 19: ...r a new password into the New Password field then enter your new password one more time into the Confirm Password field to confirm it Please note that the system consists of two accounts out of the bo...

Страница 20: ...time period the system will set off an alarm After five login failures the account will be locked The next screen that comes up is the GENERAL settings screen Make sure to click the tabs at the top fo...

Страница 21: ...he camera from the results list then clicking Add or by using the Manual Add function Otherwise ignore this screen for now as the adding of both WiFi and PoE cameras will be covered later on in this g...

Страница 22: ...the Finished button at the bottom of the screen Once the setup process is finished and you have clicked the Finished button you should see the below dialog box Click OK to continue and the next screen...

Страница 23: ...version information INFO NETWORK View information about the network or test the network status INFO EVENT Display information about events that triggered recording INFO LOG Display system logs of crit...

Страница 24: ...first time all within the NVR s interface for instant access to the live video streams Using the device search method Before beginning this process make sure that the cameras you are trying to add ha...

Страница 25: ...k connected devices 6 From the list choose the IP address for the camera you want to add Then mark the check box to the left of the list item for that camera and click Add 7 The selected list item wil...

Страница 26: ...password to be able to pull the stream through In order to access the camera s interface to change the username and password please refer to the manufacturer s documentation for that camera Once fini...

Страница 27: ...ould be followed after all steps in the above Using the device search method process have been followed and completed 1 Once your device has been added to the Added Device table click the pencil icon...

Страница 28: ...Setup Adding ONVIF cameras 25 When finished click Save down below 4 This will take you back to the previous Remote Remote Device Search page Make sure to click Apply before leaving this page by clicki...

Страница 29: ...Once purchased separately for hard drive installation instructions please refer to part 3 of this guide Hardware Setup Hard drive installation The following setup processes will be shown using the NVR...

Страница 30: ...rdings to happen 4 To choose a channel or camera for which to configure the recording schedules click the number next to Channel then select either a single channel or All 5 By default the NVR will ha...

Страница 31: ...h block represents one hour Click the trash can icon to the right of any day to clear the entire row of all green blocks 6 To add or remove motion detection blocks to the grid mark the checkbox next t...

Страница 32: ...Another way to configure recording schedules is by using setting the time periods Click the gear icon to the far right of any day to open the Time Period page Here the periods Periods 1 6 must be in s...

Страница 33: ...1 will be selected when you visit this page Unless you immediately selected All in the channel window from step 4 above note that you can copy these settings directly over to another channel by click...

Страница 34: ...rd drive installed 1 Log into your NVR with your username and password 2 Open the MAIN MENU then click EVENT in the SETTINGS row 3 Make sure you are on the DETECT MotionDetect page This is the main co...

Страница 35: ...ons to configure sensitivity and threshold settings as well as to choose from up to four regions Sensitivity is the measure of how many pixels on the screen need to change before being considered moti...

Страница 36: ...to 100 and threshold to 0 motion detection will be triggered most easily by almost any change in the field of view large or small But if sensitivity is set to 0 and threshold to 100 motion detection w...

Страница 37: ...e by clicking Setup next to Period The Period Setup page works very similarly to the recording schedule page featured in the previous section in part 5 of this guide Motion Detection Recording Setup S...

Страница 38: ...all the settings made on this page 10 Click the STORAGE tab on the top row then click SCHEDULE Snapshot to get to the snapshot schedule settings page Here you can set up the snapshot schedule just li...

Страница 39: ...L from the left navigation panel The recommended method for this step is to create a new Gmail account that is dedicated to sending you email alert snapshots for motion detection This is useful becaus...

Страница 40: ...n the Password field In the Receiver field enter your own personal email account s address For example myemail website com Note In the above example the Receiver and Sender fields have the same email...

Страница 41: ...e connected to the same network as your NVR home office etc Remote Access Logging into your NVR s web interface from a computer or laptop device connected to a network outside of your home or business...

Страница 42: ...By using the NVR on your computer through a web browser you need to introduce a new piece of software that allows your computer to understand the language that the NVR speaks in a way that a computer...

Страница 43: ...s folder and click it to open the installer 5 You will be asked to allow this program to make changes to your computer with a pop up window click Yes 6 Once you see the first page of the installer wiz...

Страница 44: ...indows Security Alert popup click Allow access 9 This brings you to the main screen of Amcrest IP Config Software Your NVR will automatically be found on your network and appear in the list if properl...

Страница 45: ...address and use your computer s default web browser to access and log into your NVR If your default browser is not Internet Explorer you can write down the IP address from the Amcrest IP Config Softw...

Страница 46: ...de 2 Left click on the main 4 window screen to access the Main Menu or right click and choose it from the list 3 Click the Network icon in the third bottom most row to the right of Settings 4 On the N...

Страница 47: ...write down will be correct Installing the Amcrest browser plugin Once you ve followed one of the above methods to get to the login screen for the NVR follow the below steps to install the browser plug...

Страница 48: ...e NVR through the Amcrest web interface the most common method To view a video on how to setup the NVR for local access on a computer laptop go to http amcrest com videos click the Videos tab then fin...

Страница 49: ...and Play UPnP and Dynamic Domain Name Server DDNS functionality is the easiest way to setup stable remote access For this method your router should support the UPnP networking protocol and the protoco...

Страница 50: ...TTINGS row 2 From the left hand navigation panel click CONNECTION then locate the HTTP port on the right It is recommended to ensure the port number is at least 5 digits long to prevent any port confl...

Страница 51: ...ext click DDNS from the left navigation panel check the Enable checkbox then click Apply on the bottom right 7 Write down the entire Domain Name field including the white text that says quickddns com...

Страница 52: ...at appears click into the number fields next to Internal Port and External Port to change them to the same port number that was chosen in step 2 above e g 12345 Then click OK 10 Once back to the previ...

Страница 53: ...ow this guide for more information on what to do next 13 Open a web browser and enter in the DDNS domain name address from step 7 enter in a colon without quotes then type the port number from step 2...

Страница 54: ...4 Write the URL correctly When using Internet Explorer it is crucial to write the NVR s remote access URL correctly Some versions of Internet Explorer will not automatically include the http prefix t...

Страница 55: ...etup for PC Port Forwarding Note This is NOT an HDCVI system it is an NVR However the same exact procedure as shown in the video applies 8 Still not working Please contact Amcrest Support via one of t...

Страница 56: ...the left hand list is blue otherwise the live video feed will not show You can also control PTZ and image settings here as well as view cameras in full screen Playback This tab allows for playback of...

Страница 57: ...up as well as a manual network setup For purposes of this guide we will use Amcrest View Pro which is free on both the App Store and Play Store Before the NVR can be accessed through the app using the...

Страница 58: ...Amcrest View App Setup Enabling P2P on the NVR 55 4 Exit out of the main menu then come back to the P2P SETTING page and confirm that the Status is Connected...

Страница 59: ...continue the app setup process for an Android phone and though the iPhone version of the app has slightly different steps most of this process is identical and easy 1 On your Android device locate an...

Страница 60: ...Amcrest View App Setup Amcrest View Pro Setup 57 3 Tap Install to begin installation 4 Tap Accept on the next screen...

Страница 61: ...st View App Setup Amcrest View Pro Setup 58 5 When finished installing tap Open to launch the app You will see some screens appear 6 When it shows the screens with arrows you can swipe them out of the...

Страница 62: ...tup Amcrest View Pro Setup 59 7 Now you should see the home screen of your app Tap the icon in the top right to get to the Device List 8 Tap the icon in the top right of this window to get to the Conn...

Страница 63: ...Amcrest View App Setup Amcrest View Pro Setup 60 9 Select P2P Setup from the list to get to the P2P Setup main page 10 Name your device this can be any name you want...

Страница 64: ...R scan recommended method easier Tap the QR code icon in the far right of the S N field and it will activate your smartphone s camera Note the QR code will only scan if positioned entirely inside the...

Страница 65: ...P2P Setup page where you will notice that the serial number has been automatically populated in the S N field Entering serial number manually technical method harder In order to locate your serial nu...

Страница 66: ...tting up the app after gaining local access with a computer log into the web interface with your username and password Then click the i button in the top right of the screen Make sure you are on the V...

Страница 67: ...the default username admin and password admin will work and you will be prompted to change your password Note You may not see any cameras if this is your first setup method even though you will have...

Страница 68: ...nabled on the NVR It will be enabled by default To confirm P2P is enabled log into the main console built in interface for your NVR and select Network from the Main Menu in the Settings row Then click...

Страница 69: ...recordings etc Clicking the Menu Icon on the top left hand corner will open the menu for this app and it should look like the image below on the right Live Preview is the default screen that the app...

Страница 70: ...of accessing your NVR using AmcrestView com the user method registering an account for login and the device method instant direct access using the serial number Both of these methods require that the...

Страница 71: ...pted by the browser to install the plugin Click Run 5 You may be prompted to verify this download This software is not harmful to your computer and will not make any unwanted changes To verify start b...

Страница 72: ...mpt it will say the install was successful and ask you to restart your browser Click OK 9 You will be taken back to the login page and see another notification from your browser asking you to allow th...

Страница 73: ...lick Allow Now the plugin has been installed successfully and you can continue on to register for an account for NVR access through AmcrestView com User method The user method requires that you first...

Страница 74: ...your Username Password then Confirm Password type your Email enter the Verification Code make sure the box is checked confirming you ve read the Amcrest Terms of Service then click Create an Account...

Страница 75: ...lick the confirmation email from AmcrestView com 4 Once you ve opened the email click the confirmation link inside to complete your registration 5 You will be taken back to AmcrestView com and shown c...

Страница 76: ...eb Portal Setup User method 73 6 You will be taken back to the login screen Enter your new AmcrestView com username and password then click Login 7 A popup will appear from your Windows Firewall Click...

Страница 77: ...your NVR or through the web interface Please refer to part 6 of this guide Amcrest View App Setup Entering serial number manually technical method harder Enter your username and password for the NVR n...

Страница 78: ...12 You will be taken to the live view page and given a notification to allow the plugin to pull the video feed through here Click the small arrow to the right of Allow then click Allow for all websit...

Страница 79: ...channel list Click the small square icon to enable your feed for an added camera to see the video feed Click the S to change it to an M which stands for Main Stream and will give you a full HD quality...

Страница 80: ...which is covered above but can be done with only the NVR s login credentials and the serial number 1 On the main login screen for AmcrestView com click the Device tab 2 Enter your NVR s S N serial nu...

Страница 81: ...u will see a notification from your browser asking you to allow the plugin Click the small arrow to the right of Allow then click Allow for all websites 4 You will see a popup asking you to confirm th...

Страница 82: ...is a channel list Click the small square icon to enable your feed for an added camera to see the video feed Click the S to change it to an M which stands for Main Stream and will give you a full HD qu...

Страница 83: ...ive view section can be accessed by both registered users and those accessing their NVRs using the device method covered above Device list section The device list section has 3 main tabs The first is...

Страница 84: ...mail and enable email notifications from AmcrestView com The last tab for the device list section is the CHANGE PASSWORD tab Here you can change your password Live view section The live view section i...

Страница 85: ...ever you will need to have a hard drive installed and recordings properly configured in order to view the playback 8 References Contact Information For a detailed operational introduction please refer...

Отзывы: