Operating
111
0000010040-002- GB
Operating
Fitting a milling tool
In order to use a milling tool (max. cutting width 20mm), first proceed as descri-
bed in point 1-8 in the previous section.
Then proceed as follows:
1.
Remove the riving knife, cushioning disc and screws in the centre table
strip
2.
Remove the front part of the centre table strip
3.
Place the milling cutter and front flange onto the saw shaft, turn in the
expansion-head screw by hand and tighten it with the wrench.
4.
Retract the riving knife block completely and tighten the clamping screw of
the riving knife holding fixture
5.
Close the red protective cover and perform a short test run to see whether
the milling cutter is running freely. Do this by lowering the top protection
hood down to the table so that the milling cutter is completely covered.
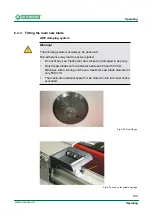
Fig. 6-27
See point 1
Warning!
When returning to normal processing with a saw blade, adhere to the fol-
lowing:
Non-adherence to these points may lead to severe injuries of the opera-
tor!
•
Reinsert the disassembled centre table strip; only use original brass
screws for fastening
•
Reinstall the cushioning disc
•
Reinstall and correctly adjust the riving knife
Содержание ElmoDrive F45
Страница 8: ...Identification 8 Identification 0000010040 002 GB EC prototype testing certificate ...
Страница 9: ...Identification 9 0000010040 002 GB Identification ...
Страница 10: ...Identification 10 Identification 0000010040 002 GB GS test certificate ...
Страница 11: ...Identification 11 0000010040 002 GB Identification ...
Страница 12: ...Identification 12 Identification 0000010040 002 GB DGUV Test Certificate ...
Страница 13: ...Identification 13 0000010040 002 GB Identification ...
Страница 14: ...Identification 14 Identification 0000010040 002 GB C US Certificate ...
Страница 39: ...Definitions 39 0000010040 002 GB Definitions ...
Страница 116: ...Operating 116 Operating 0000010040 002 GB Fig 6 32 ELMO II start screen ...
Страница 117: ...Operating 117 0000010040 002 GB Operating Fig 6 33 Start screen Fig 6 34 Start screen tilting in both directions ...
Страница 123: ...Operating 123 0000010040 002 GB Operating 6 4 3 Tilt adjustment Fig 6 40 Tilt adjustment_ElmoDrive tilting to one side ...
Страница 124: ...Operating 124 Operating 0000010040 002 GB Fig 6 41 Tilt adjustment_ElmoDrive tilting to both sides ...
Страница 144: ...Operating 144 Operating 0000010040 002 GB Press the Cal button for 3 seconds Enter the new value Fig 6 62 Fig 6 63 ...
Страница 147: ...Operating 147 0000010040 002 GB Operating Fig 6 68 Switches for saw drives ...
Страница 152: ...Operating 152 Operating 0000010040 002 GB 6 4 10 Menu Fig 6 72 Main menu ...
Страница 171: ...Operating 171 0000010040 002 GB Operating Fig 6 92 Geometric shapes triangle Fig 6 93 Axis function mapped in ...
Страница 172: ...Operating 172 Operating 0000010040 002 GB Fig 6 94 Geometric shapes trapezoid Fig 6 95 Geometric shapes pentagon ...
Страница 180: ...Operating 180 Operating 0000010040 002 GB Fig 6 104 Entering saw blade thickness Fig 6 105 Input of a rotational speed ...
Страница 213: ...Operating 213 0000010040 002 GB Operating i Note For information on how to handle batteries see chapter 3 6 4 ...
Страница 247: ...Cleaning care 247 0000010040 002 GB Cleaning care i Note No relubrication of the saw shaft is necessary ...

