background image

19

-EN

Set your favourite source to the FAV button 
(FAV SETUP)

You can set a favourite source to the FAV button by following steps. 
Once this is set, you can switch to favourite source directly by pressing 

FAV

.

1

Press and hold 

FAV

 for at least 2 seconds to activate FAV 

setup mode.

2

Turn the 

Rotary encoder

 to select a favourite source, and 

then press 



ENTER

.

The favourite source is set.

Notes

• If you do not want to use this function, select “OFF”.
• If no operation is performed for 10 seconds, the unit automatically 

returns to normal mode.

Once a source is set to FAV button, press 

FAV

 to recall the 

source directly.

Note

• Depending on the setting, even though you set a source to FAV, it may 

not be available, For example, when you set AUX as your favourite 
source and OFF is set in “Setting the AUX SETUP Mode” (refer to 
“Setting the AUX SETUP Mode” on page 21), the AUX source will not 
be recalled by pressing 

FAV

.

Setting

You can flexibly customize the unit to suit your own preferences and 
usage. From the SETUP menu, GENERAL Setting, DISPLAY Setting, 
etc., can be modified.

1

Press and hold 

AUDIO

SETUP

 for at least 2 seconds to 

activate the SETUP mode.

2

Turn the 

Rotary encoder

 to select the desired item, and 

then press 



ENTER

.

BLUETOOTH

*1


 GENERAL 

 AUDIO

*2


 DISPLAY 

 TUNER 


iPod & USB

(e.g. Select GENERAL)

BLUETOOTH:

BT IN 

 BT MENU

*3

GENERAL:

FAV SETUP

*4


 PLAY MODE 

 INT MUTE

*5


 AUX-R SET 


AUX-R NAME

*6


 AUX SETUP 

 AUX NAME

*7


 AUX GAIN

*7


 AUX-R GAIN

*6


 AUX MIX

*7


 CYRILLIC 

 POWER IC 


DEMO

DISPLAY:

ILLUMINATI 

 SCROLLTYPE 

 TEXT SCR

TUNER:

RDS REG

*8


 PI SEEK

*9


 ALARM

*10


 FM-LEVEL

iPod & USB:

USB SEARCH 

 USB SKIP

*1

Displayed only when INT MUTE is set to OFF, and the mode is 
set to other than BT AUDIO.

*2

Refer to “Sound Setting” on page 16.

*3

Not displayed when BT IN is set to OFF.

*4

You can also set this in “Set your favourite source to the FAV 
button (FAV SETUP)” (refer to “Set your favourite source to the 
FAV button (FAV SETUP)” on page 19).

*5

Displayed only when BT IN is OFF.

*6

Displayed only when AUX-R SET is set to ON.

*7

Displayed only when AUX SETUP is set to ON.

*8

Refer to “Receiving RDS Regional (Local) Stations” on page 11.

*9

Refer to “PI SEEK Setting” on page 11.

*10

Refer to “Setting PTY31 (Emergency Broadcast) reception” on 
page 11.

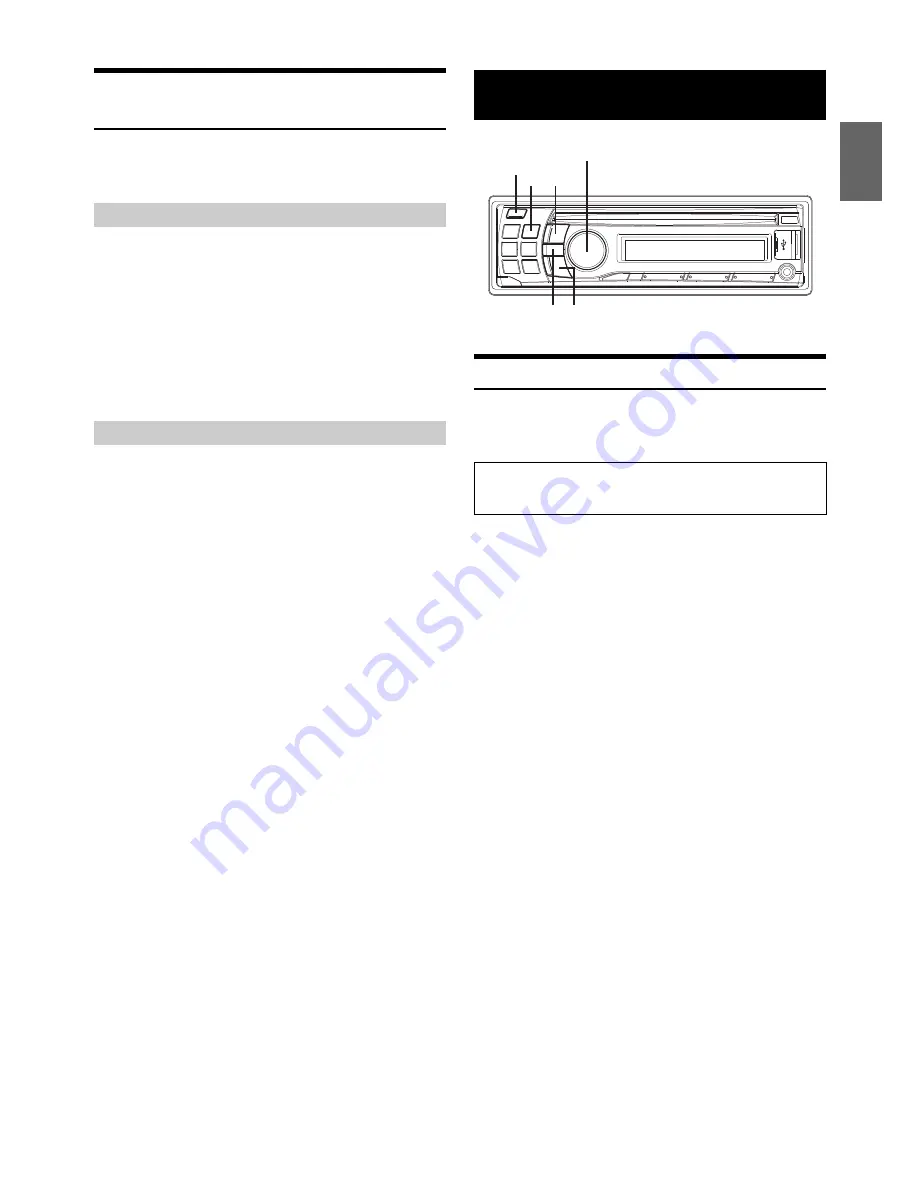
Set your favourite source

Recall your favourite source

SETUP

Use steps 1 to 5 to select one of the SETUP modes to modify. 
See the applicable section below for details about the 
selected SETUP item.

Rotary encoder/ 

/ENTER

AUDIO/SETUP

FAV

Содержание CDE-123R

Страница 1: ...e il attrezzatura ΕΓΧΕΙΡΙΔΙΟ ΧΡΗΣΤΗ Παρακαλούμε διαβάστε το πριν χρησιμοποιήσετε τη συσκευή ALPINE ELECTRONICS MARKETING INC 1 1 8 Nishi Gotanda Shinagawa ku Tokyo 141 0031 Japan Phone 03 5496 8231 ALPINE ELECTRONICS OF AMERICA INC 19145 Gramercy Place Torrance California 90501 U S A Phone 1 800 ALPINE 1 1 800 257 4631 ALPINE ELECTRONICS OF CANADA INC 777 Supertest Road Toronto Ontario M3J 2M9 Can...

Страница 2: ......

Страница 3: ...ofer Level Bass Level Mid Level Treble Level Balance Between Left and Right Fader Between Front and Rear AUX Mix Level Loudness Defeat 15 Sound Setting 16 Equalizer Presets FACTORY EQ 16 Adjusting the Parametric Equalizer Curve 3BAND EQ 16 Setting the Bass Control 16 Setting the Mid Control 16 Setting the Treble Control 17 Adjusting the High Pass Filter 17 Turning Subwoofer ON OFF 17 Adjusting the...

Страница 4: ...26 Alphabet Skip Function Tag search mode only 26 Quick Search 26 Search Position Memory 26 iPod iPhone optional Connecting an iPod iPhone 27 Setting the iPod Control 27 Playback 27 Searching for a desired Song 27 Direct Search Function 28 Select Playlist Artist Album Genre Composer Episode 28 Alphabet Skip Function 28 Search Position Memory 29 Random Play Shuffle M I X 29 Repeat Play 29 Displayin...

Страница 5: ...t instructions Failure to heed them can result in injury or material property damage HALT USE IMMEDIATELY IF A PROBLEM APPEARS Failure to do so may cause personal injury or damage to the product Return it to your authorized Alpine dealer or the nearest Alpine Service Centre for repairing PRECAUTIONS Product Cleaning Use a soft dry cloth for periodic cleaning of the product For more severe stains p...

Страница 6: ...h accessories can cause the disc to be out of standard specifications and may create operational problems We recommend not using these accessories on discs played in Alpine CD players On handling Compact Discs CD CD R CD RW Do not touch the surface Do not expose the disc to direct sunlight Do not affix stickers or labels Clean the disc when it is dusty Make sure that there are no bumps around the ...

Страница 7: ...oroughly Fix the Portable audio player in a location where driver operation will not be hindered Portable audio player may not function correctly at high or low temperature Depending on the settings of the Portable audio player type memory state or encoding software the unit may not play back or display properly If the Portable audio player has an MSC MTP setting set to MTP A Portable audio player...

Страница 8: ...ou can recall your favourite source by pressing FAV directly For details refer to Set your favourite source to the FAV button FAV SETUP on page 19 Detaching and Attaching the Front Panel 1 Turn off the unit power 2 Press e Release at the lower left side until the front panel pops out 3 Grasp the left side of the front panel and pull it out Notes The front panel may become hot in normal usage espec...

Страница 9: ...ode Both strong and weak stations will be automatically tuned in Automatic Seek Tuning Local mode Only strong stations will be automatically tuned in Automatic Seek Tuning Manual mode The frequency is manually tuned in steps Manual tuning 4 Press or to tune in the desired station Holding down or will change the frequency continuously Presetting Stations Manually While receiving the station that yo...

Страница 10: ...quency Note Press in the search mode to cancel Or the search mode will be cancelled if no operation is performed for 10 seconds Turning AF Alternative Frequencies ON OFF The RDS Radio Data System is a radio information system using the 57 kHz subcarrier of regular FM broadcast The RDS allows you to receive a variety of information such as traffic information station names and to automatically re t...

Страница 11: ...ncoder to select ALARM and then press ENTER 4 Turn the Rotary encoder to select ON or OFF If you set to ON emergency broadcasts are received regardless of source ALARM is displayed during reception 5 Press and hold AUDIO SETUP for at least 2 seconds to return to normal mode When an emergency broadcast is received the volume level will be automatically changed to the memorized level in the traffic ...

Страница 12: ...n broadcast began When traffic information stations cannot be received In the CD mode When the TP signal can no longer be received the traffic information station of another frequency will be selected automatically Note The receiver is equipped with the EON Enhanced Other Networks function in order to keep track of additional alternate frequencies to the AF list If the station being received does ...

Страница 13: ...les in a folder are repeatedly played back MP3 WMA AAC mode only 2 To cancel repeat play select off with the above procedure M I X Random Play 1 Press 5s The songs are played back in random sequence s 1 s ALL 2 off s 1 Only files in a folder are played back in random sequence MP3 WMA AAC mode only 2 The tracks files are played back in random sequence 2 To cancel M I X play select off with the abov...

Страница 14: ...o data WMA is similar to MP3 audio data and can achieve CD quality sound with small file sizes What is AAC AAC is the abbreviation for Advanced Audio Coding and is a basic format of audio compression used by MPEG2 or MPEG4 Method for creating MP3 WMA AAC files Audio data is compressed using software with MP3 WMA AAC codecs For details on creating MP3 WMA AAC files refer to the user s manual for th...

Страница 15: ...rmation such as track titles artist names album names etc written into MP3 WMA AAC files Root folder The root folder or root directory is found at the top of the file system The root folder contains all folders and files It is created automatically for all burned discs Adjusting Subwoofer Level Bass Level Mid Level Treble Level Balance Between Left and Right Fader Between Front and Rear AUX Mix Le...

Страница 16: ...ng value and then press ENTER 3 Press to return to the previous step Setting the Bass Bandwidth WIDTH Q Turn the Rotary encoder to select the desired bass bandwidth WIDE 0 50 MEDIUM 1 00 MEDIUM 1 50 NARROW 2 00 Changes the boosted bass bandwidth to wide or narrow A wider setting will boost a wide range of frequencies above and below the centre frequency A narrower setting will boost only frequenci...

Страница 17: ... subwoofer output level refer to Adjusting Subwoofer Level Bass Level Mid Level Treble Level Balance Between Left and Right Fader Between Front and Rear AUX Mix Level Loudness Defeat on page 15 Setting item SUBWOOFER Setting contents ON Initial setting OFF ON The subwoofer signal is output from the Subwoofer RCA Connectors refer to Connections on page 36 OFF No subwoofer signal is output from the ...

Страница 18: ...track name Such text information is referred to as text Notes Some characters may not be displayed correctly with this device depending on the character type NO SUPPORT is displayed when the desired text information cannot be displayed on this unit The text or tag information may not be correctly displayed depending on the contents Using the Front AUX Input Terminal Connect a portable music player...

Страница 19: ...ds to activate the SETUP mode 2 Turn the Rotary encoder to select the desired item and then press ENTER BLUETOOTH 1 GENERAL AUDIO 2 DISPLAY TUNER iPod USB e g Select GENERAL BLUETOOTH BT IN BT MENU 3 GENERAL FAV SETUP 4 PLAY MODE INT MUTE 5 AUX R SET AUX R NAME 6 AUX SETUP AUX NAME 7 AUX GAIN 7 AUX R GAIN 6 AUX MIX 7 CYRILLIC POWER IC DEMO DISPLAY ILLUMINATI SCROLLTYPE TEXT SCR TUNER RDS REG 8 PI ...

Страница 20: ... Phone Menu recorded for the last dialed received missed calls and Phone Book Voice Dial will be changed depending on this setting When BT MENU is set to ENGLISH the Phone Menu is displayed as VOICE DIAL DIALLED RECEIVED MISSED PHONE BOOK When BT MENU is set to DEUTSCH the Phone Menu is displayed as SPRACHWAHL GEWAEHLT ANGENOMMEN VERPASST TEL BUCH When BT MENU is set to FRANCAIS the Phone Menu is ...

Страница 21: ...the audio of an external device such as a Portable audio player to the AUX connector of this unit Setting item AUX SETUP Setting contents ON Initial setting OFF ON Set to ON when a portable device is connected If SOURCE is pressed and AUX is selected the sound of the portable device is input to the unit You can change the AUX NAME display when AUX SETUP is set to ON Press ENTER when AUX SETUP is s...

Страница 22: ...ing six buttons SOURCE FAV BAND and Setting item ILLUMINATI Setting contents ILUM TYPE1 Initial setting TYPE2 TYPE3 TYPE4 TYPE1 When the colour of the six buttons is blue the colour of the other is red TYPE2 When the colour of the six buttons is green the colour of the other is green TYPE3 When the colour of the six buttons is amber the colour of the other is red TYPE4 When the colour of the six b...

Страница 23: ...u can skip over designated folders files by pressing For example if you select 10FILE in the Explorer FILE NAME searching mode by pressing you can skip forward 10 folders files from the current folder file by pressing you can skip backward 10 folders files from the current folder file If the folders files searched are less than the assigned skipped over ones pressing will skip to the first or last...

Страница 24: ...es every 1 000 songs stored in USB Memory Portable audio player into individual banks to make searching and playing back a song easier A maximum of 1 000 songs for one bank can be stored according to the order stored in USB Memory Portable audio player A maximum of 20 banks 20 000 songs can be recognized Playback 1 Press SOURCE to select the USB mode Depending on which USB Connector you used press...

Страница 25: ...xcept Song and File hierarchy all songs of the selected hierarchy are played back Even if the songs belong to the same playlist they may be saved as different BANK After selecting ALL in the Tag search mode with press and hold ENTER for at least 2 seconds to play back all songs in the selected search mode While in the search mode if you press and hold for at least 2 seconds or no operation is perf...

Страница 26: ...r to select the desired Playlist Artist Album Genre Composer Folder This item is invalid when a portable audio player is connected Notes If the song search mode was used to select a song this function is inactive If an album is selected during an artist search other albums by that artist are searchable For Flash Memory this function is inactive during M I X ALL M I X song playback For Portable aud...

Страница 27: ...iPod nano 1st generation Ver 1 3 1 Confirmed devices regarding Made for iPhone Correct function of earlier versions cannot be guaranteed iPhone 4 Ver 4 2 1 iPhone 3GS Ver 4 2 1 iPhone 3G Ver 4 2 1 iPhone Ver 3 1 3 For clarity in identifying your model of iPod please see Apple s own document Identifying iPod models at http support apple com kb HT1353 This unit does not support video playback from i...

Страница 28: ...the iPod iPhone podcast search is not supported If any one of the preset buttons 1 through 6 is pressed in the search mode a search can be made quickly by skipping to the specified location For details refer to Direct Search Function on page 28 Direct Search Function The unit s direct search function can be used to search for an album song etc more efficiently In PLAYLIST ARTIST ALBUM SONG PODCAST...

Страница 29: ...g does not play back again until all songs have been played back 1 Press 6 The songs are played back in random sequence s ALL off s ALL Shuffle ALL 2 To cancel M I X play select off with the above procedure Notes If Shuffle ALL is selected the selected songs being played back in the search mode are cancelled This function is unavailable when iPod is selected in Setting the iPod Control refer to Se...

Страница 30: ...not possible A CD is already in the CD player Eject the CD and remove it The CD is being improperly inserted Make sure the CD is being inserted following instructions in the CD Player Operation section Unable to fast forward or backward the CD The CD has been damaged Eject the CD and discard it using a damaged CD in your unit can cause damage to the mechanism CD playback sound skips due to vibrati...

Страница 31: ... to the USB connector device You can solve the problem by switching the source No song file is stored in the Flash Memory Portable audio player Connect the Flash Memory device Portable audio player after storing songs files A sampling rate bit rate not supported by the unit is used Use a sampling rate bit rate that is supported by the unit A copy protected WMA file was played back You can only pla...

Страница 32: ... Distortion 0 008 at 1 kHz Dynamic Range 95 dB at 1 kHz Signal to Noise Ratio 105 dB Channel Separation 85 dB at 1 kHz USB requirements USB 1 1 2 0 Max Power Consumption 500 mA USB Class Mass Storage File System FAT 12 16 32 MP3 Decoding MPEG 1 2 AUDIO Layer 3 WMA Decoding Windows Media Audio AAC Decoding AAC LC format m4a file Number of Channels 2 Channel Stereo Frequency Response 5 20 000 Hz 1 d...

Страница 33: ...specified accessory parts Use of other than designated parts may damage this unit internally or may not securely install the unit in place This may cause parts to become loose resulting in hazards or product failure ARRANGE THE WIRING SO IT IS NOT CRIMPED OR PINCHED BY A SHARP METAL EDGE Route the cables and wiring away from moving parts like the seat rails or sharp or pointed edges This will prev...

Страница 34: ...ssis installing location 3 Slide the CDE 123R into the dashboard When the unit is in place make sure the locking pins are fully seated in the down position This can be done by pressing firmly in on the unit while pushing the locking pin down with a small screwdriver This ensures that the unit is properly locked and will not accidentally come out from the dashboard Install the detachable front pane...

Страница 35: ...he iPod iPhone in a vehicle for a long time Heat and humidity may damage the iPod iPhone and you may not be able to play it again Connect USB Memory Connect the USB cable to the Rear USB connector of the unit and then secure the connection using the lock case supplied with USB cable as shown below Remove USB Memory Pull out USB Memory squarely from the USB cable Notes When removing USB Memory pull...

Страница 36: ...ntenna ISO Antenna Plug JASO Antenna Plug Pink Black To vehicle phone Blue White To amplifier To the instrument cluster illumination lead Red To power antenna Black Ignition Key Blue Orange Yellow Battery Speakers Green Rear left Green Black White Front left White Black Grey Black Front right Grey Violet Black Rear right Violet Speakers Rear left Amplifier Rear right Front left Amplifier Front rig...

Страница 37: ...tenna Do not use this lead to turn on an amplifier or a signal processor etc Dimmer Lead Orange This lead may be connected to the vehicle s instrument cluster illumination lead This will enable the vehicle s dimmer control to dim the backlighting of the unit Battery Lead Yellow Connect this lead to the positive post of the vehicle s battery ISO Power Supply Connector ISO Connector Speaker Output L...

Отзывы: