


1
2
3
1
2
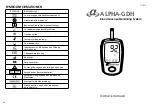
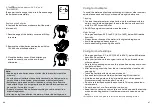
Lancet Holder
Ejector
Cap
Adjustable
Tip
Depth Indicator
Drop
Release Button
Cocking
Control
Locking
device
Locking notice
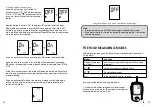
teStinG With BLOOD SAMPLe
Overview of the Lancing Device
If your lancing device differs from the one shown here, please refer
to the manufacturer’s manual to ensure proper usage.
note:
To reduce the chance of infection:
• Never share a lancet or the lancing device.
• Always use a new, sterile lancet. Lancets are for single use only.
• Avoid getting hand lotion, oils, dirt, or debris in or on the lancets
and the lancing device.
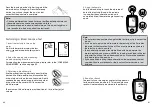
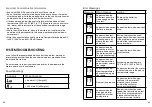
Setting up the Lancing Device
1. pull off the cap of the lancing device.
2. Insert a lancet into the lancet holder and push
down firmly until it is fully secured.
3. Twist the protective disk off the lancet.
4. Replace the cap by aligning the arrow on
the cap with the release button.
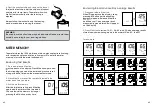
5. Select the depth of penetration by turning the
adjustable tip in either direction so that the ar-
row on the cap points to the desired depth.
6. pull the cocking control back until it clicks.
You will see a color change inside the release
button when it is ready.
If it does not click, the device may have been cocked when the lancet
was inserted.
the lancing device is now ready for use. Set aside for later use.
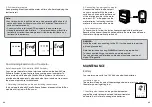
Preparing the Puncture Site
Stimulating blood perfusion by rubbing the puncture site before blood
extraction has a significant influence on the glucose value obtained.
Please follow the suggestions below before obtaining a drop of blood:
• Wash and dry your hands before starting.
• Select the puncture site at fingertips.
• Clean the puncture site using cotton moistened with 70% alcohol
and let it air dry.
• Rub the puncture site for about 20 seconds before penetration.
• Fingertip testing.
58
59


