background image

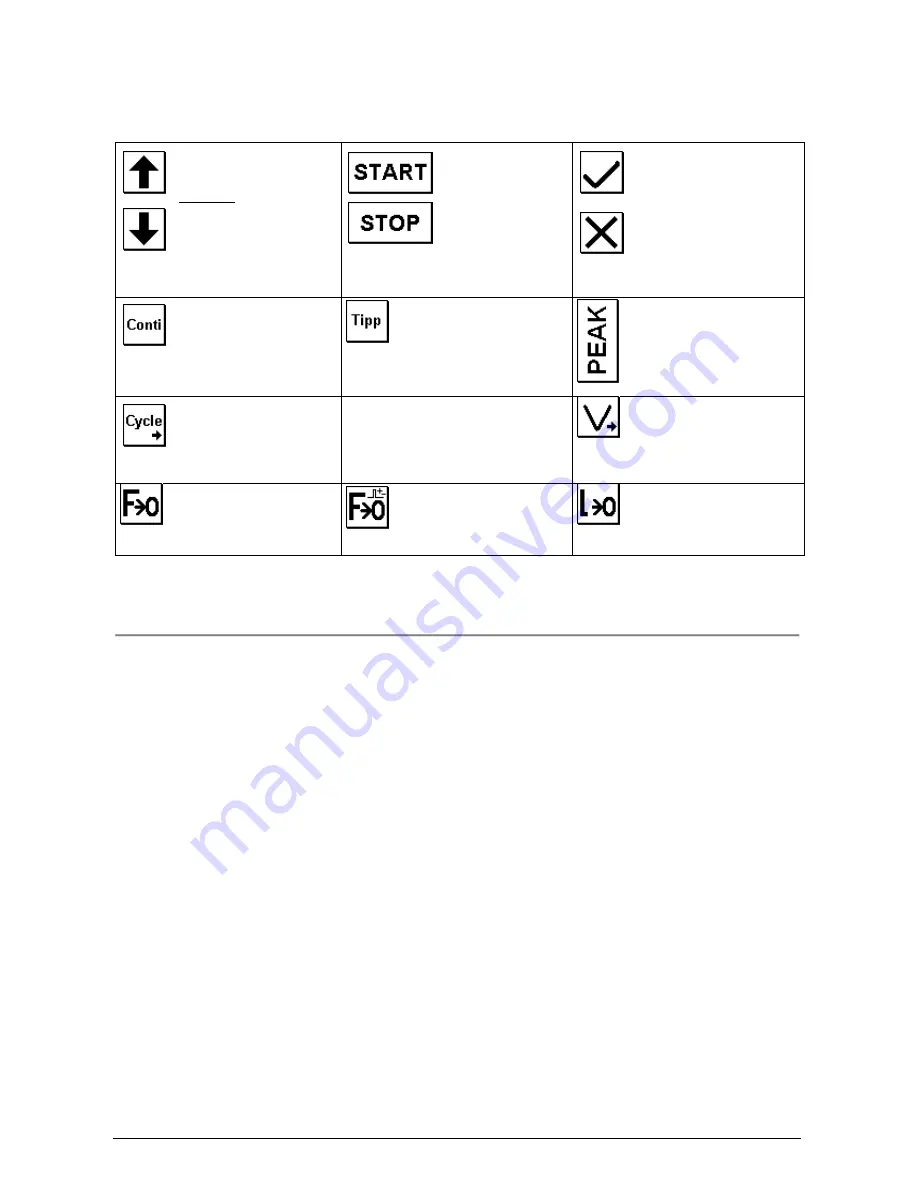
4.2.2. Handling arrows to control the test stand 


Guide 

To guide upwards or downwards 
within the manual mode. 
ATTENTION: The same arrows, at 
the  right  boarder  of  the  screen, 
serve for the menu navigation.


Start 

or 

Stop 

arrow 

To initiate, abort or stopp 
the  test  run  within  the 
manual mode. 

Acknowledgement key 

By pressing this key you 
acknowledge the indicated 
process. 

Abortion key


By pressing the abbortion key the 
effection  of  the  chosen  process 

gets distorted or  aborted. 


Conti-mode 

Change  from  the  Tipp  to  the 
Conti mode 


Tipp-mode 

Change from the Conti to the Tipp 
mode


Readout  of  the  peak 
values  

By pressing the button the 
currently in the force gauge saved 
values of pressure and tensione 
force values get indicated.


Next cycle 

By  pressing  the  next  go  of  an 
inspection  process  with  various 
cycles gets started. 


Speed levels  

Change  between  the  5  setted 
speed  levels  within  the  manual 

mode. 


Zero setting force 

Removing  the  measured  force 
value on 0 


Cancel the paek values 

Canceling  the  peak  values  within 
the force gauge. 


Zero setting path 

Removing 

the 

measured 

wegelinals on 0. 


5.0 Mode of operation 

5.1 Explanation of instrumentation 

5.1.1 Force measurement 

For  the  force  measurement,  high-precision  measuring  beam  get  used,  their  deflection  during  force 
transmission gets recorded by a extension-measuring tape. The conversion of the analog signals into 
digital form takes places within the load cell. The digital signals of the D/A – converter constitutes 1000 
Hz., the transfer rate to the control unit 100 Hz. 
The  load  cell  gets  imported  and  tared  with  every  restart  of  the  universal  testing  machine. 
Contemporaerly  a  temperature  compensation  takes  place.  Fluctuation  of  temperature  during  the 
operation of the test stand lead to errors of measurement (T

K

=0,02%K). If more intense changes of the 

environmental  conditions  take place during  a  working  day,  it  is  recommendable  to  switch  on and  off 
again  the  instrument  to  adjust  the  load  cell  to  the  compensation  of  the  changed  environmental 
conditions. 
The  load  cell  should  be  checked  at  regular  intervals.  Accordant  to  DIN  ISO  75000  a  calibration  is 
necessary after 12 month, after repairation or after lager backfittings. A change of the load cell, if it has 
been effected duly, does not demand a calibration or adjusting. 
The  calibration  (adjusting)  of  the  load  cell  is  simple  user  effectable  within  the  service-  program  (see 
chapter 6.2.). 


Содержание FMT-310

Страница 1: ...1 Bedienungsanleitung Operation Manual FMT 310 Force Tester BDA Version 1 1 DE ENG ...

Страница 2: ...N 10 5 3 3 PREDEFINED FUNCTIONS 10 5 3 3 1 ZERO POINT SEARCH 11 5 3 3 2 BREAKDETECTION 11 5 3 3 3 FORCE REGULATION 11 5 3 3 4 PATH REGULATION 11 5 3 3 6 HARDNESSGRADE 11 5 3 4 PREDEFINED TEST PROGRAMMS 12 5 3 4 1 BREAK TESTING 1 DIAGRAMM 13 5 3 4 2 BREAK TESTING 2 PEAK VALUES 13 5 3 4 3 BEND TESTING PATH DEPENDING 14 5 3 4 4 ENDURANCE TESTING PRESSURE WITH PRESSURE FORCE REGULATION 15 5 3 4 5 TOW ...

Страница 3: ... only The instrument is equipped with a temperature compensation for 0 40 C Use the instrument in this temperature range only If you effect a material testing during which the material can break or sliver in a way that people the test stand or other instruments in the near could get damaged you have to install protective equipment If you have no protective equipment at your disposal we would be gl...

Страница 4: ...test has been finished succesfully the change to the main menu takes place Press now the button REF it takes place an automatic adjustment of the internal zero reference machine zero For this the load cell gets driven into the highest position After the reference path has been effected succesfully the test stand is ready for use Now you can choose the wanted function within the main menu In depend...

Страница 5: ...agram Break testing 2 Diagram Setting Results Bend testing Path depending Settings Results Diagram Endurance testing Force regulation Settings Results Diagram Tow testing 1 Path depending Settings Results Diagram Tow testing 2 Peak Settings Results Stretch testing 1 Path depending Settings Results Diagram Stretch testing 2 Force regulation Settings Results Diagram Service adjust date time report m...

Страница 6: ...el of menu Scroll To jump line by line within the list of parameters or results ATTENTION within the manual mode the arrows indicate only the movement of the slide per direction List of parameter After pressing the button appearce a list of parameteriseable settings Enter keyboard By pressing the button the input box to change the parameterizeable settings appearse Jump first last line The arrow k...

Страница 7: ...of operation 5 1 Explanation of instrumentation 5 1 1 Force measurement For the force measurement high precision measuring beam get used their deflection during force transmission gets recorded by a extension measuring tape The conversion of the analog signals into digital form takes places within the load cell The digital signals of the D A converter constitutes 1000 Hz the transfer rate to the c...

Страница 8: ...nspection process gets aborted and an infotext display takes place in the lower line of the display The load cells have an additional electronic overload protection which takes effect independently of the setted limits as soon as a damage of the load cell is imminent The control unit tries automatically to take it off into the diametrical direction with a propulsion command Similarly the drive doe...

Страница 9: ...hieved 5 2 4 Ride in the Tipp mode Tipp In the tip mode which gets setted by the mode button the drive gets moved with a preselected speed into the required direction till the button gets released or a limit gets achieved 5 2 5 Indication and reset of the peak values maximum values The absolut maximum values for traction force and compression force get saved within the load cell The two maximum va...

Страница 10: ...ell all parameter sets in all test programms get reset onto the default values to avoid possible damage on the construction If you change the tools in use or the material to check it might be necessary to adjust the parameter to avoid damages on the construction The submenu to regular the parameter gets called by pressing the parameter button 5 3 2 Definition of the valve position Reference positi...

Страница 11: ...ation a predefined force gets kept for kept for a predefined amount of time The drive re enacts automatically the position of the load cell provided that the material property demands this The basic and the driving speed depends of the regulated hardnessgrade of the material Is the hardnessgrade understated it can lead to a consequently overshooting of the regulation Is the hardnessgrade overstate...

Страница 12: ... readings of measurment of force Minimise y axle with readings of measurment of force Enlarge x axle with readings of measurment of length Minimise x axle with readings of measurment of length The recorded force values are placed on the y axle the corrisponding position values on the x axle The scaling of the diagram takes automatically place on the base of the size of the values and the nuber of ...

Страница 13: ...ut on 0 Reference Spee vHome 0 1 mm min 900 0 mm min Hardnessgrade measurment object 0 99 START position HOME position 405 00 Speed bread detection 0 1 mm min 900 0 mm min Force Breakdetection 0 00 100 Speed till break 0 1 mm min 900 0 mm min Force break 0 00 100 5 3 4 2 Break testing 2 Peak values The inspection process serves to appraise the breaking force at various successive tests by pressing...

Страница 14: ...orce and path 9 Automatically the slide gets moved upwards with the speed vHome to the HOME position Adjustable parameter for the test procedure Bend testing path dependend Parameter Permissible range of values Reference Min Max Setpoint position DOWN SP top 405 00mm Absolut on 0 Reference Setpoint position TOP 0 00mm 405 00mm Absolut on 0 Reference Setpoint force PRESSURE 0 N Nominal range of loa...

Страница 15: ...er 6 Engaging of the force regulation and movement of the load cell until achieving the holding force Remaining for the predetermined pause time after the first arrival at the holding force 7 End of the reading record and ride to the Home positionsition Adjustable parameter for the test procedure Load force regulated Parameter Permissible range of values Reference Min Max Setpoint position DOWN SP...

Страница 16: ...d VStart 0 1 mm min 900 0 mm min Force Break detection 0 00 100 Speed break 0 1 mm min 900 0 mm min Force break 0 00 100 5 3 4 6 Tow testing 2 Peak values Like the former one the inspection process serves to appraise the tear out force at a continuous tension at a uniform speed until the break of the measurment Instead of a test serie the peak values and position of the measurment object at the mo...

Страница 17: ...or the pause time T 6 Return for the path_2 absolut relating to 0 position test ATTEND prefix of the way value 7 End of the reading record and return to the HOME position Adjustable parameter for the test procedure Strech testing path depending Parameter Permissible range of values Reference Min Max Setpoint position DOWN SP top 405 00mm Absolut on 0 Reference Setpoint position TOP 0 00mm 405 00mm...

Страница 18: ... deposit too The description of the operation may be described within the enclosure 1 Parameter Zulässiger Wertebereich Reference Min Max Setpoint position DOWN SP top 405 00mm Absolut on 0 Reference Setpoint position TOP 0 00mm 405 00mm Absolut on 0 Reference Setpoint force Pressure 0 N Nominal range of load cell Setpoint force TENSION 0 N Nominal range of load cell HOME position SP top SP down A...

Страница 19: ... becomes activated after the next initiation of the instrument 6 1 2 Password Categorical the servicefunctions are protected by a password You can change these passwords and afterwards not even the Alluris Service is able to access the servicefunctions without a direct interference into the firm ware It s possible to protect the parameters for the corrisponding inspection processes with a user pas...

Страница 20: ...rence has been setted the measurment range of the nominal value gets newly setted by adherencing an adapted reference standard Only when the new values have been exactly averaged out and checked on their plausibility within a width which is predetermined within the force gauge the new settings become assumed Otherwise the old values remain stored After every force calibration it is necessary to sw...

Страница 21: ...memory can be necessary especially if the memory capacity is exhausted Within most of the menues the remaining memory capacity gets indicated within the info line Before cancelling the data you can import them into Exel by the help of the Fmt_Connect_Software in this way you can save them everlasting 7 0 Connection to the PC The Force Tester FMT 310 can be conected to the serial interface of a PC ...

Страница 22: ... x H 400 mm x 300 mm x 900 mm Additional technical data for the test stand with optional equipment may be mentioned within the enclosure 2 9 0 Maintenance 9 1 Linear bearing The linear bearing has to lubricated periodical depending on the frequency of use and the environmental conditions but at least after 6 month Therefore please open the upper bellows on the load cell In front of the drive screw...

Страница 23: ...a comunication mistake between the load cell and the control unit Pleas check if the two cable for the load cell 9 p D Sub switch and M8 sensor connector are correctly connected Switch off the test stand to reset all the functions Try again to initiate the test stand If the load cell is defekt it can be necessary to change the whole force measurment unit see in addition chap 7 4 Our service can re...

Страница 24: ... return it to Alluris for recycling For more information please contact our website www alluris de The compliance to the requirements of all relevant EEC directives is confirmed by the CE marking of the product Calibration Confirmation We hereby confirm in accordance to DIN EN 10204 2 1 that this instrument has been tested in accordance with DIN EN 9000 2000 approved procedures The instrument meet...

Страница 25: ...25 Service Adressen Alluris GmbH Co KG Technischer Service Basler Strasse 63 DE 79100 Freiburg Deutschland Fon 49 0 761 47979 3 Fax 49 0 761 47979 44 service alluris de www alluris de ...

Отзывы: