background image

6

5

4

3

2

1

DRY2756N_SVG1

1

2

4

3

5

6

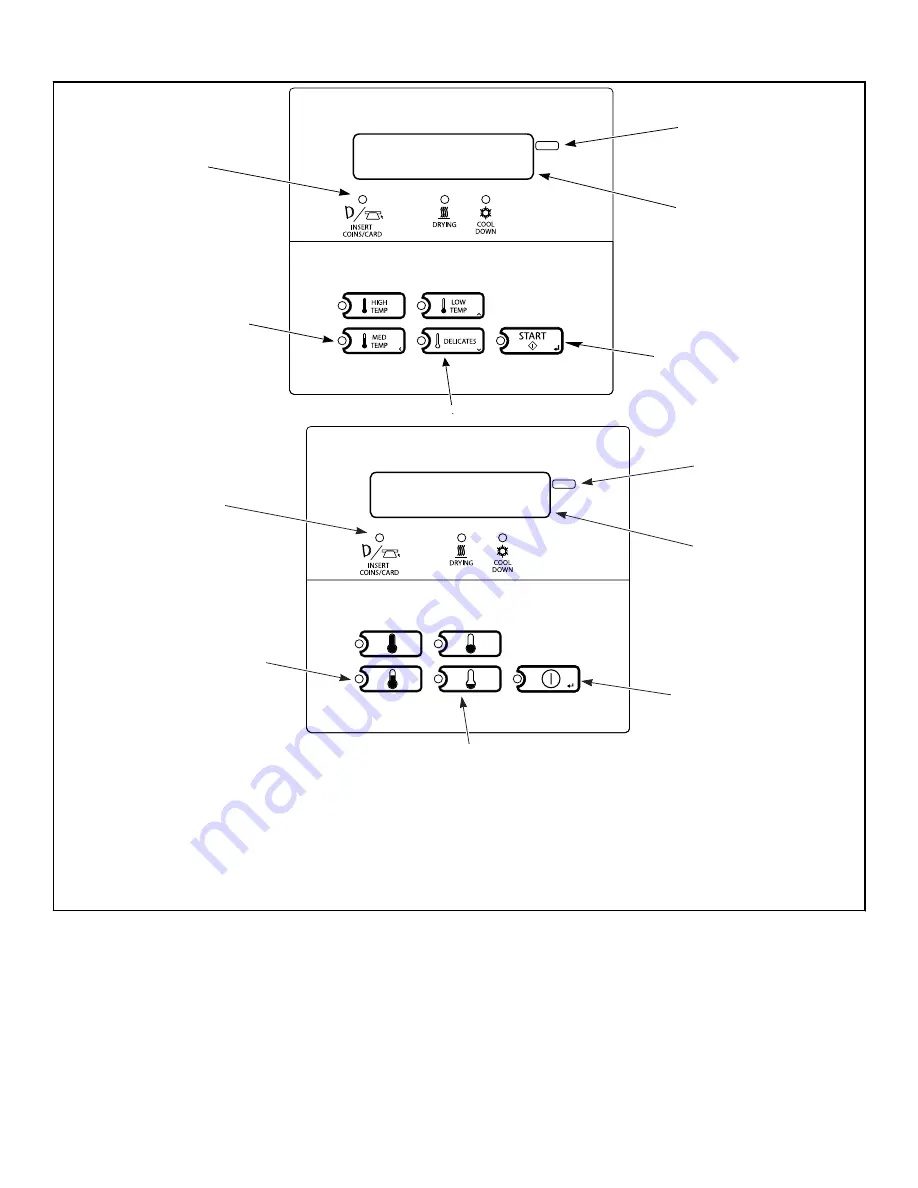
1.  

Display

2.  

7-Segment Digits

3.  

START Pad

4.  

SELECT CYCLE Pads

5.  

LED Light

6.  

LED Status Lights

Figure 1

Control Identification

©

 Copyright, Alliance Laundry Systems LLC -

 DO NOT COPY or TRANSMIT

  10

  Part No. D515810ENR3

Содержание PD3JGBGS403UG01

Страница 1: ...tion DRY2733N_SVG DRY2756N_SVG Original Instructions Keep These Instructions for Future Reference CAUTION Read the instructions before using the machine If this machine changes ownership this manual m...

Страница 2: ......

Страница 3: ...nual are not meant to cover all possi ble conditions and situations that may occur It must be understood that common sense caution and care fulness are factors which cannot be built into these washers...

Страница 4: ...amming Control 12 Collecting Audit Information 12 Testing Machine and Control Functions 12 Rapid Advance Feature 12 Start Pulse Operation 12 Opening the Service Door 13 Stacked Washers and Dryers Stac...

Страница 5: ...unctions 32 How to Enter Testing Feature 32 How to Start Tests 32 How to Exit Testing Feature 32 Diagnostic Test Descriptions 35 Control Software Version Number Test 35 Input Output Board Software Ver...

Страница 6: ...PSEJCAGS174TW01 PSLJXAGW303NG22 PTGJEASP094CG01 PDEJXAGS174CW01 PSEJEAGS284CG01 PTEJCASP174TG01 PTGJEASP095CG01 PDEJXAGS174TG01 PSEJEAGS284CW01 PTEJCASP175TG01 PTGJEASP095CW01 PDEJXAGS174TW01 PSEJXAG...

Страница 7: ...e previ ously active cycle If the length of the power failure is less than the POWER FAIL RESET time and the power failure is greater than 2 seconds or the POWER FAIL RESET is turned off the dryer wil...

Страница 8: ...nter face board which allows the control to be linked to a personal computer This network link allows an owner to program collect data and run diagnostics on any machine For detailed information on ne...

Страница 9: ...e 1 The START pad is used to start the dryer after the full vend price has been satisfied and the dryer door is closed Both the START pad and the SELECT CYCLE pads are used in various combinations for...

Страница 10: ...1 1 2 4 3 5 6 1 Display 2 7 Segment Digits 3 START Pad 4 SELECT CYCLE Pads 5 LED Light 6 LED Status Lights Figure 1 Control Identification Copyright Alliance Laundry Systems LLC DO NOT COPY or TRANSMI...

Страница 11: ...lay The DRYING LED will be lit during the heat portion of a heat cycle The COOL DOWN LED will be lit during the cool down portion of a heat cycle and during an entire no heat cycle When a cycle is com...

Страница 12: ...ersion Number Service Door Opening Test Coin Vault Opening Test Coin Drop 1 Input Test Coin Drop 2 Input Test Vend Header Present Status Test Start Pulse Test Dryer on Temperature Test Door Switch Inp...

Страница 13: ...g the service door or unplugging the bul let connector the programmer has 4 25 minutes to begin pro gramming Refer to Figure 2 for locating the service door W521I_SVG 1 DRY579R_SVG 1 DOOR LOCKED SPIN...

Страница 14: ...the display 7 Press the START enter keypad to enter the displayed mode 8 To exit press the MED TEMP keypad The control will revert back to Ready Mode Manual Programming can only be turned on or off wi...

Страница 15: ...it Press the START enter keypad to read audit Press the START enter keypad to read audit Press the START enter keypad to read audit to C1 Total coin 1 top offs to PLS Total start pulse card reader top...

Страница 16: ...Entering the Man ual Mode 2 Press the LOW TEMP or the DELICATES keypad un til rESEt appears 3 Press the START enter keypad The display will show no Use the LOW TEMP or the DELICATES keypad to change...

Страница 17: ...advanced users a quick reference list of the options available through the programming mode is located on this page NOTE The codes in the Option Display column of the Programmable Options List are wh...

Страница 18: ...Err 1 Coin Error On Off on on oFF 2 CErr 2 Coin Error Penalty On Off oFF on oFF 3 CErr 3 Vend Header Present Error On Off on on oFF b CLrErr Clear Error On Off oFF on oFF 15 Cdt Cooldown Time a Cdt 1...

Страница 19: ...0 Fahrenheit 1 Cel sius 19 rtC Real Time Clock Pa rameters a rtC 1 Set Real Time Clock Minutes 0 59 b rtC 2 Set Real Time Clock Hours 0 23 c rtC 3 Set Real Time Clock Day 1 7 d rtC 4 Set Real Time Clo...

Страница 20: ...6 Special Vend 1 Start Year 0 0 99 g SP1 7 Special Vend 1 Length in Hours 0 0 24 h SP1 8 Special Vend 1 End Date 0 0 oFF 31 i SP1 9 Special Vend 1 End Month 0 0 oFF 12 j SP1 10 Special Vend 1 End Yea...

Страница 21: ...On Off oFF on oFF 27 LPAS 3 Low Power Auto Shut down 3 Days Enable On Off oFF on oFF 28 LPAS 4 Low Power Auto Shut down 4 Days Enable On Off oFF on oFF 29 PF rES Power Fail Reset oFF 0 oFF 120 minute...

Страница 22: ...y On Off on on oFF 38 PodL d Programmable Open Door Lid Display On Off on on oFF 39 AtS do Vend Price Display Override oFF on oFF 40 oPL OPL Parameters a oPL 1 OPL Mode Enable On Off oFF on oFF b oPL...

Страница 23: ...Top Off top 1 Top Off On Off toP 2 Coin 1 Top Off Time Minutes toP 5 Coin 2 Top Off Time Seconds toP 4 Coin 2 Top Off Time Minutes toP 3 Coin 1 Top Off Time Seconds Ats dp Vend Price Decimal Point On...

Страница 24: ...Coin Error On Off CErr 2 Coin Error Penalty On Off CErr 3 Vend Header Present Error On Off CErr Coin Error Parameters CLrErr Clear Error On Off Cdt Cool Down Time Cdt 1 High Temp Cooldown Time Cdt 2...

Страница 25: ...Time Clock Date rtC 5 Set Real Time Clock Month rtC 6 Set Real Time Clock Year continued continued dLS Daylight Saving Parameters dLS 1 Daylight Savings On Off dLS 2 Start Month dLS 3 Start Day of We...

Страница 26: ...ycle Time Minutes SP1 13 Special Vend 1 Heat Cycle Time Seconds SP1 17 Special Vend 1 Coin 1 Topoff Time Minutes SP1 18 SP1 19 SP1 20 DRY615R d_SVG dLS Daylight Savings dLS 5 Start Hour dLS 6 End Mont...

Страница 27: ...ys Enable On Off LPAS 2 Low Power Auto Shutdown 2 Days Enable On Off LPAS 3 Low Power Auto Shutdown 3 Days Enable On Off LPAS 4 Low Power Auto Shutdown 4 Days Enable On Off PF rSt Power Fail Reset irA...

Страница 28: ...Off oPL 3 OPL Display Power Save On Off Figure 9 Heat Vend Price AtS HChanging Vend Price This option allows the owner to set the vend price for a heated cycle This vend price will be shown in the di...

Страница 29: ...minutes or seconds dis played to the desired number of minutes or seconds 8 Press the START enter keypad when the correct number of minutes or seconds appears in the display The new value is saved and...

Страница 30: ...ce displayed will decrease by 25 for each coin entered into coin drop 1 1 Control must be in Manual Mode Refer to Entering the Man ual Mode 2 Press the LOW TEMP or the DELICATES keypad un til Prog app...

Страница 31: ...decrease the value of the active digit and the START enter keypad to enter the value of the digit and ad vance to the next digit 7 Press the START enter keypad with the last active digit The new valu...

Страница 32: ...st be in Manual Mode Refer to Entering the Man ual Mode 3 Press the LOW TEMP or the DELICATES keypad un til diAg appears 4 Press the START enter keypad Display will change to d001 indicating the contr...

Страница 33: ...C SHort or oPEn d 29 Machine Configuration 1 Display Test a xxx d 30 Machine Configuration 2 Display Test b xxx d 31 Machine Configuration 3 Display Test C xxx d 32 Machine Configuration 4 Display Tes...

Страница 34: ...or Temperature Test d 30 Machine Configuration 2 Display Test d 31 To enter a test press the START keypad To exit a test press the MED TEMP keypad d 29 Machine Configuration 1 Display Test d 2 Input O...

Страница 35: ...splay will show v oP when the coin vault switch is open and v CL when the coin vault switch is closed The coin vault switch has to be closed for at least one second and opened for at least a half a se...

Страница 36: ...s pressed the control will display the number assigned to the keypad 1 HIGH TEMP 2 LOW TEMP 3 NO HEAT 4 MED TEMP 5 DELICATES 6 START 4 HIGH TEMP 5 LOW TEMP 7 MED TEMP 8 DELICATES 9 START As each keypa...

Страница 37: ...splay door until the door is closed While this 10 Minute Test Cycle is running the START pad may be used to decrement the remaining cycle time If power to the control is turned off before this test cy...

Страница 38: ...ication failure Re aim external device and try again EI0A Ei0A Framing Error Communication error Re aim external de vice and try again EI0C Ei0C Time out Exceeded Communication error Re aim external d...

Страница 39: ...etwork board ALArn ALm Break in Alarm Error Service the service door or coin vault switches oFF Break in Alarm Shutdown Error Service the service door or coin vault switches Err Coin Error Invalid coi...

Страница 40: ...nd Machine ID chip or try replacing the user control or the Machine ID chip E Co Output Board Communication Communication failure Power down power up and try again If error persists check connection b...

Отзывы: