W 3 S E R I E S
H I G H P R E S S U R E A I R C O M P R E S S O R
©ALKIN COMPRESSORS
31
1.
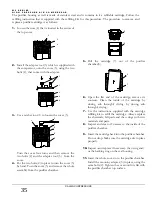
Loosen the valve acorn nuts.
2.
Remove the valve assembly from the covers. Note the manner in which the valve parts are assembled in
order to replace them in the same order and position after cleaning or installing new parts.
3.
The valve parts can be cleaned by light scraping or stiff brushing (do not use a wire brush!). If necessary,
use a non-flammable safety solvent to loosen dirt, oil or carbon deposits.
4.
Discard the worn, scrateched or broken valve discs and springs. Re-assemble the cleaned (or replaced)
valve parts in their place in the reverse sequence of dismantling and in proper position as shown in the
parts manual. Make absolutely sure that the stop plate is centred properly on its guide; otherwise, the valve
will be damaged when it is pulled up tight in the airhead. Replace the beleville washer on the valve bolt and
tighten the nuts to the torque values recommended.
5.
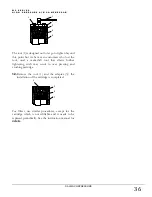
Before replacing the valve in the air head (the two halves of the top cover), scrape the old shellac off the
valve bolt steel washer and coat it with new shellac to prevent air from leaking under the washer. Replace
the acorn nut and tighten it to the lower limit of the torque value, recommended. Do not over tighten this
nut, since this will distort the springs and plates, causing the valve to leak. After the valve has been replaced
in the airhead. Make certain that the valve operates freely by lifting at its edges with a knife blade.
6.
Replace the cover gasket between the two cover valves, and between the head and the cylinders; then
replace the air head asembly. Tighten the air head cap screws to the torque values recommended.
IMPORTANT!
Handle the valve parts with care. Do not nick, scratch or bend them.
5.11.5 Servicing 3
rd
stage valve
The 3
rd
stage valve is plate type valve, made of stainless steel for longer service life and relaible operation. These
stages are under particular stress caused by temperatures and high-pressure rates. They should be periodically
checked and maintained as instructed in the Maintenance Table. Refer to illustration on figure. To disassemble
the remove the 3
rd
stage valve, observe the following step by step procedures:
1.
Remove the airhead from the cylinder and pull the valve out of the head. If the valve assembly is covered
with hard carbon, soak the valve in a suitable carbon solvent overnight to permit easier disassembly.
2.
Remove the snap ring from the valve by prying under its tapered edge with a penknife. Withdraw the
internal parts of the valve and place them on a clean surface in the correct relationship so that the valve
can be properly reassembled.
3.
After disassembly, inspect the condition of all the parts. If theres are no signs of wear, clean the parts or
replace them with new original.
4.
To clean the valve parts use a light brush to brush and scrape. When cleaning valve parts use extreme
care to prevent damaging the parts.
Use new o-rings and gaskets. When reassembling the valve, make sure all parts are replaced exactly as removed
and that new gaskets and “O” rings are used. It is important to install original Alkin “O” rings as these are
made of special high temperature resistant material and ordinary o-rings will be promptly damaged causing
failures
Содержание W3 Series
Страница 1: ...W3 SERIES HIGH PRESSURE AIR COMPRESSORS...
Страница 2: ......
Страница 4: ......
Страница 6: ......
Страница 10: ...W 3 S E R I E S H I G H P R E S S U R E A I R C O M P R E S S O R ALKIN COMPRESSORS 5...
Страница 14: ...W 3 S E R I E S H I G H P R E S S U R E A I R C O M P R E S S O R ALKIN COMPRESSORS 9...
Страница 26: ...W 3 S E R I E S H I G H P R E S S U R E A I R C O M P R E S S O R ALKIN COMPRESSORS 21...
Страница 30: ...W 3 S E R I E S H I G H P R E S S U R E A I R C O M P R E S S O R ALKIN COMPRESSORS 25...

