background image

8

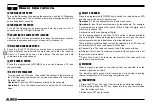
CH Ranging

In standby, if the call contact type for a channel is "Single call" , 

press the key programmed as " Channel Ranging" to turn on this 

function. The radio will automatically start ranging function when 

turn to this channel.

Max VOL Set In standby, press the key programmed as" Max Volume", will 

enable users to set the maximum RX volume.

Slot Set

Choose Slot for current channel, this function is only valid in 

repeater mode.

Aprs Type

Choose analog or digital Aprs Type for current channel.

Zone Select

In standby, press the programmed "Zone Select" key, it will allow 

you input the zone number and then press confirm key will switch 

to the zone.

A CH Mute

Mute the main channel

B CH Mute

Mute the sub channel

Roaming Set Enter into Roaming menu quickly 

APRS Set

Enter into APRS menu quickly

Zone Up

Switch the zone upwardly

Zone Dn

Switch the zone downwardly

Exit

Exit the menu  (only for A-D short press)

Menu

Enter into the menu  (only for A-D short press)

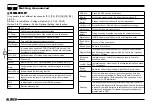
 Hot Key Setting for P1,P2,P3,P4,P5,P6, PA-PD

Call

Analog

Should edit the analog quick call first, then choose analog 

in the hot key set. Press the key to transmit 2Tone/5Tone/

DTMF to start the analog quick call.

Digital

It allows to select a contact from the digital contact 

list, press the key to switch the channel to the contact 

temporary. It will switch back to the original contact after 

the group/personal call hold time.

Menu

SMS

Quick access to Messages in the menu

New Msg

Quick access to New Msg in the Menu - Messages

Hot Text

Quick access to Quick Text in the Menu - Messages

Received 

SMS

Quick access to Inbox in the Menu - Messages

Send SMS

Quick access to Out box in the Menu - Messages

Contact list

Quick access to Contact list in the Menu - Contacts

Manual dial

Quick access to Manual Dial in the Menu - Contacts

Call Log

Quick access to Call Log in the Menu

Dialed Calls

Quick access to Dialed Calls in the Menu - Call Log

Received 

Calls

Quick access to Answered Calls in the Menu - Call Log

Missed Calls

Quick access to Missed Calls in the Menu - Call Log

Zone

Quick access to Zone in the Menu

Radio set

Quick access to Radio Set in the Menu - Settings

Enter radio Menu-Settings-Radio Set-P1-P6,PA-PD,sub menu. 
Users can choose settings for Hot Keys 1-6.

Hot Key function

 details must be setup in PC software – Public - Hot key.

 Combination Key Function

[MENU] + number key operation:
Press [MENU] key and hold until the LCD display "Next Please Press 

Dial Key", press the number key, it will perform the programmed function.
Combination key function shall be setup in PC software-Public-Hot key.

3

Getting Acquainted

Содержание DR-MD520E

Страница 1: ...e 81 6 7636 2362 Fax 81 6 6208 3802 http www alinco com E mail export alinco co jp Copyright Alinco lnc PS1001A FNFN EE Printed in China Electrical and electronic equipment and batteries should be recycled at a facility capable of handling these items Contact your local authority for details of disposal rules ...

Страница 2: ...tains information on after sales services In case addendum or errata sheets are included with this product please read those materials and keep them together with this instruction manual for future reference NOTE DR MD520 may be delivered to you after dealer programming In such cases please ask your dealer about the available features in your unit and how to operate this unit Features and function...

Страница 3: ...on an oil rig or in an open mine Integrated GPS receiver An internal GPS receiver is installed in T FCC and E CE models When using the GPS receiver A GPS receiver is installed under the top panel When the GPS receiver is activated do not cover the top part with anything that will block satellite signals GPS signals can t pass through metal objects When driving or navigating you may risk not receiv...

Страница 4: ...can users Due to strict rules this product is blocked for operations before sales and only dealers can program the radio before delivery to consumers Manufacturer is not aware of details of such dealer programming therefore please kindly contact your dealer first in case technical service may be necessary Important Notice The utility software may be available to distributors dealers only Programmi...

Страница 5: ...ed on recommendations from the National Council on Radiation Protection and Measurements and the American National Standards Institute FCC OET Bulletin 65 Edition 97 01 Supplement C American National Standards Institute C95 1 1992 American National Standards Institute C95 3 1992 FOR HOME OR OFFICE USE Information in this document is subject to change without notice or obligation All brand names an...

Страница 6: ...how to operate this transceiver so that the FCC RF exposure limitations are not exceeded The electro magnetic exposure of this device may exceed the standards of the hazard level when transmitting at the high power setting while connected to a unity gain antenna at a distance of 63cm 24 8 inch or less from the operator Furthermore the hazardous RF exposure level depends on the conditions of the co...

Страница 7: ...se proximity to other electronics devices especially medical ones It may cause interference to those devices Keep the radio out of the reach of children In case a liquid leaks from the product do not touch it It may damage your skin Rinse with plenty of cold water if the liquid contacted your skin Never operate this product in facilities where radio products are prohibited for use such as aboard a...

Страница 8: ...installation may result in short circuit electronic shock and or fire Do not plug the power supply into the wall outlet if the contacts are dirty and or dusty Short circuiting and or overheating may result in fire electric shock and or damage to the product Do not modify or remove fuse assembly from the DC cable It may result in fire electric shock and or damage to the product In case of emergency...

Страница 9: ...al of the batteries in your area About transceiver Do not connect devices other than specified ones to the jacks and ports on the product It may result in damage to the devices Turn off and remove the power source AC cable DC cable etc from the product when the product is not in use for extended period of time or in case of maintenance Use a clean dry cloth to wipe off dirt and condensation from t...

Страница 10: ...The Power 11 Turning Off The Power 11 Adjusting The Audio Output Volume 11 Main Band Sub Band Switch 11 VFO Channel Switch 11 Set Up VFO Frequency 11 Select a Channel 11 Recieving 11 Transmitting 11 New Channel 12 Delete Channel 12 Receiving and Responding to a Radio Call 12 Make a Digital Call 12 Monitor 12 Emergency Alarm 12 Advanced Features for Private Call 13 Access Advanced Features for Priv...

Страница 11: ... you have purchased Please contact your local authorized Alinco dealer should you have any questions Alinco and authorized dealers are not responsible for any typographical errors there may be in this manual Standard accessories may change without notice Warranty Policy Please refer to any enclosed warranty information or contact your authorized Alinco dealer distributor for the warranty policy In...

Страница 12: ...e certain your transceiver will not interfere with their deployment If you are uncertain about where to mount the unit contact your vehicle s dealer Caution Use only the provided screws otherwise you risk damaging the circuit board components or fall off of the unit 2 Position the transceiver then insert and tighten the supplied hexagon SEMS screws Double check that all screws are tightened to pre...

Страница 13: ...rop excessively 1 Route the DC power cable supplied with the transceiver directly to the vehicle s battery terminals using the shortest path from the transceiver Never use the cigarette lighter socket as a DC source The entire length of the cable must be dressed so it is isolated from heat moisture and the engine secondary high voltage ignition system cables 2 After installing cable in order to av...

Страница 14: ...k DC power cable with fuse holder Regulated power supply The current capacity of your power supply must be 12A or more 1 Connect the DC power cable to the regulated DC power supply and ensure that the polarities are correct Red positive Black negative Never directly connect the transceiver to an AC outlet Use the supplied DC power cable to connect the transceiver to a regulated power supply Do not...

Страница 15: ...transceiver Always connect the antenna to the transceiver before transmitting All fixed stations should be equipped with a lightning arrester to reduce the risk of fire electric shock and transceiver damage External speaker SPEAKER MIC For voice communications connect a provided Speaker mic into the socket on the front of the main unit Turn the ring firmly on the plug until it locks Attach the sup...

Страница 16: ...ey Press Press to return to previous menus Press to delete characters when texting message Press and hold to active keypad lock 6 P1 P6 key Press press and hold these keys to use the pre programmed functions In the radio menu setting P1 is up key and P2 is down key 7 MIC connector Connector to connect the speaker mic 8 LED indicator Constant Red Transmitting Constant Green Analog Receiving Constan...

Страница 17: ...or Monitor the weak signal or the signal with unmatched ID Main CH Switch Choose channel A or channel B as the main channel Hot Key 1 6 Selects Hot Keys 1 6 Note Hot key setup details on next page Work Alone Turn on off the work alone function Nuisance Delete During scanning press the key to skip the unwanted channel Digi Monitor In DMR mode press the key to turn on off digital monitor Sub CH On O...

Страница 18: ...ows to select a contact from the digital contact list press the key to switch the channel to the contact temporary It will switch back to the original contact after the group personal call hold time Menu SMS Quick access to Messages in the menu New Msg Quick access to New Msg in the Menu Messages Hot Text Quick access to Quick Text in the Menu Messages Received SMS Quick access to Inbox in the Men...

Страница 19: ...et the programs in PC software The EXIT key is set as default setting Key Lock Unlock is set as default setting of holding key in advance PD EXIT Programmed key Set the programs in PC software The EXIT key is set as default setting 4 TX RX Indicator Main Sub Illuminates red while transmitting green while receiving signals M lights on when RX TX Channel A S lights on when RX TX Channel B 5 Band Ind...

Страница 20: ...ORY DEFAULT If your transceiver seems to be malfunctioning becuase of wrong operation or setup this function will be able to resume all setup and channels to factory default Press and hold P2 Key CH knob Power key at the same time to power on the transceiver The transceiver will start up with a note on the display Are you sure you want to initialize radio Press Menu Key to proceed the reset on the...

Страница 21: ...the main channel VFO Channel Switch Press the programmed VFO MR key to switch between VFO and channel display Set Up VFO Frequency Turn the radio to VFO mode then switch the channel to the main band the VFO frequency can only be set up when the channel is in the main bold text channel Operation 1 Input the VFO frequency directly by the keyboard Operation 2 Turn the channel selector to adjust the V...

Страница 22: ...in the digital hold time otherwise the radio will drop the connection after the digital hold time is expired Make a Digital Call A Talk to the preset TG DMR ID in channel Choose a programmed channel and press PTT to start the call B Talk to a temporary TG DMR ID not in the channel Method 1 Select a temporary TG DMR ID from the Talk Group list 1 Choose a programmed channel 2 Press EXIT key to enter...

Страница 23: ...PS positioning and send a message of its GPS position to the transmit radio You have to check on the function in CPS Optional Setting GPS Ranging Get GPS positioning first 4 Check Radio Select Check Radio and it will send out a radio check to the target radio which will send back a message if it is available or not available to the transmit radio With this feature you can determine if another radi...

Страница 24: ...nels 1 One Time Roam Allow you turn on the roaming manually After the roaming is finished it will return to the off state Manually Roaming is a onetime action only MAIN MENU FUNCTIONS Talk Group TG List Will display the talk group list which had been programmed in the PC software This list is used as a look up table to display the contact TG information when receiving a call New Contact Allows to ...

Страница 25: ... on this function will allow the radio to check the repeater status Interval Set When the repeater is out of range the radio will try reconnect to the repeater this function allows to set the interval for reconnections 5 OutRange Note When the repeater is out of range after the repeater check the radio will remind out of range Note kind It allows to set beep or sound to remind out of range Note Ti...

Страница 26: ... low volume suitable for the indoor use Level 1 8 Set up the maximum volume level 10 Enhanced Sound For digital mode only It will allow you set up the audio pitch Normal Low pitch for TX audio only Enhance High pitch for TX audio only Indoor Improved both the TX and RX audio Outdoor Improved both the TX and RX audio 11 Fan Open PTT The fan will open when PTT is pressed Temperature The fan will ope...

Страница 27: ... are offered Hold pressing PTT key at the same time press UP or DN key on microphone to transmit the TBST tone 28 Scan Mode SCM TO When scanning and stopping for a signal stays at the channel 5s before resuming the scan SCM CO When scanning and stopping for signal stays at the channel until the signal disappears and resumes scan 2s later SCM SE When scanning and stopping for a signal will terminat...

Страница 28: ...uble Slot operation Please Turn Off Digital Monitor when using the Cross band repeat function Analog A to Analog A Cross band Repeater Setup a To set the channels or frequencies you will want to use with cross band operation the radio must be set to display both the Main Channel VFO A and the Sub Channel VFO B b Set the analog channel with simplex or repeater frequency c Turning the Repeater funct...

Страница 29: ... current set up to the new channel a Select New Chan then input new channel number and confirm b Input channel name and confirm c Select a zone and confirm The new channel will be saved to the selected zone 2 Delete Chan Allows to delete current channel a Select Delete Chan the radio will remind Delete b press confirm the current channel will deleted Note After delete one channel the radio will mo...

Страница 30: ...X Group List Add Group Add a TG to the current RX Group List Remove Group Remove a TG from the current RX Group List 18 Work Alone In the PC software Public Alarm settings Work Alone you have to set up the response time warn time and response method initially Turn on the work alone function for the current channel When the radios predetermined time has been reached for the alone working time the r...

Страница 31: ...n receive matched CTCSS DCS signal TONE You can hear the call when receives a matched signaling C T You can hear the call when receives a matched CTCSS DCS and matched signaling C T You can hear the call when receives a matched CTCSS DCS or 11 Band Width Choose wide band or narrow band for the analog channel 12 Reverse When this function is enabled the RX frequency TX frequency and CTCSS DCS encod...

Страница 32: ...n date picture version language version sct version and BT module version Record The voice record is designed for security use purpose Each call will be saved as a separated recording file with DMR ID and time details The standard voice 10hours record allows in digital channel only The optional 500 hours voice record allow in both digital and analog channels It requires to implement an optional re...

Страница 33: ...ess key to switch group ID or private ID press MENU to send the GPS info APRS Location Reporting APRS menu is not in menu list when GPS is off you have to turn on GPS first if you want to use APRS menu 1 Upload Type None No APRS Sel A Aprs Select analog APRS Sel D Aprs Select DMR APRS 2 Ana APRS PTT Upload Set the PTT transmit method Off Not transmit APRS Tx Start Transmit analog APRS when press t...

Страница 34: ...RS box first to get APRS menu add to the left Digital menu APRS is a registered trademark of Bob Bruninga WB4APR Digital Monitor 1 DigiMoni Switch off Turn off Digital Monitor Single Slot Monitor the current TS Double Slot Monitor TS1 and TS2 2 DigiMoni Cc Any Cc Monitor any color code Same Cc Monitor the same color code 3 DigiMoni Id Any Id Monitor any TG Same Id Monitor the same TG 4 Slot Hold O...

Страница 35: ...h a screen display note Initialize Radio D After a re start the radio will display the setting of time zone and the date and the time Use the channel switch to set the current year Move to the month by pushing the channel switch Set the month and use the channel switch key to move forward each step Once done click the Confirm key to save the date and time Please remember set up the time zone to av...

Страница 36: ...tage 13 8V DC 15 Operating Temperature Range 20 60 Frequency Stability 2 0ppm Antenna Impedance 50Ω Dimensions WxHxD Approx 141x40x188 mm 5 55x1 57x7 40 inches Weight Approx 1 04kg 36 68 ounces Recording time 4 Hours RF Power Output VHF 55W 25W 10W 1W 222 225MHz 5W High 1 5W middle low small UHF 40W 25W 10W 1W Channel Spacing Less than 1GHz 36dBm More than 1GHz 30dBm FM Hum Noise Analog 25kHz 40dB...

Страница 37: ...e dealer or an experienced radio TV technician for help WARNING MODIFICATION OF THIS DEVICE TO RECEIVE CELLULAR RADIOTELEPHONE SERVICE SIGNALS IS PROHIBITED UNDER FCC RULES AND FEDERAL LAW Licensing Information Use our radio in USA is subject to the rules regulations of FCC Changes or modifications not expressly approved by our may void the user authority granted by the FCC to operate this radio a...

Отзывы: