


FILTER EFFECT - This button is used to activate and deactivate the filter effect. The filter effect
30- TIME BUTTON:
tweaks the original sound to add different tonal definition.
The button will switch the time value described in the TIME METER between ELAPSED
PARAMETER RATIO BUTTON - This button is used to adjust the parameter ratio value. You
playing time, TRACK Remaining time and TOTAL Remaining time.
can also push the RATIO knob, LED on, and turn the JOG WHEEL to adjust the parameter ratio
31- </> Use this button to select FX SYNC or LOOP SET:
value.
- FX SYNC: This is used to select the delay time of an effect to the beat of music. The beat delay
AUTO LOOP BUTTON - Press this button to activate AUTO LOOP function. Press IN button,
ratios are 1/4, 1/2, 3/4, 1/1, 2/1, and 4/1. To turn off auto beat sync press < button for 1sec.
and OUT point will be found automatically according to the BPM value.
- LOOP SET: When the loop set function is activated, select the beat bar of 1/2, 1, 2, 4, 8, 16(1 bar
More info at D- STEP BY STEP FOR IMPORTANT OPERATION 6- EFFECTS page 28
.
= 4 beat) at which you would like to end your desired loop.
28- MIDI A/B:
More info at D- STEP BY STEP FOR IMPORTANT OPERATION 3-
Under the MIDI mode, press this button to switch PLAYER A/B.
LOOP/AUTOLOOP page 27.
More info at D- STEP BY STEP FOR IMPORTANT OPERATION E- MIDI
32- SHIFT BUTTON:
CONTROLLER page 29.
Hold the SHIFT button enables to call up a second function.
29- SGL/CTN BUTTON:
More info at D- STEP BY STEP FOR IMPORTANT OPERATION E- MIDI
This function allows you to choose between single track play or continuous track play (all tracks
CONTROLLER page 29.
in order). This function also operates in RELAY mode. With this button you can also switch auto
cue on and off, by pressing it for at least 1 sec.
A- GENERAL FUNCTIONS AND CONTROLS
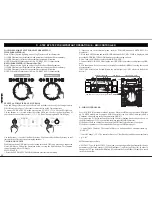
REAR AND END SIDE CONTROLS
ICONS at the VFD DISPLAY
40
AUDIO OUT R & L
: Audio out signals.
Connect stereo RCA cable from audio out to
a mixer's line input channel. You can also
connect it to an amplifier or autoamplified
loudspeakers.
HEADPHONE JACK &
VOLUME CONTROL
:This
jack is used to connect your
h e a d p h o n e s a n d t h e
volumecontrol is for your
headphones is located next
to it.
39
P
O
W
E
R
C O N N E C T O R :
This connection is
used to connect
your main power.
33
POWER BUTTON:
This button is used
to turn your unit’s
power on and off.
34
35
RELAY SOCKET:
Via the relay socket, two
CD players can relay play. If you connect
with a mixer which
supporting fader start,
you can also relay play via mixer’s
crossfader.
DIGITAL OUT:
Use this
connection to create near
perfect copies of your
music to
a Mini disc, CD-R, or any
other
digital recording device.
36
USB MIDI PORT:
Use this
jack to connect to a computer
or link a host USB player.
37
USB 2 PORT:
This
is the USB port
where you insert
your USB mass
storage device.
38
38
37
36
35
34
33
40
39
53
47
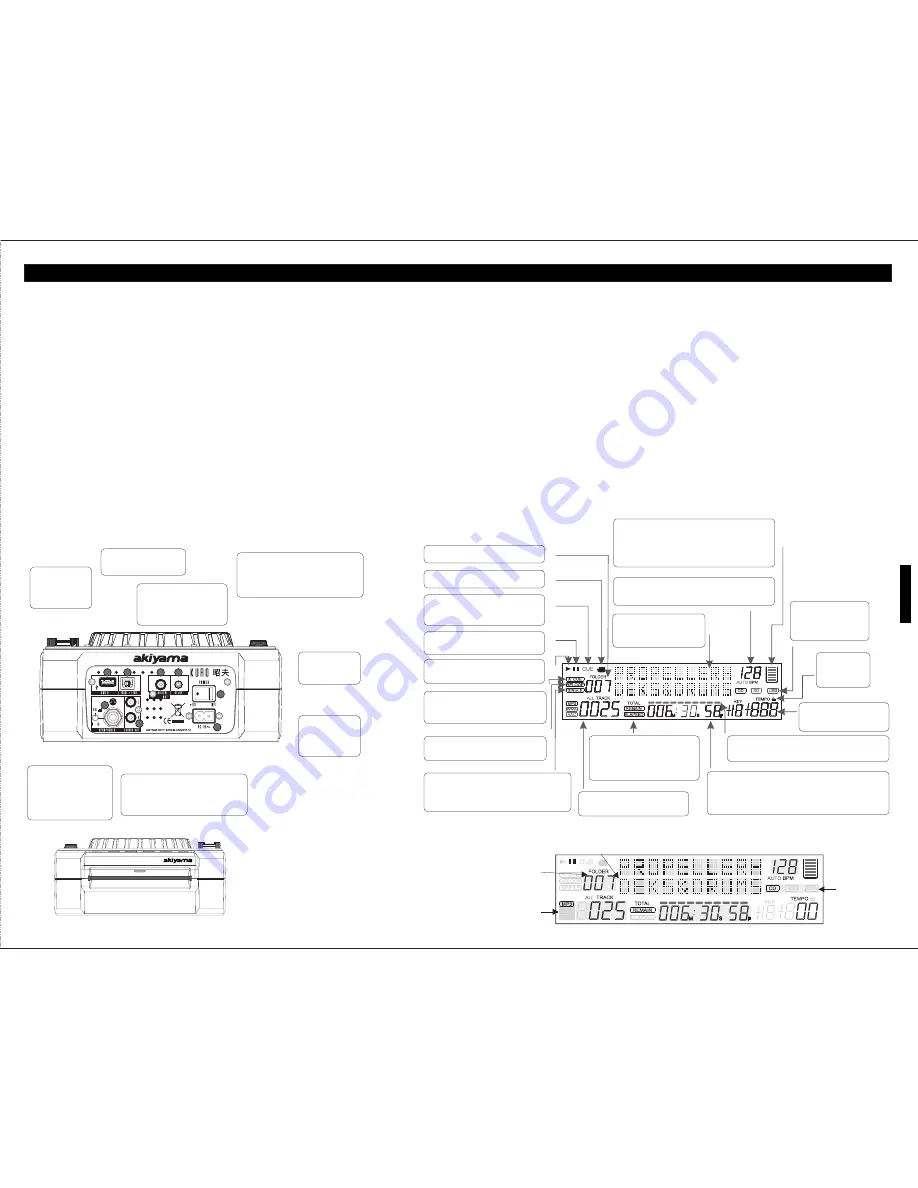
BPM METER:
This meter will display the BPM's of the current track.
CD/USB INDICATOR:
This indicates which port is
active. Use the source
button to select your
desired port.
CHARACTER DISPLAY:
This will display the name of the
track and album when a MP3
track is loaded.
46
PLAY INDICATOR:
The play indicator will glow when the unit
is in play mode.
41
42
43
44
48
TEMPO LOCK:
This will indicate
the Tempo Lock
function is active.
50
PITCH INDICATOR:
This meter will display the pitch
percentage applied by the pitch
slider.
51
54
56
SINGLE INDICATOR:
This indicates that the track is in single play mode,
the track will play once and return to CUE mode. If
the single indicator is not on, the unit is in continuous
mode.
RELOOP INDICATOR:
Appears when LOOP is engaged or ready
to be engaged.
57
AUTO CUE:
This will indicate if the Auto Cue is on or off.
Press and hold the SGL/CTN for 1 sec. to
turn the Auto Cue function on and off.
58
PAUSE INDICATOR:
The pause indicator will glow when the
unit is in pause mode.
CUE INDICATOR:
This indicator will glow when the unit is in
CUE mode and will flash every time a new
CUE
POINT is set.
TOUCH INDICATOR:
This appears when
anything touches the jog wheel.
45
FOLDER DISPLAY:
This indicates which folder you are in.
MEMORY BUCKET
: This indicator serves two functions.
The bucket outline details the cue memory status, a full
bucket outline indicates the cue memory is full.
The five bars in the memory bucket detail the digital
buffer. Each bar indicates 2 second. The search functions
will not operate until all the bars are full.
54
55
55
REMAIN/ELAPSED INDICATOR:
When
REMAIN is indicated in the VFD display the
time meter will show the current track's
remaining time. When ELAPSED is
indicated in the VFD display the time meter
will show the current track's elapsed time.
52
TIME BAR INDICATOR:
This bar gives a visual approximation of a track's or disc's
time. This bar will begin to
flash when a track is ending.
53
TIME METER:
These indicators will detail the current Minutes,
Seconds, and Frames. The meter will display
either the elapse, total, or
remaining time of a track or the entire disc. The display time will depend
on the
selected time function. The selected time function will be
displayed above the TIME METER as total remaining, remaining track
time, or elapsed track name.
TRACK DISPLAY:
This indicator
describes which track is currently cued
or is playing.
Album title
Name of the track
Track BPM value
CD or USB
Folder number of de track
Track number in Folder
Track length
Track format
Information at Display when loading a track:
ENGLISH
49
22
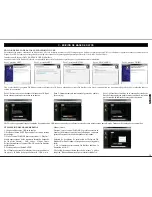
Insert smoothly the CD in the “Slot”,
The CD will be fixed and dragged in.