background image

13


Remote Control (Cont.)

Using the Remote Control

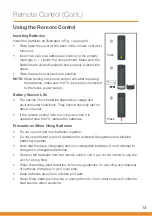
Inserting Batteries

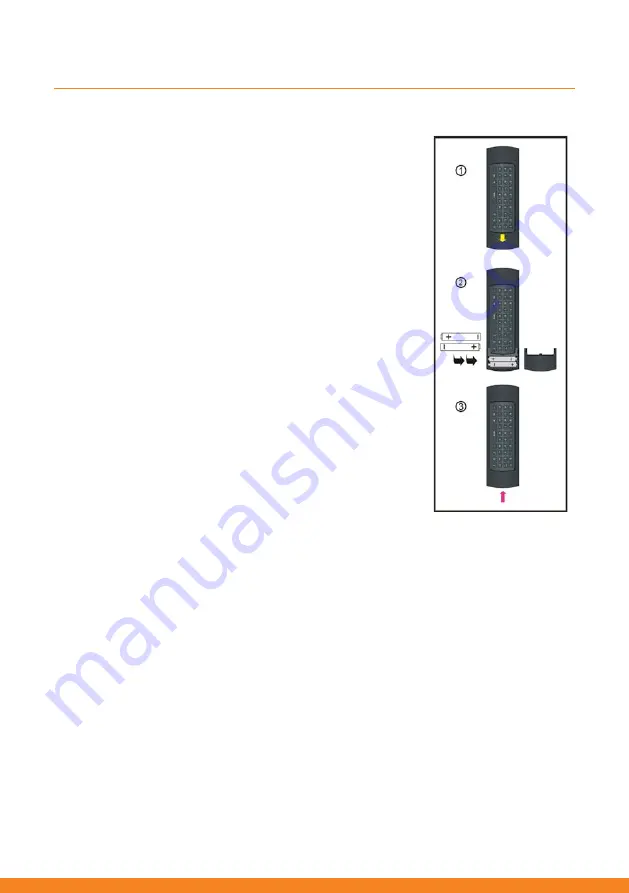
Install the batteries as illustrated in Fig. 1 (see right). 
• 

Slide open the cover at the back of the remote control to 
remove it.

• 

Insert two AAA size batteries according to the polarity 
markings (+ / -) inside the compartment. Make sure the 
batteries are correctly aligned and properly pushed into 
place. 

• 

Slide the back cover back into position.

NOTE:  

When testing the remote control unit after replacing 
the batteries, make sure the TV is properly connected 
to the mains power supply.

Battery Service Life

• 

The service life of batteries depends on usage and 
environmental conditions. They should normally last for 
about one year. 

• 

If the remote control fails to work even when it is 
operated near the TV, replace the batteries.

Precautions When Using Batteries

• 

Do not use old and new batteries together.

• 

Do not use different types of batteries (for example, Manganese and Alkaline 
batteries) together.

• 

Note that there are chargeable and non-chargeable batteries. Do not attempt to 
charge non-chargeable batteries.

• 

Remove the batteries from the remote control unit if you do not intend to use the 
unit for a long time.

• 

When discarding used batteries, follow any guidelines for recycling and disposal 
of batteries that apply in your local area.

• 

Keep batteries away from children and pets. 

• 

Never throw batteries into a fire or expose them to fire or other sources of extreme 
heat such as direct sunshine.

Push

Press

Содержание AK4919UHDS

Страница 1: ...INSTRUCTION MANUAL 49 4K Ultra HD Smart TV Model Number AK4919UHDS ...

Страница 2: ...t to you by AKAI are manufactured to the highest standards of performance and safety and as part of our philosophy of customer service and satisfaction are backed by our comprehensive 1 Year Warranty We hope you will enjoy using your purchase for many years to come Welcome ...

Страница 3: ...s 4 Remote Control 10 Installation 16 Controls and Connections 20 Getting Started 28 Basic Operations 31 TV Guide 34 Recording 35 USB Multimedia Playback 39 Smart TV 43 Menu Settings 49 Troubleshooting 57 Specifications 60 Other Useful Information 61 ...

Страница 4: ...ains socket with a protective earthing connection To prevent damage which may result in fire or an electric shock hazard do not expose this appliance to rain or moisture Do not change or modify the appliance in any way Only use the attachments accessories specified by the manufacturer Electrical Safety and Cord Handling Voltage Before installing this TV make sure your outlet voltage corresponds to...

Страница 5: ...y from damp and cold Protected from overheating and away from direct sunlight Total darkness or a reflection on the picture screen can cause eyestrain Soft and indirect lighting is recommended for comfortable viewing Away from moisture drips or splashes Protected from excessive dust or grease WARNING To prevent injury this apparatus must be securely attached to the floor wall in accordance with th...

Страница 6: ...moke or odour If you notice any unusual odours or smoke around the unit immediately disconnect the unit from the outlet and contact the service centre Failure to do so may result in fire or electric shock Water Do not place containers with liquids such as vases or with small metallic objects on top of the unit If liquid enters the unit or any metal object falls into the unit it may result in short...

Страница 7: ...semble or modify the TV or attempt to service it yourself Service Refer all servicing to qualified service personnel Servicing is required when the TV has been damaged in any way such as when the power supply cord or plug is damaged liquid has been spilled or objects have fallen into the TV when the TV has been exposed to rain or moisture does not operate normally or has been dropped Disc Protecti...

Страница 8: ...aratus from one location to another for example from a cold environment to a warm one allow sufficient time for the apparatus to acclimatise to the new location before switching it on In tropical climates keep the air surrounding the unit sufficiently dry to avoid condensation forming Important Safety Instructions Cont WARNING Never tamper with any components inside the TV or any other adjustment ...

Страница 9: ...9 Remote Control ...

Страница 10: ...ttons to navigate the on screen menus and adjust the system settings to your preference 10 VOL Turn the volume up down 11 MUTE Mute the sound Press it again to restore the sound 12 NUMBER BUTTONS 0 9 Select a TV channel directly when watching TV 13 REC Record a program digital TV only 14 BUTTONS Perform the corresponding functions shown on the On Screen Display 15 Return to previous channel 16 SUB...

Страница 11: ...n to return to normal mode The Del button on the keyboard performs the backspace function As an alternative to the keyboard you can use the on screen keyboard The USB RF receiver dongle must be connected for the keyboard to operate 20 Live TV Enter Live TV directly 21 CH Press to play the next or previous channel 22 RETURN Go back to previous page Smart TV 23 Play next file 24 MENU Display the mai...

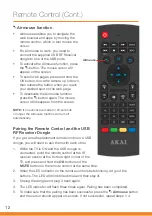
Страница 12: ...mouse function will turn off automatically 1 While the TV is ON and the USB dongle is connected point the remote control at the IR receiver sensor at the bottom right corner of the TV and press and hold the OK button and the MUTE button on the remote control at the same time 2 When the LED indicator on the remote control starts blinking let go of the buttons The LED will blink three times and then...

Страница 13: ...onditions They should normally last for about one year If the remote control fails to work even when it is operated near the TV replace the batteries Precautions When Using Batteries Do not use old and new batteries together Do not use different types of batteries for example Manganese and Alkaline batteries together Note that there are chargeable and non chargeable batteries Do not attempt to cha...

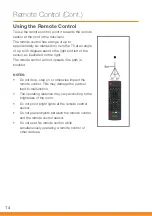
Страница 14: ...llustrated on the right The remote control will not operate if its path is blocked NOTES Do not drop step on or otherwise impact the remote control This may damage the parts or lead to malfunction The operating distance may vary according to the brightness of the room Do not point bright lights at the remote control sensor Do not place objects between the remote control and the remote control sens...

Страница 15: ...15 Installation ...

Страница 16: ...anding up on the supplied base stands on suitable furniture or mounted to a wall You will find installation instructions for both options on the following pages After having installed the base stands or wall mounted the TV follow the instructions in the Controls and Connections section to ensure that you TV is correctly connected to your TV antenna and related AV equipment e g Blu ray player ampli...

Страница 17: ...rew holes Installation Cont Assembling the Base Stands If you want to stand the TV on furniture first find a suitable location where you can attach the base stands to the body of the TV You will need to arrange a soft cloth that is large enough to cover the entire front panel of the TV for protection of the screen as well as a screwdriver to attach the base stands Before using the TV install the s...

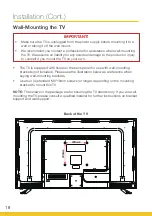
Страница 18: ...rews in the package are for securing the TV stands only If you are wall mounting the TV please consult a qualified installer for further instructions on bracket support and wall support IMPORTANT Make sure the TV is unplugged from the power supply before mounting it to a wall or taking it off the wall mount We recommend you contact a professional for assistance when wall mounting the TV We assume ...

Страница 19: ...19 Controls and Connections ...

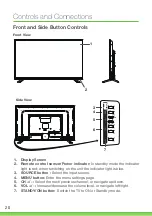
Страница 20: ...ode the indicator light is red when switching on the unit the indicator light is blue 3 SOURCE button Select the input source 4 MENU button Enter the menu settings page 5 CH Select the next previous channel or navigate up down 6 VOL Increase decrease the volume level or navigate left right 7 STANDY ON button Switch the TV to ON or Standby mode 3 4 5 6 7 ...

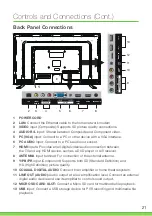
Страница 21: ...s a DVD player or A V receiver 8 ANTENNA input terminal For connection of the external antenna 9 Y PB PR input Component Supports both SD Standard Definition and HD High Definition picture quality 10 COAXIAL DIGITAL AUDIO Connect to an amplifier or home theatre system 11 LINE OUT AUDIO Audio output at a low amplification level Connect an external digital audio device and use its amplifier to contr...

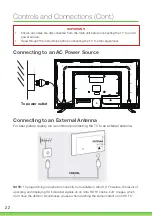
Страница 22: ...ing to an AC Power Source Connecting to an External Antenna For best picture quality we recommend connecting the TV to an external antenna To power outlet NOTE TV programming in Australia is currently not available in Ultra HD Therefore the result of upscaling and displaying HD broadcast signals on an Ultra HD TV can be soft images which don t have the detail or smoothness you see when watching th...

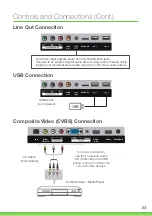
Страница 23: ...tion use the composite Audio L R white red and CVBS yellow cable to connect the unit with other devices LAN ANTENNA IN HDMI 1 ARC CVBS VIDEO IN HDMI 2 MICRO SD COAX OUT 1 2 Line Out socket outputs audio at a low amplification level Connect to an external digital audio device using a 3 5mm audio cable cable is not included and use the device to control the sound output MICRO SD COAX OUT 1 2 ...

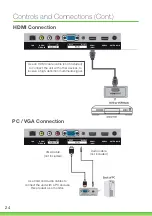
Страница 24: ...onnect the unit with other devices to receive a high definition multimedia signal LAN ANTENNA IN HDMI 1 ARC CVBS VIDEO IN HDMI 2 LAN ANTENNA IN HDMI 1 ARC CVBS VIDEO IN HDMI 2 VGA Cable not included Audio cable not included Use VGA and Audio cables to connect the unit with a PC and use this product as a monitor ...

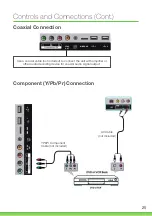
Страница 25: ...onent Y Pb Pr Connection Use a coaxial cable not included to connect the unit with amplifier or other audio decoding device for coaxial audio signal output MICRO SD COAX OUT 1 2 MICRO SD COAX OUT 1 2 2 YPbPr Component Cable not included AV Cable not included ...

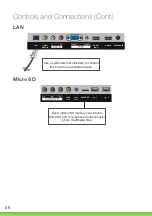
Страница 26: ... Insert a Micro SD memory card into the Micro SD port for playback of video music photo multimedia files MICRO SD COAX OUT 1 2 Use a LAN cable not included to connect this TV with an available network LAN ANTENNA IN HDMI 1 ARC CVBS VIDEO IN HDMI 2 ...

Страница 27: ...27 Getting Started ...

Страница 28: ...e POWER button again to power off set it in standby mode the indicator will glow red NOTE Switching off and on again After you have switched off the TV do not immedi ately try to power it on again If you want it back on wait for at least 30 seconds until the indicator light has gone out before switching on the TV again Standby mode If you are not going to use your TV for a long period of time swit...

Страница 29: ...o the TV The TV will automatically connect to the Internet If you are using a wireless connection the TV will scan for nearby wireless networks Make sure that the TV is within the range of your wireless modem router Select your wireless network name and press OK Depending on your network setup enter the password for your wireless network using the remote s keyboard or the on screen keyboard Select...

Страница 30: ...etting Started Cont Step 5 Finalise Keep the Store Mode setting OFF if you are using the TV at home Store Mode is for in store demonstration purposes only Select Watch TV to finalise the setup and watch TV ...

Страница 31: ...ourite See page 53 for more information Volume Control Press the VOL button to adjust the volume level Press the MUTE button to mute the sound press it again to restore sound Picture Mode For easy picture adjustment you can select a preset Picture Mode While watching a TV channel press the MENU button select Picture and press OK Select the Picture Mode setting To select one of the preset picture m...

Страница 32: ... picture is not filling the whole screen you can adjust the picture to fill the screen completely While watching a TV channel press the MENU button select Picture and press OK Select the Aspect Ratio setting To select one of the Aspect Ratio settings use the buttons The available options are 16 9 4 3 Full Zoom 1 Zoom 2 Auto and Panorama available options may vary for different input sources NOTE I...

Страница 33: ...33 TV Guide Recording USB Multimedia Playback ...

Страница 34: ...view any TV Guide information you have to activate every channel for which you want to view programme information To do this use the buttons to select a channel in the left column then press OK to confirm Press the buttons to choose a TV programme from the selected channel Press the buttons to select a different channel Press the RED button to display the TV guide for the previous day Press the GR...

Страница 35: ...s the GUIDE button to bring up the TV Guide Select the program you wish to record and press the RECORD button Press the button to select the Mode and use the buttons to edit the mode of recording Available options are Once Daily and Weekly You can further adjust the start and end dates and times by pressing OK on the highlighted date time and then pressing the buttons to change the value After you...

Страница 36: ...ress the MENU button on the remote control and navigate to Setting PVR Setting Record List Use the buttons to select a recorded file and it will start playing on the small screen to the right While on the Record List page press the RED button to replay the programme on the small screen Press the GREEN button to delete the selected file Press the YELLOW button to delete all the recorded files on th...

Страница 37: ...the screen Use the buttons to select Play then and press OK to play the program in time shift mode Use the buttons then press OK to select a function such as Fast Forward from the on screen toolbar To stop time shift press the STOP button on the remote control to display a dialogue box then select Yes to exit time shift mode and return to live TV signal or select No to dismiss the dialogue box NOT...

Страница 38: ...ces may not be compatible for smooth operation with this TV For large file sizes and large capacity storage devices the loading speed may be longer The recognition speed of a USB storage device may vary depending on the device When connecting or disconnecting the USB storage device ensure the TV is not in USB mode otherwise the USB device or the files stored in it may be damaged Only use a USB sto...

Страница 39: ...e main multimedia page Video Press the MEDIA button to enter multimedia page Use the buttons to select the desired media drive Select VIDEO and press OK Navigate through the drive s folder structure to the desired file and press OK to start playback During playback press the button to pause playback press it again to resume playback During playback press the button to perform rewind fast forward p...

Страница 40: ...er structure to the desired file and press OK to start playback During playback press the button to pause playback press it again to resume playback During playback press the button to perform rewind fast forward play previous file play next file functions respectively During playback press the or button to stop music playback During playback press the INFO button to display information on the fil...

Страница 41: ...k press the or button to stop music playback During playback press the INFO button to display information on the file During playback press the MENU button to open tool bar Use the buttons to navigate the tool bar and press OK to select Select and press OK to view file information Select and press OK to adjust Aspect Ratio and Slideshow Duration settings Select and press OK to view a listing of ot...

Страница 42: ...42 Page intentionally left blank ...

Страница 43: ...43 Smart TV ...

Страница 44: ...is 5 0Mbps or faster Contact your ISP if you have problems maintaining a fast connection that is reliable If any of your other network connected devices such as computers gaming consoles and network hard drives are transferring large amounts of data across your network such as a file transfer online gaming or other instances of streaming video your sound and picture quality may be compromised Acce...

Страница 45: ...enter submenu Click the RIGHT button Back to previous page Web Browser Use Airmouse or the navigation buttons to select BROWSER on the HOME page and press the OK button to enter it Use Airmouse or the navigation buttons to move the cursor to the URL web address field Press the OK button to open the on screen keyboard Use Airmouse or the keyboard on the back of the remote control to type in your se...

Страница 46: ... app Add an app to the Smart TV home screen On the Smart TV home page select the tile and press OK From the apps list navigate to the app tile that you want to add and press OK To remove an app select the app tile that you want to remove and press the MENU button A red X will appear on the top right corner of the app tile Press OK to remove the app This will not delete the app from the TV Settings...

Страница 47: ...eless choose this for a wireless WiFi connection Make sure the LAN cable is disconnected Press OK to see a list of nearby Wireless networks Select your Wireless network name and press OK Depending on your network setup enter the password for your Wireless network using the remote s keyboard or the on screen keyboard NOTE You can press the button to hide the on screen keyboard Select Connect and pr...

Страница 48: ...uage Setting select the on screen display language Input Method select the keyboard input method not adjustable for this model System Upgrade upgrade the software to its newest version System Recovery recover the system to its default settings WARNING Your personal data will be erased if you opt to recover the system to factory default settings About See system information such as Storage Space An...

Страница 49: ...49 Menu Settings ...

Страница 50: ...y mode This means you can always operate the system under the same conditions Menu Navigation Press the MENU button to display the main menu screen above Press the buttons to select different submenus Press OK to enter the submenu page Press the buttons to select the preferred option Press the buttons to adjust the value Press the MENU button to save the current setting and return to the previous ...

Страница 51: ...e is available only for the NTSC system Backlight Adjust the backlight brightness Noise Reduction Available options Off Low Middle High NOTE Not available in DTV mode Colour Temp This item is used to adjust the optimum colour temperature for suitable viewing Available options Normal Warm Cool Aspect Ratio This item is used to adjust the video size Available options Auto 4 3 16 9 Zoom1 Zoom2 NOTE T...

Страница 52: ...urn on off Auto Volume Control Audio Description This item is used to turn on off Audio Description function NOTE For Visually Impaired users this function can help to know a certain scene or action through the narration instead of see it This function works only when you are viewing programs that contain related narration information SPDIF Available options Off RAW PCM Surround This item is used ...

Страница 53: ...and press OK to confirm it Skip Skip the highlighted channel Delete Delete the highlighted channel NOTE Once deleted you will have to manually scan and add the channel again to add it to the list Fav Add a channel to the favourites list Lock Lock a channel Press the button to return to the previous page Preferences Press the OK or button to enter Audio Language select available audio language Subt...

Страница 54: ...emote control and then enter your private password twice Select OK on screen to enter it Parental Control This item is used to block access to specific program ratings Available options No Block Block G and above Block PG and above Block M and above Block MA and above Block AV and above Block R and above Block All Time Menu OSD Timer Select the desired OSD menu duration Available options Off 5 15 ...

Страница 55: ...CEC Turn on off HDMI CEC TV Auto Power On If this function is enabled the TV will turn on automatically when you turn on the external connected CEC device Device Auto Power Off If this function is enabled the external connected CEC device will turn off automatically when you turn off the TV ARC Audio Return Channel If this function is enabled you can use an external amplifier or audio decoding dev...

Страница 56: ...it Use the buttons to select your preferred item Press the OK or navigation button to enter the sub menu Use the buttons to adjust the value Auto Adjust Adjust the PC screen automatically Horizontal Position Adjust the value of horizontal position Vertical Position Adjust the value of vertical position Clock Phase Adjust the picture applying to the TV Sampling Clock Adjust the signal transfer spee...

Страница 57: ...57 Troubleshooting Specifications Other Useful Information ...

Страница 58: ... connected properly Ensure that the input setting for the TV is correct Ensure the audio settings are properly set Ensure the volume is not muted If it is press the MUTE button to restore the sound If earphones are connected unplug them Adjust the volume to a suitable level by pressing the VOL VOL button If the picture from an HDMI source is not 4K ensure the Menu Setting 4K Enhanced setting is se...

Страница 59: ...her Android version or are not supported on TV format will not appear on Google Play store I want to remove my accounts from the TV Go to Smart Home Settings About Account Manage Select the account you wish to remove and press OK Select Delete and press OK I want to delete an app Go to Smart Home Apps section and hover on the app that you wish to delete Press the MENU button on the remote control ...

Страница 60: ... all ports HDCP version 2 2 Wi Fi Built in Wi Fi protocols 802 11 b g n Wi Fi bands 2 4G USB multimedia playback formats Video AVI MPEG MPEG 4 TS MKV Music MP3 WAV AAC Photo JPG JPEG USB disk size max 1TB USB file format FAT32 USB 2 0 power output 5V 500mA Power consumption W 105 Standby power consumption W 0 5 Dimensions without stand mm 1100 W x 88 D x 636 7 H Dimensions with stand mm 1100 W x 2...

Страница 61: ... rather than throwing these materials away TV At the end of its working life do not throw this TV out with your household rubbish An environmentally friendly method of disposal will ensure that valuable raw materials can be recycled and used again Electrical and electronic items contain materials and substances which if handled or disposed of incorrectly could potentially be hazardous to the envir...

Страница 62: ...62 Page intentionally left blank ...

Страница 63: ...63 Page intentionally left blank ...

Страница 64: ...Customer Helpline 1300 886 649 Distributed by Tempo Aust Pty Ltd PO Box 6056 Frenchs Forest DC 2086 ...

Отзывы: