background image


AIR DIRECTION 

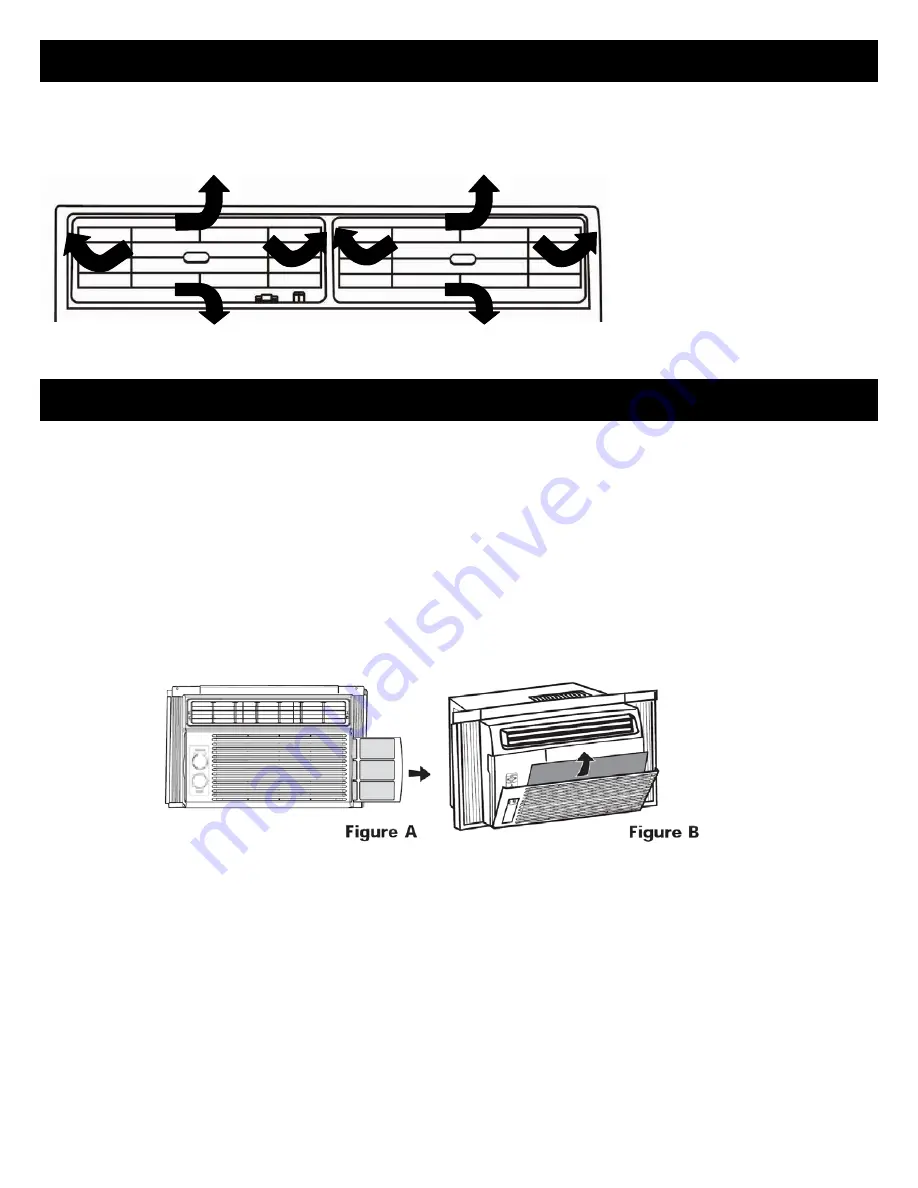
Depending on the model of your air conditioner, use the tab to direct the airflow right or left or rotate the horizontal 
louvers to direct the airflow up or down. 


CLEANING THE FILTER 

AIR DIRECTION CONTROLS 

MAINTENANCE 

ƒ


The air filter is removable for easy cleaning. A clean filter helps to remove dust, lint and other particles from the 
air.  It is also essential to maximize the cooling and operating efficiency of the air conditioner.  

ƒ


A dirty air filter reduces air volume.  

ƒ


We recommend cleaning the air filter every two weeks, or more frequently if there are animals around. 

ƒ


Never run the air conditioner without the air filter. 

ƒ


Do not clean the air filter in the dishwasher, nor use chemical products or abrasive detergents. 


1.  Depending on your air conditioner model, choose the right procedure to remove the filter : 

ƒ


Fig. A: Slide the filter out from the front right side of the unit. 

ƒ


Fig. B: Close the Vent tab (if applicable), open the front panel, grasp the filter by the center and pull it up 
and out. 


2.  Gently clean with a vacuum cleaner or wash the filter in warm soapy water. 
3.  Rinse well and let dry before putting it back. 
4.  Put the filter back in and press on the CHECK FILTER button to reset. 
 

CLEANING THE HOUSING 

1.  Turn the unit off and unplug the unit. 
2.  Wipe the surface of the unit with a soft damp cloth. Never immerse the unit. 
3.  Air dry completely and reconnect the unit. 
4.  Never use chemical products or abrasive detergents; it could damage paint and finish. 


18

Содержание 10 000 BTU

Страница 1: ...OWNER S MANUAL 1 WINDOW AIR CONDITIONER A11MDA10AG 8 000 BTU 10 000 BTU WINDOW AIR CONDITIONER A11MDA20AG 12 000 BTU WINDOW AIR CONDITIONER A11MDA30AG IMPORTANT INSTRUCTIONS READ SAVE ...

Страница 2: ...R CONDITIONER 8 PREPARE FOR INSTALLATION 8 PREPARE WINDOW FOR INSTALLATION 9 PREPARE AIR CONDITIONER FOR INSTALLATION 10 INSTALLING THE AIR CONDITIONER 11 LED DISPLAY CONTROL PANEL 12 REMOTE CONTROL 13 USE OF BATTERIES 14 REMOTE CONTROL FUNCTIONS IN DEPTH 14 UNIT OPERATION 16 UNIT FUNCTIONS EXPLAINED 17 AIR DIRECTION CONTROL 18 MAINTENANCE 18 NOISES AND VIBRATIONS 19 TROUBLESHOOTING 20 WARRANTY 21...

Страница 3: ...symbol indicates the possibility of injury or damage to property only Meanings of symbols used in this manual are as shown below Be sure not to do Be sure to follow the instruction INSTALLATION WARNINGS 3 ALWAYS INSTALL THE EXPANSION PANEL S Improper assembly or installation may cause incorrect operation including injury fire and electric shock hazards DO NOT PLACE THE POWER CORD NEAR A HEATER It ...

Страница 4: ...TH OTHER APPLIANCES It may cause failure and electric shock ALWAYS PLUG INTO A GROUNDED OUTLET No grounding may cause electric shock See Installation Manual UNPLUG THE UNIT IF STRANGE SOUNDS ODORS OR SMOKE COME FROM IT Otherwise t may cause fire and electric shock accident DO NOT OPERATE OR STOP THE UNIT BY INSERTING OR PULLING OUT THE POWER PLUG It will cause fire and electric shock due to heat g...

Страница 5: ...ent accidental startup and the possibility of injury DO NOT PLACE HEAVY OBJECT ON THE POWER CORD AND TAKE CARE SO THAT THE CORD SHOULD NOT BE PRESSED There is danger of fire or electric shock WHEN WATER ENTERS THE PRODUCT TURN OFF THE POWER SWITCH OF THE MAIN BODY OF APPLIANCE Contact service center after taking the power plug out from the socket DO NOT CLEAN THE AIR CONDITIONER WITH WATER Water m...

Страница 6: ...ets or plants to direct airflow for extended periods of time 2 Due to the possibility of oxygen deficiency ventilate the room when used together with stoves or other heating devices 3 Do not use this air conditioner for non specified refrigeration purposes e g preserving precision devices food pets plants and art objects Such usage could cause damages to them 4 The air conditioner is a consumer co...

Страница 7: ...ng changes will create an unsafe condition that could result in fire or electrical shock Refer all such work to a licensed and qualified electrician 7 WARNING Do not cut or remove the grounding prong from the power plug X WARNING Attaching the adapter ground terminal to the wall receptacle cover screw does not ground the appliance unless the cover screw is metal and not insulated and the wall rece...

Страница 8: ...ts rubbing alcohol flammable fluids or abrasive cleaners to remove tape or glue These products can damage the surface of your air conditioner 5 Handle the air conditioner with care We recommend that 2 persons move and install this air conditioner Before beginning to install make sure to have close at hand all the tools you will need listed below and that all accessories and hardware parts provided...

Страница 9: ...osed areas WARNING This product is a WINDOW AIR CONDITIONER As such a standard single hung or double hung window is required for proper installation Non window installations including using sleeves holes in the walls and other installations are not recommended WINDOW CLEARANCE Important Proper clearance enhances the cooling efficiency of the unit and prevents heat radiation from the condenser If t...

Страница 10: ...he panel frame in order to be inserted in the unit s side rail pre installed in A11MDA20AG A11MDA30AG Fig B Slide the panel edge down in the unit s side rail Fig C Insert and slide all the way in the top and bottom ends of the panel frame into the unit top and bottom rails Repeat on other side Top rail and expandable panels are offset to provide 5 6 pitch to the rear This is necessary for proper c...

Страница 11: ...cket and into the sill To prevent window sill from splitting drill a pilot hold before screwing in B B B Using 1 2 13 mm screws fix the panel to the window sash by screwing through the hole in the panel frame and into the window sash C To secure lower sash in place fix the locking hinge with a 19mm screw D Cut the window foam between the gasket to the window width Insert the foam between the glass...

Страница 12: ... temperature in COOL and ENERGY SAVER modes The hours when setting the timer for an automatic start of shut off of the air conditioner Temperature range 17 C 30 C or 62 F to 86 F LED DISPLAY The LED display shows the following The temperature Time settings when timer is on The current room temperature when on FAN mode FAN This function circulates the air in the room Press this button to select the...

Страница 13: ...CLOCK Sets the clock on the remote control CANCEL Deactivates the timed feature to resume normal operation LED Powers on off the display on the unit s control panel RESET Cancels all current settings and resumes normal operation LOCK Remote stores programmed settings until RESET SIGNAL Transmission signal When using the remote always point the remote to the unit Each time the remote programs a set...

Страница 14: ... Ensure nothing is REMOTE CONTROL FUNCTIONS IN DEPTH H This air conditioner has a built in microcomputer m E CONTROL start the unit it will remember and resume the same program set before it was shut off S Before operating the remote control Once batteries are in the remote control 1 Press and hold the CLOCK button for 3 seconds the time will begin to flash 2 Press on the and buttons to adjust the...

Страница 15: ...ress and hold both these two keys together for 3 seconds S Up to 24 hours can b increments while selections in the range of 10 24 hours will increase in 1 hour increments A 3 second pause in adjustments will register the desired time and set the timer A 1 Press the TIME display Press or buttons to set the number of hours you want the unit automatically turn o Wait for 3 seconds and the set time wi...

Страница 16: ...mperature will show on the LCD display panel 3 To alternate between C and F press and hold both and keys together for 3 seconds 4 Press the to set fan speed AUTO LOW MED or HIGH The corresponding indicator light will illuminate AUTO COOLING MODE This automatically sets the fan speed to provide an optimum comfort level based on the set temperature The fan speed will increase or decrease in order to...

Страница 17: ...de and set the desired temperature level 2 Press the SLEEP button to activate 3 To cancel this mode simply press SLEEP button once more at any time SETTING THE TIMER The timer is used to set an automatic start or shut off AUTOMATIC START 1 Press TIMER until the ON indicator light goes on to indicate program activation 2 Press increase or decrease to set the numbers of hours up to 24 hours before d...

Страница 18: ...er Do not clean the air filter in the dishwasher nor use chemical products or abrasive detergents 1 Depending on your air conditioner model choose the right procedure to remove the filter Fig A Slide the filter out from the front right side of the unit Fig B Close the Vent tab if applicable open the front panel grasp the filter by the center and pull it up and out 2 Gently clean with a vacuum clea...

Страница 19: ...th a heavy duty cover to reduce air drafts as well as paint and finish damages 6 ALWAYS TURN OFF AND UNPLUG THE UNIT BEFORE CLEANING TO AVOID ELECTRICAL SHOCK NOISES AND VIBRATIONS When the air conditioner is running it may produce these normal noises or vibrations NOISES AND VIBRATIONS Pinging or clicking noise caused by water dropping on the condenser The relay clicking when the compressor cycle...

Страница 20: ...o cause ice blocking in the airflow Set highest fan speed and coolest temperature and wait for frost to melt Is the outdoor temperature within the unit working range The unit will not operate properly when the outside temperature is below 17 C 62 F Is the power source voltage properly rated Refer to the unit rating plate and modify power source accordingly The internal evaporator and outside conde...

Страница 21: ...d or implied including warranties of merchantability and fitness for a particular purpose and excludes all liability for incidental or consequential damages for any cause whatsoever Warranty Performance During the above warranty period a product with a defect will either be repaired or replaced with a reconditioned comparable model when the product is returned to the Repair Center The repaired or ...

Отзывы: