background image

24 


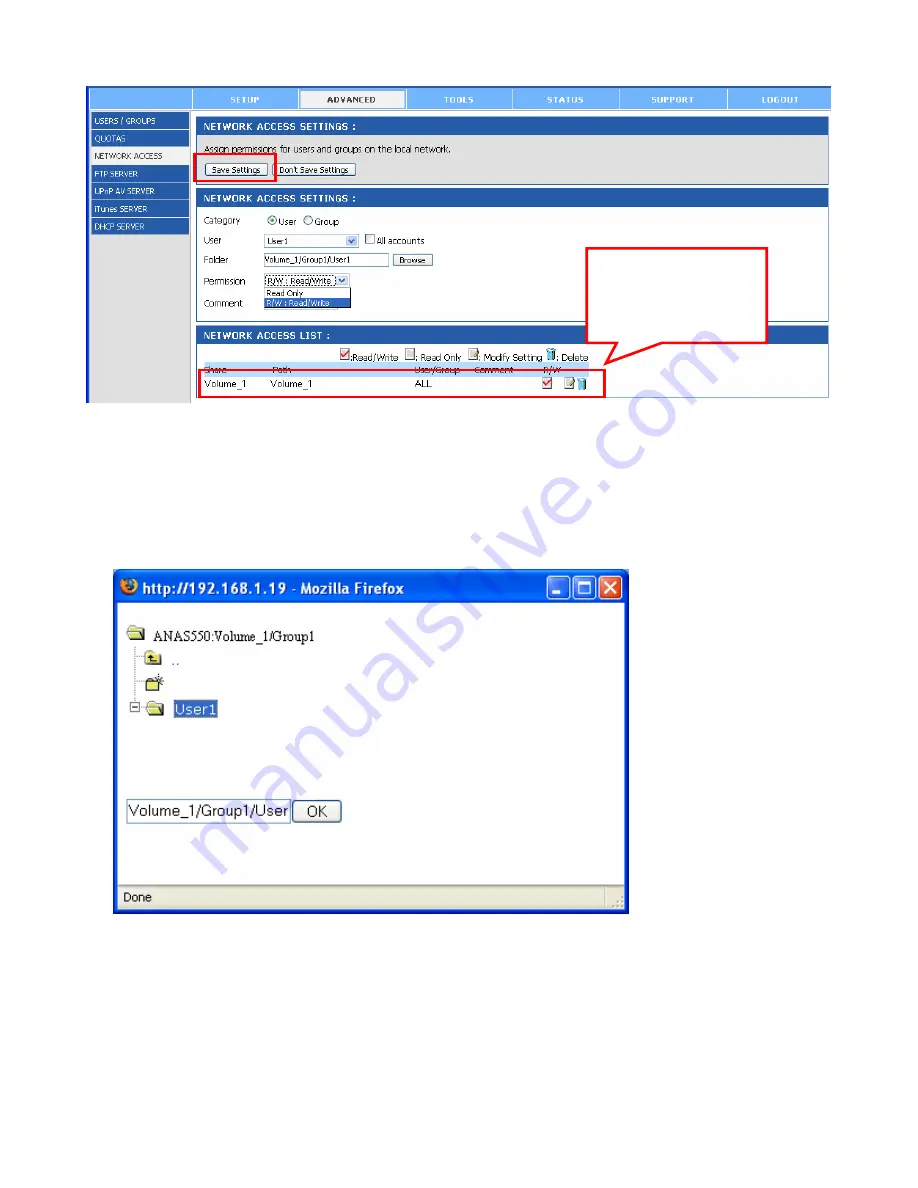
Network Access Settings: 

Assign permissions for the users and groups on the local 

network here. 

o


Category: 

Select Group or User to decide the access rule. 

o


Group/User: 

Select the group or user the access rule will apply to. 

o


Folder: 

Click 

Browse 

to select the folder or directory. Select the designated folder 

from the pop-up window and click 

OK


o


Permission: 

Set the user or group permission to 

Read Only 

or 

Read/Write

o


Comment: 

Enter a comment for reference or description of the rule. 


Network Access List: 

Lists all defined access rules. 

When completed, click 

Save Settings 

to save the settings. 


Before specific user or 
group rules can take 
effect, the default rules 
must be deleted.


Содержание ANAS550

Страница 1: ...2 Bay NAS 3 5 SATA Network Attached Storage Model ANAS550 User s Manual Ver 1 0...

Страница 2: ...1 ADVANCED USER 21 ADVANCED GROUP 22 ADVANCED QUOTAS 23 ADVANCED NETWORK ACCESS 23 ADVANCED FTP SERVER 25 ADVANCED UPnP AV SERVER 26 ADVANCED iTUNES SERVER 26 ADVANCED iTUNES SERVER 27 3 3 TOOLS 29 TO...

Страница 3: ...e network and map drives to your computer With the ease to use and high performance features 2 Bay NAS is the ideal solution for any network 1 1 Package Contents Before you begin the installation plea...

Страница 4: ...1 2 LED The steady Blue light indicates the hard disk drive s is connected but inactive When it blinks the hard disk drive s is reading writing data The steady Orange light indicates the hard disk dr...

Страница 5: ...the power outlet when performing the following assembly procedure Step 1 Make sure the front panel is unlocked Step 2 Slide the front panel up and then pull it off to access the drive bays Step 3 Inse...

Страница 6: ...r switch or router Step 6 Plug the AC power adapter to the power connector located on the rear panel and connect it to a power outlet Step 7 Press the power button to turn on the 2 Bay NAS Verify the...

Страница 7: ...There are multiple methods to access the NAS configuration Method A Using the Airlink101 2 Bay NAS Utility found on the Utility CD This is only available for Windows operating systems Step A1 Insert t...

Страница 8: ...link101 Airlink101 2 Bay NAS Utility Step A4 Select the NAS device you want to connect to and click on Connect to Webpage Note If you do not see any NAS device under Search Device box please make sure...

Страница 9: ...ptional You can also type in the IP address of the NAS device instead of using its host name anas550 If you ever change the username or password and forget you will need to perform the factory reset p...

Страница 10: ...D type you want to use and click Next Note All data will be lost if you want to change the RAID type in the future Step 5 Click OK to start formatting your hard drive s Warning All data will be erased...

Страница 11: ...d type in anas550 and click OK Step 2 Click on the Volume_1 folder to begin accessing your files and using 2 Bay NAS to store backup your data Method 2 Mounting the hard drive to your local computer F...

Страница 12: ...omes up follow the screen instructions and click Next to finish installing the 2 Bay NAS Utility To open the 2 Bay NAS Utility double click the icon on your desktop or go to Start All Programs Airlink...

Страница 13: ...y to mount to your computer from Static box and click Mount Then you will be able to access the disk drive from My Computer Note If you do not see any NAS device under Search Device box please make su...

Страница 14: ...14 Note If you have installed 2 hard drives you will see both of them only when you configure the RAID type as Standard mode Please refer back to 2 2 Configuring 2 Bay NAS Step 3 to 5...

Страница 15: ...to configure the users groups of users and their storage quotas The network access FTP server UPnP AV server iTunes server and DHCP server settings are all contained here as well TOOLS contain the con...

Страница 16: ...16 Step 2 You are recommended to set an admin password here Enter the new password and re enter it for confirmation When completed click Next...

Страница 17: ...ing is critical to have accurate time stamps on the system logs Set an appropriate Time Zone in this step When completed click Next Step 4 You can select the connection type and enter the LAN informat...

Страница 18: ...escription for the 2 Bay NAS or leave the default values When completed click Next Step 6 When completed click Restart to restart the 2 Bay NAS and save the configuration or click Back to go back the...

Страница 19: ...ut can be manually set to 100 or 1000 Mbps Connection type Selecting DHCP Client will cause the 2 Bay NAS to obtain an IP address from the local DHCP server Selecting Static IP requires the user to as...

Страница 20: ...orkgroup name to the 2 Bay NAS Name Assign a name to the 2 Bay NAS so that you can access it through a web browser by entering the device name For example http anas550 When completed click Save Settin...

Страница 21: ...ver via FTP or the local network User And Group Creation This section contains required attributes for a new user including group user name and password When completed click Add to create the user s a...

Страница 22: ...p User And Group Creation Select Group and enter a unique group name in the blank of Add New Group When completed click Add to create the group Group Settings Assign certain user s to a group First se...

Страница 23: ...king the Edit icon Group Quota Settings Group quotas are displayed here Quotas can be edited by clicking the Edit icon Quota Status The current status of the quota feature is displayed here Click Enab...

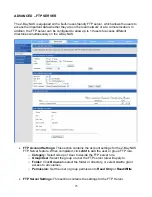
Страница 24: ...Browse to select the folder or directory Select the designated folder from the pop up window and click OK o Permission Set the user or group permission to Read Only or Read Write o Comment Enter a com...

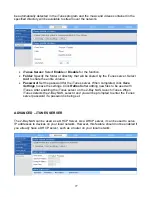
Страница 25: ...Account Settings This section contains the account settings for the 2 Bay NAS FTP Server feature When completed click Add to add the user or group FTP rule o Category Select Group or User to decide t...

Страница 26: ...Server It provides the ability to stream photos music and videos to UPnP AV compatible network media players If the function is enabled the 2 Bay NAS will be automatically detected by the UPnP AV com...

Страница 27: ...When completed click Save Settings to save the settings Click Refresh after adding new files to be used with iTunes After enabling the iTunes server on the 2 Bay NAS launch iTunes When iTunes detects...

Страница 28: ...he DHCP server o Ending IP Address Enter the ending IP address for the range of addresses assigned by the DHCP server o Lease Time Set the duration of time that an IP address will remain assigned to a...

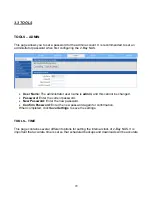
Страница 29: ...n and this cannot be changed Password Enter the current password New Password Enter the new password Confirm Password Enter the new password again for confirmation When completed click Save Settings t...

Страница 30: ...ay NAS with the computer being used to configure it Set The Date And Time Manually This option allows you to set the time and date manually Enter the appropriate time and date and click Set Time Dayli...

Страница 31: ...need to reload this configuration after a system reset click Browse to find the file and click Load Idle Time Enter the time in minutes that the administrator will be allowed to remain idle while acc...

Страница 32: ...omputer and then click Apply to begin the firmware upgrade process Do not power down or restart the NAS Device until the upgrade process is complete TOOLS EMAIL ALERTS With the E Mail Alerts feature y...

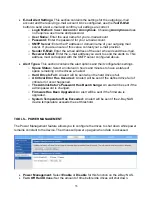
Страница 33: ...section contains the alert options and their configuration settings o Space Status Select an interval in hours and minutes to have a status of space remaining on the drives e mailed o Hard Drive Is F...

Страница 34: ...ID 0 and RAID 1 RAID Settings Click Set RAID Type and Re Format to change the current drive configuration All data will be lost when changing the drive configuration NOTE Standard each drive is a uniq...

Страница 35: ...tings of the 2 Bay NAS Device Info Displays the workgroup device name device description and current temperature of the 2 Bay NAS Printer Info This product does not support print server function Hard...

Страница 36: ...36 3 5 SUPPORT This page provides a menu of Support topics explaining the features of the 2 Bay NAS Click on the desired link to display the related online instruction...

Страница 37: ...n mode click LOGOUT to exit the web configuration and log in to the download page by clicking the Schedule Downloads button on the login dialog box The Main menu of Download page will display as below...

Страница 38: ...192 168 1 1 public file1 avi or ftp ftp yourftp com public file1 avi o Click test to test the connection Click Local to set the source file or folder from one of the internal drive volumes o Save to C...

Страница 39: ...isplays all completed active and pending scheduled downloads and backups 4 2 Status Click the STATUS menu to display the status of the scheduled download tasks Click Refresh to reload the status of th...

Страница 40: ...Reset Button Power Network Protocols DHCP Client Server FTP SMB SMTP HTTP S DLNA HNv1 Button Power LED Power LAN HDD1 HDD2 System Requirement Windows 2000 XP Vista Utility Power adapter External DC 1...

Страница 41: ...t 2008 AirLink101 All rights reserved AirLink101 the stylized AirLink101 logo specific product designations and all other words and logos that are identified as trademarks and or service marks are unl...

Отзывы: