


FR
EN
15
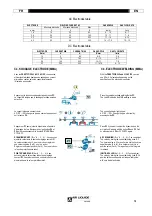
2T/AMORCAGE PAR CONTACT (PAC)
1. Appuyer légèrement l’électrode sur la pièce à
souder.
2. Appuyer sur la gâchette de la torche.
3. Ecarter lentement l’électrode de la pièce à souder.
L’arc s’établit et le courant de soudage atteindra son
niveau pendant la durée de montée en intensité.
4. Relâcher la gâchette, le courant de soudage
descend selon la durée de l’évanouissement choisie.
Une fois l’arc éteint, le gaz continue à s’écouler
pendant la durée du post-gaz.
2-STROKE / CONTACT STRIKING (PAC)
1. Press the electrode lightly on the work piece.
2. Press the torch trigger.
3. Slowly move the electrode away from the work
piece. The arc is set up and the current rises to its
welding level over the current rise time.
4. Release the trigger, the welding current falls over
the selected slope-down time. After the arc has
died the gas continues to flow for the post-gas time.
2T/AMORCAGE PAR CONTACT (PAC)
Le temps d’évanouissement peut être interrompu en
appuyant rapidement sur la gâchette.
2-STROKE / CONTACT STRIKING (PAC)
The slope-down time can be interrupted by
stabbing the trigger quickly.
2T/AMORCAGE PAR CONTACT (PAC)
Vous pouvez revenir au courant de soudage en
appuyant sur la gâchette.
Ainsi, le courant atteindra à nouveau son niveau en
un temps similaire à celui de l’évanouissement.
2-STROKE / CONTACT STRIKING (PAC)
You can return to the welding current by pressing
the trigger.
The current will reach its level in a time similar to
the slope-down time.
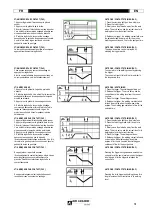
4T/ AMORÇAGE H.F.
1. Appuyer sur la gâchette. Le gaz de protection
s’écoule.
2. Relâcher la gâchette. L’arc s’établit et le courant de
soudage atteindra son niveau pendant le temps de
montée en intensité.
3. Appuyer sur la gâchette. Le soudage continue.
4. Relâcher la gâchette, le courant de soudage
commence à descendre et l’arc s’éteint une fois le
temps de l’évanouissement écoulé. Le gaz de
protection continue à s’écouler pendant la durée
sélectionnée.
4-STROKE / HF STRIKING.
1. Press the trigger. The shielding gas flows out.
2. Release the trigger. The arc is set up and the
current rises to its welding level over the current
rise time.
3. Press the trigger. The welding continues.
4. Release the trigger, the welding current starts to
fall and the arc dies when the slope-down time
expires. The shielding gas continues to flow for the
selected time.
4T/ AMORÇAGE PAR CONTACT (PAC)
1. Appuyer légèrement l’électrode sur la pièce à souder.
2. Appuyer longuement sur la gâchette de la torche.
3. Ecarter lentement l’électrode de la pièce à souder.
L’arc s’établit et le courant de soudage atteindra son
niveau pendant le temps de montée en intensité.
4. Appuyer sur la gâchette. Le soudage continue.
5. Relâcher la gâchette, le courant de soudage
descend et se coupe dès que la durée de
l’évanouissement sélectionnée est écoulée. Une fois
l’arc éteint, le gaz de protection continue à s’écouler
pendant la durée du post-gaz.
4-STROKE / CONTACT STRIKING (PAC)
1. Press the electrode lightly on the work piece
2. Press the torch trigger and hold it down for a
long time.
3. Slowly move the electrode away from the work
piece. The arc is set up and the current rises to its
welding level over the current rise time.
4. Press the trigger. The welding continues.
5. Release the trigger, the welding current falls and
cuts out when the selected slope-down time
expires. After the arc has died the shielding gas
continues to flow for the post-gas time.
4T/ AMORÇAGE PAR CONTACT (PAC)
En appuyant sur la gâchette pendant
l’évanouissement le courant restera au même niveau
aussi longtemps que vous maintiendrez votre
pression. Quand vous relâcherez la gâchette, le
courant descendra.
4-STROKE / CONTACT STRIKING (PAC)
Pressing the trigger during slope-down makes the
current stay at the same level as long as the trigger
is held down. After the trigger is released the
current falls.
4T/ AMORÇAGE PAR CONTACT (PAC)
En appuyant longuement sur la gâchette on peut
revenir au niveau du courant de soudage.
4-STROKE / CONTACT STRIKING (PAC)
Pressing the torch trigger and holding it down for a
long time makes the current return to its welding
level.
Содержание SAF-FRO PRESTOTIG 240 AC/DC
Страница 111: ...111 D3 PIECES DE RECHANGE PRESTOTIG 240 AC DC D3 6 20 14 2 7 8 12 3 1 34 15 9 10 11 4 5 13 16 33 17 ...
Страница 112: ...112 D3 PIECES DE RECHANGE COOLERTIG 2 D3 6 5 18 4 19 3 2 20 8 11 12 1 16 9 10 17 7 13 14 15 ...
Страница 113: ...113 SCHEMA PRESTOTIG 240 AC DC ...
Страница 114: ...114 D3 PIECES DE RECHANGE PRESTOTIG 310 AC DC D3 14 6 12 3 1 17 2 7 15 4 under 13 16 33 9 ...
Страница 115: ...115 D3 PIECES DE RECHANGE COOLERTIG III D3 11 13 1 16 9 10 17 7 12 14 15 6 5 22 21 1 4 8 3 2 20 ...
Страница 116: ...116 SCHEMA PRESTOTIG 310 AC DC P R E S T O T I G 3 1 0 A C D C ...
Страница 117: ...117 DESCRIPTION DU PANNEAU DE REGLAGE DU PRESTOTIG 240 310 AC DC voir page 6 ...
Страница 118: ...118 DESCRIPTION DU PANNEAU DE REGLAGE voir page 6 ...
Страница 119: ......
Страница 120: ......
Страница 121: ......