5
Gen IV Controller with Smart Arm Setup Instruction Manual
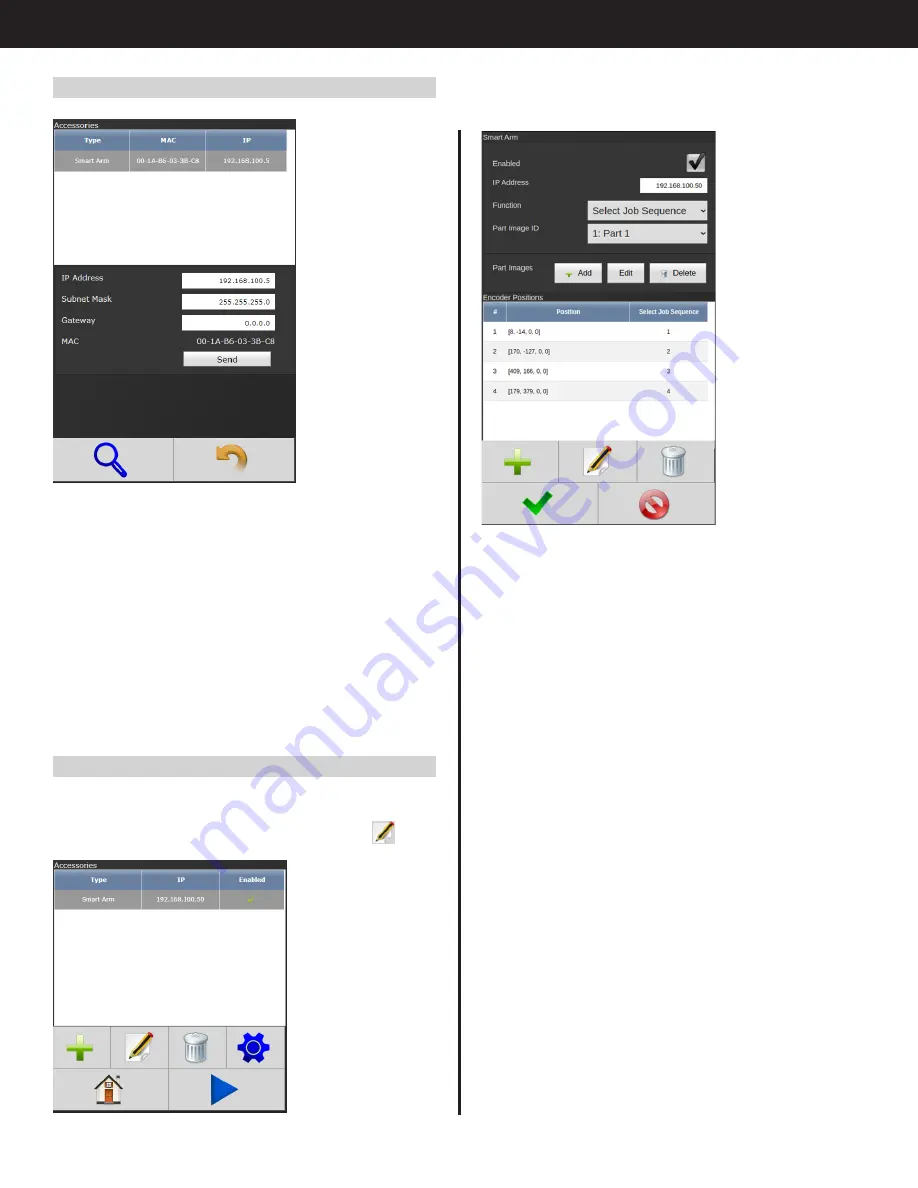
The Main Configuration/Primary Setup screen will
appear.
The primary setup screen contains the basic settings
for what action will be taken when the arm is in
position and a list of valid locations. Settings are not
saved until the OK/Check button is clicked.
•
Enabled:
Toggles whether the smart arm
accessory is active. If this is unchecked then the
smart arm will not control the enabled state of
the tool
•
IP Address:
This is the IP Address of the smart
arm accessory that was set up in "7.3 Accessory
Scanning and IP Setup Screen" on page 5
•
Function:
Selects what action the smart arm
position activates. Options include
○
Select Pset
▪
This will pair a location to a PSet and
the controller will select the PSet when
this location is matched
○
Verify Pset
▪
The tool will be disabled until the PSet
is selected that matches the required
PSet from the location configuration
○
Select Job Sequence
▪
This will pair a location to a job
sequence. The controller will select
a specific job sequence when the
location is matched
○
Verify job Sequence
▪
The tool will be disabled until the
correct job sequence is selected that
matches the job sequence from the
location configuration
7.3 Accessory Scanning and IP Setup Screen
This screen is used to configure the IP settings of the
accessory. Clicking the magnifying glass will search
for AcraDyne Accessories on the network. Any
accessories found will show up in the list. Click on the
accessory to be configured to edit its settings. Once
clicked, the current settings will autofill in the edit
fields. Edit these and click ‘Send’ to send the new
settings to the accessory that matches that MAC
address. Ensure that the accessory being modified
is the intended accessory by matching the MAC
address on the screen to the MAC address labeled
on the accessory box.
7.4 Main Configuration Screen
To configure the smart arm accessory, select it from
the Accessory Setup Screen and select Edit
Содержание AcraDyne
Страница 15: ......


