background image

36

AcraDyne Gen IV iAC Controller Manual

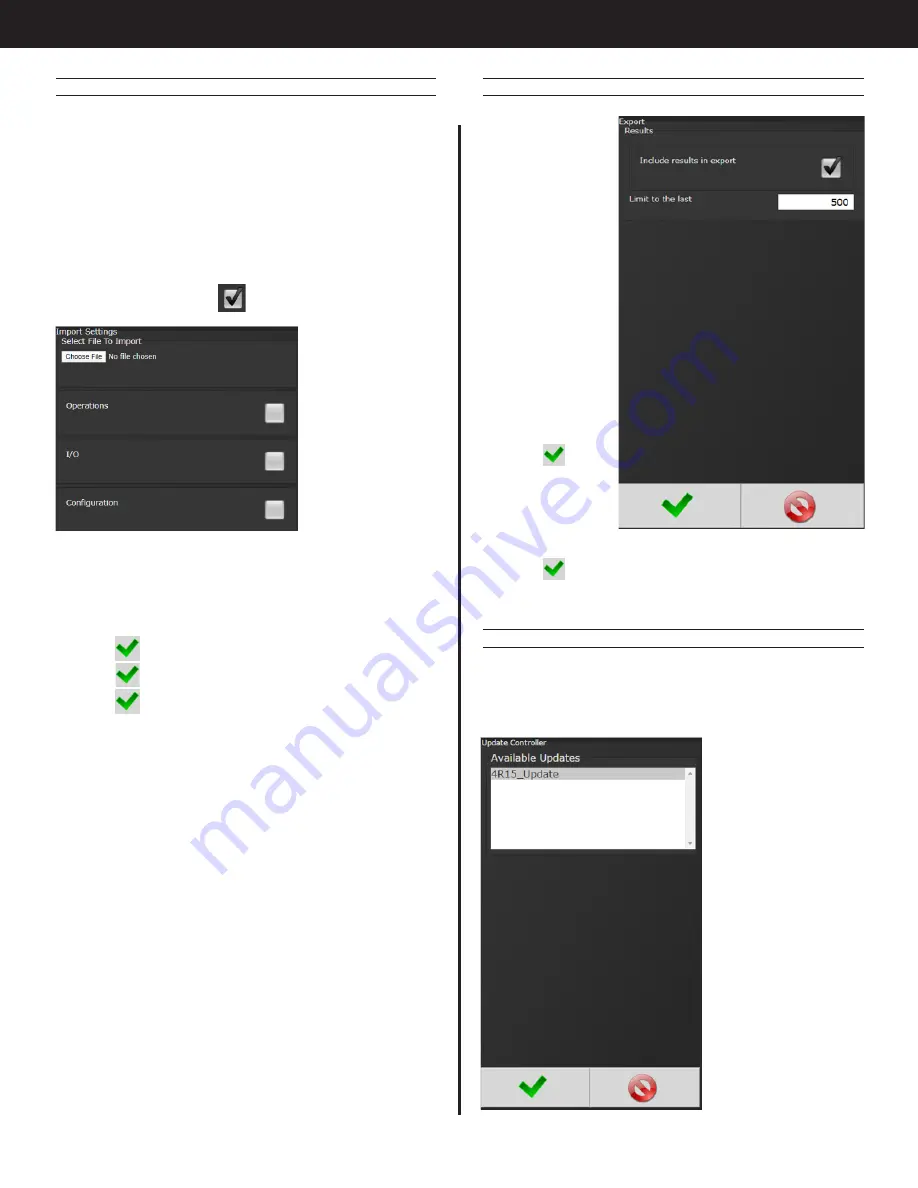
4.9.3  Import Settings

This allows the user to download any previously 

saved settings onto the controller (refer to ‘Export 

Controller’ for help with saving data). 

1. 

Plug the USB with an export file into any port on 

the controller.

2.  From the Home screen, navigate to Advanced 

→ Import Settings.

3.  Select the settings to be checking the 

corresponding box 

Operations:

 This 

includes PSets 

and Jobs.

I/O:

 This includes 

I/O settings 

for the local 

I/O, Anybus, 

Modbus, and 

EtherNet/IP.

Configuration:

 This includes all settings of the controller 

except I/O, Master Spindle, Rundowns, PSets or Jobs.

Spindle:

 This includes any Master Spindle setup (i.e. 

number of spindles, slave IP addresses, etc).
4.  Press 

 to accept the changes.

5.  Press 

 to proceed.

6.  Press 

 when the import is complete and the 

controller will restart.

Import settings that were exported from another 

controller via a USB flash drive. Use this to quickly 

apply the same settings across several controllers. 

For example, it is common to have multiple 

controllers with the same I/O configuration. Set up 

one controller with the correct I/O configuration 

and export the controller from Advanced → Export 

Controller. Now the I/O settings can be imported 

using this screen.

NOTE:

 Setting can only be imported from controllers 

running the same version of software.

4.9.4  Export Controller

This allows the 

user to save 

Configuration, 

Operations, I/O, 

and Spindle 

settings onto a 

USB flash drive.

1.  Plug a USB 

into any 

port on the 

controller.

2.  From the 

Home screen, 

navigate to 

Advanced 

→ 

Export 

Controller.

3.  Press 

 to 

continue, and 

the controller 

will begin 

the export 

process.

4.  Press 

 to complete the export.

4.9.5  Update Controller

NOTE:

 Updated firmware versions will typically be 

sent via email zip file. Always save PSet and IP 

address information before upgrading controller.

Upgrading the 

AIMCO Gen IV 

Controller

Using the 

TouchScreen or 

a System Port 

browser session, 

navigate to the 

‘Advanced’ menu. 

Click ‘Update 

Controller’ and 

select the latest 

release. 

Click the green 

checkmark when 

ready.

Содержание AcraDyne Gen IV iAC

Страница 1: ...Gen IV iAC Controller Operation Manual 10000 SE Pine St Portland OR 97216 800 852 1368 503 254 6600 Fax 800 582 9015 www aimco global com ...

Страница 2: ...ysical IO Monitor 23 4 5 2 3 Anybus Modbus TCP Ethernet IP Inputs 24 4 5 2 4 Anybus Modbus TCP Ethernet IP Outputs 25 4 5 3 Communication Interfaces 26 4 5 3 1 Ethernet 26 4 5 3 2 Second Ethernet 26 4 5 3 3 System Port 26 4 5 3 4 Serial 27 4 5 3 5 Anybus 27 4 5 3 6 Serial USB 27 4 5 4 Protocols 29 4 5 5 Front Panel Buttons 29 4 5 6 Power Up 29 4 5 7 Bar Code Setup 29 4 5 8 Set Time 30 4 5 9 Remote...

Страница 3: ...evice is maintained 7 Air Handling a In the event of loss of air flow to this unit power must be turned off Damage to air regulator can occur b Supply air that is filtered to 5 microns General Power Tool Safety Warnings WARNING Read all safety warnings instructions illustrations and specifications provided with this power tool Failure to follow all instructions listed below may result in electric ...

Страница 4: ...s for process control 10 Anybus To connect customers field bus network Ex Profibus AcraDyne Gen IV iEC Controller Manual 2 Controller Diagram 2 2 Bottom Panel iAC Models with Shutoff Valve and or Regulator 1 Air Outlet to the tool NPT bottom exit versions 2 Tool Connector bottom exit versions 3 Power Disconnect Switch Turns controller power on and off 4 Power Supply Cord Connection 5 System Port U...

Страница 5: ...chieving low angle The angle indication overrides pulse in the case where the angle was low but the pulse was high Blue Tool is In cycle above threshold Toggle Button Toggles what is shown in the secondary display Torque Display Always displays torque value Secondary Display Toggle button switches secondary display between Units of measure Ethernet IP address USB System Port IP address Angle repor...

Страница 6: ...h the controller may need to be modified in order to connect to local 230Vac power outlets AIMCO has a wide variety of country specific power cord options available Check with your authorized AIMCO representatives to see if your specific configuration is available In any case connection to local power should be made in consultation with a qualified electrician Step 8 Turn controller on by pushing ...

Страница 7: ...LAN Touchscreen Console Controller functions and programming can be accessed directly through the touch screen 1 Power on controller 2 Run screen will appear 3 Controller is ready for use Connecting via the System Port Directly to PC The following is an example using Window 7 Your screen may look different depending on the operating system Windows USB Setup Step 1 Power on PC and controller allow ...

Страница 8: ...click Properties Step 9 In Properties set the IP address to a static address Type an IP address of 192 168 1 5 Any address on the same subnet as the controller will work Set subnet mask to 255 255 255 0 Step 10 To connect to the controller open a browser such as Chrome or Firefox Enter 192 168 1 4 the default system port IP address Step 4 Go to Network and Internet Step 5 Go to Network and Sharing...

Страница 9: ...Controller does not have a DHCP client it will not automatically configure itself with a usable IP address Consult your Network Administrator for configuring a correct IP address for your network The PC Laptop or Tablet IP address will need to be configured to communicate with the controller 3 3 Enter Tool Information into the Controller Attention For proper operation of the tool the tool ratings ...

Страница 10: ...eal time Job information such as Run Screen or rundown indicators Home tab will return user to the Home Page Click for curve detail Click on blue arrow to change curve X axis Time Overall Screen Choose Time In cycle Time Overall Angle or Angle In Cycle screen Run Screen displays real time Job information 4 1 Run The Run Screen is essentially the dashboard of the Gen IV controller and provides a lo...

Страница 11: ... IV iAC Controller Manual Large Screen Indicators and Audit information The large screen indicators are helpful in viewing real time results of the rundown from a distance Example of Accepted Job Example of Failed Job ...

Страница 12: ...lue at which tool is In Cycle and results from the Rundown will be reported This value is also used to count pulses by determining the start of a pulse Time Limit s Maximum allowable time in seconds tool is allowed to run after going In Cycle Advanced Options see 4 2 4 Advanced Options on page 16 Once PSet values are entered press to enter Add New Stage screen 4 2 1 1 Add New Stage A single stage ...

Страница 13: ...pulses Pulse Low Minimum acceptable pulses Pulse Reference drop down menu In cycle Pulse Monitoring number of tool Pulse begins after the tool overcomes pre set in cycle Torque Stage Pulse Monitoring all Pulses specifically in the Stage Additional Pulses After reaching target torque additional pulses to be applied before shutting of the air to the tool PSI Desired amount of air pressure supplied t...

Страница 14: ...he Reference Torque value set Pulse Bailout Total number of Pulses never to be exceeded Helps to illustrate how far past Pulse High the rundown experienced awithout damaging the part or excessively wearing the tool s Pulse Fluid Pulse High Maximum acceptable pulses Pulse Low Minimum acceptable pulses Pulse Reference drop down menu In cycle Pulse Monitoring number of tool Pulse begins after the too...

Страница 15: ...first stage of the PSet is applied when the tool is enabled to run a Stage Timeout s Maximum allowable time in seconds in this stage If time is exceeded the tool will stop and the Rundown will be terminated 4 2 2 4 AC_TM Angle Control Torque Monitor Torque High Upper control limit of the rundown Torque Target Final desired torque CUT Level Torque Low The lower control limit of the rundown a Torque...

Страница 16: ...ction the tool is required to run for fastening NOTE The actual tool direction is set on the tool Judgement Delay Delay after the air is shutoff to the tool where the peak torque pulse count and angle are still being recorded After this delay the rundown is evaluated and reported as complete 4 2 3 Edit PSet On Home page press On the PSet screen click on the desired PSet you would like to edit Clic...

Страница 17: ...eating point Pulse Timeout The primary use for this timer is to detect trigger release This timer starts after a pulse is detected If another pulse is not detected before the timer expires then the rundown will terminate Re hit Reject Parameters Prevents the fastening of an already tightened fastener If enabled tool will stop and the rundown will be aborted if the angle of rotation between the Re ...

Страница 18: ...inal audit stage The overall result of the rundown will be reported as a reject The torque pulse and angle evaluation will be determined using the limits set in the stage that was running when the rundown was terminated The peak torque pulse count and angle at the point in time when the rundown was terminated is used for the stage evaluation The torque pulse count and angle status reported will re...

Страница 19: ...ning They are displayed on the run screen stored in the results and transmitted on all protocols 4 3 3 Jobs Enabled Display and Button Function Torque Display Always displays torque value Toggle Button PSet Job Functions Secondary Display Parameter Setting PSet Job Display Increment Decrement Buttons Increment and Decrement buttons change the job sequence The PSet number will change and job sequen...

Страница 20: ...Individual Rundown Information 4 4 Results This screen provides a history of rundowns performed Information such as ID Number Time Stamp Parameter Set Accept Reject status and Torque and Angle are recorded for each rundown Deletes individual rundowns by clicking on them separately and deleting them in the next screen or deleting all rundowns by clicking on the icon at the bottom of Results page A ...

Страница 21: ... tool CAL Ratio Calibration factor for matching the torque reading of the tool controller to a torque auditor Maximum Torque Nm Rated maximum torque of the tool This is used when determining the default PSets Rated Speed Rated catalog speed of the tool Optional information only Does not affect the operation of the tool Model Number Optional information only Does not affect the operation of the too...

Страница 22: ...rundown record containing the following Overall evaluation will be marked as Disassembled Peak torque during the disassembly torque shown as negative Peak overall angle during the disassembly angle shown as negative Curve data from the disassembly Parameters from the current PSet selected Fastening events from the disassembly All of the controller s status LEDs will be turned OFF The LED display w...

Страница 23: ...e Enable Disable Enables the forcing of the selected input or output Force Off On If Force is enabled this button will toggle the state of input or output selected 4 5 2 IO 4 5 2 1 Physical IO Assign functionality to 24V Input and Output pins Shows the live state of each Input and Output Functions shown in screen shot are default settings To change these assignments click on the Function column of...

Страница 24: ...n Torque not shown Torque value to be reported when using Click Wrench input Value input is what will be sent from controller when Input Signal is received from a Click Wrench Value is NOT calculated by the controller rather it is solely what the Click Wrench is calibrated to by outside means Polarity not shown Select Normally Open or Normally Closed Outputs Function See 11 Assignable I O on page ...

Страница 25: ...rting bit location Polarity Select Normally Open N O or Normally Closed N C Outputs Mode Normal Output signal sent Timed Signal Sent Time entered in seconds Flash Signal Sent Time entered in seconds Function See 11 Assignable I O on page 47 for more details on assignable functions Click on after appropriate changes are made Example of the Anybus Output screen with five Outputs set up Click on to c...

Страница 26: ...m Port NOTE It is not recommended to change this setting 4 5 3 Communication Interfaces 4 5 3 1 Ethernet IP Address IP address of controller s Ethernet port Subnet Mask Subnet mask of the controller Gateway Gateway is the IP address of the gateway computer that provides access beyond the local network NOTE Consult your local System Administrator to connect the controller to your Network and assign...

Страница 27: ...nd configure per hardware requirements Open Protocol Select from dropdown and configure per hardware requirements PFCS Select from dropdown and configure per hardware requirements Baud Serial ports can be configured for different baud rates available 75 110 300 1200 2400 4800 9600 19200 38400 57600 115200 Data Bits Stop Bits Parity Configure per hardware requirements Serial Output Format Options S...

Страница 28: ...et Standard Output Format O P HHHHH LLLLL TTTTT P HHHHH LLLLL AAAAA CR CR NULL O Overall Pass Fail P Pass F Fail P Torque Pass Fail P Pass F Fail HHHHH Torque High Limit Units selected in the PSet X10 LLLLL Torque Low Limit Units selected in the PSet X10 TTTTT Torque Result Units selected in the PSet X10 P Angle Pass Fail P Pass F Fail HHHHH Angle High Limit Degrees LLLLL Angle Low Limit Degrees A...

Страница 29: ...ast as long in length as the Mask The Mask can also contain don t care characters of a decimal point or period in the string These characters are counted in the length however the actual received character in that position doesn t matter 4 5 4 Protocols For information about these settings see individual protocol instructions on AIMCO s website at www aimco global com 4 5 5 Front Panel Buttons Ena...

Страница 30: ...ceived barcode will be stored into Identifier Description Text field can be used to give a description to each identifier type Example Vehicle Action Action executed by controller when barcode with a matching identifier mask is scanned The actions are Select Job This will require a Job to be configured on the JOB page when using this option Do Nothing Select PSet Action When Select Job or Select P...

Страница 31: ...rdware Hardware configuration of the controller 4 7 2 Controller Status Shows Live status of controller voltages active faults and temperature 4 6 Accessories This screen shows accessories configured in the controller New accessories can be added edited and deleted using the buttons at the bottom of the table The gear icon navigates to the Accessory Scanning and Setup page 4 7 Diagnostics The Diag...

Страница 32: ...of these values are out of range 24 Vdc Represents voltage from 24V power supply Value is reported as on or off 0 or 24 0 volts This supply is for external use via 24V I O port 15 Vdc and 15Vdc These are voltages that power the torque transducer for IAC IPC controllers only 5 Vdc Represents voltage from 5V power supply powering controller electronics 3 3 Vdc Represents controller electronics inter...

Страница 33: ... be displayed on the controller screen 4 7 9 Network Diagnostics Network Diagnostics can be useful in troubleshooting Ethernet communication issues Ethernet Shows if the Ethernet port is physically connected and if the hardware is operational Test Connection Provides a way to check the ethernet connection to other devices on the same network Capture Captures and saves the ethernet traffic for eval...

Страница 34: ... Setup This screen allows the user to select the default Login level upon controller start up Operator Technician Administrator 4 8 Login When a password is required it can be entered in this screen Three levels of access to the controller are available Operator Run Login screens available Technician Run PSet Job Diagnostics and Login screens available Administrator All screens available ...

Страница 35: ...e save the runs to either a USB stick or to the Web as a USV file imported directly into an Excel spreadsheet Using the touchscreen console you can select multiple files to save Using the web option you can select one of these files at a time to save web option is default Select either USB or Web Archive location Select a file and press 4 9 2 Results Archive Example of Saved Excel File ...

Страница 36: ...uickly apply the same settings across several controllers For example it is common to have multiple controllers with the same I O configuration Set up one controller with the correct I O configuration and export the controller from Advanced Export Controller Now the I O settings can be imported using this screen NOTE Setting can only be imported from controllers running the same version of softwar...

Страница 37: ...ess Restore to initialize the restore process 5 Press to restore all settings and firmware to last backup the restore process will begin 6 The controller will restart when finished 4 9 7 Restore Factory Defaults This allows the user to reset the controller s parameters to factory settings 1 From the Home screen navigate to Advanced Restore Factory Defaults 2 Select the settings to be changed and a...

Страница 38: ...ion are available on the controller console 1 From the Home screen navigate to Advanced Calibrate Touch Screen 2 Press to disable the tool 3 Select the desired calibration Custom Calibration This allows the user to create a custom calibration setting for the touch screen Factory Default Calibration This calibrates the touchscreen to the factory defaults 4 Press to accept the selection 5 Press to p...

Страница 39: ...an be associated with up to four identifiers Identifier s can be used to select a parameter set or a job Display identifier s on controller Ability to lock out tool until correct identifier s is entered Ability to block barcode reads while a job is in progress Barcode reads identifiers can come from any or all the following sources Serial barcode reader Open protocol Fieldbus network Telnet port S...

Страница 40: ... ID 2 ID 3 ID 4 Yes No No No Examples This is what the Operator Scans example looks like once set up in the Barcode Configuration Screen see 4 5 7 Bar Code Setup on page 29 Airbag Install The customer wants to track the serial number of each airbag being installed as well as the operator installing it When the operator reports to the station they will scan their employee ID When the vehicle comes ...

Страница 41: ... status of NOK High Torque When peak torque recorded exceeds the High Torque the fastening cycle is recorded as a reject for High Torque the High Torque light solid red illuminates and fastening cycle is given an overall status of NOK High Pulse When pulse count recorded exceeds the High Pulse the fastening cycle is recorded as a reject for High Pulse the High Pulse light solid yellow illuminates ...

Страница 42: ...anges Button Reject the changes made and return to the parent screen Edit screens Add New Button Add a new item Pset Stage Job and other PSet and Job edit screens Edit Button Edit selected Item PSet and Job edit screens Move Up and Down Buttons Move selected item up or down in the sequence order PSet and Job edit screens Copy Button Copy selected Items PSet Job and other edit screens Delete Button...

Страница 43: ...n from a Multi Spindle Job has not been configured NET XML Disconnected XML Stop from XML NOK XML Max Rejects Exceeded FLT Controller Fault Error has been detected See fault code list for details Code Icon Description IO Stopped or Disabled from Physical 24 volt IO input ABUS Stopped or Disabled from ANYBUS MODB Stopped or Disabled from Modbus EIP Stopped or Disabled from Ethernet IP RTU Stopped o...

Страница 44: ...f tolerance 15 Volt bus voltage out of range Faulty power supply or wiring Faulty Controller main board or other Controller electronics Faulty tool cable Faulty tool electronics or wiring FH25 15vdc out of tolerance 15 Volt bus voltage out of range Faulty power supply or wiring Faulty Controller main board or other Controller electronics Faulty tool cable Faulty tool electronics or wiring FS26 Pow...

Страница 45: ...out and Diagrams An I O wiring adapter kit is available Part 27348 from AIMCO to make connection to I O port on the controller easier Contact your AIMCO Sales Representative for ordering information Toll Free 1 800 852 1368 Pin Function Default Assignment 1 Output 1 Accept 2 Output 2 Reject 3 Output 3 In Cycle 4 Output 4 Torque High 5 Outputs 1 4 common 6 Input 1 N C 7 Input 2 N C 8 Input 3 Disabl...

Страница 46: ...troller via system port and web browser default address 192 168 1 4 4 Navigate to Advanced Import Settings 5 Choose file and select ONLY I O 6 Click OK 7 Click OK in the Confirmation dialog box 8 The controller will restart 9 Verify the Anybus outputs a Navigate to Controller IO Anybus Outputs b Click on the first row of element 1 and verify it is set as Running Job Number Bit 0 Bits 8 Start at 0 ...

Страница 47: ...ime word swap Verify PSet Clear Results Log Change Decrement Batch Increment Batch Click Wrench Bypass Stops Verify Job Sequence ASCII ID Abort Job Remote Start Remove Lock on Reject All assignments have a bus element and bit configuration to define its location in the system The bus value needs to be set from the list above The element and bit define the location in the bus The first element on t...

Страница 48: ...r limit the width of the input bits read The minimum width is 1 and the maximum is 8 After the input is read the offset parameter will be added to the value do get the actual job number Selecting an invalid job number will disable the tool Polarity When the polarity is set to N O the input is considered active high 24vdc for physical inputs and logic 1 for all network type buses When the polarity ...

Страница 49: ...disabled Clear Results Supported Feature Bus Element Bit 0 31 Polarity N O N C Width Offset The Clear Results assignment will clear the latest results outputs Ok Nok etc on the same bus Select Job Sequence Supported Feature Bus Element Bit 0 31 Polarity N O N C Width Offset The Select Job Sequence input will select the job sequence number according to the input value Uses the width parameter limit...

Страница 50: ...running JOB This will cause the JOB count to be reduced by one Increment Batch Supported Feature Bus Element Bit 0 31 Polarity N O N C Width Offset The Increment Batch assignment will insert a manual rundown into the current sequence of the current JOB This will cause the JOB count to increment by one Click Wrench Supported Feature Bus Element Bit 0 31 Polarity N O N C Width Offset The Click Wrenc...

Страница 51: ...Z Ok Nok Torque Ok Torque Nok Low Torque High Torque Angle Ok Angle Nok Low Angle High Angle Fastening Complete In Cycle Fastening Aborted Fastening Stopped Batch Complete Job Complete Error Tool Start Switch Tool Push to Start Switch Tool MFB Tool Enabled Tool Running Service Indicator ToolsNet Connected Open Protocol Connected PFCS Connected Running PSet Number Running Job Number External Contro...

Страница 52: ...ment 0 For the first element on the bus Bit 4 For the starting bit location Width 2 To span the two bits 4 5 Offset 1 Adding 1 to the read input value so we get 1 Binary 00 2 Binary 01 3 Binary 10 4 Binary 11 Polarity When the polarity is set to N O the output will be high when it is active 24vdc for physical outputs and logic 1 for all network type buses When the polarity is set to N C the output...

Страница 53: ... inactive when the next fastening is started the torque exceeds the threshold value or a Job reset Low Torque Supported Feature Bus Element Bit 0 32 Polarity N O N C Mode Normal Timed Flash Time Width Offset Input Bus Input Element Input Bit The Low Torque output assignment will go active at the completion of a fastening that has a low torque results It will go inactive when the next fastening is ...

Страница 54: ... It will go inactive when the fastening cycle ends Fastening Aborted Supported Feature Bus Element Bit 0 32 Polarity N O N C Mode Normal Timed Flash Time Width Offset Input Bus Input Element Input Bit The Fastening Aborted output assignment will go active at the completion of a fastening that was aborted by the system It will go inactive when the next fastening is started the torque exceeds the th...

Страница 55: ...rted Feature Bus Element Bit 0 32 Polarity N O N C Mode Normal Timed Flash Time Width Offset Input Bus Input Element Input Bit The Tool Enabled output assignment will be active if the tool is enabled Tool Running Supported Feature Bus Element Bit 0 32 Polarity N O N C Mode Normal Timed Flash Time Width Offset Input Bus Input Element Input Bit The Tool Running output assignment will be active while...

Страница 56: ...de Normal Timed Flash Time Width Offset Input Bus Input Element Input Bit The Tool In CCW output assignment will be active if the tool is put into disassembly mode and inactive if the tool is in assembly mode Tool In CW Supported Feature Bus Element Bit 0 32 Polarity N O N C Mode Normal Timed Flash Time Width Offset Input Bus Input Element Input Bit The Tool In CW output assignment will be active ...

Страница 57: ...his output to work It will go inactive when the next fastening is started the torque exceeds the threshold value or a Job reset Spindle Ok Supported Feature Bus Element Bit 0 32 Polarity N O N C Mode Normal Timed Flash Time Width Offset Input Bus Input Element Input Bit The Spindle Ok output assignment will go active at the completion of multi spindle fastening if all spindles have an OK It will g...

Страница 58: ...utput assignment will go active at the completion of a fastening that has an pulse count that falls below the low limit It will go inactive when the next fastening is started the torque exceeds the threshold value or a Job reset ON Supported Feature Bus Element Bit 0 32 Polarity N O N C Mode Normal Timed Flash Time Width Offset Input Bus Input Element Input Bit The ON output assignment will be act...

Страница 59: ...uest 11 Parameter set ID upload reply 14 Parameter set selected subscribe 15 Parameter set selected 16 Parameter set selected acknowledge 17 Parameter set selected unsubscribe 18 Select Parameter set 19 Set Parameter set batch size 20 Reset Parameter set batch counter 30 Job ID upload request 31 Job ID upload reply 34 Job info subscribe 35 Job info 36 Job info acknowledge 37 Job info unsubscribe 3...

Страница 60: ...Communication stop 4 Command error 5 Command accepted 10 Parameter set ID upload request 11 Parameter set ID upload reply 14 Parameter set selected subscribe 15 Parameter set selected 16 Parameter set selected acknowledge 17 Parameter set selected unsubscribe 18 Select Parameter set 20 Reset Parameter set batch counter 30 Job ID upload request 31 Job ID upload reply 34 Job info subscribe 35 Job in...

Страница 61: ...ing Type 3 8 NPT Female Electrical AC Power Source 100 240 VAC 50 60 Hz 1Amp 100 Watts Standards Compliance Contact AIMCO for details 800 852 1368 or 503 254 6600 Mechanical Dimensions Width 6 25 in 159 mm Height 15 75 in 400 mm Depth 12 5 in 316 mm Weight Controller 11 15 1bs depending on options 5 6 8 kg depending on options Plinth 4 5 lbs 2 kg Operating Conditions Temperature 32 to 122 F 0 to 5...

Страница 62: ...ware configuration and rundowns to a new controller in the event of hardware failure This allows the controller to be replaced with a new unit while retaining all the rundown information and configuration settings Remove the rear SD card from the damaged unit and insert it into a functioning unit to perform the replacement It is highly recommended that the controller settings are backed up and sav...

Страница 63: ...ual Step 6 In the Select Network Adapter window select Microsoft Corporation from the Manufacturer list Under the list of Network Adapter select Remote NDIS Compatible Device Step 7 The RNDIS Kitl device is now installed and ready for use ...

Страница 64: ...to the original buyer against defects in materials and workmanship for a period of one 1 year from date of delivery Under the terms of this warranty AIMCO agrees without charge to repair or replace at its option and Ex Works EXW its authorized service centers any product or accessory warranted hereunder proving to AIMCO s satisfaction to be defective as a result of defective workmanship or materia...

Страница 65: ......

Страница 66: ......

Страница 67: ......

Страница 68: ...XICO SA DE CV 10000 SE Pine Street Ave Cristobal Colon 14529 Portland Oregon 97216 Chihuahua Chihuahua 31125 Phone 503 254 6600 Mexico Toll Free 1 800 852 1368 Phone 01 614 380 1010 Fax 01 614 380 1019 LIT MAN177iAC Rev 07 31 20 Printed in USA 2020 AIMCO ...

Отзывы: