Page 25
11.1.2 RS232 Interface
The 9-way D-type serial interface connector is located on the instrument rear panel. It should be
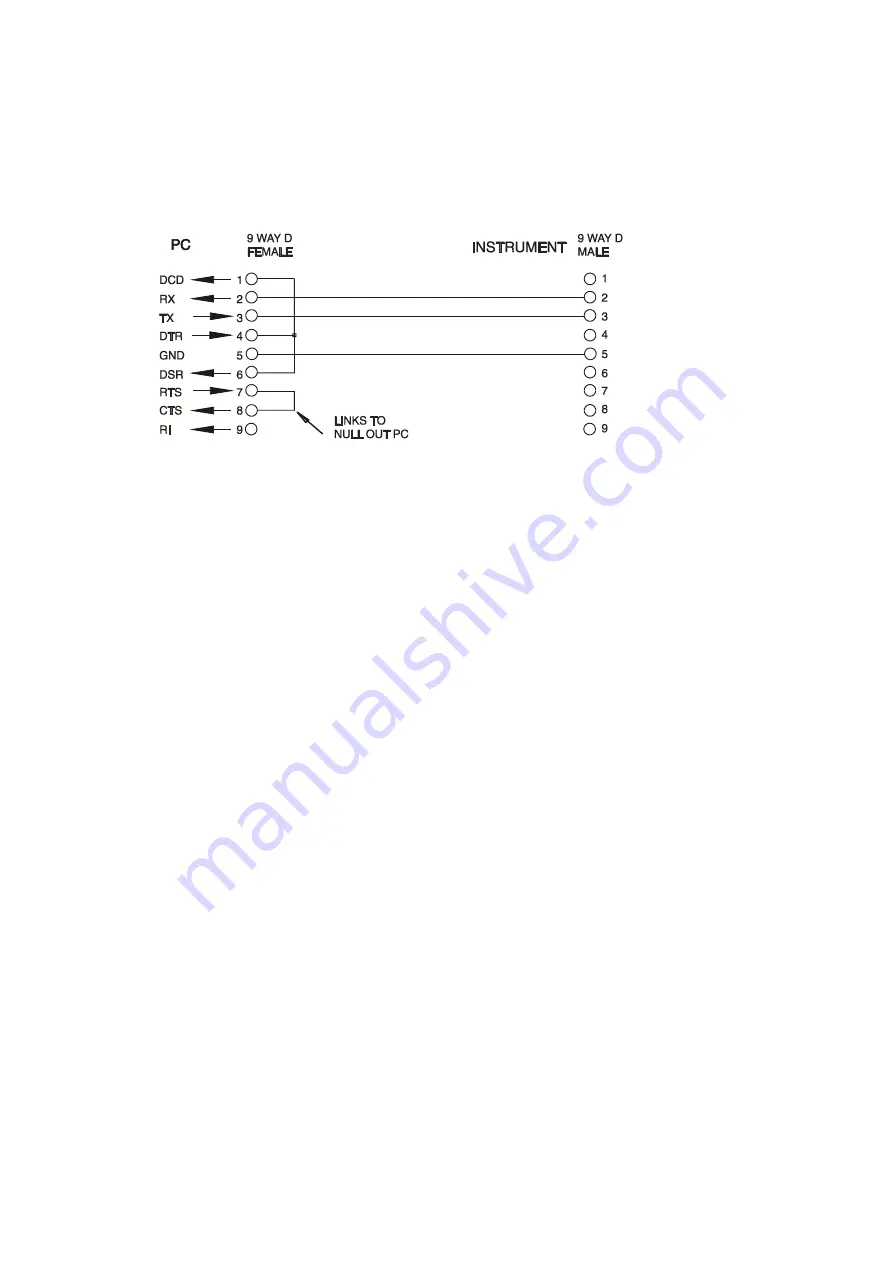
connected to a standard PC port preferably using a fully wired 9 way 1:1 male-female cable
without any cross-over connections. Alternatively, a 3-way cable can be used, connecting only
pins 2, 3 and 5 to the PC, but with links made in the connector at the PC end between pins 1, 4
and 6 and between pins 7 and 8, as shown in the diagram:
Most commercial cables provide these connections.
In addition to the transmit and receive data lines, the instrument passively asserts pins 1 (DCD)
and 6 (DSR), actively drives pin 8 (CTS) and monitors pin 4 (DTR) from the PC. This allows the
use of a fully wired 9-way cable.
The Baud Rate for this instrument is fixed at 9600; the other parameters are 8 data bits, no
parity and one stop bit. Flow control uses the XON/XOFF protocol, but because of the low
volume of data associated with this instrument it is very unlikely that flow control will actually be
invoked.
11.1.3 USB Interface and Device Driver Installation
The instrument firmware can be updated in the field through the USB port. This does not need
the driver described here. It requires a PC software utility provided by the manufacturer, and
uses a HID driver that will already be installed on the PC. If that is the only USB functionality
required, download the package containing the firmware update together with the PC utility from
the manufacturer, and follow the instructions included.
Using the USB interface for remote control requires a Communications Device Class driver on
the PC to provide a virtual COM port instance. In Windows a suitable driver is provided by
Microsoft, but it is not installed by default. The data (.INF) file to control the installation is
provided on the Product Documentation CD delivered with the unit; however, the same driver is
also used by many other instruments from this manufacturer and may already be known to the
PC.
To install the driver for the first time, first switch the unit on, and then connect the USB port to
the PC. The Windows plug and play functions should automatically recognise the attachment of
new hardware to the USB interface and (possibly after searching the internet for some time)
prompt for the location of a suitable driver. Follow the Windows prompts and point to the CD,
then the sub-directory for this product, and then to the USB Driver sub-directory below that. The
file is named USB_ARM_VCP_xxx.INF, where xxx is a version number. (A readme.pdf file will
also be found in that directory if further assistance is needed.)
In some cases, Windows will not complete this procedure (especially recent versions which
search the internet first, looking for the unique Vendor ID and Product ID), in which case the
instrument will show in Device Manager as “not working properly”.


