background image

Tel. +39 049 641 679 

|

 [email protected] 

|

 www.aercomponents.it

35

EN

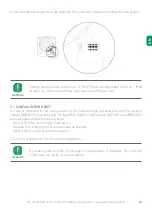
When turning on the unit the first time and when passing from stand-by or switch 
OFF to switch ON, the tilting front cover will take 40 seconds to open.

NOTE

 - The meaning of “heat recovery operation” corresponds to standard operation of the product i.e. 70 

seconds in extraction and 70 seconds in intake reversing the cycle with open tilting front cover.

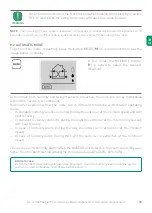
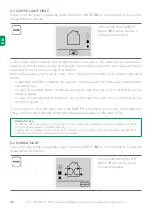
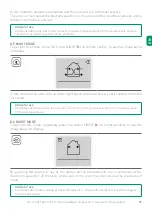
8.2  AUTOMATIC MODE

To get into this mode, repeatedly press the button MODE (

M

) on remote control, to see the 

image below on display.

In  this  mode  the  HUMIDITY  button 
(

H

)  is  active  to  select  the  desired 

threshold.

In this mode both humidity and twilight sensors are active, the units will run by themselves 
without the need to give commands.
Hereinafter  explaining  how  the  units  run  in  different  situations  with  related  operating 
mode.
–  In standard humidity conditions during the day the units run at the medium speed and with 

heat recovery.

–  In standard humidity conditions during the night the units run at the minimum speed and 

with heat recovery.

–  In  case  of  humidity  alarm  during  the  day  the  units  run  in  extraction  at  the  medium 

speed.

–  In  case  of  humidity  alarm  during  the  night  the  units  run  in  extraction  at  the  minimum 

speed.

The units get into humidity alarm when the MASTER unit detects in the room a humidity level 
higher than the set threshold among the three values available (40%, 60%, 90%).

Advice for use

Recommended mode during standard use of product; once the humidity level is set, the system 

will run by itself without the need of any further action.

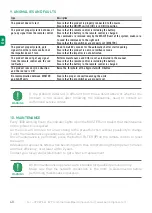
WARNING

Содержание RECARM

Страница 1: ...MANUALE DI INSTALLAZIONE E D USO INSTALLATION AND USE MANUAL RECARM Unità di calore decentralizzata a flusso reversibile Decentralized heat recovery unit with reversible flow ...

Страница 2: ...Tel 39 049 641 679 commerciale aercomponents it www aercomponents it 2 ...

Страница 3: ...I ELETTRICI 12 7 CONFIGURAZIONE 12 7 1 Reset configurazione 13 8 ISTRUZIONI D USO 14 8 1 Segnalazioni audio visive 14 8 2 Modalità automatica 15 8 3 Modalità sorveglianza 16 8 4 Modalità manuale 16 8 5 Modalità notte 17 8 6 Modalità espulsione temporizzata Boost 17 8 7 Modalità flusso aria MASTER SLAVE 18 8 8 Modalità flusso aria SLAVE MASTER 18 8 9 Modalità espulsione 19 8 10 Modalità immissione ...

Страница 4: ...rie indicati su questa targa 1 IDENTIFICAZIONE DELLA MACCHINA Ogni unità è provvista di una targhetta identificativa che contiene i principali dati della macchina UNITÀ TIPO UNIT TYPE NUMERO SERIE SERIES NUMBER CODICE VENTILATORE FAN CODE POTENZA INSTALLATA POWER IN PUT Kw CORRENTE ASSORBITA OPERATING CURRENT A ALIMENTAZIONE POWER SUPPLY V F PH HZ www aercomponents it IT ...

Страница 5: ...ga dismesso si raccomanda di renderlo inoperante eliminando il cavo di alimentazione Si raccomanda inoltre di rendere innocue le parti potenzialmente pericolose specialmente per i bambini che potrebbero servirsene per i propri giochi L installazione deve essere effettuata secondo le istruzioni del costruttore da personale professionalmente qualificato Un errata installazione può causare danni a pe...

Страница 6: ...immagazzinato nello scambiatore Il prodotto deve essere installato a muro Il tubo all interno del quale è posizionato lo scambiatore ceramico è fornito per pareti da uno spessore massimo di 500 mm il tubo può essere accorciato ad un minimo di 250 mm L aria estratta o immessa dal prodotto non deve contenere miscele infiammabili o esplosive vapori chimici polveri oli e altre sostanze patogene in gen...

Страница 7: ... tra i 30 C e i 50 RECARM Ø foro mm Tensione V Frequenza Hz Portata In Out m3 h Pressione mmH2 O Pa Potenza W Rendimento Rumorosità a 3 m dB A Peso kg 160 220 240 50 60 5 5 54 6 7 93 Max 30 5 PRESTAZIONI Velocità notte Velocità 1 Portata m3 h Potenza W Rumore dB A Portata m3 h Potenza W Rumore dB A 10 3 9 4 20 4 2 9 Velocità 2 Velocità 3 Portata m3 h Potenza W Rumore dB A Portata m3 h Potenza W Ru...

Страница 8: ...anto questi potrebbero comprometterne il corretto funzionamento Assicurarsi che una volta installato le pale della ventola siano poste a non meno di 2 30 m di distanza dal pavimento sottostante al prodotto In caso di installazione di più apparecchi la distanza tra ciascun prodotto deve essere di almeno 3 m Prima di montare il prodotto leggere attentamente ed attenersi scrupolosamente al manuale di...

Страница 9: ...Tel 39 049 641 679 commerciale aercomponents it www aercomponents it 9 5 2 MONTAGGIO 1 3 5 7a 2 4 6 7b ESTERNO ESTERNO ESTERNO IT ...

Страница 10: ...Tel 39 049 641 679 commerciale aercomponents it www aercomponents it 10 Vedi Collegamenti elettrici p 12 7 9 11 8 10 12 IT ...

Страница 11: ...Tel 39 049 641 679 commerciale aercomponents it www aercomponents it 11 Vedi Configurazione p 12 13 15 17 14 16 18 IT ...

Страница 12: ...R è l unica che riceverà i comandi dal controllo e che rileverà le condizioni ambientali tramite i sensori e di conseguenza comanderà tutto il resto dell impianto MASTER SLAVE OPPOSTO A MASTER SLAVE UGUALE A MASTER ON OFF OFF OFF OFF ON Nel caso di abitazioni con metrature importanti o di impianti realizzati su più piani si consiglia di dividere l impianto in più zone zona giorno zona notte o 1 pi...

Страница 13: ...ri di configurazione delle unità tramite dip switches sia per quanto riguarda la codifica impianto e sia per quanto riguarda la configurazione MASTER SLAVE delle unità sarà necessario procedere in questo modo Spegnere l unità tramite interruttore principale Cambiare la configurazione dei dip switches con quella desiderata Accendere l unità tramite interruttore principale A questo punto la macchina...

Страница 14: ...odalità ESPULSIONE TEMPORIZZATA Modalità FLUSSO D ARIA MASTER SLAVE Modalità FLUSSO D ARIA SLAVE MASTER Modalità ESPULSIONE Modalità IMMISSIONE 8 1 SEGNALAZIONI AUDIO VISIVE Ricezione Comando Quando l unità ventilante riceverà correttamente un comando emetterà un BIP e il LED bianco lampeggerà una volta Modalità Sorveglianza Quando il prodotto si trova in modalità sorveglianza il LED rosso lampegg...

Страница 15: ...nità quindi si autogestiscono senza il bisogno di dare ulteriori comandi Di seguito sono elencate le varie condizioni in cui si possono trovare le macchine con la relativa modalità di funzionamento In condizioni di umidità normale di giorno le macchine funzionano alla velocità media in recupero di calore In condizioni di umidità normale di notte le macchine funzionano alla velocità minima in recup...

Страница 16: ...ità di giorno le macchine funzionano alla velocità media in espulsione con il led rosso acceso In condizione di allarme umidità di notte le macchine funzionano alla minima velocità in espulsione Le unità entrano in allarme umidità quando l unità MASTER rileva un umidità ambientale superiore alla soglia impostata tra le 3 disponibili 40 60 90 Consiglio di utilizzo Modalità consigliata nei casi in c...

Страница 17: ...he si vede sotto In questa modalità tutte le unità funzioneranno alla velocità notte in recupero di calore fino a quando non verrà inserito un altro comando Consigli di utilizzo Questa modalità è consigliata nei casi in cui l ambiente esterno sia molto silenzioso e anche la velocità minima del prodotto venga percepita 8 6 MODALITÀ ESPULSIONE TEMPORIZZATA BOOST Per entrare in questa modalità bisogn...

Страница 18: ...anno costantemente nella direzione desiderata con la possibilità di cambiare la velocità di funzionamento in base alle proprie esigenze 8 8 MODALITÀ FLUSSO D ARIA SLAVE MASTER Per entrare in questa modalità bisogna premere ripetutamente il tasto FLUSSO F del telecomando fino a che verrà visualizzata la schermata che si vede sotto In questa modalità è attivo il tasto VENTOLA V per scegliere la sogl...

Страница 19: ... recupero di calore ad esempio quando gli ambienti sono frequentati da molte più persone rispetto all uso normale feste ricorrenze ecc 8 10 MODALITÀ IMMISSIONE Per entrare in questa modalità bisogna premere ripetutamente il tasto FLUSSO F del telecomando fino a che verrà visualizzata la schermata che si vede sotto In questa modalità è attivo il tasto VENTOLA V per scegliere la soglia desiderata Pr...

Страница 20: ...iona solo in modalità espulsione e rimane acceso il led rosso Alzare la soglia di intervento dell igrostato con il tasto H I prodotti master slave non comunicano Verificare che i prodotti siano connessi correttamente tra di loro Verificare che i dip switches siano impostati correttamente Nel caso la problematica riscontrata sia diversa da quelle elencate o nel caso non si risolva seguendo i passag...

Страница 21: ...Tel 39 049 641 679 commerciale aercomponents it www aercomponents it 21 1 3 5 7 9 2 4 6 8 10 1 2 1 2 1 2 IT ...

Страница 22: ...Tel 39 049 641 679 commerciale aercomponents it www aercomponents it 22 11 MANUTENZIONI E INTERVENTI DATA CONTROLLO ANOMALIA ESITO INTERVENTO FIRMA IT ...

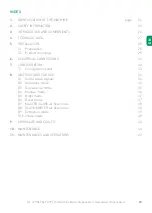
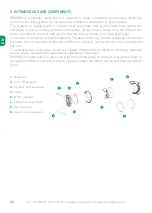
Страница 23: ...oduct mounting 29 6 ELECTRICAL CONNECTIONS 32 7 CONFIGURATION 32 7 1 Configuration reset 33 8 INSTRUCTIONS FOR USE 34 8 1 Audio visual signals 34 8 2 Automatic mode 35 8 3 Surveillance mode 36 8 4 Manual mode 36 8 5 Night mode 37 8 6 Boost mode 37 8 7 MASTER SLAVE air flow mode 38 8 8 SLAVE MASTER air flow mode 38 8 9 Extraction mode 39 8 10 Intake mode 39 9 ANOMALIES AND FAULTS 40 10 MAINTENANCE ...

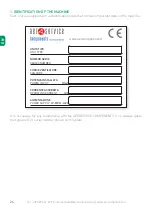
Страница 24: ...or serial number shown on this plate 1 IDENTIFICATION OF THE MACHINE Each unit is equipped with a identification plate that contains important data on the machine UNITÀ TIPO UNIT TYPE NUMERO SERIE SERIES NUMBER CODICE VENTILATORE FAN CODE POTENZA INSTALLATA POWER IN PUT Kw CORRENTE ASSORBITA OPERATING CURRENT A ALIMENTAZIONE POWER SUPPLY V F PH HZ www aercomponents it EN ...

Страница 25: ...rotate freely and without oscillation and is properly fixed to the shaft When the appliance is out of use remove the power lead Moreover make potentially dangerous parts harmless especially with regard to children who might play with appliance when it is not in use Installation must be carried out by qualified personnel according to manufacturer s instructions Incorrect installation can cause dama...

Страница 26: ...d in the heat exchanger The product is designed for wall installation The duct containing the heat exchanger is supplied for walls with a maximum thickness of 500 mm the duct can be shorten to a minimum of 250 mm The extracted or incoming air must not contain inflammable or explosive mixtures chemical vapors dusts oils and other pathogenic substances in general RECARM is composed of a main unit wi...

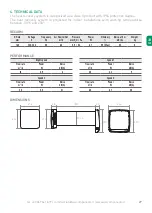
Страница 27: ...atures between 30 C and 50 RECARM Ø Hole mm Voltage V Frequency Hz Air flow In Out m3 h Pressure mmH2 O Pa Power W Efficiency Noise at 3 m dB A Weight kg 160 220 240 50 60 5 5 54 6 7 93 Max 30 5 PERFORMANCE Night speed Speed 1 Flow rate m3 h Power W Noise dB A Flow rate m3 h Power W Noise dB A 10 3 9 4 20 4 2 9 Speed 2 Speed 3 Flow rate m3 h Power W Noise dB A Flow rate m3 h Power W Noise dB A 40 ...

Страница 28: ...mise the correct working of the product Make sure that once installed the fan blades are placed not less than 2 30m away from the floor below to the product In case of installation of more than one appliance the distance between the products must be at least 3 metres Before assembling or using this product carefully read all the instructions in this manual and be sure to own all the necessary mate...

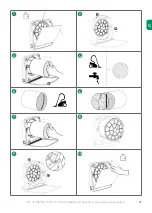
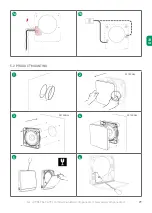
Страница 29: ...Tel 39 049 641 679 commerciale aercomponents it www aercomponents it 29 EN 5 2 PRODUCT MOUNTING 1 3 5 7a 2 4 6 7b EXTERNAL EXTERNAL EXTERNAL ...

Страница 30: ...Tel 39 049 641 679 commerciale aercomponents it www aercomponents it 30 EN See Electrical connections p 32 7 9 11 8 10 12 ...

Страница 31: ...Tel 39 049 641 679 commerciale aercomponents it www aercomponents it 31 EN See Configuration p 32 13 15 17 14 16 18 ...

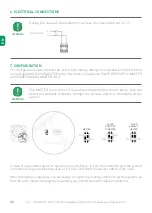
Страница 32: ...nly unit receiving commands from control device that will detect the ambient conditions through the sensors and thus controlling all the system MASTER SLAVE OPPOSITE TO MASTER SLAVE SAME AS MASTER ON OFF OFF OFF OFF ON In case of large indoor space or systems on multi floors it is recommended to split the system into zones living area sleeping area or 1st floor 2nd floor for easier control of the ...

Страница 33: ...ET In case of mistakes in the configuration of the units through dip switches both for system coding WIRELESS version and for MASTER SLAVE configuration ACTIVE and WIRELESS version please follow the instructions Switch OFF the unit through main switch Change the configuration of dip switches as needed Switch ON the unit through main switch The unit is properly set with the new configuration By kee...

Страница 34: ...uick buttons NIGHT mode BOOST mode MASTER SLAVE AIR FLOW mode SLAVE MASTER AIR FLOW mode EXTRACTION mode INTAKE mode 8 1 AUDIO VISUAL SIGNALS Command receipt When the unit properly receives the command will make a BIP sound and the LED will flash white Surveillance mode When the product is in surveillance mode the red LED blinks every 60 seconds Humidity alarm When the unit gets into humidity alar...

Страница 35: ... the units will run by themselves without the need to give commands Hereinafter explaining how the units run in different situations with related operating mode In standard humidity conditions during the day the units run at the medium speed and with heat recovery In standard humidity conditions during the night the units run at the minimum speed and with heat recovery In case of humidity alarm du...

Страница 36: ...losed and the sensors active In case of humidity alarm conditions during the day the units run in extraction at the medium speed In case of humidity alarm conditions during the night the units run in extraction at the minimum speed The units get into humidity alarm when the MASTER unit detects in the room a humidity level higher than the set threshold among the three values available 40 60 90 Advi...

Страница 37: ...ol to see the image below on display In this mode all the units will run at the night speed with heat recovery until another command is entered Advise for use Recommended mode when the external environment is very quiet and even the minimum speed of the unit is perceived 8 6 BOOST MODE To get into this mode repeatedly press the button TIMER B on remote control to see the image below on display By ...

Страница 38: ...e specific function button all the units will constantly run in the desired direction with the possibility to change the speed as required 8 8 SLAVE MASTER AIR FLOW MODE To get into this mode repeatedly press the button FLOW F of remote control to see the image below on display In this mode the IMPELLER button V is active to select the desired speed In this mode the units generate a continuous air...

Страница 39: ...ded mode to extract a lot of stale air to the disadvantage of the heat recovery when rooms are very crowded like during parties anniversaries 8 10 INTAKE MODE To get into this mode repeatedly press the button FLOW F of remote control to see the image below on display In this mode the IMPELLER button V is active to select the desired speed By pressing the specific function button all the units will...

Страница 40: ...sure that the battery in the remote control is charged The product runs only in extraction and the red led is ON Raise the threshold of the hygrostat with H button No communication between MASTER and SLAVE units Ensure the proper connection among the units Ensure that the dip switches are properly set If the problem detected is different from those listed above or whether the problem is not solved...

Страница 41: ...Tel 39 049 641 679 commerciale aercomponents it www aercomponents it 41 EN 1 3 5 7 9 2 4 6 8 10 1 2 1 2 1 2 ...

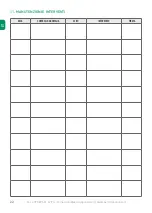
Страница 42: ...Tel 39 049 641 679 commerciale aercomponents it www aercomponents it 42 11 MAINTENANCES AND OPERATIONS DATE CHECK OR FAILURE RESULT ACTION SIGNATURE ...

Страница 43: ...Tel 39 049 641 679 commerciale aercomponents it www aercomponents it 43 ...

Страница 44: ...AERSERVICE COMPONENTS Srl www aercomponents it Via Marconi 1 35020 Legnaro PD P IVA e CF 04888500289 Tel 39 049 641679 Fax 39 049 790674 commerciale aercomponents it ...

Отзывы: