Information subject to change
96-8006123_11-03-2021
8302 OPERATOR’S MANUAL – SECTION 6
26
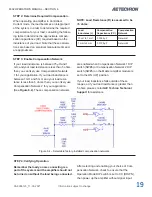
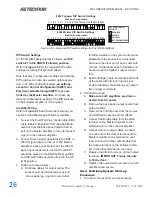
DIP Switch Settings
On the amplifier designated as Follower,
set DIP
switch #7 in the DOWN (Follower) position.
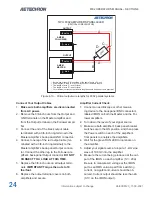
Refer to
Figure 6.12
for the required DIP switch
settings for testing Push/Pull amplifiers.
Note that other configuration settings controlled by
DIP switches can also be selected before opera
-
tion. In an 8302 multi-amp system,
all settings
except for Control Configuration (SW#7) and
Electronic Gain Matching (SW#17) are con
-
trolled by the Master amplifier.
For these ad-
ditional configurations, setting of the DIP switches
on the Follower amplifier is not required.
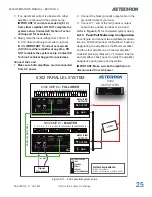
Amplifier Wiring
Refer to
Figure 6.13
and make the following con
-
nections to the Master and Follower amplifiers.
1.
Connect the Push/Pull 9-pin D-sub cable
(DB9
cable labeled “Push/Pull” from the 8302 Multi-
amp Kit) from the back-panel Interconnect B
port on the Master amplifier to the Interconnect
A port on the Follower amplifier.
2.
Connect from a signal generator to the BNC or
WECO signal input connector on the Master
amplifier’s back panel. Note that if the WECO
signal input connector is used, DIP switch #1
should be placed in the DOWN (OFF) position
and DIP switch #2 should be placed in the UP
(ON) position.
3.
Build your output cables:
A.
Build two cables for output wiring. The
wires should be terminated at one end
into a spade lug, ring terminal or other
terminal suitable for the system output and
adaptable to the connectors on the load.
Terminate the other end of each cable with
3/8-inch ring terminal ends to facilitate con
-
nection to each amplifier’s output connec
-
tors.
B.
Build a “Bridge” cable. Terminate both ends
of the cable with 3/8-inch ring terminal
ends to facilitate connection to each ampli
-
fier’s output connectors.
4. Connect the Load
A.
Make sure both amplifiers are discon-
nected from AC power.
B.
Remove the back-panel output covers from
both amplifiers.
C.
Remove the 3/8-inch nuts from the Output
and GND terminals on both amplifiers.
D. Connect the Bridge cable from the GND
terminal on the Master amplifier to the
GND terminal on the Follower amplifier.
E.
Connect the two output cables. Connect
one cable from the Output terminal of the
Master amplifier to one terminal on your
load. Connect the other output cable from
the Output terminal on the Follower ampli
-
fier to the other terminal on your load.
F.
Replace the 3/8-inch nuts on all four output
terminals.
IMPORTANT: Torque the nuts
to 10 lbs./foot.
G. Replace the output terminal covers on both
amplifiers and secure.
6.4.4 Multiamp System Start-up
Procedure
1.
Turn down the level of your signal source.
8302 Follower DIP Switch Settings
Push/Pull Configuration
1 2 3 4 5 6 7 8 9 10 11 12 13 14 15 16 17 18 19 20 21 22 23 24
8302 Master DIP Switch Settings
Push/Pull Configuration
1 2 3 4 5 6 7 8 9 10 11 12 13 14 15 16 17 18 19 20 21 22 23 24
KEY FOR DIP SWITCH
SETTINGS:
REQUIRED
DEFAULT
OPTIONAL
NOT RECOMMENDED
Figure 6.12 – Required DIP switch settings for Push/Pull amplifiers
Содержание 8302
Страница 2: ......

