background image


                ©2006 Adventistsat.com

22

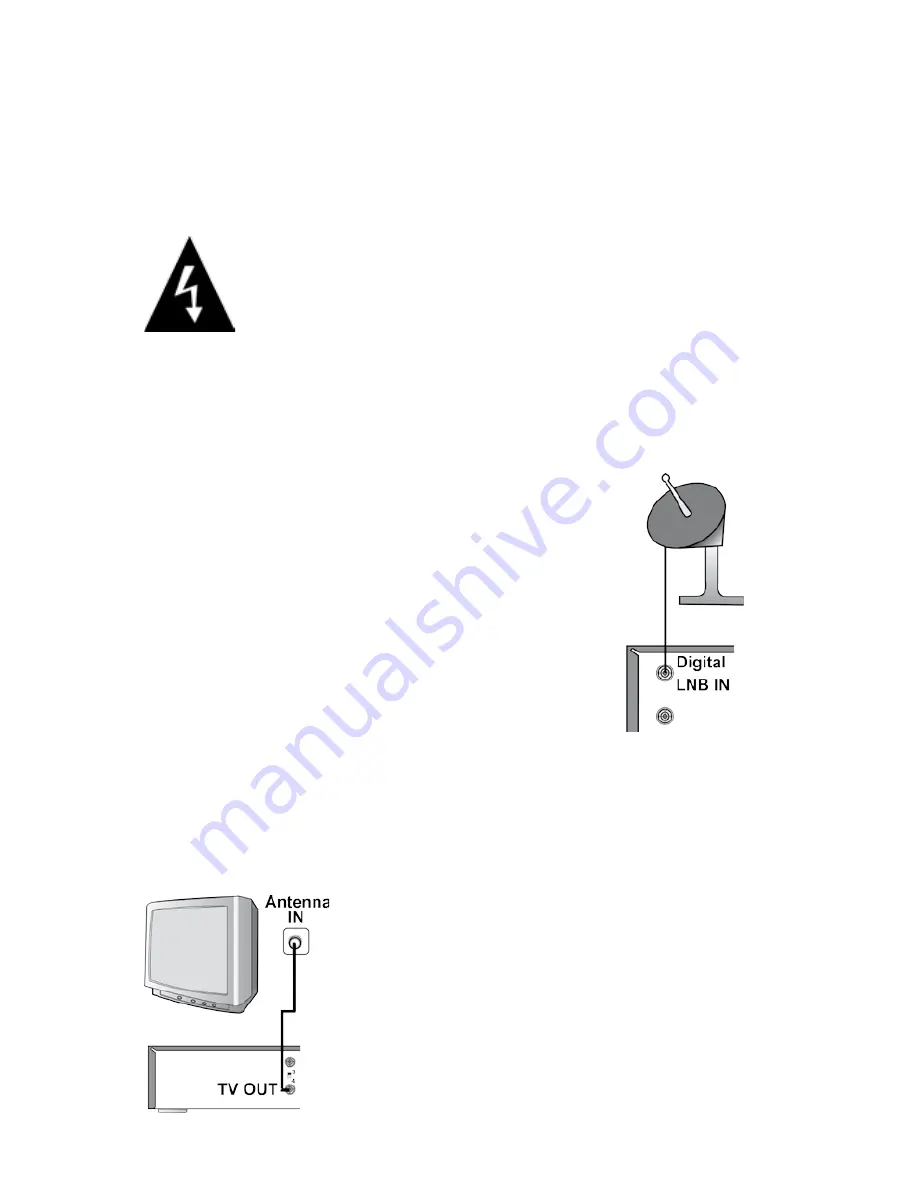
Connect Receiver and TV

The easiest way to aim the satellite dish is to temporarily place the 

satellite receiver connected to a small television at the dish antenna 

mounting location. 

CAUTION:  DO  NOT  ATTEMPT  TO  OPERATE 

ELECTRONIC  DEVICES  IN  AN  UNSAFE 

LOCATION OR IN VIOLATION OF SAFEGUARDS 

PROVIDED IN THIS MANUAL OR ANY OTHER 

EQUIPMENT  MANUAL  PROVIDED WITH THIS 

ADVENTISTSAT SATELLITE SYSTEM.

Remove the satellite receiver and remote control from the packaging. 

Inspect the unit before operation. If any equipment is damaged or if 

you have any questions, please immediately contact AdventistSat at 

866-552-6882.

Finger-tighten all connections. Never use a wrench to tighten the 

LNBF and receiver connections as this will cause severe damage 

and void the warranty!

Set  the  channel  3/4  selection  switch  on  the 

back  of  the  satellite  receiver  to  an  unused 

channel in your area (usually channel 3). Plug 

the television power plug into a surge protected 

power strip Turn the TV power on and set the 

channel to match this same channel. 
Plug the satellite receiver’s AC power plug to 

the same power strip. Power ON the Master 

Power Switch on back of the receiver.

Install  the  two  included AAA  batteries  into  the 

remote control. Connect a coaxial cable from the 

LNBF on the dish antenna to the LNB IN Digital 

port on the back of the satellite receiver. Do not 

connect  Satellite  dish  to  ANT  INPUT,  as  this 

input is reserved for an outdoor antenna or cable 

TV connection.

Содержание GEOSATpro DVR1000ci

Страница 1: ...__________ Dish Elevation _______ _______ Compass Azimuth _______ _______ LNBF Rotation _______ _______ AdventistSat Installation Guide Digital Video Recorder System 45 Hours Record Capacity Reception...

Страница 2: ...ruled that local government zoning or homeowner s associations may not prevent the installation of satellite antennas one meter 39 or smaller in diameter unless legitimate safety restrictions such as...

Страница 3: ...for Professional Installers 34 Site Check Satellite Elevation Finder Tool 37 Materials contained in this installation manual are the property of AdventistSat 8801 Washington Blvd Suite 101 Roseville C...

Страница 4: ...2006 Adventistsat com...

Страница 5: ...ound heights and electrical hazards Determining if water pipes gas lines or wires are hidden before drilling Using a power drill to drill holes into your house Routing cable through walls crawl spaces...

Страница 6: ...or 1 LNBF ARM 1 Post 1 Tripod Support Leg 2 Installation Kit 1 LNBF 1 Tools Required Phillips Screwdriver Drill and Bits Hammer AdventistSat System Parts Measuring Tape 10 11mm Socket Dish Accessory K...

Страница 7: ...NoticetoSystemInstaller Thisisaremindertothesysteminstaller to follow Article 820 40 of the NEC that provides guidelines for proper grounding and in particular specifies that the cable ground shall be...

Страница 8: ...on the product and in the operating instructions should be adhered to Follow Instructions Follow all operating and usage instructions Cleaning Unplug this product from the wall outlet before cleaning...

Страница 9: ...a bookcase or rack unless proper ventilation is provided or the manufacturer s instructions have been adhered to Power Sources This product should be operated only from the type of power source indic...

Страница 10: ...the antenna or cable system This will prevent damage to the product due to lightning and power line surges Power Lines An outside antenna system should not be located in the vicinity of overhead powe...

Страница 11: ...in or water If the product does not operate normally by following the operating instructions Adjust only those controls that are covered by the operating instructions as an improper adjustment of othe...

Страница 12: ...mpt to install the dish indoors Site Survey If you feel comfortable with drilling holes in the walls and or roof of your home climbing ladders attaching wires to the utility ground according to NEC an...

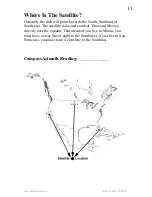
Страница 13: ...the South Southeast or Southwest The satellite is located south of Texas and Mexico directly over the equator That means if you live in Miami you must have a clear line of sight to the Southwest if yo...

Страница 14: ...der with the weighted string registering the correct elevation angle Is the line of sight clear with no branches limbs or tall buildings Please note that the Elevation Angle Finder is only used for th...

Страница 15: ...al wall roof post mount This mount can be attached at almost any angle and provides a stable secure mount even in high wind regions if properly attached If this universal post mount is used the includ...

Страница 16: ...edges of the reflector laying perfectly flat If any area of the edge is raised by even an 1 8th of an inch reception of the satellite signal could be affected It is important to check the reflector fo...

Страница 17: ...if any of these parts are missing or damaged Most replacement or damaged hardware items can be found at a local hardware supply store If the reflector edges are not laying perfectly flat pick up the...

Страница 18: ...e Elevation Bracket to the Post Clamp using either the hole stampedAif the Dish ElevationAngle is between 20 50 degrees or the hole stamped B if the elevation angle is 50 90 degrees The dish has been...

Страница 19: ...e reflector rotate the LNBF counter clockwise left for a positive LNBF Rotation setting and Clockwise right for a negative LNBF Rotation setting The RotationAngle is marked on the LNBF Clamp for Zero...

Страница 20: ...roof rafter using two 5 16th x 3 lag bolts Adding 5 16th x 2 lag bolts on the outer edges will increase stability To prevent water leakage use the included silicone sealant or other waterproofing prod...

Страница 21: ...sealant on any roof or wall penetration The legs are required to support the wind load on the universal post mount Failure to install the tripod support legs will result in collapse of the post during...

Страница 22: ...set using an angle finder on the LNBF arm or on the face of the dish for the elevation indicator is a white line that is visible through the elevation scale and is located near the edge of the elevat...

Страница 23: ...e dish to be just loose enough to be moved left or right by gripping the elevation bracket with applying light pressure Example Texas Magnetic Compass Reading 180 degrees Compass Reading Azimuth In No...

Страница 24: ...ger tighten all connections Never use a wrench to tighten the LNBF and receiver connections as this will cause severe damage and void the warranty Set the channel 3 4 selection switch on the back of t...

Страница 25: ...Press the CH DOWN arrow to select Installation Press OK Enter password 0000 with the remote numeric keypad Press the CH DOWN arrow to select Antenna Setup Select satellite AMC4 KU by pressing the VOL...

Страница 26: ...ed to be adjusted up to 5 degrees depending on the accuracy of the post leveling and mechanical tolerances Move the dish very slowly to allow the receiver to process the signal information and update...

Страница 27: ...possible to insure optimum picture and sound on the receiver The higher the quality the better the reception If the signal quality is low the picture will break up into little squares and the sound w...

Страница 28: ...ify that the Signal Quality is 70 or better on all channels If the Signal Quality is below 70 on any of the channels place the receiver on the channel with the lowest quality reading and make very sma...

Страница 29: ...w to properly ground your satellite system please consult with a local professional Copies of the NEC are often available at your local library or online Important Notice AdventistSat recommends that...

Страница 30: ...tellite radio services Channels may offer alternative audio translations or additional audio services Press the AUDIO button to determine if additional audio selections are available Press CH UP or CH...

Страница 31: ...e breaks up into big blocks and the audio is garbled The antenna might not be aimed correctly Satellite view partially obstructed Damaged coax or connections Satellite receiver has a channel number on...

Страница 32: ...ceiver is capable of automatically programming these additional TV and Radio services Many free national and international services are available Do this at your own risk as AdventistSat will only pro...

Страница 33: ...ers manual provided with TV VCR or other device that will be connected to the AdventistSat satellite receiver The manual will include important connection and operational information Please contact Ad...

Страница 34: ...Temporary 55 Universal Remote Mercury Replacement 20 RF Remote Extender Change Channels from 2nd Room 45 Dish 1 2 Meter Reliable Fringe Area Reception 129 Signal Line Amplifier Long Cable Runs 12 Dual...

Страница 35: ...Merchandise Authorization before returning any merchandise Equipment must be properly protected and packaged to prevent damage in transit The retail display box provided with the equipment is not sui...

Страница 36: ...the included universal post mount Failure to install the tripod support legs will result in a Charge Back to the contracted installer Install the LNBF into LNBF clamp The LNBF should be slid in the c...

Страница 37: ...ut Selector Switch on the back of the receiver to Channel 3 or 4 and select the same channel on the television set Power ON the Master Power switch on the rear of the receiver 6 Power the receiver in...

Страница 38: ...lity must be at least 90 on this channel Press VOL RIGHT arrow to place the receiver on 12020 This is the LLBNchannel a weaker transponder Verify the Quality reading is 70 If not peak Quality reading...

Страница 39: ...www adventistsat com Toll Free 866 552 6882 37 Cut Here...

Отзывы: