background image

Chapter 9  Award BIOS Setup

9 5

Delayed Transaction

When disabled, the syatem operates normally. When enabled, the
system can support lower-speed ISA devices.

The options are: Disabled (Default), Enabled.

Spread Spectrum

When disabled, the syatem operates normally. When enabled, the
spread spectrum will be set to 0.5% (CNTR).

The options are: Disabled (Default), Enabled.

9.6

Power Management Setup

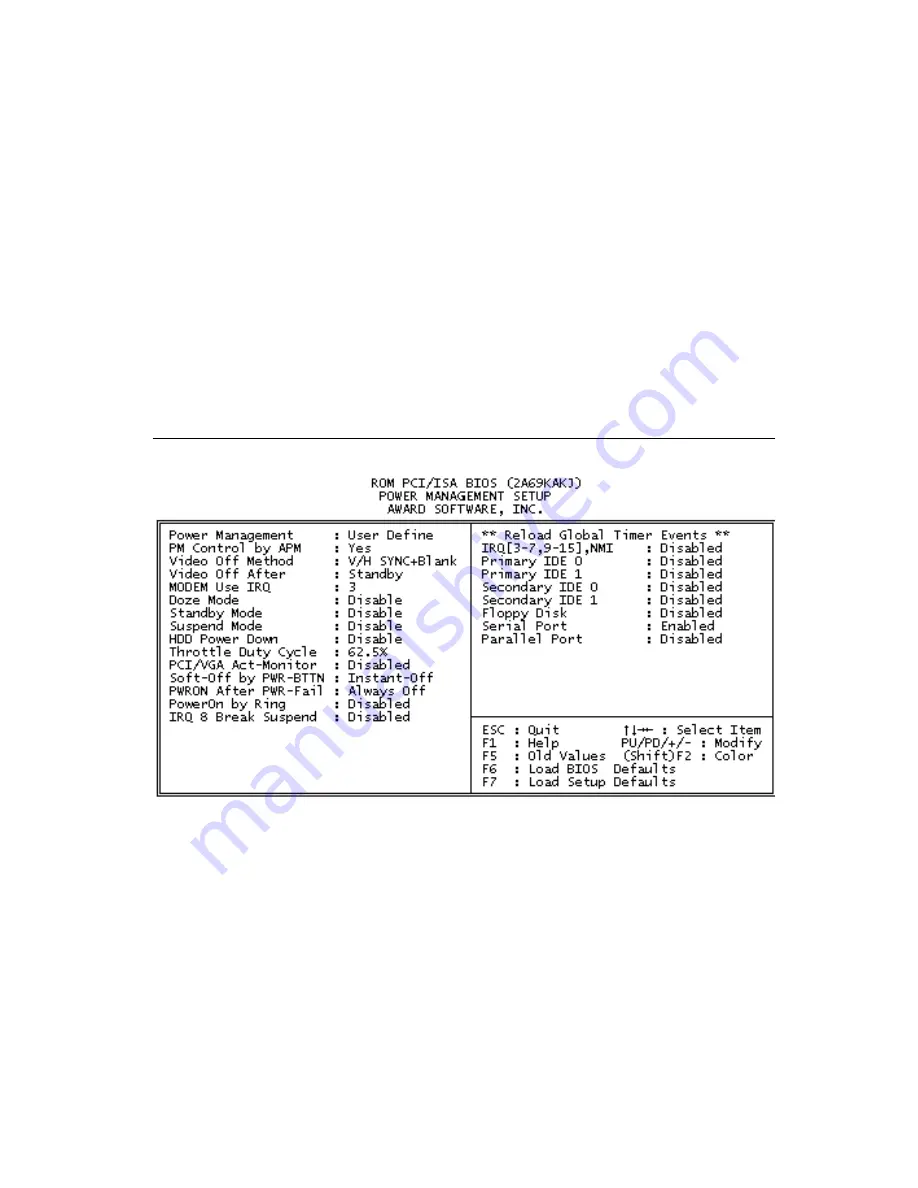
Figure 9-5: Power management setup screen

Power Management

When enabled, allows you to use Power Management features.

The options are: Disabled (Default), Enabled.

Содержание PPC-153

Страница 1: ...PPC 153 Pentium III processor based panel PC with 15 LCD flat panel display User s Manual...

Страница 2: ...n any form or by any means without the prior written permission of Advantech Information provided in this manual is intended to be accurate and reliable However Advantech assumes no responsibility for...

Страница 3: ...ll no guarantee that interference will not occur If this equipment is believed to be causing harmful interference to radio or television reception this can be determined by turning the equipment on an...

Страница 4: ...rive driver Drivers and Utilities CD ROM disc Mounting kits and packet of screws Heat sink optional refer to Notes 1 and 2 below If any of these items are missing or damaged contact your distributor o...

Страница 5: ...Description of your peripheral attachments Description of your software operating system version application software etc A complete description of the problem The exact wording of any error messages...

Страница 6: ...t used for a long time disconnect it from the power source to avoid damage by transient overvoltage 12 Never pour any liquid into an opening This may cause fire or electrical shock 13 Never open the e...

Страница 7: ...it wird im Falle einer berspannung eine Besch digung vermieden 12 Durch die L ftungs ffnungen d rfen niemals Gegenst nde oder Fl ssigkeiten in das Ger t gelangen Dies k nnte einen Brand bzw elektrisch...

Страница 8: ...10 1 4 Dimensions 11 CHAPTER 2 System Setup 13 2 1 A Quick Tour of the Panel PC 14 2 2 Preparing For First time Use 17 2 3 Installation Procedures 17 2 3 1 Connecting the power cord 17 2 3 2 Installin...

Страница 9: ...verview of Hardware Installation and Upgrading 40 4 2 Disassembling the Panel PC 40 4 3 Installing the 2 5 Hard Disk Drive HDD 42 4 4 Installing the Central Processing Unit CPU 43 4 5 Installing the S...

Страница 10: ...oduction 62 6 2 Installation of Ethernet Driver 62 6 2 1 Installation for Windows 95 63 6 2 2 Installation for Windows 98 65 6 2 3 Installation for Windows NT 68 6 2 4 Installation for Windows 2000 ME...

Страница 11: ...figuration Setup 98 9 8 Load BIOS Defaults 99 9 9 Load Setup Defaults 100 9 10 Integrated Peripherals 100 9 11 Password Setting 102 9 12 IDE HDD Auto Detection 103 9 13 Save and Exit Setup 104 9 14 Ex...

Страница 12: ...30 APPENDIX C Full Disassembly Procedures 133 APPENDIX D Pin Assignments 141 D 1 AT Power Connector J1 142 D 2 TV Output Connector J2 Reserved 142 D 3 Inverter Power Connector J4 143 D 4 Internal Spea...

Страница 13: ...D 17 COM2 158 APPENDIX E Mounting Instructions 159 E 1 Introduction 160 E 2 Panel Mounting 160 E 2 1 Introduction 160 E 2 2 Installation procedure 161 E 2 3 Cut out area 162 E 3 Desktop Stand Mounting...

Страница 14: ...43 Table D 4 Internal speaker connector J6 143 Table D 5 Front panel control connector J8 Reserved 144 Table D 6 IR connector J9 Reserved 144 Table D 7 Flat panel display connector CN2 145 Table D 8 F...

Страница 15: ...erface lower level ports and COM ports 32 Figure 3 6 PCI ISA bus expansion 34 Figure 4 1 Disassembling the plastic rear cover of the panel PC 41 Figure 4 2 Installing the primary 2 5 HDD 42 Figure 4 3...

Страница 16: ...y steps 5 6 137 Figure C 3 Disassembly steps 7 12 139 Figure E 1 Cutout dimensions of the PPC 153 160 Figure E 2 Panel mounting 161 Figure E 3 Dimensions of panel mounting holes 162 Figure E 4 Desktop...

Страница 17: ...General Information This chapter gives background informationonthePPC 153panelPC Introduction How to Use This Manual Specifications Dimensions CHAPTER 1...

Страница 18: ...he panel PC can be placed on a desktop to replace the traditional desktop computer In addition its fit anywhere design makes it very flexible and able to be used in many different kinds of installatio...

Страница 19: ...Chapter 1 General Information 3 Figure 1 1 The panel PC in perspective CRT Monitor Fax modem Network Speakers Keyboard Joystick Printer Mouse Touchscreen...

Страница 20: ...provides important information about the daily use of the panel PC including using the CD ROM drive floppy drive and enjoying the panel PC s audio capabilities Chapter 4 provides detailed step by step...

Страница 21: ...ough 3 regarding hardware operation For additional drivers and BIOS setup information you should read Chapters 6 through 10 If you want to upgrade your system you may follow the instructions in Chapte...

Страница 22: ...0x60x10mm 2 4 x2 4 x0 4 Disk drive housing Space for one 2 5 HDD one 12 7 mm compact CD ROM drive and one slim type 3 5 FDD Frontpanel IP65 protection not for the model with SAW touchscreen Standard P...

Страница 23: ...s USB port Supports up to two USB ports PCI ISA bus expansion slot Accepts either one ISA card or one PCI bus card Watchdog timer 62 level interval 1 62 seconds Automatically generates system reset or...

Страница 24: ...pliance with IEEE 802 3u 100Base T and 10 Base T specifications Includes software drivers and boot ROM 100 10Base T auto sensing capability PCMCIA interface Chipset RICOH5C478II Cardbus controller A P...

Страница 25: ...s DOS Windows 3 1 Windows 95 98 Windows NT4 0 Durability touches in a lifetime 30 million 20 million 50 million Touchscreen optional Note The panel PC with the optionally installed touch screen will s...

Страница 26: ...te 1 The PCMCIA driver of Windows 95 which includes a PCMCIA interface is available on the Drivers and Utilities CD ROM of your PPC 153 package Environment Temperature 0 45 C 32 122 F Relative humidit...

Страница 27: ...Chapter 1 General Information 11 1 4 Dimensions Figure 1 3 Dimensions of the PPC 153 Unit mm...

Страница 28: ...12 PPC 153 User s Manual...

Страница 29: ...SYSTEM SETUP A Quick Tour of the Panel PC Preparing for First time Use Installation Procedures Running the BIOS Setup Program Installing System Software Installing the Drivers CHAPTER 2...

Страница 30: ...l PC take a moment to become familiar with the locations and purposes of the controls drives connectors and ports which are illustrated in the figures below When you place the panel PC upright on the...

Страница 31: ...you will find the PCI ISA expansion slot located on the left side This slot is covered by a side panel cover The sunken I O section is at the bottom of the panel PC as shown in Fig 2 3 The I O sectio...

Страница 32: ...of the panel PC Figure 2 4 Rear and side view of the panel PC USB ports PCI ISA expansion slot cover PS 2 mouse and keyboard connector Ethernet jack Contrast adjust knob Brightness adjust knob Line ou...

Страница 33: ...ndows NT etc 2 3 Installation Procedures 2 3 1 Connecting the power cord The panel PC can only be powered by an AC electrical outlet 100 250 volts 50 60 Hz Be sure to always handle the power cords by...

Страница 34: ...ator with hood then make sure to connect the insulator with the system STEP 1 Connect the three contact pins individually to the negative and positive power cables of the power adaptor as well as to t...

Страница 35: ...positive DC power input pin 2 connects to the frame ground G and pin 3 should be plugged into the negative DC power input STEP 3 Mount the front part of the male insulator onto the bottom tray STEP 4...

Страница 36: ...PPC 153 User s Manual STEP 5 Attach the upper cap to the bottom tray and secure it with the screws STEP 6 Now that you have completed the assembly of the male insulator plug it into the female insulat...

Страница 37: ...onnect the PS 2 mouse and keyboard to the Y shaped adapter See Fig 2 6 If you use a serial mouse and your panel PC has a touchscreen you can connect the mouse to any COM port except COM4 Figure 2 6 Co...

Страница 38: ...panel PC by pressing the Del key on your keyboard immediately after powering on the computer The settings you specify with the setup program are recorded in a special area of memory called CMOS RAM Th...

Страница 39: ...stem boot up directly from the CD ROM drive You may also insert your system installation CD ROM into the CD ROM drive See Fig 3 2 Refer to Chapter 9 if you wish to change the BIOS settings Power on yo...

Страница 40: ...river into the floppy disk drive and type install after the following prompt is displayed on screen A INSTALL Press Enter and the installation process will be completed in a few seconds The standard p...

Страница 41: ...s and understand their functions These files are a very useful supplement to the information in this manual Note The drivers and utilities used for the PPC 153 panel PCs are subject to change without...

Страница 42: ...26 PPC 153 User s Manual...

Страница 43: ...loppy Drive CD ROMDrive PCMCIA PS 2 Mouse and Keyboard PCI ISA Bus Expansion Parallel Port Serial COM Ports VGAPort GamePort USB Ports Audio Interface Ethernet Adjusting the LCD Contrast and Brightnes...

Страница 44: ...fingers and push it toward the drive See Fig 3 1 Slide the disk until it clicks into place Note that new disks must be formatted by your operating system before you can use them for data storage See y...

Страница 45: ...g 3 2 Align the center hole of the CD ROM disc with the center circle of the CD ROM holding plate Press the transparent ring around the center hole of the CD ROM until you hear a click Push the front...

Страница 46: ...A memory cards must be prepared by your operating system before you can use them for data storage See your PCMCIA card manual for details To eject a PCMCIA card first ensure that the panel PC is not a...

Страница 47: ...Chapter 3 Using the Panel PC 31 Figure 3 4 Using the I O interface upper level ports excluding COM ports USB keyboard Printer Network PS 2 mouse...

Страница 48: ...32 PPC 153 User s Manual Figure 3 5 Using the I O interface lower level ports and COM ports Microphone Headphones CD ROM player Joystick CRT monitor Serial mouse...

Страница 49: ...he PS 2 mouse to the 6 pin female PS 2 port of the Y shaped adapter 5 Turn on the panel PC 3 6 PCI ISA Bus Expansion The panel PC supports PCI and ISA bus expansion cards To integrate a new PCI or ISA...

Страница 50: ...34 PPC 153 User s Manual Figure 3 6 PCI ISA bus expansion PCI ISA bus card Metal plate PCI ISA expansion slot cover...

Страница 51: ...am to configure the parallel port to respond as required by your printer and software operating environment 3 8 Serial COM Ports There are four serial COM ports on the bottom of the rear cover You can...

Страница 52: ...e connected to the system through the 15 pin external port located on the rear of the system unit 1 Be sure the panel PC is turned off 2 Connect the external joystick or game device to the system See...

Страница 53: ...be connected to the system through the external ethernet port located on the rear side of the system unit 1 Be sure the panel PC is turned off 2 Connect the external device s to the panel PC See Fig...

Страница 54: ...you put your fingertip on the screen to move the cursor You will need to install the touchscreen driver before it will work The touchscreen drivers for various operating systems are stored on the CD...

Страница 55: ...Hardware Installation and Upgrading Disassembling the Panel PC Installing the 2 5 Hard Disk Drive HDD Installing the Central Processing Unit CPU Installing the SDRAM Memory Module Installing the Flop...

Страница 56: ...arning Do not remove the plastic rear cover until you have verified that no power is flowing within the panel PC Power must be switched off and the power cord must be unplugged Every time you service...

Страница 57: ...Chapter 4 Hardware Installation and Upgrading 41 Figure 4 1 Disassembling the plastic rear cover of the panel PC PCI ISA expansion PCB Side panel CPU fan and cover Plastic rear cover...

Страница 58: ...ing case See Fig 4 2 Remove the two screws on the metal plate 3 Pull the metal plate toward the outside of the unit and remove it from the two lugs of the shielding case 4 Place the HDD on the metal p...

Страница 59: ...lectronic components can be damaged by the sudden rush of power Only experiencedelectronicspersonnelshould openthepanelPC 1 Detach and remove the plastic rear cover 2 Remove the four screws of the CPU...

Страница 60: ...e and make sure the pins of the CPU correspond with the holes of the socket DO NOT USE EXCESSIVE FORCE 10 Press the lever down The plate will slide across slightly 11 Place the heat sink on top of the...

Страница 61: ...Chapter 4 Hardware Installation and Upgrading 45 Figure 4 3 Installing the CPU CPU fan CPU cover Heat sink clip Heat sink CPU Lever Socket 370...

Страница 62: ...he small arrowhead printed on the motherboard next to the DIMM socket The golden pins of the module must point down into the DIMM socket 1 Detach and remove the plastic rear cover and CPU cover 2 Push...

Страница 63: ...ich is attached to the shielding case There are two screws A on the metal plate Unscrew these two screws See Fig 4 5 3 Push the metal plate toward the outside of the unit This will free it from the tw...

Страница 64: ...0 on the PC board The other end of the CD ROM cable is connected to connector CN18 on the PC board 10 Slide the FDD assembly and slim CD ROM assembly toward the inside of the panel PC as far as they w...

Страница 65: ...rs and connecting peripherals switches and indicators Be sure to read all the safety precautions before you begin the installation procedures Jumpers and Connectors CPU Installation CMOSClearforExtern...

Страница 66: ...r will have three pins labeled 1 2 and 3 In this case you would connect either pins 1 and 2 or pins 2 and 3 The jumper settings are schematically depicted in this manual as follows A pair of needle no...

Страница 67: ...function of each of the board s jumpers Table 5 1 Jumpers and their functions Label Function JP1 Internal 12 V source selection setting JP2 Wake on LAN Reserved JP3 COM2 RS 232 422 485 setting JP4 COM...

Страница 68: ...anel type setting JP6 COM3 COM4 Pin 9 output type setting JP9 COM1 COM2 Pin 9 output type setting JP5 COM2 RS 232 422 485 setting JP3 COM2 RS 232 422 485 setting JP4 COM2 RS 232 422 485 setting JP2 Wa...

Страница 69: ...on J1 AT power connector J4 Inverter power connector J6 Internal speaker connector Reserved J8 Front panel control connector Reserved J9 IR connector Reserved CN2 Flat panel display connector CN3 Flat...

Страница 70: ...wer connector CN23 Internal COM4 and PS 2 connector J1 AT power connector CN3 Flat panel display connector CN16 EIDE hard disk drive connector SLOT1 PCI ISA expansion connector J8 Front panel control...

Страница 71: ...g any frequency ratio or voltage 5 3 CMOS Clear for External RTC JP8 Warning To avoid damaging the computer always turn off the power supply before setting Clear CMOS Set the jumper back to Normal ope...

Страница 72: ...Table 5 4 COM2 RS 232 422 485 setting JP3 JP4 RS 232 RS 422 485 default setting Table 5 5 COM2 RS 232 422 485 setting JP5 RS 232 RS 422 RS 485 default setting The IRQ and the address ranges for COM1 2...

Страница 73: ...interrupt IRQ is IRQ4 COM3 and COM4 are another set Their selectable function is the same as the COM1 COM2 set Table 5 6 Serial port default settings Port Address Range Interrupt COM1 3F8 3FF IRQ4 COM...

Страница 74: ...1 3 and 5 are for COM3 Pins 2 4 and 6 are for COM4 5 5 Internal 12 V Source Selection Setting JP1 The panel PC provides an internal 12 V source in an expansion slot available for various expansion ca...

Страница 75: ...l power setting The panel PC s AGP SVGA interface supports 5 V and 3 3 V LCD displays The LCD cable already has a built in default setting You do not need to adjust any jumper or switch to select the...

Страница 76: ...or standalone or unmanned applications Setup involves one jumper and running the control software Refer to Appendix B 5 7 1 Watchdog activity selection JP7 When the watchdog timer activates i e CPU pr...

Страница 77: ...net Interface This chapter provides information on Ethernet configuration Introduction Installation of Ethernet Driver for Windows 95 for Windows 98 for Windows NT for Windows 2000 ME Further Informat...

Страница 78: ...combined with system BIOS which can be enabled disabled in the BIOS setup 6 2 Installation of Ethernet Driver Before installing the Ethernet driver note the procedures below You must know which opera...

Страница 79: ...Settings Control Panel and Network icons Click the Add button b 1 a Select Start Settings Control Panel System b Click the Device Manager and Other Devices items c Remove the PCI Ethernet Controller...

Страница 80: ...k the OK button b a Choose the highlighted Realtek RTL8139 A B C 8130 PCI Fast Ethernet Press the OK button b 7 Press the Add button to select suitable services or protocol Press the OK button to fini...

Страница 81: ...Installation for Windows 98 2 a Choose Driver folder 1 a Select Start Settings Control Panel System b Click Device Manager and highlight PCI Ethernet Controller c Select Properties Follow the instruct...

Страница 82: ...66 PPC 153 User s Manual 5 a Click Next 6 a Select Network Adaptors b Click Next Choose Have Disk 7 a Type the path D 123 153 LAN WIN98 8 a b Click OK...

Страница 83: ...Chapter 6 PCI Bus Ethernet Interface 67 5 a Click OK 6 a Click Next Click Finish 7 a Select Yes to reboot system 8 a End...

Страница 84: ...Start Settings Control Panel and then double click the Network icon b Choose the Adapters label c Click the Add button 2 a Press Have Disk 3 Type the path D PPC123 153 LAN WINNT a Press the OK button...

Страница 85: ...ace 69 5 a 4 a Click the OK button b Choose the highlighted RTL8139 A B C 8130 PCI Fast Ethernet Adapter Choose a suitable RTL8139 Duplex mode for your application end 6 Finish the network configurati...

Страница 86: ...com tw 6 2 4 Installation for Windows 2000 ME After finishing the Windows 2000 ME installation the system will automatically detect the Ethernet hardware and install the Ethernet driver from the driv...

Страница 87: ...AGP SVGA Setup Introduction Installation of SVGA Driver for Windows 95 98 for Windows NT for Windows 2000 for Windows ME Further Information CHAPTER 7...

Страница 88: ...resolution modes while maintaining complete IBM VGA compatibility Digital monitors i e MDA CGA and EGA are NOT supported Multiple frequency multisync monitors are handled as if they were analog monito...

Страница 89: ...the operating system that you you are using within your PPC 153 Important The following windows illustrations are examples only You must follow the flow chart instructions and pay attention to the in...

Страница 90: ...74 PPC 153 User s Manual 7 2 1 Installation for Windows 95 98 1 a Select Start Run b Click OK Type the path D 123 153 VGA 3DM Win9x Setup exe c 2 a Click Next 3 Click Finish to reboot the system a End...

Страница 91: ...Click OK Type the path D 123 153 VGA 3DM WinNT Setup exe c 2 a Click Next 3 Click Finish to reboot the system a End 7 2 2 Installation for Windows NT Note Service Pack X X 3 4 5 6 must be installed f...

Страница 92: ...6 PPC 153 User s Manual 7 2 3 Installation for Windows 2000 1 a Select Start Run b Click OK Type the path D 123 153 VGA 3DM Win2000 Setup exe c 2 a Click Next 3 Click Finish to reboot the system a End...

Страница 93: ...Chapter 7 PCI SVGA Setup 77 1 a Select Start Run b Click OK Type the path D 123 153 VGA 3DM WinME Setup exe c 2 a Click Next 3 Click Finish to reboot the system a End 7 2 4 Installation for Windows ME...

Страница 94: ...information about the AGP SVGA installation in your PPC 153 including driver updates troubleshooting guides and FAQ lists visit the following web resources Silicon Motion website www siliconmotion co...

Страница 95: ...Audio Introduction Installation of Audio Driver for Windows 95 98 for Windows NT for Windows 2000 ME CHAPTER 8...

Страница 96: ...is register compatible with the OPL3 and has extended capabilities 8 2 Installation of Audio Driver Before installing the audio driver please take note of the procedures detailed below You must know...

Страница 97: ...95 98 1 a Select Start RUN Enter the driver path D PPC123 153 Audio win9x only Setup exe b 2 a Click Next to continue the installation 3 a Select Upgrade Drivers Click Next b 4 a When installation is...

Страница 98: ...82 PPC 153 User s Manual 5 a After installation select Start Settings Control Panel System Click the Device Manager tab to see the result of your installation b End...

Страница 99: ...Select Start Settings Control Panel Double Click the Multimedia icon b 2 a Select the Devices item Click the Add button b 3 a Choose the Unlisted or Updated Driven item b Click the OK buttom 4 a Type...

Страница 100: ...OK button End 8 2 3 Installation for Windows 20000 ME After finishing the Windows 2000 or Windows ME installation the system can automatically detect the audio hardwre and install the driver from the...

Страница 101: ...Award BIOS Setup This chapter describes how to set BIOS configuration data CHAPTER 9...

Страница 102: ...ngs according to your system configuration Some setup items will not be explained because it is recommended that users do not change such items Note Values for the various setup items that appear on y...

Страница 103: ...utility screen will appear as shown in Fig 9 1 Use the arrow keys to select and press Enter to run the selected program 9 3 Standard CMOS Setup Figure 9 2 CMOS setup screen The standard CMOS setup sc...

Страница 104: ...rd disk PRECOMP The cylinder number at which the disk drive changes the write timing LANDZ The cylinder number where the disk drive heads read write are seated when the disk drive is parked SECTOR The...

Страница 105: ...set Features setup The BIOS Features setup program is shown above Users are not encour aged to run the BIOS and Chipset Features setup programs Your system should have been fine tuned before shipping...

Страница 106: ...the CPU L2 cache to enable the memory parity check The options are Disabled Default Enabled Quick Power On Self Test When enabled allows the BIOS to bypass the extensive memory test The options are Di...

Страница 107: ...When set to On allows the BIOS to automatically enable the NumLock function when the system boots up The options are On Default Off Typematic Rate Setting The term typematic means that when a keyboar...

Страница 108: ...2 Otherwise stay with the default setting Non OS2 Report No FDD For WIN 95 Assigns IRQ6 for the FDD The options are Yes Default No Video BIOS Shadow When enabled allows the BIOS to copy the video ROM...

Страница 109: ...e advanced knowledge is required to effect such changes Figure 9 4 Chipset features setup screen EDO CASX MA Wait State Sets the EDO CASX MA wait state The options are 1 Default 2 EDO RASX Wait State...

Страница 110: ...se the video BIOS codes from SRAMs instead of the slower DRAMs or ROMs The options are Enabled Default Disabled Video RAM Cacheable Enables video RAM to be cacheable The options are Disabled Default E...

Страница 111: ...re Disabled Default Enabled Spread Spectrum When disabled the syatem operates normally When enabled the spread spectrum will be set to 0 5 CNTR The options are Disabled Default Enabled 9 6 Power Manag...

Страница 112: ...enters Suspend mode The option All Modes Off allows the video display to go blank if the system enters Doze mode or Suspend mode The option Always On allows the video display to stay in Standby mode e...

Страница 113: ...will not work concurrently When the HDD is in Power Saving Mode any access to the HDD will wake it up The options are Disabled Default 1 Min 15 Min PNP OS Installed Select Yes if the installed system...

Страница 114: ...does not support the PnP function The options are No Default Yes Resources Controlled By If set at Auto the BIOS automatically arranges all system resources for you If there are conflicts or you are...

Страница 115: ...The options are Disabled Default Enabled Used MEM base addr Choose and use the MEM base address The options are N A Default C800 DC00 Assign IRQ for USB Assigns an IRQ for the USB The options are Dis...

Страница 116: ...ler to use the fast block mode to transfer data to and from your hard disk drive HDD The options are Enabled Default Disabled IDE Primary Secondary Master Slave PIO IDE hard disk drive controllers can...

Страница 117: ...ng data to or from memory at a fast rate without involving the CPU When you select Auto the BIOS will choose the best available mode The options are Auto Default Disabled Onboard FDD Controller When e...

Страница 118: ...Type your password up to eight characters and press Enter You will be asked to confirm the password Type the password again and press Enter You may also press Esc to abort the selection and not enter...

Страница 119: ...Use it for quick configuration of new hard disk drives This feature allows you to set the parameters of up to four IDE HDDs The option with Y is recommended by the system BIOS You may also key in you...

Страница 120: ...not change anything press Esc again or move the cursor to Exit Without Saving and press Y to retain the setup settings The following message will appear at the center of the screen to allow you to sav...

Страница 121: ...PCMCIA Introduction Installation of PCMCIA Driver for Windows 95 10 CHAPTER...

Страница 122: ...CD ROM included with your PPC 153 The installation procedure is shown in the next section in this chapter Other operating systems such as Windows 98 and Windows NT also support PCMCIA drivers However...

Страница 123: ...Chapter 10 PCMCIA 107 10 2 1 Installation for Windows 95 a In Start Run type the path D PPC123 153 Cardbus win95osr2 Setup exe 1 a Click Next 2 a Click Yes 3 a Click Finish to reboot the system 4 End...

Страница 124: ...108 PPC 153 User s Manual...

Страница 125: ...tion Installation of Driver for Resistive or SAW Touchscreen for Windows 95 for Windows 98 for Windows NT for Windows 2000 for Windows ME Installation of Driver for Capacitive Touchscreen for Windows...

Страница 126: ...red from UL recognized components When properly installed the touchscreen s ball impact resistance meets the UL 1950 standard Its fire resistance meets the UL 746C 19 mm 0 75 flame test standard Syste...

Страница 127: ...uchscreen The touchscreen driver for Windows 95 98 contains a native 32 bit driver and a 32 bit control panel program for the PPC 153 system To facilitate installation of the touchscreen driver you sh...

Страница 128: ...a Click the Yes button to restart your computer 2 a Click Yes a Select the Smart serial Controller on COM4 item 1 a Insert the Drivers and Utilities CD Click the Start button and then Run b c Type the...

Страница 129: ...Chapter 11 Touchscreen 113 5 a Touch targets to calibrate the touchscreen controller End...

Страница 130: ...panel PC refer to the following flow chart instructions 3 4 a Click the Yes button to restart your computer 2 a Click Yes a Select the Smart serial Controller on COM4 item 1 a Insert the Drivers and...

Страница 131: ...Chapter 11 Touchscreen 115 5 a Touch targets to calibrate the touchscreen controller End...

Страница 132: ...153 User s Manual 3 4 a Choose a suitable item 2 a Press the Next button 1 a Select Start Run Type the path D PPC123 153 Elotouch WINNT Setup exe b a Set the directory path 11 2 3 Installation for Win...

Страница 133: ...Chapter 11 Touchscreen 117 5 a Choose COM4 b Press OK 7 a Calibrate the touchscreen End 6 a Click OK to reboot the system...

Страница 134: ...C 153 User s Manual 11 2 4 Intallation for Windows 2000 3 2 a Press Next a Click Yes 1 a Select Start Run Type the path D PPC123 153 Elotouch Win2k Setup exe b Click OK c 4 a Select Yes to accept agre...

Страница 135: ...Chapter 11 Touchscreen 119 7 6 a Press Finish a Click Yes to reboot the system 5 a Choose COM4 Then click Next b 8 a Calibrate the touch screen...

Страница 136: ...120 PPC 153 User s Manual 9 a Click Finish to complete installation End...

Страница 137: ...r 11 Touchscreen 121 4 a Press Next 1 a Select Start Run Type the path D 123 153 Elotouch WInME Setup exe b c Click OK 2 a Click Next 3 a Click Yes to accept the agreement 11 2 5 Installation for Wind...

Страница 138: ...122 PPC 153 User s Manual 5 a Choose COM4 b Press Next 6 a Calibrate the touch screen 7 a Click Finish to complete the installation End...

Страница 139: ...ns in this chapter carefully before you attempt installation Important The following windows illustrations are examples only You must follow the flow chart instructions and pay attention to the instru...

Страница 140: ...98 NT a Select Start Run b Type in D PPC123 153 Microtouch Tware54 Setup exe 1 a Follow the installation instructions and click on Next 2 a If you accept the terms of the License Agreement click on Ye...

Страница 141: ...s item to reboot the system and finish the touchscreen driver installation 6 a Click on Calibrate to calibrate the touchscreen b Touch the target point for a moment until the next Touch enable message...

Страница 142: ...126 PPC 153 User s Manual...

Страница 143: ...LCD Specifications and Selection Settings APPENDIX A...

Страница 144: ...mode Yes LCDMTBF 50 000hours Backlight MTBF 25 000 hours The VR control knob is located in the I O section on the rear side of the panel PC Note The color LCD display installed in the panel PC is hig...

Страница 145: ...C 153 is equipped with a watchdog timer that resets the CPU or generates an interrupt if processing comes to a standstill for any reason This feature ensures system reliability in industrial standalon...

Страница 146: ...rval value The value range is from 01 hex to 3E hex and the related time interval is from 1 sec to 62 sec Data TimeInterval 01 1 sec 02 2 sec 03 3 sec 04 4 sec 3E 62 sec After data entry your program...

Страница 147: ...H443 data REM Start and restart the watchdog 30 GOSUB 1000 REM Your application task 1 40 OUT H443 data REM Reset the timer 50 GOSUB 2000 REM Your application task 2 60 OUT H443 data REM Reset the tim...

Страница 148: ...132 PPC 153 User s Manual...

Страница 149: ...Full Disassembly Procedures APPENDIX C...

Страница 150: ...for the CPU HDD CD ROM drive FDD and SRAM all of which can be found in Chapter 4 1 Unscrew the seven screws on the rear cover and remove it The PCI ISA expansion slot cover can be detached by removing...

Страница 151: ...Appendix C Full Disassembly Procedures 135 Figure C 1 Disassembly steps 1 4 Step 1 Step 2 Step 4 Step 3...

Страница 152: ...exagonal screwdriver The EMI protection cover lies below the I O bracket You can now remove both the bracket and the cover from the I O ports 6 Detach the flat cables of the LCD inverter touchscreen a...

Страница 153: ...Appendix C Full Disassembly Procedures 137 Figure C 2 Disassembly steps 5 6 Step 5 Step 6 EMI protection I O bracket Motherboard...

Страница 154: ...LCD only 10 Detach the plastic housing 11 Detach the LCD by unscrewing the four screws located on the each corners 12 The touchscreen is stuck on the LCD holding plate by a strongly double side adhens...

Страница 155: ...Appendix C Full Disassembly Procedures 139 Figure C 3 Disassembly steps 7 12 Step 8 Step 12 Step 9 Front panel Touchscreen Power supply Plastic housing LCD LCD holding plate Step 10 Step 11 Step 7...

Страница 156: ...140 PPC 153 User s Manual...

Страница 157: ...8 Reserved IR Connector J9 Reserved Flat Panel Display Connector CN2 Flat Panel Display Connector CN3 PanelLink Interface CN4 Reserved Floppy Drive Connector CN10 EIDE Hard Disk Drive Connector CN16 C...

Страница 158: ...J1 Table D 1 AT power connector J1 Pin Signal 1 PS_NO 2 5 VSB 3 12 V 4 12 V 5 GND 6 GND 7 GND 8 GND 9 5 V 10 5 V 11 5 V 12 5 V 1 12 D 2 TV Output Connector J2 Reserved Table D 2 TV output connector J2...

Страница 159: ...le D 3 Inverter power connector J4 Pin Signal 1 12 V 2 GND 3 ENABKL 4 Brightness Adj 5 5 V 1 5 2 3 4 1 2 4 3 D 4 Internal Speaker Connector J6 Reserved Table D 4 Internal speaker connector J6 Pin Sign...

Страница 160: ...onnector J8 Reserved Pin Signal 1 Vcc 2 GND 3 HDD LED 4 Reset SW 5 Power SW 6 NC D 5 Front Panel Control Connector J8 Reserved D 6 IR Connector J9 Reserved Table D 6 IR connector J9 Reserved Pin Signa...

Страница 161: ...D 4 GND 5 VDDSAFE3 6 VDDSAFE3 7 Vcon 8 GND 9 P0 10 P1 11 P2 12 P3 13 P4 14 P5 15 P6 16 P7 17 P8 18 P9 19 P10 20 P11 21 P12 22 P13 23 P14 24 P15 25 P16 26 P17 27 P18 28 P19 29 P20 30 P21 31 P22 32 P23...

Страница 162: ...4 GND 5 VDDSAFE3 6 VDDSAFE3 7 Vcon 8 GND 9 P24 10 P25 11 P26 12 P27 13 P28 14 P29 15 P30 16 P31 17 P32 18 P33 19 P34 20 P35 21 NC 22 NC 23 NC 24 NC 25 NC 26 NC 27 NC 28 NC 29 NC 30 NC 31 NC 32 NC 33...

Страница 163: ...Interface CN4 Reserved Table D 9 PanelLink Interface CN4 Reserved Pin Signal Pin Signal 1 TXC 11 TX1 2 GND 12 NC 3 TXC 13 TX2 4 GND 14 NC 5 TX0 15 TX2 6 GND 16 EDGE 7 TX0 17 2NDSDA 8 GND 18 Vcc 9 TX1...

Страница 164: ...Pin Signal Pin Signal 1 VCC 5 V 14 STEP 2 INDEX 15 GND 3 VCC 5 V 16 WRITE ENABLE 4 DRIVE SELECT 17 GND 5 VCC 5 V 18 WRITE DATA 6 DISK CHANGE 19 GND 7 NC 20 TRACK 0 8 NC 21 GND 9 NC 22 WRITE PROTECT 1...

Страница 165: ...8 DATA 10 9 DATA 4 10 DATA 11 11 DATA 3 12 DATA 12 13 DATA 2 14 DATA 13 15 DATA 1 16 DATA 14 17 DATA 0 18 DATA 15 19 SIGNAL GND 20 N C 21 HDD DREQ 22 GND 23 IO WRITE 24 GND 25 IO READ 26 GND 27 HD REA...

Страница 166: ...7 DATA7 8 DATA9 9 DATA6 10 DATA10 11 DATA5 12 DATA11 13 DATA4 14 DATA12 15 DATA3 16 DATA13 17 DATA2 18 DATA14 19 DATA1 20 DATA15 21 DATA0 22 HDD DREQ 23 GND 24 IO READ 25 IO WRITE 26 GND 27 HD READY 2...

Страница 167: ...1 D 13 CPU Fan Power Connector FAN1 Table D 13 CPU fan power connector FAN1 Pin Signal 1 GND 2 12 V 3 FAN_DET D 14 System Fan Power Connector FAN2 Table D 14 Fan power connector FAN2 Pin Signal 1 GND...

Страница 168: ...B19 E19 A19 F19 B20 E20 A20 F20 B21 E21 A21 F21 B22 E22 A22 F22 B23 E23 A23 F23 B24 E24 A24 F24 B25 A25 B26 E26 A26 F26 B27 E27 A27 F27 B28 E28 A28 F28 B29 E29 A29 F29 B30 E30 A30 F30 B31 E31 A31 F31...

Страница 169: ...A8 SD1 B8 OWS A9 SD0 B9 12 V A10 IORDY B10 GND A11 AEN B11 SMW A12 SA19 B12 SMR A13 SA18 B13 IOW A14 SA17 B14 IOR A15 SA16 B15 DACK3 A16 SA15 B16 DRQ3 A17 SA14 B17 DACK1 A18 SA13 B18 DRQ1 A19 SA12 B1...

Страница 170: ...E D1 MEM16 C2 LA23 D2 IO16 C3 LA22 D3 IRQ10 C4 LA21 D4 IRQ11 C5 LA20 D5 IRQ12 C6 LA19 D6 IRQ15 C7 LA18 D7 IRQ14 C8 LA17 D8 DACKO C9 MEMR D9 DRQ0 C10 MEMW D10 DACK5 C11 SD8 D11 DRQ5 C12 SD9 D12 DACK6 C...

Страница 171: ...F7 VCC E8 RST F8 PCLK2 E9 GNT2 F9 V E10 REQ2 F10 GNT3 E11 GND F11 GND E12 PCLK1 F12 REQ3 E13 GND F13 AD31 E14 AD30 F14 AD29 E15 NC F15 NC E16 F16 E17 NC F17 NC E18 AD28 F18 AD27 E19 AD26 F19 AD25 E20...

Страница 172: ...Pin Signal G1 H1 SERR G2 H2 AD15 G3 CBE1 H3 AD14 G4 PAR H4 AD12 G5 GND H5 GND G6 H6 KEY G7 GND H7 GND G8 AD13 H8 AD10 G9 AD11 H9 AD8 G10 AD9 H10 AD7 G11 CBEO H11 AD5 G12 AD6 H12 AD3 G13 AD4 H13 AD1 G1...

Страница 173: ...19 Internal COM4 and PS 2 Connector CN23 Pin Signal Pin Signal 1 NRLSD 2 NDSR 3 NRX 4 NRTS 5 NTX 6 NCTS 7 NDTR 8 NRI 9 GND 10 GND 11 MSDAT 12 EXT MSDAT 13 MSCLK 14 EXT MSCLK 15 Vcc 16 Vcc D 16 Touchsc...

Страница 174: ...158 PPC 153 User s Manual D 17 COM2 Table D 20 COM2 Pin Signal RS 232 RS 422 RS 485 1 DCD TX DATA 2 RX TX DATA 3 TX RX 4 DTR RX 5 GND GND 6 DSR 7 RTS 8 CTS 9 RI 1 5 9 6 3 2 4 7 8...

Страница 175: ...Mounting Instructions Introduction Panel Mounting Desktop Stand Mounting Swingarm Stand Mounting APPENDIX E...

Страница 176: ...ized swingarm or desktop stand E 2 Panel Mounting E 2 1 Introduction Panel mounting can help system integrators conveniently integrate the panel PC into their system To construct a suitable panel refe...

Страница 177: ...e front panel There are ten holes located along the four sides of the panel PC 2 Insert the screws from the front side into the holes and tighten them with the nuts provided See Fig E 2 3 Put the fron...

Страница 178: ...162 PPC 153 User s Manual E 2 3 Cut out area Refer to Figure E 3 below for the locations and dimensions of the cut out area and mounting holes Figure E 3 Dimensions of panel mounting holes...

Страница 179: ...C 4 Attach the main body of the stand to the rear cover of the panel PC using the four screws provided 5 Slide the main body of the stand into the stand base Tighten it with the two screws provided 6...

Страница 180: ...164 PPC 153 User s Manual Figure E 4 Desktop stand mounting Rear cover of panel PC Main body Holding plate Base Top cover Cap Rear cover...

Страница 181: ...53 can be mounted on a unique swingarm This versatile accessory is easy to install and operate and can be rotated through a wide range of angles Its dimensions are shown in Figure E 5 below and it is...

Страница 182: ...166 PPC 153 User s Manual...

Отзывы: