background image

PCI-1706U User Manual

42

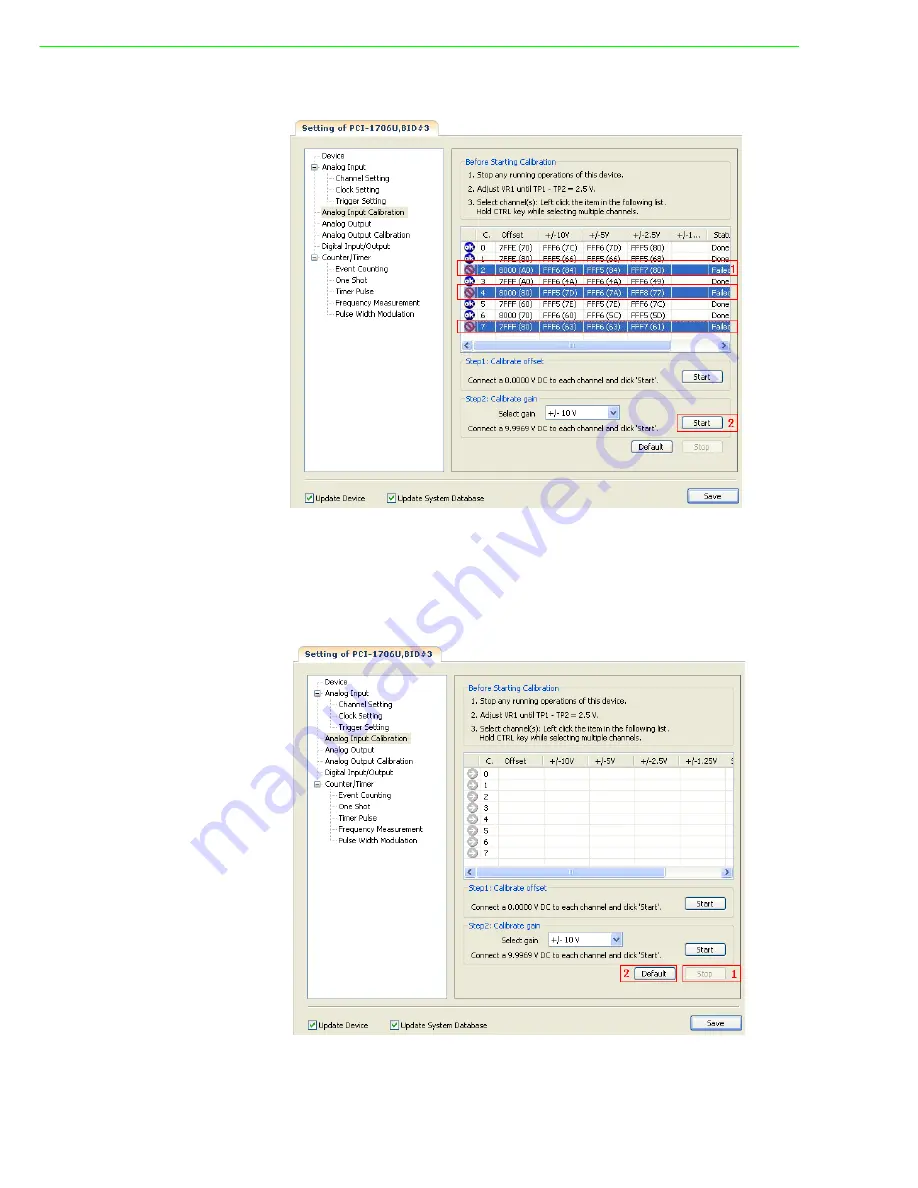
Retry calibration:

Item 1: 

Display some channels which fails in calibration process.

Item 2: 

Select the failed channels and re-click "Start" button to try again.

Restore to factory default:

Item 1: 

Click "Stop" button to stop calibration process.

Item 2: 

Click "Default" button to restore factory settings.

Содержание PCI-1706U

Страница 1: ...User Manual PCI 1706U 250 kS s 16 bit Simultaneous 8 ch Universal PCI Multifunction Card with Multiple Synchronization...

Страница 2: ...ion Advantech assumes no liability under the terms of this warranty as a consequence of such events Because of Advantech s high quality control standards and rigorous testing most of our customers nev...

Страница 3: ...of your peripheral attachments Description of your software operating system version application software etc A complete description of the problem The exact wording of any error messages Packing Lis...

Страница 4: ...PCI 1706U User Manual iv...

Страница 5: ...oubleshooting Device Drivers Error 6 1 7 Accessories 6 1 7 1 Wiring Cables 6 1 7 2 Wiring Boards 6 Chapter 2 Installation 7 2 1 Unpacking 8 2 2 Driver Installation 8 2 2 1 Device Auto Installation Rec...

Страница 6: ...nnections 26 Figure 3 7 Digital Input Channel Connections 26 Figure 3 8 Digital Output Channel Connections 27 3 3 5 Counter Connections 27 Figure 3 9 Event Counter Connection 27 Figure 3 10Frequency M...

Страница 7: ...tion on the features of the PCI 1706U cards a quick installation guide together with some brief information on software and accessories Sections include Features Applications Installation Guide Softwa...

Страница 8: ...astering DMA Data Transfer PCI 1706U card supports PCI bus mastering DMA for high speed data transfers By setting a block of memory in the PC the card performs bus mastering data transfers without CPU...

Страница 9: ...ides a programmable timer counter for generating pacer trigger for the A D conversion It includes twoindividual32 bit counters of 10 MHz clock The two counters are cascaded together to make a 64 bit t...

Страница 10: ...me of the accessories for enhanced opera tion of your Multifunction card you can then begin the installation procedures Figure 1 1 on the next page provides a concise flow chart for a broad picture of...

Страница 11: ...en for your reference 1 6 1 Programming Tools Programmers can develop application programs with their favorite development tools Visual C Visual C Visual Basic NET Delphi C Builder For instructions on...

Страница 12: ...vers Manual 1 6 3 Troubleshooting Device Drivers Error Driver functions will return a status code when they are called to perform a certain task for the application When a function returns a code that...

Страница 13: ...Chapter 2 2 Installation...

Страница 14: ...out the card you should first inspect the card for any possible signs of external damage loose or damaged components etc If the card is visibly dam aged please notify our service department or the loc...

Страница 15: ...he card only by its edges and carefully align it with the slot Insert the card firmly into place Use of excessive force must be avoided otherwise the card might be damaged 6 Fasten the bracket of the...

Страница 16: ...PCI 1706U User Manual 10 2 Push the CONTINUE button to go to the next screen Figure 2 2 Contents of the CD 3 Select the Installation option Figure 2 3 Select Drivers...

Страница 17: ...2 Installation 4 Select the DAQNavi option Figure 2 4 Items of DAQNavi 5 Select the Individual Drivers option After driver installation we recommend you to install BioDAQ SDK for further development...

Страница 18: ...PCI 1706U User Manual 12 6 Select the PCI Series option Figure 2 6 Different Options for Driver Setup 7 Select the PCI1706s option to Run the PCI 1706 BioDAQ Driver package Figure 2 7 Driver Install 1...

Страница 19: ...Next button to finish step Figure 2 8 Driver Installation 2 9 Click Finish The installer detects and installs PCI 1706 device on the sys tem automatically The device driver files and driver manual ca...

Страница 20: ...OFF your computer before installing or removing any components on the computer 3 Remove the cover of the computer 4 Remove the slot cover on the back panel of your computer 5 Touch the metal part on t...

Страница 21: ...you can now configure your device using the Device Configuration Program that has itself already been installed during driver installation The DAQNavi Driver provides device setting dialog box that al...

Страница 22: ...listed under DAQNavi Devices Installed Devices Select Device Setting to open PCI 1706U device setting dialog box on the right Figure 2 10 Navigator Utility On the device setting dialog box you can ch...

Страница 23: ...r If the software and hardware installation are completed you will see PCI 1706U name in the System Device Manager Figure 2 11 Windows Device Manager On the Device Manager window right click the devic...

Страница 24: ...will be saved in the system The device property will be referenced by the device driver functions Figure 2 13 Embedded Configuration page Please click the Configure button to configure your device On...

Страница 25: ...figuration information will be set into device When you check the check box of Update System Database after click the OK button configuration information will be set into system registry Click the OK...

Страница 26: ...PCI 1706U User Manual 20...

Страница 27: ...his chapter provides useful information about how to connect input and output signals to the PCI 1706U cards via the I O con nector Sections include Overview Switch and Jumper Settings Signal Connecti...

Страница 28: ...onnector 3 2 Switch and Jumper Settings Figure 3 1 Connector and Switch Locations 1 Jumper Settings There is no Jumpers in PCI 1706U 2 Setting the BoardID Switch SW1 The PCI 1706U has a built in DIP s...

Страница 29: ...2 I O Connector Pin Assignments for the PCI 1706U Series Table 3 1 Board ID Settings SW1 3 2 1 0 BoardID ID3 ID2 ID1 ID0 0 ON ON ON ON 1 ON ON ON OFF 2 ON ON OFF ON 3 ON ON OFF OFF 4 ON OFF ON ON 5 O...

Страница 30: ...0 15 DGND Inout Digital inout channels direction can be set by software DGND Digital GND CNT0_CLK CNT1_CLK DGND Input Counter clock external Input The clock input of counter can be either external 1Hz...

Страница 31: ...on clocks at dedicated timing A D conver sion clocks come from internal clock sources or external signals on connector The CLK has several sources Internal A D clock derived from 32 bit divider Extern...

Страница 32: ...rrent output and the trigger source support software and External digital TTL trigger from terminal board Figure 3 6 Analog Output Channel Connection 3 3 4 Digital Input Output Connections PCI 1706 pr...

Страница 33: ...ns Figure 3 8 Digital Output Channel Connections 3 3 5 Counter Connections 3 3 5 1 Event Counter Connection Figure 3 9 Event Counter Connection 3 3 5 2 Frequency Measurement Connection Figure 3 10 Fre...

Страница 34: ...clock or external clock The Out pin output a pulse or Toggled signal after the counter count the number of delay count that can be set by user Figure 3 12 One shot Connection 3 3 5 5 PwMeter Connectio...

Страница 35: ...acquisition system If the cable travels through an area with significant electromagnetic interference you should adopt individually shielded twisted pair wires as the analog input cable This type of...

Страница 36: ...PCI 1706U User Manual 30...

Страница 37: ...Appendix A A Specifications...

Страница 38: ...FIFO Size 8K Max Sampling Rate 250K Input range and Gain List Gain 1 2 4 8 Range 10 V 5 V 2 5 V 1 25 V Drift Gain 1 2 4 8 Zero V C 2 2 2 2 Gain ppm C 10 10 10 10 Small Signal Bandwidth for PGA Gain 1...

Страница 39: ...ncy Up to 150kHz Channels 2 Resolution 12 bit Output Range Internal Reference Voltage 0 10 V 0 5 V 5V 5 V 10 V 10 V Current 0 20 mA 0 24 mA 4 20 mA Accuracy DNLE 1LSB INLE 1LSB Gain Error Adjustable t...

Страница 40: ...Frequency 10 M Hz Clock Input Low 0 8 V max High 2 0 V min Gate Input Low 0 8 V max High 2 0 V min Counter Output Low 0 5 V max 24 mA High 2 4 V min 15 mA Table A 1 PCI 1706 Analog Input Input Range...

Страница 41: ...Appendix B B Block Diagram...

Страница 42: ...PCI 1706U User Manual 36 B 1 Block Diagram Figure B 1 PCI 1706U Block Diagram...

Страница 43: ...ppendix C C Calibration This appendix provides brief information on PCI 1706U card calibration Regular calibration checks are important to maintain accuracy in data acquisition and control application...

Страница 44: ...it voltmeter and a low noise standard DC voltage source for the calibration process It is important that the accuracy after calibration depends on the precision voltmeter s accuracy Auto A D Calibrati...

Страница 45: ...rations of the device 2 Connect your voltmeter to TP1 and AGND adjust VR1 until the voltage is 2 5 V See this page for the position of TP1 VR1 3 Select channels in the following list Hold CTRL key and...

Страница 46: ...o the channel s selected above and click Start button Item 2 Display some values during calibration process These values are for internal use send them to Advantech if calibration fails Item 3 Display...

Страница 47: ...librating Item 3 Display some values during calibration process These values are for internal use send them to Advantech if calibration fails Item 4 Display the calibration result If success the statu...

Страница 48: ...some channels which fails in calibration process Item 2 Select the failed channels and re click Start button to try again Restore to factory default Item 1 Click Stop button to stop calibration proces...

Страница 49: ...tions 1 Stop any running operations of this device 2 Connect AO channel 0 1 to AI channel 0 1 as described in the dialog See this page for pin assignment of the connector 3 Select channels in the foll...

Страница 50: ...t button to start D A calibration process Item 2 Display some values during calibration process These values are for internal use send them to Advantech if calibration fails Item 1 Display some channe...

Страница 51: ...45 PCI 1706U User Manual Appendix C Calibration Item 1 Click Stop button to stop calibration process Item 2 Click Default button to restore factory settings...

Страница 52: ...tions are subject to change without notice No part of this publication may be reproduced in any form or by any means electronic photocopying recording or otherwise without prior written permis sion of...

Отзывы: