3.3
Assemble the Spacer
3.3.1
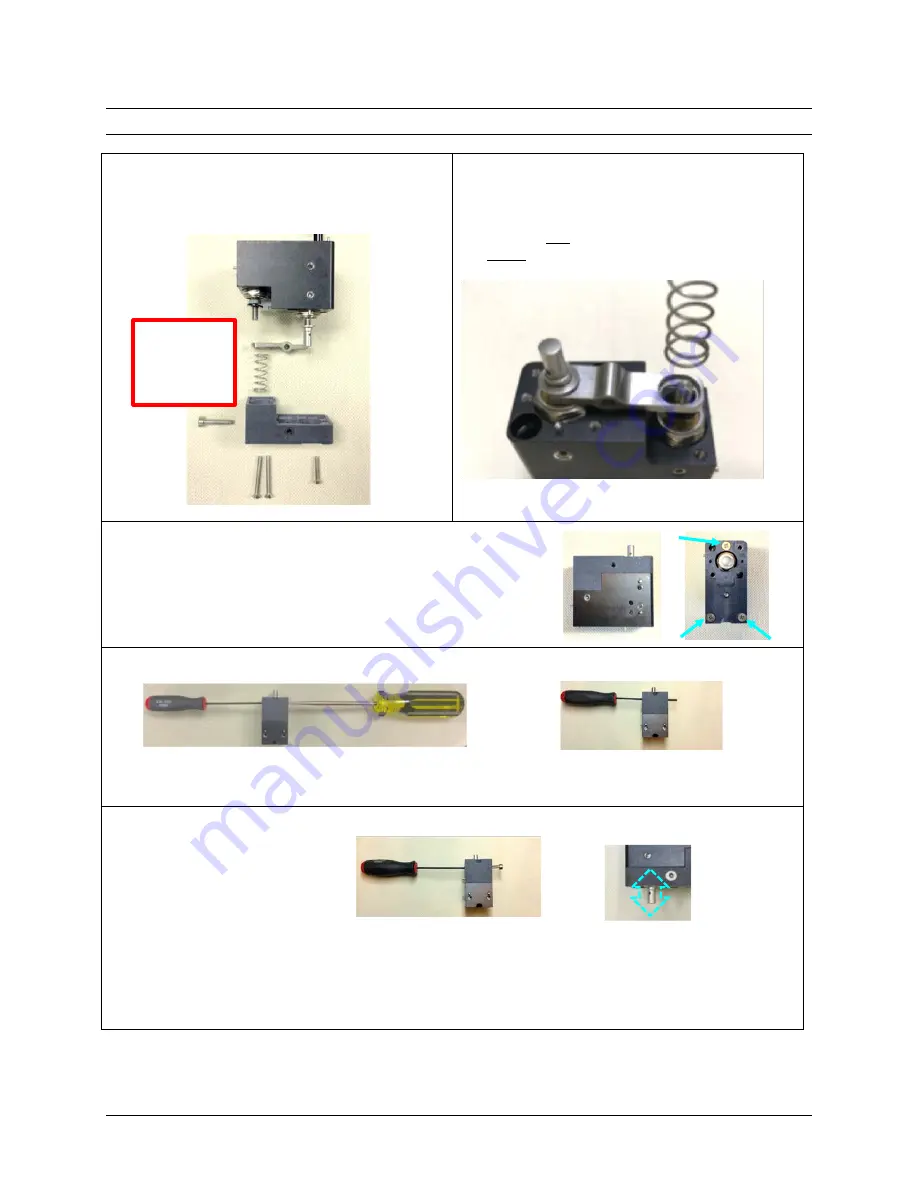
Assemble the Spacer Parts
Locate the new lever and shoulder bolt, and also
the nylon spacer, spacer screws, and automatic
shutoff spring that were set aside.
3.3.2
Check the Lever Assembly
Observe the orientation of the lever and washers
as shown:
The bore in the lever faces the shutoff spring.
There is one washer on the shutoff cylinder
below the lever.
Proper positioning is critical.
3.3.3
Attach the Spacer
With the spring resting in the bore of the lever, position the
spacer over as shown.
Locate the three spacer screws that were set aside. Apply a
light coating of Loctite 242 to the threads. Firmly squeeze the
spacer closed and install the spacer screws.
3.3.4
Align the Lever with the Shoulder Bolt
Use an awl to line up the hole for the pivot (shoulder) bolt
with the hole in the lever. Insert the 2 mm driver from the
opposite side and line it up with the awl.
Push out the awl with the driver.
3.3.5
Install the Shoulder Bolt
Apply a light coating of
Loctite 242 to the threads of
the pivot bolt and wipe off
any excess.
Note: Do not allow Loctite
from the shoulder bolt tip
to transfer to the lever.
Push out the driver with the
shoulder bolt.
Screw in the shoulder bolt
with the 2 mm driver until it
is barely snug. Do not over-
tighten.
Verify that the lever is not
binding—the hammer
cylinder hat should move up
and down freely.
HAT MOVES
UP & DOWN
SPRING
FITS INTO
LEVER
BORE
3A6328A
Advanjet HM-2600 Hotmelt Jet Maintenance and Repair
Page 19 of 28


